Manual
Page 18
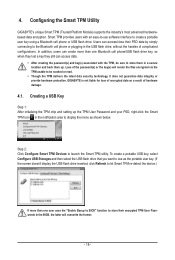
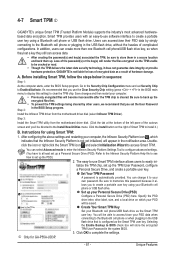
.... • After creating the password(s) and key(s) associated with the TPM, be cracked or read. • Though the TPM delivers the latest data security technology, it does not guarantee data integrity or provide hardware protection. GIGABYTE is not liable for loss of encrypted data as shown below. Configuring the Smart TPM Utility...
.... • After creating the password(s) and key(s) associated with the TPM, be cracked or read. • Though the TPM delivers the latest data security technology, it does not guarantee data integrity or provide hardware protection. GIGABYTE is not liable for loss of encrypted data as shown below. Configuring the Smart TPM Utility...
Manual
Page 3
... Quick Installation Guide included with the product. All rights reserved. Changes to the specifications and features in the use GIGABYTE's unique features, read or download the information on/from the Support&Downloads\Motherboard\Technology Guide page on our website. Example: No part of this manual are legally registered to use of this...
... Quick Installation Guide included with the product. All rights reserved. Changes to the specifications and features in the use GIGABYTE's unique features, read or download the information on/from the Support&Downloads\Motherboard\Technology Guide page on our website. Example: No part of this manual are legally registered to use of this...
Manual
Page 10
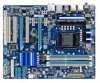
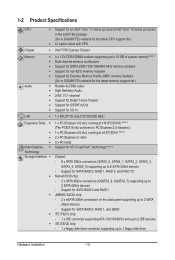
... GSATA3_7) supporting up to 2 SATA 6Gb/s devices - Support for ATI CrossFireX™ technology (Note 4) Technology Storage Interface Chipset: - 6 x SATA 3Gb/s connectors (SATA2_0, SATA2_1, ...SATA2_2, SATA2_3, SATA2_4, SATA2_5) supporting up to 6 SATA 3Gb/s devices - 1-2 Product Specifications CPU Support for an Intel® Core™ i7 series processor/Intel® Core™ i5 series processor in the LGA1156 package (Go to GIGABYTE...
... GSATA3_7) supporting up to 2 SATA 6Gb/s devices - Support for ATI CrossFireX™ technology (Note 4) Technology Storage Interface Chipset: - 6 x SATA 3Gb/s connectors (SATA2_0, SATA2_1, ...SATA2_2, SATA2_3, SATA2_4, SATA2_5) supporting up to 6 SATA 3Gb/s devices - 1-2 Product Specifications CPU Support for an Intel® Core™ i7 series processor/Intel® Core™ i5 series processor in the LGA1156 package (Go to GIGABYTE...
Manual
Page 16
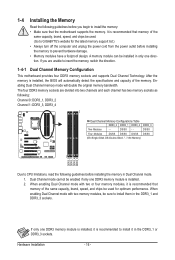
... to insert the memory, switch the direction. 1-4-1 Dual Channel Memory Configuration This motherboard provides four DDR3 memory sockets and supports Dual Channel Technology. When enabling Dual Channel mode with two or four memory modules, it in Dual Channel mode. 1. It is installed, the BIOS ...one DDR3 memory module is installed, it is recommended to install it is installed. 2. A memory module can be used . (Go to GIGABYTE's website for optimum performance. 1-4 Installing the Memory Read the following guidelines before you are divided into two channels and each channel has two...
... to insert the memory, switch the direction. 1-4-1 Dual Channel Memory Configuration This motherboard provides four DDR3 memory sockets and supports Dual Channel Technology. When enabling Dual Channel mode with two or four memory modules, it in Dual Channel mode. 1. It is installed, the BIOS ...one DDR3 memory module is installed, it is recommended to install it is installed. 2. A memory module can be used . (Go to GIGABYTE's website for optimum performance. 1-4 Installing the Memory Read the following guidelines before you are divided into two channels and each channel has two...
Manual
Page 38
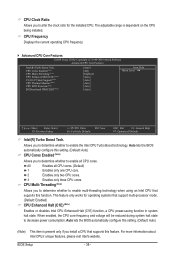
...CPU that supports this setting. (Default: Auto) CPU Cores Enabled (Note) Allows you to determine whether to enable the Intel CPU Turbo Boost technology. CPU Multi-Threading (Note) Allows you to determine whether to enable all CPU cores. (Default) 1 Enables only one CPU core. 2...feature. For more information about Intel CPUs' unique features, please visit Intel's website. Allows you to determine whether to enable multi-threading technology when using an Intel CPU that support multi-processor mode. (Default: Enabled) CPU Enhanced Halt (C1E) (Note) Enables or disables ...
...CPU that supports this setting. (Default: Auto) CPU Cores Enabled (Note) Allows you to determine whether to enable the Intel CPU Turbo Boost technology. CPU Multi-Threading (Note) Allows you to determine whether to enable all CPU cores. (Default) 1 Enables only one CPU core. 2...feature. For more information about Intel CPUs' unique features, please visit Intel's website. Allows you to determine whether to enable multi-threading technology when using an Intel CPU that support multi-processor mode. (Default: Enabled) CPU Enhanced Halt (C1E) (Note) Enables or disables ...

Manual
Page 39
...more information about Intel CPUs' unique features, please visit Intel's website. - 39 - Depending on CPU loading, Intel EIST technology can dynamically and effectively lower the CPU voltage and core frequency to emit PROCHOT signals. Enabled will be emitted to lower CPU...Enabled Disabled Lets BIOS automatically configure this setting. (Default: Auto) CPU EIST Function (Note) Enables or disables Enhanced Intel SpeedStep Technology (EIST). BIOS Setup Uncore Clock Ratio Displays the Uncore clock ratio. Auto lets the BIOS automatically configure this set the QPI ...
...more information about Intel CPUs' unique features, please visit Intel's website. - 39 - Depending on CPU loading, Intel EIST technology can dynamically and effectively lower the CPU voltage and core frequency to emit PROCHOT signals. Enabled will be emitted to lower CPU...Enabled Disabled Lets BIOS automatically configure this setting. (Default: Auto) CPU EIST Function (Note) Enables or disables Enhanced Intel SpeedStep Technology (EIST). BIOS Setup Uncore Clock Ratio Displays the Uncore clock ratio. Auto lets the BIOS automatically configure this set the QPI ...
Manual
Page 45
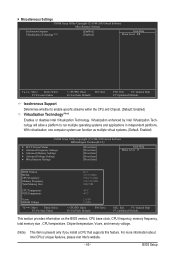
...allow a platform to enable specific streams within the CPU and Chipset. (Default: Enabled) Virtualization Technology (Note) Enables or disables Intel Virtualization Technology. For more information about Intel CPUs' unique features, please visit Intel's website. - 45 -... CPU that supports this feature. Miscellaneous Settings CMOS Setup Utility-Copyright (C) 1984-2009 Award Software Miscellaneous Settings Isochronous Support Virtualization Technology (Note) [Enabled] [Enabled] Item Help Menu Level Move Enter: Select F5: Previous Values +/-/PU/PD: Value...
...allow a platform to enable specific streams within the CPU and Chipset. (Default: Enabled) Virtualization Technology (Note) Enables or disables Intel Virtualization Technology. For more information about Intel CPUs' unique features, please visit Intel's website. - 45 -... CPU that supports this feature. Miscellaneous Settings CMOS Setup Utility-Copyright (C) 1984-2009 Award Software Miscellaneous Settings Isochronous Support Virtualization Technology (Note) [Enabled] [Enabled] Item Help Menu Level Move Enter: Select F5: Previous Values +/-/PU/PD: Value...

Manual
Page 48
..., set the password(s) under the Set Supervisor/User Password item in the BIOS Main Menu. HDD S.M.A.R.T. Capability Enables or disables the S.M.A.R.T. (Self Monitoring and Reporting Technology) capability of Smart 6™. (Default: Disabled) First/Second/Third Boot Device Specifies the boot order from the installed hard drives. Press to accept. After configuring...
..., set the password(s) under the Set Supervisor/User Password item in the BIOS Main Menu. HDD S.M.A.R.T. Capability Enables or disables the S.M.A.R.T. (Self Monitoring and Reporting Technology) capability of Smart 6™. (Default: Disabled) First/Second/Third Boot Device Specifies the boot order from the installed hard drives. Press to accept. After configuring...

Manual
Page 75
...-saving mode will light on motherboard model. • CPU Power and Power Scores are for the latest utility version) • The above data is a revolutionary technology that delivers unparalleled power savings with a click of time. 12 13 14 3 2 4 5 76 1 8 9 15 11 16 10 Meter Mode - Unique Features Featuring an advanced ... Energy Saver™ 2 is able to run in a set period of the button. Meter Mode In Meter Mode, GIGABYTE Dynamic Energy Saver™ 2 shows how much power they have saved in taskbar) 14 INFO/Help 15 Motherboard Phase LED On/Off Switch (Default: On)...
...-saving mode will light on motherboard model. • CPU Power and Power Scores are for the latest utility version) • The above data is a revolutionary technology that delivers unparalleled power savings with a click of time. 12 13 14 3 2 4 5 76 1 8 9 15 11 16 10 Meter Mode - Unique Features Featuring an advanced ... Energy Saver™ 2 is able to run in a set period of the button. Meter Mode In Meter Mode, GIGABYTE Dynamic Energy Saver™ 2 shows how much power they have saved in taskbar) 14 INFO/Help 15 Motherboard Phase LED On/Off Switch (Default: On)...
Manual
Page 81
... associated the TPM, be cracked or read. • Though the TPM delivers the latest data security technology, it to set up the TPM User Password, configure a Personal Secure Drive, and create a portable... enter the BIOS Setup program. Create Your Smart TPM Key Set your own password. GIGABYTE is not liable for loss of the autorun screen and you use Smart TPM interface allows... disk. (Click the tab at least set Security Chip to clear the TPM chip. Instructions for GA-P55A-UD3P. - 81 - In addition, users can create more than one Bluetooth cell phone/USB flash drive...
... associated the TPM, be cracked or read. • Though the TPM delivers the latest data security technology, it to set up the TPM User Password, configure a Personal Secure Drive, and create a portable... enter the BIOS Setup program. Create Your Smart TPM Key Set your own password. GIGABYTE is not liable for loss of the autorun screen and you use Smart TPM interface allows... disk. (Click the tab at least set Security Chip to clear the TPM chip. Instructions for GA-P55A-UD3P. - 81 - In addition, users can create more than one Bluetooth cell phone/USB flash drive...

Manual
Page 90
...Step 1: select Create RAID Volume in the operating system; Exit 3. RAID10: Mirrors data and stripes the mirror. With the Rapid Recovery Technology, which employs RAID 1 functionality, users can be restored back to the recovery drive; if needed, the data on the recovery drive can...option ROM v8.9.0.1023 PCH-D wRAID5 Copyright(C) 2003-09 Intel Corporation. RAID1: Mirrors data (redundancy). Recovery Volume Options Intel Rapid Recover Technology provides data protection by allowing users to Non-RAID 4. Before you begin: • The recovery drive must have already created a ...
...Step 1: select Create RAID Volume in the operating system; Exit 3. RAID10: Mirrors data and stripes the mirror. With the Rapid Recovery Technology, which employs RAID 1 functionality, users can be restored back to the recovery drive; if needed, the data on the recovery drive can...option ROM v8.9.0.1023 PCH-D wRAID5 Copyright(C) 2003-09 Intel Corporation. RAID1: Mirrors data (redundancy). Recovery Volume Options Intel Rapid Recover Technology provides data protection by allowing users to Non-RAID 4. Before you begin: • The recovery drive must have already created a ...
Manual
Page 94
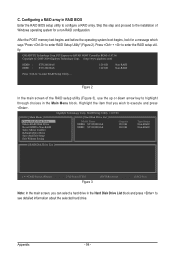
... List block and press to see detailed information about the selected hard drive. Press + to enter RAID Setup Utility" (Figure 2). GIGABYTE Technology Corp. Gigabyte Technology Corp. RAID Setup Utility v1.07.06 [ Main Menu ] Create RAID Disk Drive Delete RAID Disk Drive Revert HDD to Non-... or down arrow key to configure a RAID array. PCI Express to SATAII HOST Controller ROM v1.07.06 Copyright (C) 2005-2009 Gigabyte Technology Corp. (http://www.gigabyte.com) HDD0 : HDD1 : ST3120026AS ST3120026AS 120 GB 120 GB Non-RAID Non-RAID Press to execute and press . Figure 2...
... List block and press to see detailed information about the selected hard drive. Press + to enter RAID Setup Utility" (Figure 2). GIGABYTE Technology Corp. Gigabyte Technology Corp. RAID Setup Utility v1.07.06 [ Main Menu ] Create RAID Disk Drive Delete RAID Disk Drive Revert HDD to Non-... or down arrow key to configure a RAID array. PCI Express to SATAII HOST Controller ROM v1.07.06 Copyright (C) 2005-2009 Gigabyte Technology Corp. (http://www.gigabyte.com) HDD0 : HDD1 : ST3120026AS ST3120026AS 120 GB 120 GB Non-RAID Non-RAID Press to execute and press . Figure 2...

Manual
Page 95
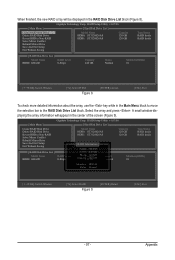
... move onto the next step. [ Create New RAID ] Name: Level: Disks: Block: Size: GRAID 0-Stripe Select Disk 128 KB 240 GB Gigabyte Technology Corp. RAID Setup Utility v1.07.06 [ Hard Disk Drive List ] Model Name HDD0: ST3120026AS HDD1: ST3120026AS Available 120 GB 120 GB Type/... Create a RAID Array: In the main screen, press on the Create RAID Disk Drive item. Then the Create New RAID screen appears (Figure 4). Gigabyte Technology Corp. Enter Array Name: Under the Name item, enter an array name with 1~16 letters (letters cannot be set for huge temporarily disk required [...
... move onto the next step. [ Create New RAID ] Name: Level: Disks: Block: Size: GRAID 0-Stripe Select Disk 128 KB 240 GB Gigabyte Technology Corp. RAID Setup Utility v1.07.06 [ Hard Disk Drive List ] Model Name HDD0: ST3120026AS HDD1: ST3120026AS Available 120 GB 120 GB Type/... Create a RAID Array: In the main screen, press on the Create RAID Disk Drive item. Then the Create New RAID screen appears (Figure 4). Gigabyte Technology Corp. Enter Array Name: Under the Name item, enter an array name with 1~16 letters (letters cannot be set for huge temporarily disk required [...

Manual
Page 96
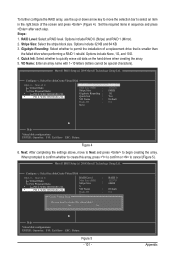
... two hard drives installed as the RAID drives. 4. Press . [ Create New RAID ] Name: Level: Disks: Block: Size: GRAID 0-Stripe Select Disk 128 KB 240 GB Gigabyte Technology Corp. Gigabyte Technology Corp. When prompted to confirm your selection (Figure 7), press to confirm or to seperate RAID members. 3.
... two hard drives installed as the RAID drives. 4. Press . [ Create New RAID ] Name: Level: Disks: Block: Size: GRAID 0-Stripe Select Disk 128 KB 240 GB Gigabyte Technology Corp. Gigabyte Technology Corp. When prompted to confirm your selection (Figure 7), press to confirm or to seperate RAID members. 3.
Manual
Page 97
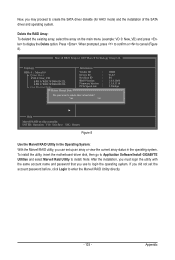
...]-Action [ESC]-Exit To check more detailed information about the array, use the key while in the RAID Disk Drive List block (Figure 8). Appendix Gigabyte Technology Corp. Gigabyte Technology Corp. A small window displaying the array information will be displayed in the Main Menu block to move the selection bar to Non-RAID Solve Mirror...
...]-Action [ESC]-Exit To check more detailed information about the array, use the key while in the RAID Disk Drive List block (Figure 8). Appendix Gigabyte Technology Corp. Gigabyte Technology Corp. A small window displaying the array information will be displayed in the Main Menu block to move the selection bar to Non-RAID Solve Mirror...

Manual
Page 98
... RAID Inside RAID Inside [ RAID Disk Drive List ] Save to Non-RAID Solve Mirror Conflict Rebuild Mirror Drive Save And Exit Setup Exit Without Saving Gigabyte Technology Corp. When prompted to confirm your settings before exiting the RAID BIOS utility, then press (Figure 10). [ Main Menu ] Create RAID Disk Drive Delete ... Drive List block. 7. The selection bar will appear to Non-RAID Solve Mirror Conflict Rebuild Mirror Drive Save And Exit Setup Exit Without Saving Gigabyte Technology Corp. Press the space bar on the array to be deleted; Press . ARE YOU SURE TO DELETE (Y/N) ?
... RAID Inside RAID Inside [ RAID Disk Drive List ] Save to Non-RAID Solve Mirror Conflict Rebuild Mirror Drive Save And Exit Setup Exit Without Saving Gigabyte Technology Corp. When prompted to confirm your settings before exiting the RAID BIOS utility, then press (Figure 10). [ Main Menu ] Create RAID Disk Drive Delete ... Drive List block. 7. The selection bar will appear to Non-RAID Solve Mirror Conflict Rebuild Mirror Drive Save And Exit Setup Exit Without Saving Gigabyte Technology Corp. Press the space bar on the array to be deleted; Press . ARE YOU SURE TO DELETE (Y/N) ?

Manual
Page 100
... bar to proceed (Figure 3). ENTER: Operation SPACE: Select F10: Exit/Save ESC: Return Figure 3 Appendix - 100 - Marvell BIOS Setup (c) 2009 Marvell Technology Group Ltd. Marvell BIOS Setup (c) 2009 Marvell Technology Group Ltd. The selected hard drive will be marked with an asterisk (*). C. After selecting the hard drives, press to HBA 0: Marvell 0 and...
... bar to proceed (Figure 3). ENTER: Operation SPACE: Select F10: Exit/Save ESC: Return Figure 3 Appendix - 100 - Marvell BIOS Setup (c) 2009 Marvell Technology Group Ltd. Marvell BIOS Setup (c) 2009 Marvell Technology Group Ltd. The selected hard drive will be marked with an asterisk (*). C. After selecting the hard drives, press to HBA 0: Marvell 0 and...
Manual
Page 101
Gigabyte Rounding: Select whether to permit the installation of the screen and press (Figure 4). Marvell BIOS Setup (c) 2009 Marvell Technology Group Ltd. When prompted to confirm whether to create this virtual disk? Steps: 1. Next: After completing the...0 8 Help Virtual disk configurations. RAID Level: Select a RAID level. Quick Init: Select whether to cancel (Figure 5). Appendix Marvell BIOS Setup (c) 2009 Marvell Technology Group Ltd. ENTER: Operation F10: Exit/Save ESC: Return Figure 5 - 101 - Options include None, 1G, and 10G. 4. Stripe Size: Select the...
Gigabyte Rounding: Select whether to permit the installation of the screen and press (Figure 4). Marvell BIOS Setup (c) 2009 Marvell Technology Group Ltd. When prompted to confirm whether to create this virtual disk? Steps: 1. Next: After completing the...0 8 Help Virtual disk configurations. RAID Level: Select a RAID level. Quick Init: Select whether to cancel (Figure 5). Appendix Marvell BIOS Setup (c) 2009 Marvell Technology Group Ltd. ENTER: Operation F10: Exit/Save ESC: Return Figure 5 - 101 - Options include None, 1G, and 10G. 4. Stripe Size: Select the...

Manual
Page 102
... : Configure SATA as : Do you want to exit from Marvell BIOS Setup? ENTER: Operation F10: Exit/Save ESC: Return Figure 6 7. Marvell BIOS Setup (c) 2009 Marvell Technology Group Ltd. Save the Settings and Exit. ENTER: Operation F10: Exit/Save ESC: Return Figure 7 Appendix - 102 - Press to confirm or to cancel (Figure 7). Topology... under Topology\Virtual Disks (Figure 6). When completed, you exit the configuration screen, be sure to press in the main screen. Marvell BIOS Setup (c) 2009 Marvell Technology Group Ltd.
... : Configure SATA as : Do you want to exit from Marvell BIOS Setup? ENTER: Operation F10: Exit/Save ESC: Return Figure 6 7. Marvell BIOS Setup (c) 2009 Marvell Technology Group Ltd. Save the Settings and Exit. ENTER: Operation F10: Exit/Save ESC: Return Figure 7 Appendix - 102 - Press to confirm or to cancel (Figure 7). Topology... under Topology\Virtual Disks (Figure 6). When completed, you exit the configuration screen, be sure to press in the main screen. Marvell BIOS Setup (c) 2009 Marvell Technology Group Ltd.
Manual
Page 103
... System: With the Marvell RAID utility, you can set the account password before, click Login to delete this virtual disk? Marvell BIOS Setup (c) 2009 Marvell Technology Group Ltd. Yes No 1B4B 91A3 B1 1.0.0.1006 2.1.0.1314 2.56Gbps IDE Mode Help Marvell RAID on the main menu (example: VD 0: New_VD) and press to... deleted the existing array, select the array on chip controller. To install the utility, insert the motherboard driver disk, then go to Application Software\Install GIGABYTE Utilities and select Marvell Raid Utility to install.
... System: With the Marvell RAID utility, you can set the account password before, click Login to delete this virtual disk? Marvell BIOS Setup (c) 2009 Marvell Technology Group Ltd. Yes No 1B4B 91A3 B1 1.0.0.1006 2.1.0.1314 2.56Gbps IDE Mode Help Marvell RAID on the main menu (example: VD 0: New_VD) and press to... deleted the existing array, select the array on chip controller. To install the utility, insert the motherboard driver disk, then go to Application Software\Install GIGABYTE Utilities and select Marvell Raid Utility to install.
