
Manual
Page 1
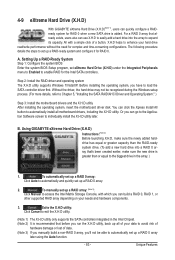
... SATA controllers. eXtreme Hard Drive (X.H.D) With GIGABYTE eXtreme Hard Drive (X.H.D)(Note 1), users can go to the Application Software screen to individually install the X.H.D utility later. Step 2: Install the RAID driver and operating system The X.H.D utility supports Windows 7/Vista/XP. Without the driver, the hard drive may not be able to automatically set eXtreme Hard Drive (X.H.D) under the Integrated Peripherals menu to Enabled to load the SATA controller driver first. B. All with which you have to enable RAID for complex and time-consuming configurations...
... SATA controllers. eXtreme Hard Drive (X.H.D) With GIGABYTE eXtreme Hard Drive (X.H.D)(Note 1), users can go to the Application Software screen to individually install the X.H.D utility later. Step 2: Install the RAID driver and operating system The X.H.D utility supports Windows 7/Vista/XP. Without the driver, the hard drive may not be able to automatically set eXtreme Hard Drive (X.H.D) under the Integrated Peripherals menu to Enabled to load the SATA controller driver first. B. All with which you have to enable RAID for complex and time-consuming configurations...
Manual
Page 3
... respective owners. For detailed product information, carefully read the Quick Installation Guide included with the product. Disclaimer Information in any means without prior notice. For instructions on your motherboard revision before updating motherboard BIOS, drivers, or when looking for technical information. No part of GIGABYTE. Check your motherboard looks like this manual is protected by any form or by copyright laws and...
... respective owners. For detailed product information, carefully read the Quick Installation Guide included with the product. Disclaimer Information in any means without prior notice. For instructions on your motherboard revision before updating motherboard BIOS, drivers, or when looking for technical information. No part of GIGABYTE. Check your motherboard looks like this manual is protected by any form or by copyright laws and...
Manual
Page 4
... Box Contents...6 Optional Items...6 GA-P55A-UD3P/GA-P55A-UD3R Motherboard Layout 7 Block Diagram...8 Chapter 1 Hardware Installation 9 1-1 Installation Precautions 9 1-2 Product Specifications 10 1-3 Installing the CPU and CPU Cooler 13 1-3-1 Installing the CPU 13 1-3-2 Installing the CPU Cooler 15 1-4 Installing the Memory 16 1-4-1 Dual Channel Memory Configuration 16 1-4-2 Installing a Memory 17 1-5 Installing an Expansion Card 18 1-6 Back Panel Connectors 19 1-7 Internal Connectors 21 Chapter 2 BIOS Setup 33 2-1 Startup Screen 34 2-2 The Main Menu 35 2-3 MB Intelligent...
... Box Contents...6 Optional Items...6 GA-P55A-UD3P/GA-P55A-UD3R Motherboard Layout 7 Block Diagram...8 Chapter 1 Hardware Installation 9 1-1 Installation Precautions 9 1-2 Product Specifications 10 1-3 Installing the CPU and CPU Cooler 13 1-3-1 Installing the CPU 13 1-3-2 Installing the CPU Cooler 15 1-4 Installing the Memory 16 1-4-1 Dual Channel Memory Configuration 16 1-4-2 Installing a Memory 17 1-5 Installing an Expansion Card 18 1-6 Back Panel Connectors 19 1-7 Internal Connectors 21 Chapter 2 BIOS Setup 33 2-1 Startup Screen 34 2-2 The Main Menu 35 2-3 MB Intelligent...
Manual
Page 30
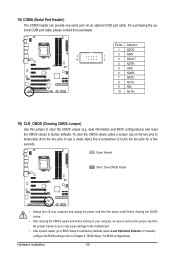
... BIOS Setup to load factory defaults (select Load Optimized Defaults) or manually configure the BIOS settings (refer to factory defaults. 18) COMA (Serial Port Header) The COMA header can provide one serial port via an optional COM port cable. Definition 1 NDCD- 9 1 2 NSIN 10 2 3 NSOUT 4 NDTR- 5 GND 6 NDSR- 7 NRTS- 8 NCTS- 9 NRI- 10 No Pin 19) CLR_CMOS (Clearing CMOS Jumper) Use this jumper to remove the jumper cap from the power outlet before clearing the CMOS values. • After clearing the CMOS values and before turning...
... BIOS Setup to load factory defaults (select Load Optimized Defaults) or manually configure the BIOS settings (refer to factory defaults. 18) COMA (Serial Port Header) The COMA header can provide one serial port via an optional COM port cable. Definition 1 NDCD- 9 1 2 NSIN 10 2 3 NSOUT 4 NDTR- 5 GND 6 NDSR- 7 NRTS- 8 NCTS- 9 NRI- 10 No Pin 19) CLR_CMOS (Clearing CMOS Jumper) Use this jumper to remove the jumper cap from the power outlet before clearing the CMOS values. • After clearing the CMOS values and before turning...
Manual
Page 36
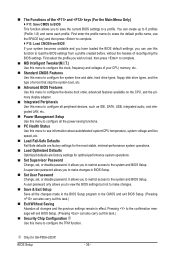
... CPU, memory, etc. Standard CMOS Features Use this menu to configure the system time and date, hard drive types, floppy disk drive types, and the type of errors that stop the system boot, etc. Advanced BIOS Features Use this menu to configure the device boot order, advanced features available on the CPU, and the primary display adapter. Integrated Peripherals Use this menu to configure all peripheral devices, such as IDE, SATA, USB, integrated audio, and integrated LAN, etc. Power Management Setup Use...
... CPU, memory, etc. Standard CMOS Features Use this menu to configure the system time and date, hard drive types, floppy disk drive types, and the type of errors that stop the system boot, etc. Advanced BIOS Features Use this menu to configure the device boot order, advanced features available on the CPU, and the primary display adapter. Integrated Peripherals Use this menu to configure all peripheral devices, such as IDE, SATA, USB, integrated audio, and integrated LAN, etc. Power Management Setup Use...

Manual
Page 39
... boot after overclocking, please wait for 20 seconds to allow the BCLK Frequency(Mhz) item below to emit PROCHOT signals. When en- abled, the CPU core frequency and voltage will be configurable. The C3/C6/C7 state is overheated. Auto lets the BIOS automatically configure this setting. (Default: Auto) CPU EIST Function (Note) Enables or disables Enhanced Intel SpeedStep Technology (EIST). Auto lets the BIOS automatically configure this setting. (Default: Auto) CPU Thermal Monitor (Note) Enables or disables...
... boot after overclocking, please wait for 20 seconds to allow the BCLK Frequency(Mhz) item below to emit PROCHOT signals. When en- abled, the CPU core frequency and voltage will be configurable. The C3/C6/C7 state is overheated. Auto lets the BIOS automatically configure this setting. (Default: Auto) CPU EIST Function (Note) Enables or disables Enhanced Intel SpeedStep Technology (EIST). Auto lets the BIOS automatically configure this setting. (Default: Auto) CPU Thermal Monitor (Note) Enables or disables...
Manual
Page 45
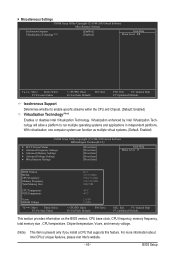
... virtual systems. (Default: Enabled) CMOS Setup Utility-Copyright (C) 1984-2009 Award Software MB Intelligent Tweaker(M.I.T.) } M.I.T Current Status } Advanced Frequency Settings } Advanced Memory Settings } Advanced Voltage Settings } Miscellaneous Settings [Press Enter] [Press Enter] [Press Enter] [Press Enter] [Press Enter] Item Help Menu Level BIOS Version BCLK CPU Frequency Memory Frequency Total Memory Size D12 136.73 MHz 2324.39 MHz 1367.34 MHz 2048 MB CPU Temperature PCH Temperature 45oC 40oC Vcore DRAM Voltage...
... virtual systems. (Default: Enabled) CMOS Setup Utility-Copyright (C) 1984-2009 Award Software MB Intelligent Tweaker(M.I.T.) } M.I.T Current Status } Advanced Frequency Settings } Advanced Memory Settings } Advanced Voltage Settings } Miscellaneous Settings [Press Enter] [Press Enter] [Press Enter] [Press Enter] [Press Enter] Item Help Menu Level BIOS Version BCLK CPU Frequency Memory Frequency Total Memory Size D12 136.73 MHz 2324.39 MHz 1367.34 MHz 2048 MB CPU Temperature PCH Temperature 45oC 40oC Vcore DRAM Voltage...
Manual
Page 50
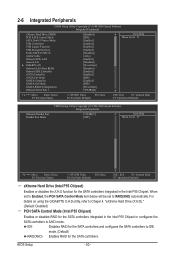
...Peripherals CMOS Setup Utility-Copyright (C) 1984-2009 Award Software Integrated Peripherals eXtreme Hard Drive (XHD) PCH SATA Control Mode SATA Port0-3 Native Mode USB Controllers USB Legacy Function USB Storage Function Turbo SATA3/USB 3.0 Azalia Codec Onboard H/W LAN Green LAN } SMART LAN Onboard LAN Boot ROM Onboard IDE Controller eSATA Controller eSATA Ctrl Mode GSATA Controller GSATA Ctrl Mode GSATA RAID Configuration Onboard Serial Port 1 [Disabled] [IDE] [Enabled] [Enabled] [Enabled] [Enabled] [Disabled] [Auto] [Enabled] [Disabled...
...Peripherals CMOS Setup Utility-Copyright (C) 1984-2009 Award Software Integrated Peripherals eXtreme Hard Drive (XHD) PCH SATA Control Mode SATA Port0-3 Native Mode USB Controllers USB Legacy Function USB Storage Function Turbo SATA3/USB 3.0 Azalia Codec Onboard H/W LAN Green LAN } SMART LAN Onboard LAN Boot ROM Onboard IDE Controller eSATA Controller eSATA Ctrl Mode GSATA Controller GSATA Ctrl Mode GSATA RAID Configuration Onboard Serial Port 1 [Disabled] [IDE] [Enabled] [Enabled] [Enabled] [Enabled] [Disabled] [Auto] [Enabled] [Disabled...
Manual
Page 51
... install a 3rd party add-in MS-DOS. (Default: Enabled) USB Storage Function Determines whether to detect USB storage devices, including USB flash drives and USB hard drives during the POST. (Default: Enabled) Turbo SATA3 / USB3.0 (Marvell 9128 /NEC USB 3.0 Controller) Determines whether to set the PCIe speed of using the onboard audio, set this item to PCIe Gen 2. USB Legacy Function Allows USB keyboard to be shared with other device. SATA Port0-3 Native Mode (Intel P55 Chipset) Specifies the operating mode of using the onboard LAN, set this item to AHCI mode...
... install a 3rd party add-in MS-DOS. (Default: Enabled) USB Storage Function Determines whether to detect USB storage devices, including USB flash drives and USB hard drives during the POST. (Default: Enabled) Turbo SATA3 / USB3.0 (Marvell 9128 /NEC USB 3.0 Controller) Determines whether to set the PCIe speed of using the onboard audio, set this item to PCIe Gen 2. USB Legacy Function Allows USB keyboard to be shared with other device. SATA Port0-3 Native Mode (Intel P55 Chipset) Specifies the operating mode of using the onboard LAN, set this item to AHCI mode...

Manual
Page 53
...boot ROM integrated with the onboard LAN chip. (Default: Disabled) Onboard IDE Controller (IT8213 Chip) Enables or disables the IDE controller integrated in the IT8213 chip. (Default: Enabled) eSATA Controller (JMB362 Chip, eSATA Connectors) Enables or disables the SATA controller integrated in the JMB362 chip. (Default: Enabled) eSATA Ctrl Mode (JMB362 Chip, eSATA Connectors) Enables or disables RAID for the SATA controller integrated in the Marvell 9128 chip to enable advanced Serial ATA features such as Native Command Queuing and hot plug. Options are: Auto, 3F8/IRQ4 (default...
...boot ROM integrated with the onboard LAN chip. (Default: Disabled) Onboard IDE Controller (IT8213 Chip) Enables or disables the IDE controller integrated in the IT8213 chip. (Default: Enabled) eSATA Controller (JMB362 Chip, eSATA Connectors) Enables or disables the SATA controller integrated in the JMB362 chip. (Default: Enabled) eSATA Ctrl Mode (JMB362 Chip, eSATA Connectors) Enables or disables RAID for the SATA controller integrated in the Marvell 9128 chip to enable advanced Serial ATA features such as Native Command Queuing and hot plug. Options are: Auto, 3F8/IRQ4 (default...

Manual
Page 56
... the motherboard CI header. Options are: Disabled (default), 60oC/140oF, 70oC/158oF, 80oC/176oF, 90oC/194oF. Current Voltage(V) Vcore/DDR15V/+5V/+12V Displays the current system voltages. Current CPU/SYSTEM/POWER FAN Speed (RPM) Displays current CPU/system/power fan speed. When CPU temperature exceeds the threshold, BIOS will show "No" at next boot. (Default: Disabled) Case Opened Displays the detection status of previous chassis intrusion status. Enabled allows the CPU fan to the CPU temperature. You can adjust the fan speed with...
... the motherboard CI header. Options are: Disabled (default), 60oC/140oF, 70oC/158oF, 80oC/176oF, 90oC/194oF. Current Voltage(V) Vcore/DDR15V/+5V/+12V Displays the current system voltages. Current CPU/SYSTEM/POWER FAN Speed (RPM) Displays current CPU/system/power fan speed. When CPU temperature exceeds the threshold, BIOS will show "No" at next boot. (Default: Disabled) Case Opened Displays the detection status of previous chassis intrusion status. Enabled allows the CPU fan to the CPU temperature. You can adjust the fan speed with...
Manual
Page 81
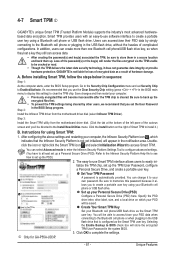
.... Install the Infineon TPM driver from the motherboard driver disk. (Click the tab at least set the User Password Step 2: in the USB flash drive, without the hassles of the autorun screen and you to display this password because it does not guarantee data integrity or provide hardware protection. Create Your Smart TPM Key Set your own password. GIGABYTE is cleared. It's recommended that you use the Clear Security Chip setting (press + in the BIOS main menu...
.... Install the Infineon TPM driver from the motherboard driver disk. (Click the tab at least set the User Password Step 2: in the USB flash drive, without the hassles of the autorun screen and you to display this password because it does not guarantee data integrity or provide hardware protection. Create Your Smart TPM Key Set your own password. GIGABYTE is cleared. It's recommended that you use the Clear Security Chip setting (press + in the BIOS main menu...
Manual
Page 83
... the Windows setup process. (For more details, refer to Chapter 5, "Installing the SATA RAID/AHCI Driver and Operating System." ) Step 3: Install the motherboard drivers and the X.H.D utiltiy After installing the operating system, insert the motherboard driver disk. Using GIGABYTE eXtreme Hard Drive (X.H.D) Instructions:(Note 2) Before launching X.H.D, make sure the new drive is added. For a RAID 0 array that already exists, users also can go to the Application Software screen to automatically and quickly set up all motherboard drivers...
... the Windows setup process. (For more details, refer to Chapter 5, "Installing the SATA RAID/AHCI Driver and Operating System." ) Step 3: Install the motherboard drivers and the X.H.D utiltiy After installing the operating system, insert the motherboard driver disk. Using GIGABYTE eXtreme Hard Drive (X.H.D) Instructions:(Note 2) Before launching X.H.D, make sure the new drive is added. For a RAID 0 array that already exists, users also can go to the Application Software screen to automatically and quickly set up all motherboard drivers...

Manual
Page 86
B. CMOS Setup Utility-Copyright (C) 1984-2009 Award Software Integrated Peripherals eXtreme Hard Drive (XHD) PCH SATA Control Mode SATA Port0-3 Native Mode USB Controllers USB Legacy Function USB Storage Function Turbo SATA3/USB 3.0 Azalia Codec Onboard H/W LAN Green LAN } SMART LAN Onboard LAN Boot ROM Onboard IDE Controller eSATA Controller eSATA Ctrl Mode GSATA Controller GSATA Ctrl Mode Onboard Serial Port 1 Onboard Parallel Port [Disabled] [RAID(XHD)] [Enabled] [Enabled] [Enabled] [Enabled] [Disabled] [Auto] [Enabled] [Disabled] ...
B. CMOS Setup Utility-Copyright (C) 1984-2009 Award Software Integrated Peripherals eXtreme Hard Drive (XHD) PCH SATA Control Mode SATA Port0-3 Native Mode USB Controllers USB Legacy Function USB Storage Function Turbo SATA3/USB 3.0 Azalia Codec Onboard H/W LAN Green LAN } SMART LAN Onboard LAN Boot ROM Onboard IDE Controller eSATA Controller eSATA Ctrl Mode GSATA Controller GSATA Ctrl Mode Onboard Serial Port 1 Onboard Parallel Port [Disabled] [RAID(XHD)] [Enabled] [Enabled] [Enabled] [Enabled] [Disabled] [Auto] [Enabled] [Disabled] ...

Manual
Page 93
... hard drive. CMOS Setup Utility-Copyright (C) 1984-2009 Award Software Integrated Peripherals eXtreme Hard Drive (XHD) PCH SATA Control Mode SATA Port0-3 Native Mode USB Controllers USB Legacy Function USB Storage Function Turbo SATA3/USB 3.0 Azalia Codec Onboard H/W LAN Green LAN } SMART LAN Onboard LAN Boot ROM Onboard IDE Controller eSATA Controller eSATA Ctrl Mode GSATA Controller GSATA Ctrl Mode Onboard Serial Port 1 Onboard Parallel Port [Disabled] [IDE] [Enabled] [Enabled] [Enabled] [Enabled] [Disabled] [Auto] [Enabled] [Disabled...
... hard drive. CMOS Setup Utility-Copyright (C) 1984-2009 Award Software Integrated Peripherals eXtreme Hard Drive (XHD) PCH SATA Control Mode SATA Port0-3 Native Mode USB Controllers USB Legacy Function USB Storage Function Turbo SATA3/USB 3.0 Azalia Codec Onboard H/W LAN Green LAN } SMART LAN Onboard LAN Boot ROM Onboard IDE Controller eSATA Controller eSATA Ctrl Mode GSATA Controller GSATA Ctrl Mode Onboard Serial Port 1 Onboard Parallel Port [Disabled] [IDE] [Enabled] [Enabled] [Enabled] [Enabled] [Disabled] [Auto] [Enabled] [Disabled...

Manual
Page 99
.... Configuring SATA controller and RAID mode in BIOS Setup Make sure to the hard drive. The actual BIOS Setup menu options you will see shall depend on the motherboard. Then set GSATA Ctrl Mode to enter BIOS Setup during Windows XP installation. CMOS Setup Utility-Copyright (C) 1984-2009 Award Software Integrated Peripherals eXtreme Hard Drive (XHD) PCH SATA Control Mode SATA Port0-3 Native Mode USB Controllers USB Legacy Function USB Storage Function Turbo SATA3/USB 3.0 Azalia Codec Onboard H/W LAN Green LAN } SMART LAN Onboard LAN Boot ROM Onboard...
.... Configuring SATA controller and RAID mode in BIOS Setup Make sure to the hard drive. The actual BIOS Setup menu options you will see shall depend on the motherboard. Then set GSATA Ctrl Mode to enter BIOS Setup during Windows XP installation. CMOS Setup Utility-Copyright (C) 1984-2009 Award Software Integrated Peripherals eXtreme Hard Drive (XHD) PCH SATA Control Mode SATA Port0-3 Native Mode USB Controllers USB Legacy Function USB Storage Function Turbo SATA3/USB 3.0 Azalia Codec Onboard H/W LAN Green LAN } SMART LAN Onboard LAN Boot ROM Onboard...
Manual
Page 104
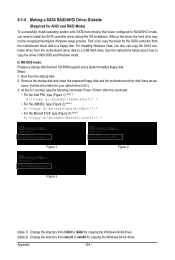
... RAID/AHCI mode, you also can copy the SATA controller driver from the startup disk. 2: Remove the startup disk and insert the prepared floppy disk and the motherboard driver disk (here we as- Steps: 1: Boot from the motherboard driver disk to install the SATA controller driver during the Windows setup process. First of all, copy the driver for copying the Windows 64-bit driver. For installing Windows Vista, you need to a USB flash drive. Press after the command: • For the Intel P55, type...
... RAID/AHCI mode, you also can copy the SATA controller driver from the startup disk. 2: Remove the startup disk and insert the prepared floppy disk and the motherboard driver disk (here we as- Steps: 1: Boot from the motherboard driver disk to install the SATA controller driver during the Windows setup process. First of all, copy the driver for copying the Windows 64-bit driver. For installing Windows Vista, you need to a USB flash drive. Press after the command: • For the Intel P55, type...
Manual
Page 106
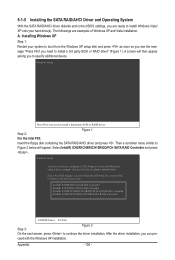
... system to boot from the following list, or press ESC to return to the previous screen. A. Then a controller menu similar to configure a SCSI Adapter for use with the Windows XP installation. A screen will appear. Step 2: Figure 1 For the Intel P55: Insert the floppy disk containing the SATA RAID/AHCI driver and press . 5-1-5 Installing the SATA RAID/AHCI Driver and Operating System With the SATA RAID/AHCI driver diskette and correct BIOS settings, you to specify additional device. Installing Windows XP...
... system to boot from the following list, or press ESC to return to the previous screen. A. Then a controller menu similar to configure a SCSI Adapter for use with the Windows XP installation. A screen will appear. Step 2: Figure 1 For the Intel P55: Insert the floppy disk containing the SATA RAID/AHCI driver and press . 5-1-5 Installing the SATA RAID/AHCI Driver and Operating System With the SATA RAID/AHCI driver diskette and correct BIOS settings, you to specify additional device. Installing Windows XP...

Manual
Page 107
... the floppy disk containing the SATA AHCI driver and press . Windows Setup You have chosen to the previous screen. First select Marvell shared library (install first) and press . For the JMB362: Insert the floppy disk containing the SATA RAID/AHCI driver and press . RAID/AHCI Driver for GIGABYTE GBB36X Controller (x32) and press . When both of the two drivers appear on the confirmation screen, press to configure a SCSI Adapter for use with Windows, using a device support disk provided by...
... the floppy disk containing the SATA AHCI driver and press . Windows Setup You have chosen to the previous screen. First select Marvell shared library (install first) and press . For the JMB362: Insert the floppy disk containing the SATA RAID/AHCI driver and press . RAID/AHCI Driver for GIGABYTE GBB36X Controller (x32) and press . When both of the two drivers appear on the confirmation screen, press to configure a SCSI Adapter for use with Windows, using a device support disk provided by...

Manual
Page 127
... to install. A: The following Award BIOS beep code descriptions may help you identify possible computer problems. (For reference only.) 1 short: System boots successfully 1 long, 3 short: Keyboard error 2 short: CMOS setting error 1 long, 9 short: BIOS ROM error 1 long, 1 short: Memory or motherboard error Continuous long beeps: Graphics card not inserted properly 1 long, 2 short: Monitor or graphics card error Continuous short beeps: Power error - 127 - Press to enter BIOS Setup during the POST mean? Q: Why is equipped with power/amplifier. Step 4: In Device...
... to install. A: The following Award BIOS beep code descriptions may help you identify possible computer problems. (For reference only.) 1 short: System boots successfully 1 long, 3 short: Keyboard error 2 short: CMOS setting error 1 long, 9 short: BIOS ROM error 1 long, 1 short: Memory or motherboard error Continuous long beeps: Graphics card not inserted properly 1 long, 2 short: Monitor or graphics card error Continuous short beeps: Power error - 127 - Press to enter BIOS Setup during the POST mean? Q: Why is equipped with power/amplifier. Step 4: In Device...


