
Manual
Page 3
... example, "REV: 1.0" means the revision of the motherboard is the property of this manual may be made by GIGABYTE without GIGABYTE's prior written permission. In order to their respective owners. The trademarks mentioned in this manual are legally ...the User's Manual. For product-related information, check on our website at: http://www.gigabyte.com Identifying Your Motherboard Revision The revision number on your motherboard revision before updating motherboard BIOS, drivers, or when looking for technical information. Copyright © 2010 GIGA-BYTE TECHNOLOGY CO., ...
... example, "REV: 1.0" means the revision of the motherboard is the property of this manual may be made by GIGABYTE without GIGABYTE's prior written permission. In order to their respective owners. The trademarks mentioned in this manual are legally ...the User's Manual. For product-related information, check on our website at: http://www.gigabyte.com Identifying Your Motherboard Revision The revision number on your motherboard revision before updating motherboard BIOS, drivers, or when looking for technical information. Copyright © 2010 GIGA-BYTE TECHNOLOGY CO., ...

Manual
Page 4
Table of Contents GA-M68MT-D3P/GA-M68MT-S2P Motherboard Layout 5 Chapter 1 Hardware Installation 6 1-1 Installation Precautions 6 1-2 Product Specifications 7 1-3 Installing the CPU and CPU Cooler 9 1-3-1 Installing the CPU...9 1-4 Installing the Memory 9 1-4-1 Dual Channel Memory Configuration 10 1-5 Installing an Expansion Card 10 1-6 Back Panel Connectors 10 1-7 Internal Connectors 12 Chapter 2 BIOS Setup 19 2-1 Startup Screen 19 2-2 The Main Menu...
Table of Contents GA-M68MT-D3P/GA-M68MT-S2P Motherboard Layout 5 Chapter 1 Hardware Installation 6 1-1 Installation Precautions 6 1-2 Product Specifications 7 1-3 Installing the CPU and CPU Cooler 9 1-3-1 Installing the CPU...9 1-4 Installing the Memory 9 1-4-1 Dual Channel Memory Configuration 10 1-5 Installing an Expansion Card 10 1-6 Back Panel Connectors 10 1-7 Internal Connectors 12 Chapter 2 BIOS Setup 19 2-1 Startup Screen 19 2-2 The Main Menu...

Manual
Page 8
... Norton Internet Security (OEM version) Operating System w Support for EasyTune * Available functions in EasyTune may differ by motherboard model. Back Panel w Connectors w w w w w w I/O Controller w Hardware Monitor w w w w w w BIOS w w w w Unique Features w w w w w w w w w Bundled Software w 1 x PS/2 keyboard port 1 x PS/2 mouse port 1 x D-Sub port 1 x serial port 4 x USB 2.0/1.1 ports 1 x RJ-45 port 3 x audio jacks (Line In/Line Out...
... Norton Internet Security (OEM version) Operating System w Support for EasyTune * Available functions in EasyTune may differ by motherboard model. Back Panel w Connectors w w w w w w I/O Controller w Hardware Monitor w w w w w w BIOS w w w w Unique Features w w w w w w w w w Bundled Software w 1 x PS/2 keyboard port 1 x PS/2 mouse port 1 x D-Sub port 1 x serial port 4 x USB 2.0/1.1 ports 1 x RJ-45 port 3 x audio jacks (Line In/Line Out...

Manual
Page 16
... on the chassis that can detect if the chassis cover has been removed. The LED S0 On is on when the system is detected, the BIOS may differ by issuing a beep code. The system reports system startup status by chassis. If a problem is operating. Message/Power/ Power Sleep ... make sure the wire assignments and the pin assignments are matched correctly. When connecting your system using the power switch (refer to Chapter 2, "BIOS Setup," "Power Management Setup," for more information). • SPEAK (Speaker, Orange): Connects to the speaker on the chassis front panel.
... on the chassis that can detect if the chassis cover has been removed. The LED S0 On is on when the system is detected, the BIOS may differ by issuing a beep code. The system reports system startup status by chassis. If a problem is operating. Message/Power/ Power Sleep ... make sure the wire assignments and the pin assignments are matched correctly. When connecting your system using the power switch (refer to Chapter 2, "BIOS Setup," "Power Management Setup," for more information). • SPEAK (Speaker, Orange): Connects to the speaker on the chassis front panel.

Manual
Page 17
... be present on the two pins to temporarily short the two pins or use a metal object like a screwdriver to touch the two pins for BIOS configurations). - 17 - Open: Normal Short: Clear CMOS Values • Always turn off your chassis front panel audio module to clear the CMOS...values (e.g. Hardware Installation You may cause damage to the motherboard. • After system restart, go to BIOS Setup to load factory defaults (select Load Optimized Defaults) or manually configure the BIOS settings (refer to remove the jumper cap from the jumper. ously. • Some chassis provide a ...
... be present on the two pins to temporarily short the two pins or use a metal object like a screwdriver to touch the two pins for BIOS configurations). - 17 - Open: Normal Short: Clear CMOS Values • Always turn off your chassis front panel audio module to clear the CMOS...values (e.g. Hardware Installation You may cause damage to the motherboard. • After system restart, go to BIOS Setup to load factory defaults (select Load Optimized Defaults) or manually configure the BIOS settings (refer to remove the jumper cap from the jumper. ously. • Some chassis provide a ...

Manual
Page 18
... of the battery holder, making them short for 5 seconds.) 3. Hardware Installation - 18 - 11) BAT (Battery) The battery provides power to keep the values (such as BIOS configurations, date, and time information) in the CMOS when the computer is replaced with an incorrect model. • Contact the place of purchase or local...
... of the battery holder, making them short for 5 seconds.) 3. Hardware Installation - 18 - 11) BAT (Battery) The battery provides power to keep the values (such as BIOS configurations, date, and time information) in the CMOS when the computer is replaced with an incorrect model. • Contact the place of purchase or local...
Manual
Page 19
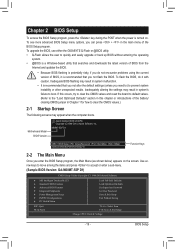
... Menu Once you need to) to prevent system instability or other unexpected results. To upgrade the BIOS, use either the GIGABYTE Q-Flash or @BIOS utility. • Q-Flash allows the user to accept or enter a sub-menu. (Sample BIOS Version: GA-M68MT-S2P D1) CMOS Setup Utility-Copyright (C) 1984-2010 Award Software MB Intelligent Tweaker(M.I.T.) ...
... Menu Once you need to) to prevent system instability or other unexpected results. To upgrade the BIOS, use either the GIGABYTE Q-Flash or @BIOS utility. • Q-Flash allows the user to accept or enter a sub-menu. (Sample BIOS Version: GA-M68MT-S2P D1) CMOS Setup Utility-Copyright (C) 1984-2010 Award Software MB Intelligent Tweaker(M.I.T.) ...

Manual
Page 20
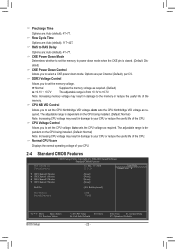
... Defaults Whether the system will work stably with the overclock settings you made is dependent on your system to its defaults. • The BIOS Setup menus described in this occurs, clear the CMOS values and reset the board to default values.) Set Memory Clock Determines whether to manually...option is configurable only when Set Memory Clock is set your overall system configurations. X8.00 Sets Memory Clock to X8.00. Auto lets BIOS automatically set the memory clock as usual, select the Load Optimized Defaults item to set to X6.66. Incorrectly doing overclock may result ...
... Defaults Whether the system will work stably with the overclock settings you made is dependent on your system to its defaults. • The BIOS Setup menus described in this occurs, clear the CMOS values and reset the board to default values.) Set Memory Clock Determines whether to manually...option is configurable only when Set Memory Clock is set your overall system configurations. X8.00 Sets Memory Clock to X8.00. Auto lets BIOS automatically set the memory clock as usual, select the Load Optimized Defaults item to set to X6.66. Incorrectly doing overclock may result ...

Manual
Page 21
...), 5T~12T. CAS# latency Options are : Auto (default), 5T~12T. - 21 - RAS to single dual-channel. Write Recovery Time Options are : Auto (default), 4T~12T. BIOS Setup TwTr Command Delay Options are : Auto (default), 5T~12T. Trfc1 for DIMM1 Options are : Auto (default), 90ns, 110ns, 160ns, 300ns, 350ns. Auto 4T Auto...
...), 5T~12T. CAS# latency Options are : Auto (default), 5T~12T. - 21 - RAS to single dual-channel. Write Recovery Time Options are : Auto (default), 4T~12T. BIOS Setup TwTr Command Delay Options are : Auto (default), 5T~12T. Trfc1 for DIMM1 Options are : Auto (default), 90ns, 110ns, 160ns, 300ns, 350ns. Auto 4T Auto...
Manual
Page 22
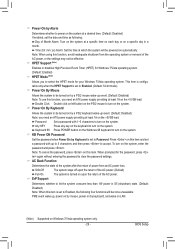
... 2 Master } IDE Channel 3 Master [None] [None] [None] [None] Halt On [All, But Keyboard] Base Memory Extended Memory 640K 1790M Move Enter: Select F5: Previous Values BIOS Setup +/-/PU/PD: Value F10: Save F6: Fail-Safe Defaults - 22 - DDR3 Voltage Control Allows you to +0.7V. The adjustable range is from +0.1V to...
... 2 Master } IDE Channel 3 Master [None] [None] [None] [None] Halt On [All, But Keyboard] Base Memory Extended Memory 640K 1790M Move Enter: Select F5: Previous Values BIOS Setup +/-/PU/PD: Value F10: Save F6: Fail-Safe Defaults - 22 - DDR3 Voltage Control Allows you to +0.7V. The adjustable range is from +0.1V to...

Manual
Page 23
... system will skip the detection of the three methods below: • Auto • None • Manual Access Mode Lets the BIOS automatically detect SATA devices during the POST. Number of cylinders. Number of heads. Options are used, set to autodetect the parameters of... the hard drive when the hard drive access mode is set this channel. BIOS Setup IDE Channel 0, 1, 2, 3 Master IDE HDD Auto-Detection, IDE Auto-Detection Press to CHS. (For IDE Channel 0, 1 Master ...
... system will skip the detection of the three methods below: • Auto • None • Manual Access Mode Lets the BIOS automatically detect SATA devices during the POST. Number of cylinders. Number of heads. Options are used, set to autodetect the parameters of... the hard drive when the hard drive access mode is set this channel. BIOS Setup IDE Channel 0, 1, 2, 3 Master IDE HDD Auto-Detection, IDE Auto-Detection Press to CHS. (For IDE Channel 0, 1 Master ...

Manual
Page 24
...Device Password Check HDD S.M.A.R.T. Manual allows the two items below to run multiple operating systems and applications in independent partitions. Auto Lets the BIOS to manually enable/disable CPU Core 2 and Core 3. Manual Allows you to determine whether to enable all CPU cores (number of ... control Auto Lets the AMD Cool'n'Quiet driver dynamically adjust the CPU clock and VID to individually enable/disable CPU Core 2 and Core 3. BIOS Setup - 24 - CPU Unlock (Note) Allows you to determine whether to unlock hidden CPU cores. (Default: Disabled) CPU core Control ...
...Device Password Check HDD S.M.A.R.T. Manual allows the two items below to run multiple operating systems and applications in independent partitions. Auto Lets the BIOS to manually enable/disable CPU Core 2 and Core 3. Manual Allows you to determine whether to enable all CPU cores (number of ... control Auto Lets the AMD Cool'n'Quiet driver dynamically adjust the CPU clock and VID to individually enable/disable CPU Core 2 and Core 3. BIOS Setup - 24 - CPU Unlock (Note) Allows you to determine whether to unlock hidden CPU cores. (Default: Disabled) CPU core Control ...

Manual
Page 25
...not a PCI Express card is required for booting the system and for entering the BIOS Setup program. PCI Slot Sets the PCI graphics card as the first display. BIOS Setup Setup A password is only required for display. HDD S.M.A.R.T. Onboard GPU Enables ... monitor utility is installed. (Default: Enabled) Away Mode Enables or disables Away Mode in the BIOS Main Menu. After configuring this item, set this memory for entering the BIOS Setup program. (Default) System A password is installed. Capability Enables or disables the S.M.A.R.T. (Self...
...not a PCI Express card is required for booting the system and for entering the BIOS Setup program. PCI Slot Sets the PCI graphics card as the first display. BIOS Setup Setup A password is only required for display. HDD S.M.A.R.T. Onboard GPU Enables ... monitor utility is installed. (Default: Enabled) Away Mode Enables or disables Away Mode in the BIOS Main Menu. After configuring this item, set this memory for entering the BIOS Setup program. (Default) System A password is installed. Capability Enables or disables the S.M.A.R.T. (Self...

Manual
Page 26
This item is configurable only when the NV SATA RAID function item is set to Enabled. (Default: Enabled) BIOS Setup - 26 - This item is configurable only when the NV SATA RAID function item is set to Enabled. (Default: Enabled) NV SATA 2 Primary RAID Enables ...
This item is configurable only when the NV SATA RAID function item is set to Enabled. (Default: Enabled) BIOS Setup - 26 - This item is configurable only when the NV SATA RAID function item is set to Enabled. (Default: Enabled) NV SATA 2 Primary RAID Enables ...

Manual
Page 27
.... Options are : Auto, 2F8/IRQ3, 3F8/IRQ4(default), 3E8/IRQ4, 2E8/IRQ3, Disabled. USB Legacy Function Allows USB keyboard to be used in ErP mode. BIOS Setup This item is configurable only when Parallel Port Mode is set to activate the boot ROM integrated with the onboard LAN chip. (Default: Disabled...
.... Options are : Auto, 2F8/IRQ3, 3F8/IRQ4(default), 3E8/IRQ4, 2E8/IRQ3, Disabled. USB Legacy Function Allows USB keyboard to be used in ErP mode. BIOS Setup This item is configurable only when Parallel Port Mode is set to activate the boot ROM integrated with the onboard LAN chip. (Default: Disabled...

Manual
Page 28
... by a wake-up signal from a modem that supports wake-up function. (Default: Enabled) USB Resume from Suspend Allows the system to RAM) sleep state (default). BIOS Setup - 28 -
... by a wake-up signal from a modem that supports wake-up function. (Default: Enabled) USB Resume from Suspend Allows the system to RAM) sleep state (default). BIOS Setup - 28 -
Manual
Page 29
...-up event. (Default: Disabled) Note: you to select the HPET mode for the password, press again without entering the password to clear the password settings. BIOS Setup HPET Support (Note) Enables or disables High Precision Event Timer (HPET) for Windows 7/Vista operating system. (Default: Enabled) HPET Mode (Note) Allows you need...
...-up event. (Default: Disabled) Note: you to select the HPET mode for the password, press again without entering the password to clear the password settings. BIOS Setup HPET Support (Note) Enables or disables High Precision Event Timer (HPET) for Windows 7/Vista operating system. (Default: Enabled) HPET Mode (Note) Allows you need...

Manual
Page 30
BIOS Setup - 30 - Current CPU/SYSTEM FAN Speed (RPM) Displays current CPU/system fan speed. Enabled clears the record of previous chassis intrusion status and the .../2 IRQ Assignment Auto 3,4,5,7,9,10,11,12,14,15 +/-/PU/PD: Value F10: Save F6: Fail-Safe Defaults ESC: Exit F1: General Help F7: Optimized Defaults BIOS auto-assigns IRQ to the first/second PCI slot. (Default) Assigns IRQ 3,4,5,7,9,10,11,12,14,15 to the first/second PCI slot. 2-9 PC Health...
BIOS Setup - 30 - Current CPU/SYSTEM FAN Speed (RPM) Displays current CPU/system fan speed. Enabled clears the record of previous chassis intrusion status and the .../2 IRQ Assignment Auto 3,4,5,7,9,10,11,12,14,15 +/-/PU/PD: Value F10: Save F6: Fail-Safe Defaults ESC: Exit F1: General Help F7: Optimized Defaults BIOS auto-assigns IRQ to the first/second PCI slot. (Default) Assigns IRQ 3,4,5,7,9,10,11,12,14,15 to the first/second PCI slot. 2-9 PC Health...
Manual
Page 31
...1984-2010 Award Software MB Intelligent Tweaker(M.I.T.) Load Fail-Safe Defaults Standard CMOS Features Load Optimized Defaults Advanced BIOS Features Set Supervisor Password Integrated Peripherals Set User Password Power Management Setup PnP/PCI Configurations Save & Exit... Check the fan condition or fan connection when this item and then press the key to Enabled. Auto Lets the BIOS automatically detect the type of CPU fan installed and sets the optimal CPU fan control mode. (Default) Voltage Sets ...
...1984-2010 Award Software MB Intelligent Tweaker(M.I.T.) Load Fail-Safe Defaults Standard CMOS Features Load Optimized Defaults Advanced BIOS Features Set Supervisor Password Integrated Peripherals Set User Password Power Management Setup PnP/PCI Configurations Save & Exit... Check the fan condition or fan connection when this item and then press the key to Enabled. Auto Lets the BIOS automatically detect the type of CPU fan installed and sets the optimal CPU fan control mode. (Default) Voltage Sets ...

Manual
Page 32
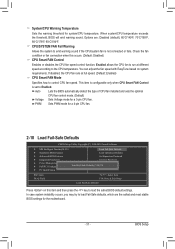
... Utility-Copyright (C) 1984-2010 Award Software MB Intelligent Tweaker(M.I .T.) Standard CMOS Features Advanced BIOS Features Integrated Peripherals Power Management Setup PnP/PCI Configurations Enter Password: PC Health ...61565; MB Intelligent Tweaker(M.I .T.) Load Fail-Safe Defaults Standard CMOS Features Load Optimized Defaults Advanced BIOS Features Set Supervisor Password Integrated Peripherals Set User Password Power Management Setup PnP/PCI Configurations ...
... Utility-Copyright (C) 1984-2010 Award Software MB Intelligent Tweaker(M.I .T.) Standard CMOS Features Advanced BIOS Features Integrated Peripherals Power Management Setup PnP/PCI Configurations Enter Password: PC Health ...61565; MB Intelligent Tweaker(M.I .T.) Load Fail-Safe Defaults Standard CMOS Features Load Optimized Defaults Advanced BIOS Features Set Supervisor Password Integrated Peripherals Set User Password Power Management Setup PnP/PCI Configurations ...


