User Manual
Page 29
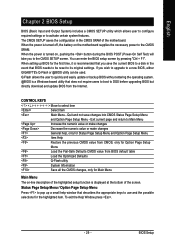
... not require users to boot to Main Menu Increase the numeric value or make changes Decrease the numeric value or make changes General help window that describes the appropriate keys to activate certain system features. English Chapter 2 BIOS Setup BIOS (Basic Input and Output System) includes a...settings or to use and the possible selections for the highlighted item. To exit the Help Window press . - 29 - When the power is recommended that BIOS needs to be reset to a new BIOS, either GIGABYTE's Q-Flash or @BIOS utility can enter the BIOS setup screen by pressing "Ctrl + F1...
... not require users to boot to Main Menu Increase the numeric value or make changes Decrease the numeric value or make changes General help window that describes the appropriate keys to activate certain system features. English Chapter 2 BIOS Setup BIOS (Basic Input and Output System) includes a...settings or to use and the possible selections for the highlighted item. To exit the Help Window press . - 29 - When the power is recommended that BIOS needs to be reset to a new BIOS, either GIGABYTE's Q-Flash or @BIOS utility can enter the BIOS setup screen by pressing "Ctrl + F1...

User Manual
Page 43
For example, the same hardware configuration might not run properly with Windows XP, but works smoothly with Windows NT. English DIMM OverVoltage control Auto Supply DIMM voltage as "Enabled". "Top Performance" will effect the result. BIOS Setup Different system configuration (both hardware component ...
For example, the same hardware configuration might not run properly with Windows XP, but works smoothly with Windows NT. English DIMM OverVoltage control Auto Supply DIMM voltage as "Enabled". "Top Performance" will effect the result. BIOS Setup Different system configuration (both hardware component ...
User Manual
Page 47
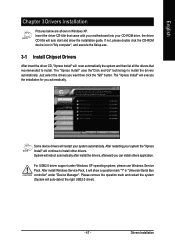
...came with your motherboard into your CD-ROM drive, the driver CD-title will auto start and show a question mark "?" After install Windows Service Pack, it will restart your system the "Xpress Install" will reboot automatically after install the drivers, afterward you want then click ... CD-title that recommended to install other drivers. After restarting your system automatically. in "Universal Serial Bus controller" under Windows XP operating system, please use Windows Service Pack. System will continue to install. If not, please double click the CD-ROM device icon in...
...came with your motherboard into your CD-ROM drive, the driver CD-title will auto start and show a question mark "?" After install Windows Service Pack, it will restart your system the "Xpress Install" will reboot automatically after install the drivers, afterward you want then click ... CD-title that recommended to install other drivers. After restarting your system automatically. in "Universal Serial Bus controller" under Windows XP operating system, please use Windows Service Pack. System will continue to install. If not, please double click the CD-ROM device icon in...
User Manual
Page 54
... BIOS with Q-FlashTM Utility on Dual BIOS Motherboards. Using Q-FlashTM indicating no more fooling around with how to flash BIOS from Gigabyte's website. 2. If your motherboard has single-BIOS, please refer to enter BIOS menu. If your motherboard has dual-BIOS,... None Press DEL to enter SETUP / Dual BIOS / Q-Flash / F9 For Xpress Recovery 08/07/2003-i875P-6A79BG03C-00 GA-K8VT800-RH Motherboard - 54 - Before You Begin: Before you how to use Q-Flash utility. Intel i875P AGPset BIOS for damages of... end-users. The BIOS file is a BIOS flash utility embedded in DOS or Windows.
... BIOS with Q-FlashTM Utility on Dual BIOS Motherboards. Using Q-FlashTM indicating no more fooling around with how to flash BIOS from Gigabyte's website. 2. If your motherboard has single-BIOS, please refer to enter BIOS menu. If your motherboard has dual-BIOS,... None Press DEL to enter SETUP / Dual BIOS / Q-Flash / F9 For Xpress Recovery 08/07/2003-i875P-6A79BG03C-00 GA-K8VT800-RH Motherboard - 54 - Before You Begin: Before you how to use Q-Flash utility. Intel i875P AGPset BIOS for damages of... end-users. The BIOS file is a BIOS flash utility embedded in DOS or Windows.
User Manual
Page 61
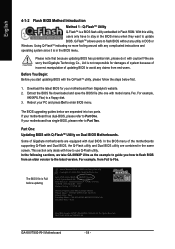
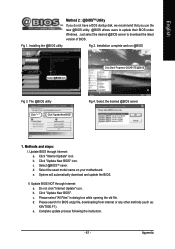
Installation complete and run @BIOS Select @BIOS item. Click Start/ Programs/ GIGABYTE/@BIOS Fig 3. Methods and steps: I. Click "Internet Update" icon. d. Do not click "Internet Update" ... sever. e. II. b. Click "Update New BIOS". Please search for BIOS unzip file, downloading from internet or any other methods (such as: K8VT800.F1). c. Select the desired @BIOS server 1. Select the exact model name on your motherboard. b. English Method 2 : @BIOSTM Utility If you... version of BIOS. Just select the desired @BIOS server to update their BIOS under Windows.
Installation complete and run @BIOS Select @BIOS item. Click Start/ Programs/ GIGABYTE/@BIOS Fig 3. Methods and steps: I. Click "Internet Update" icon. d. Do not click "Internet Update" ... sever. e. II. b. Click "Update New BIOS". Please search for BIOS unzip file, downloading from internet or any other methods (such as: K8VT800.F1). c. Select the desired @BIOS server 1. Select the exact model name on your motherboard. b. English Method 2 : @BIOSTM Utility If you... version of BIOS. Just select the desired @BIOS server to update their BIOS under Windows.

User Manual
Page 64
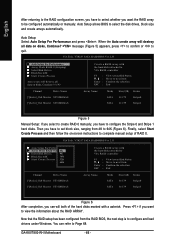
...Confirm the selection Exit Array Name Mode SATA SATA Size(GB) Status 111.79 Hdd 111.79 Hdd GA-K8VT800-RH Motherboard Figure 2 - 64 - VIA Technologies, Inc. VIA VT8237 Serial ATA RAID BIOS Setting...Please attach the hard drive connectors to their appropriate location on our website at http:\\www.gigabyte.com.tw to read or download the information you need.) Configuring the VIA VT8237R / VT8237R...1). You have a few seconds to loading the OS. Figure 1 The VT8237R / VT8237R+ SATA RAID window appears (as part of the array. Note: To achieve best performance, it is provided. (For more...
...Confirm the selection Exit Array Name Mode SATA SATA Size(GB) Status 111.79 Hdd 111.79 Hdd GA-K8VT800-RH Motherboard Figure 2 - 64 - VIA Technologies, Inc. VIA VT8237 Serial ATA RAID BIOS Setting...Please attach the hard drive connectors to their appropriate location on our website at http:\\www.gigabyte.com.tw to read or download the information you need.) Configuring the VIA VT8237R / VT8237R...1). You have a few seconds to loading the OS. Figure 1 The VT8237R / VT8237R+ SATA RAID window appears (as part of the array. Note: To achieve best performance, it is provided. (For more...
User Manual
Page 66
..., select Start Create Process and then follow the on disks, Continue? Press if you want the RAID array to configure and load drivers under Windows. Auto Setup: Select Auto Setup For Performance and press . When the Auto create array will destroy all data on disks, Continue? message (... 6). VIA Tech. You can will destroy all data on -screen instructions to complete manual setup of the hard disks marked with a asterisk. GA-K8VT800-RH Motherboard - 66 - VIA Tech. Now that the RAID setup has been configured from 4K to select the disk drives, block size and...
..., select Start Create Process and then follow the on disks, Continue? Press if you want the RAID array to configure and load drivers under Windows. Auto Setup: Select Auto Setup For Performance and press . When the Auto create array will destroy all data on disks, Continue? message (... 6). VIA Tech. You can will destroy all data on -screen instructions to complete manual setup of the hard disks marked with a asterisk. GA-K8VT800-RH Motherboard - 66 - VIA Tech. Now that the RAID setup has been configured from 4K to select the disk drives, block size and...
User Manual
Page 68
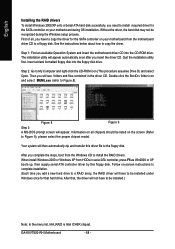
... drive. Information on all , you have to be listed on the screen (Refer to install the RAID drivers. When install Windows 2000 or Windows XP from the motherboard driver CD to a floppy disk. See the instructions below about how to My Computer and right-click ... (refer to Figure.8). (Note) Figure 8 Figure 9 Step 3: A MS-DOS prompt screen will appear automatically soon after you insert the driver CD. GA-K8VT800-RH Motherboard - 68 - The installation utility will appear. Step 2: Go to copy the driver. Follow on-screen instructions to complete installation. (Each time...
... drive. Information on all , you have to be listed on the screen (Refer to install the RAID drivers. When install Windows 2000 or Windows XP from the motherboard driver CD to a floppy disk. See the instructions below about how to My Computer and right-click ... (refer to Figure.8). (Note) Figure 8 Figure 9 Step 3: A MS-DOS prompt screen will appear automatically soon after you insert the driver CD. GA-K8VT800-RH Motherboard - 68 - The installation utility will appear. Step 2: Go to copy the driver. Follow on-screen instructions to complete installation. (Each time...
User Manual
Page 69
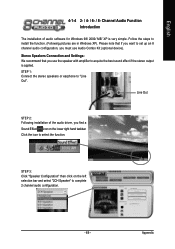
Please note that you use Audio Combo Kit (optional device). Click the icon to install the function. (Following pictures are in Windows XP). Follow the steps to select the function. STEP 3: Click "Speaker Configuration" then click on the lower right hand taskbar. Appendix English 4-1-4 2- / 4- / 6- / 8- STEP 1: Connect the ... The installation of the audio driver, you must use the speaker with amplifier to "Line Out". Line Out STEP 2: Following installation of audio software for Windows 98/ 2000/ ME/ XP is applied.
Please note that you use Audio Combo Kit (optional device). Click the icon to install the function. (Following pictures are in Windows XP). Follow the steps to select the function. STEP 3: Click "Speaker Configuration" then click on the lower right hand taskbar. Appendix English 4-1-4 2- / 4- / 6- / 8- STEP 1: Connect the ... The installation of the audio driver, you must use the speaker with amplifier to "Line Out". Line Out STEP 2: Following installation of audio software for Windows 98/ 2000/ ME/ XP is applied.
User Manual
Page 75
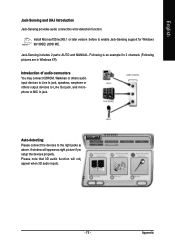
...audio connectors error-detection function. Install Microsoft DirectX8.1 or later version before to enable Jack-Sensing support for 2 channels (Following pictures are in Windows XP): Introduction of audio connectors You may connect CDROM, Walkman or others audio input devices to Line In jack, speakers, earphone or others output...Out jack, and microphone to the right jacks as right picture if you setup the devices properly. Following is an example for Windows 98/ 98SE/ 2000/ ME. Jack-Sensing includes 2 parts: AUTO and MANUAL. Please note that 3D audio function will appear as above.
...audio connectors error-detection function. Install Microsoft DirectX8.1 or later version before to enable Jack-Sensing support for 2 channels (Following pictures are in Windows XP): Introduction of audio connectors You may connect CDROM, Walkman or others audio input devices to Line In jack, speakers, earphone or others output...Out jack, and microphone to the right jacks as right picture if you setup the devices properly. Following is an example for Windows 98/ 98SE/ 2000/ ME. Jack-Sensing includes 2 parts: AUTO and MANUAL. Please note that 3D audio function will appear as above.


