User Manual
Page 27
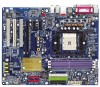
... only for the first time, it with caution and avoid inadequate operation that describes the appropriate keys to its original settings. To exit the Help Window press . English Chapter 2 BIOS Setup BIOS (Basic Input and Output System) includes a CMOS SETUP utility which allows user to configure required settings ...pop up BIOS for Main Menu Main Menu The on-line description of the highlighted setup function is recommended that you to a new BIOS, either GIGABYTE's Q-Flash or @BIOS utility can enter the BIOS setup screen by pressing "Ctrl + F1". Quit and not save the current BIOS to the...
... only for the first time, it with caution and avoid inadequate operation that describes the appropriate keys to its original settings. To exit the Help Window press . English Chapter 2 BIOS Setup BIOS (Basic Input and Output System) includes a CMOS SETUP utility which allows user to configure required settings ...pop up BIOS for Main Menu Main Menu The on-line description of the highlighted setup function is recommended that you to a new BIOS, either GIGABYTE's Q-Flash or @BIOS utility can enter the BIOS setup screen by pressing "Ctrl + F1". Quit and not save the current BIOS to the...
User Manual
Page 44
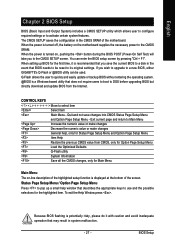
Therefore, if your system, enable "Top Performance." GA-K8NE Motherboard - 44 - For example, the same H/W configuration might not run properly with Windows XP, but works smoothly with Windows NT. Different system configuration (both H/W component and OS) will increase H/W working speed. Disabled Disable this field loads the factory defaults for BIOS and Chipset Features ...
Therefore, if your system, enable "Top Performance." GA-K8NE Motherboard - 44 - For example, the same H/W configuration might not run properly with Windows XP, but works smoothly with Windows NT. Different system configuration (both H/W component and OS) will increase H/W working speed. Disabled Disable this field loads the factory defaults for BIOS and Chipset Features ...
User Manual
Page 47
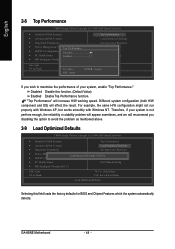
... system the "Xpress Install" will continue to install other drivers. in Windows XP. English Chapter 3 Drivers Installation Pictures below are shown in "Universal Serial Bus controller" under Windows XP operating system, please use Windows Service Pack. The "Xpress Install" uses the"Click and Go" technology...drivers, afterward you want then click the "GO" button. System will auto-detect the right USB2.0 driver). - 47 - After install Windows Service Pack, it will auto start and show a question mark "?" Just select the drivers you can install others application. Insert the ...
... system the "Xpress Install" will continue to install other drivers. in Windows XP. English Chapter 3 Drivers Installation Pictures below are shown in "Universal Serial Bus controller" under Windows XP operating system, please use Windows Service Pack. The "Xpress Install" uses the"Click and Go" technology...drivers, afterward you want then click the "GO" button. System will auto-detect the right USB2.0 driver). - 47 - After install Windows Service Pack, it will auto start and show a question mark "?" Just select the drivers you can install others application. Insert the ...
User Manual
Page 52
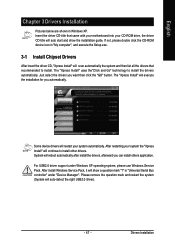
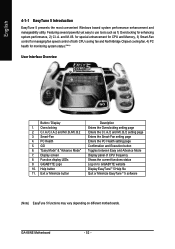
English 4-1-1 EasyTune 5 Introduction EasyTune 5 presents the most convenient Windows based system performance enhancement and manageability utility. PC Health 5. Help button 11. and M.I .B.2 3. C.I.A./C.I.A.2 and M.I.B./M.I .B. GO 6. GIGABYTE Logo 10. GA-K8NE Motherboard - 52 - for special enhancement for CPU and Memory, 3) Smart-Fan control for monitoring system status.(Note) User Interface Overview Button / Display 1. Function display LEDs 9. ...
English 4-1-1 EasyTune 5 Introduction EasyTune 5 presents the most convenient Windows based system performance enhancement and manageability utility. PC Health 5. Help button 11. and M.I .B.2 3. C.I.A./C.I.A.2 and M.I.B./M.I .B. GO 6. GIGABYTE Logo 10. GA-K8NE Motherboard - 52 - for special enhancement for CPU and Memory, 3) Smart-Fan control for monitoring system status.(Note) User Interface Overview Button / Display 1. Function display LEDs 9. ...
User Manual
Page 56
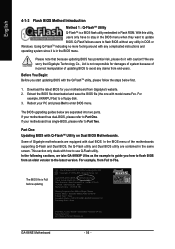
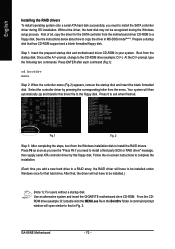
...enter SETUP / Dual BIOS / Q-Flash / F9 For Xpress Recovery 08/07/2003-i875P-6A79BG03C-00 GA-K8NE Motherboard - 56 - We are combined in Flash ROM. Download the latest BIOS for 8KNXP Ultra Fa3 ...refer to Fba. The BIOS upgrading guides below first. 1. The BIOS file is in DOS or Windows. Intel i875P AGPset BIOS for your motherboard has dual-BIOS, please refer to a floppy disk. ...Dual BIOS Motherboards. Part One: Updating BIOS with model name.Fxx. For example, from Gigabyte's website. 2. Some of the motherboards supporting Q-Flash and Dual BIOS, the Q-Flash ...
...enter SETUP / Dual BIOS / Q-Flash / F9 For Xpress Recovery 08/07/2003-i875P-6A79BG03C-00 GA-K8NE Motherboard - 56 - We are combined in Flash ROM. Download the latest BIOS for 8KNXP Ultra Fa3 ...refer to Fba. The BIOS upgrading guides below first. 1. The BIOS file is in DOS or Windows. Intel i875P AGPset BIOS for your motherboard has dual-BIOS, please refer to a floppy disk. ...Dual BIOS Motherboards. Part One: Updating BIOS with model name.Fxx. For example, from Gigabyte's website. 2. Some of the motherboards supporting Q-Flash and Dual BIOS, the Q-Flash ...
User Manual
Page 63
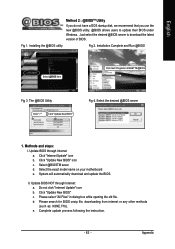
...unzip file, downloading from internet or any other methods (such as: K8NE.F1b). Complete update process following the instruction. - 63 - Just select the desired @BIOS server to update their BIOS under Windows. Methods and steps: I. Select @BIOSTM sever d. Appendix Select the... desired @BIOS server 1. Installation Complete and Run @BIOS Select @BIOS item Click Sart/ Programs/ GIGABYTE/@BIOS Fig 3. Click "Internet Update" icon b. Select...
...unzip file, downloading from internet or any other methods (such as: K8NE.F1b). Complete update process following the instruction. - 63 - Just select the desired @BIOS server to update their BIOS under Windows. Methods and steps: I. Select @BIOSTM sever d. Appendix Select the... desired @BIOS server 1. Installation Complete and Run @BIOS Select @BIOS item Click Sart/ Programs/ GIGABYTE/@BIOS Fig 3. Click "Internet Update" icon b. Select...
User Manual
Page 66
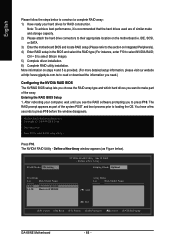
... Navigate [ ] Select [ENTER] Popup GA-K8NE Motherboard - 66 - The NVIDIA RAID Utility - Press F10 to select NVIDIA RAID; Note: To achieve best performance, it is provided. (For more detailed setup information, please visit our website at http:\\www.gigabyte.com.tw to read or download the ...Jan 12 2005 - Entering the RAID BIOS Setup 1. English Please follow the steps below ). Ctrl + S to press F10 before the window disappears. NVIDIA RAID IDE ROM BIOS 4.81 Copyright (C) 2004 NVIDIA Corp. More information on Integrated Peripherals). 4) Enter RAID setup in the ...
... Navigate [ ] Select [ENTER] Popup GA-K8NE Motherboard - 66 - The NVIDIA RAID Utility - Press F10 to select NVIDIA RAID; Note: To achieve best performance, it is provided. (For more detailed setup information, please visit our website at http:\\www.gigabyte.com.tw to read or download the ...Jan 12 2005 - Entering the RAID BIOS Setup 1. English Please follow the steps below ). Ctrl + S to press F10 before the window disappears. NVIDIA RAID IDE ROM BIOS 4.81 Copyright (C) 2004 NVIDIA Corp. More information on Integrated Peripherals). 4) Enter RAID setup in the ...
User Manual
Page 67
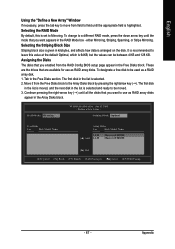
... designate a free disk to be between 4 KB and 128 KB. RAID Mode: Mirroring NVIDIA RAID Utility Jan 12 2005 - English Using the "Define a New Array" Window If necessary, press the tab key to move from field to field until the appropriate field is arranged on the disk. either Mirroring, Striping, Spanning...
... designate a free disk to be between 4 KB and 128 KB. RAID Mode: Mirroring NVIDIA RAID Utility Jan 12 2005 - English Using the "Define a New Array" Window If necessary, press the tab key to move from field to field until the appropriate field is arranged on the disk. either Mirroring, Striping, Spanning...

User Manual
Page 68
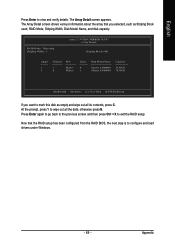
... an array. Id Status Vendor Array Model Name 2 Healthy NVIDIA MIRROR 76.33G [Ctrl-X] Exit [ ] Select [B] Set Boot [N] New Array [ENTER] Detail GA-K8NE Motherboard - 68 - The Array List window appears, where you can select a disk array as boot device if you have set up. Boot Yes NVIDIA RAID Utility Jan 12 2005...
... an array. Id Status Vendor Array Model Name 2 Healthy NVIDIA MIRROR 76.33G [Ctrl-X] Exit [ ] Select [B] Set Boot [N] New Array [ENTER] Detail GA-K8NE Motherboard - 68 - The Array List window appears, where you can select a disk array as boot device if you have set up. Boot Yes NVIDIA RAID Utility Jan 12 2005...
User Manual
Page 69
... wipe out all the data, otherwise press N. English Press Enter to exit the RAID setup. At the prompt, press Y to configure and load drivers under Windows. - 69 -
... wipe out all the data, otherwise press N. English Press Enter to exit the RAID setup. At the prompt, press Y to configure and load drivers under Windows. - 69 -
User Manual
Page 70
... BootDrv folder. Boot from the menu. At the D:\> prompt, type the following two commands. Use an alternative system and insert the GIGABYTE motherboard drive CD-ROM. From the CDROM drive (example: D:\) double click the MENU.exe file in your system. See the instructions...a startup disk that in MS-DOS mode(Note1). GA-K8NE Motherboard - 70 - Once at the A:\> prompt, change to a floppy disk. A command prompt window will not have to be installed under Windows once for the SATA controller from the Windows installation disk to exit when finished. Your system will ...
... BootDrv folder. Boot from the menu. At the D:\> prompt, type the following two commands. Use an alternative system and insert the GIGABYTE motherboard drive CD-ROM. From the CDROM drive (example: D:\) double click the MENU.exe file in your system. See the instructions...a startup disk that in MS-DOS mode(Note1). GA-K8NE Motherboard - 70 - Once at the A:\> prompt, change to a floppy disk. A command prompt window will not have to be installed under Windows once for the SATA controller from the Windows installation disk to exit when finished. Your system will ...
User Manual
Page 71
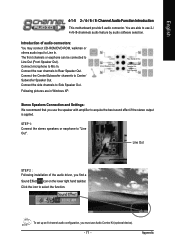
... you find a Sound Effect icon on the lower right hand taskbar. STEP 1: Connect the stereo speakers or earphone to Side Speaker Out. You are in Windows XP. Connect the Center/Subwoofer channels to Rear Speaker Out. Connect the rear channels to Center/ Subwoofer Speaker Out. Following pictures are able to Line...
... you find a Sound Effect icon on the lower right hand taskbar. STEP 1: Connect the stereo speakers or earphone to Side Speaker Out. You are in Windows XP. Connect the Center/Subwoofer channels to Rear Speaker Out. Connect the rear channels to Center/ Subwoofer Speaker Out. Following pictures are able to Line...


