Manual
Page 6
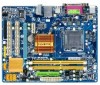
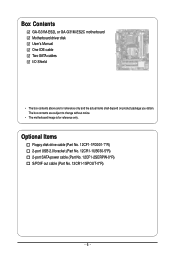
The box contents are for reference only. Box Contents GA-G31M-ES2L or GA-G31M-ES2C motherboard Motherboard driver disk User's Manual One IDE cable Two SATA cables I/O Shield • The box contents above are subject to change without notice. • The motherboard image is for reference only and the actual items shall depend on product package you obtain. Optional Items Floppy disk drive cable (Part No. 12CF1-1FD001-7*R) 2-port USB 2.0 bracket (Part No. 12CR1-1UB030-5*R) 2-port SATA power cable (Part No. 12CF1-2SERPW-0*R) S/PDIF out cable (Part No. 12CR1-1SPOUT-0*R) - 6 -
The box contents are for reference only. Box Contents GA-G31M-ES2L or GA-G31M-ES2C motherboard Motherboard driver disk User's Manual One IDE cable Two SATA cables I/O Shield • The box contents above are subject to change without notice. • The motherboard image is for reference only and the actual items shall depend on product package you obtain. Optional Items Floppy disk drive cable (Part No. 12CF1-1FD001-7*R) 2-port USB 2.0 bracket (Part No. 12CR1-1UB030-5*R) 2-port SATA power cable (Part No. 12CF1-2SERPW-0*R) S/PDIF out cable (Part No. 12CR1-1SPOUT-0*R) - 6 -
Manual
Page 12
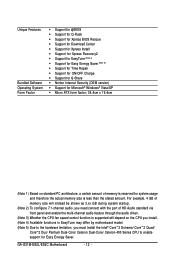
... front panel and enable the multi-channel audio feature through the audio driver. (Note 3) Whether the CPU fan speed control function is supported will depend on standard PC architecture, a certain amount of memory is less than the stated amount. GA-G31M-ES2L/ES2C Motherboard - 12 - Unique Features Bundled Software Operating System Form Factor Support...
... front panel and enable the multi-channel audio feature through the audio driver. (Note 3) Whether the CPU fan speed control function is supported will depend on standard PC architecture, a certain amount of memory is less than the stated amount. GA-G31M-ES2L/ES2C Motherboard - 12 - Unique Features Bundled Software Operating System Form Factor Support...
Manual
Page 18
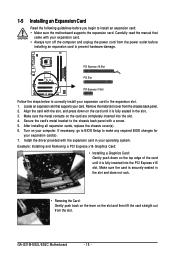
... from the power outlet before you begin to install an expansion card: • Make sure the motherboard supports the expansion card. Install the driver provided with a screw. 5. Make sure the metal contacts on the card are completely inserted into the PCI Express x16 slot. 1-5 Installing ...sure the card is fully seated in the expansion slot. 1. If necessary, go to BIOS Setup to correctly install your expansion card(s). 7. GA-G31M-ES2L/ES2C Motherboard - 18 - PCI Express x16 Slot PCI Slot PCI Express x1 Slot Follow the steps below to make any required BIOS changes for your...
... from the power outlet before you begin to install an expansion card: • Make sure the motherboard supports the expansion card. Install the driver provided with a screw. 5. Make sure the metal contacts on the card are completely inserted into the PCI Express x16 slot. 1-5 Installing ...sure the card is fully seated in the expansion slot. 1. If necessary, go to BIOS Setup to correctly install your expansion card(s). 7. GA-G31M-ES2L/ES2C Motherboard - 18 - PCI Express x16 Slot PCI Slot PCI Express x1 Slot Follow the steps below to make any required BIOS changes for your...
Manual
Page 20
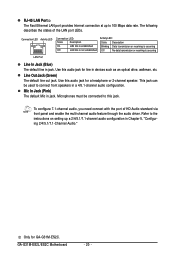
Use this audio jack for GA-G31M-ES2C. Only for line in devices such as an optical drive, walkman, etc. This jack can be connected to this audio jack for a headphone or 2-channel ... following describes the states of HD Audio standard via front panel and enable the multi-channel audio feature through the audio driver. Line Out Jack (Green) The default line out jack. GA-G31M-ES2L/ES2C Motherboard - 20 - Microphones must be used to 100 Mbps data rate. Use this jack. RJ-45 LAN Port The Fast...
Use this audio jack for GA-G31M-ES2C. Only for line in devices such as an optical drive, walkman, etc. This jack can be connected to this audio jack for a headphone or 2-channel ... following describes the states of HD Audio standard via front panel and enable the multi-channel audio feature through the audio driver. Line Out Jack (Green) The default line out jack. GA-G31M-ES2L/ES2C Motherboard - 20 - Microphones must be used to 100 Mbps data rate. Use this jack. RJ-45 LAN Port The Fast...
Manual
Page 32
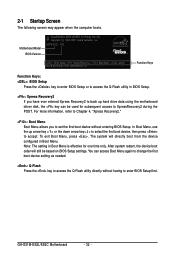
...then press to access the Q-Flash utility directly without entering BIOS Setup. In Boot Menu, use the up hard drive data using the motherboard driver disk, the key can access Boot Menu again to change the first boot device setting as needed. : Q-Flash Press the key to ... in Boot Menu. Motherboard Model BIOS Version Award Modular BIOS v6.00PG, An Energy Star Ally Copyright (C) 1984-2009, Award Software, Inc. GA-G31M-ES2L/ES2C Motherboard - 32 - After system restart, the device boot order will directly boot from the device configured in Boot Menu is effective for subsequent ...
...then press to access the Q-Flash utility directly without entering BIOS Setup. In Boot Menu, use the up hard drive data using the motherboard driver disk, the key can access Boot Menu again to change the first boot device setting as needed. : Q-Flash Press the key to ... in Boot Menu. Motherboard Model BIOS Version Award Modular BIOS v6.00PG, An Energy Star Ally Copyright (C) 1984-2009, Award Software, Inc. GA-G31M-ES2L/ES2C Motherboard - 32 - After system restart, the device boot order will directly boot from the device configured in Boot Menu is effective for subsequent ...
Manual
Page 54
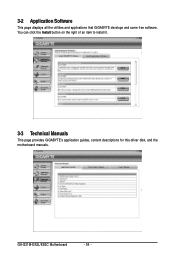
GA-G31M-ES2L/ES2C Motherboard - 54 - 3-2 Application Software This page displays all the utilities and applications that GIGABYTE develops and some free software. You can click the Install button on the right of an item to install it. 3-3 Technical Manuals This page provides GIGABYTE's application guides, content descriptions for this driver disk, and the motherboard manuals.
GA-G31M-ES2L/ES2C Motherboard - 54 - 3-2 Application Software This page displays all the utilities and applications that GIGABYTE develops and some free software. You can click the Install button on the right of an item to install it. 3-3 Technical Manuals This page provides GIGABYTE's application guides, content descriptions for this driver disk, and the motherboard manuals.
Manual
Page 56
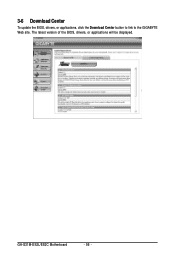
GA-G31M-ES2L/ES2C Motherboard - 56 - The latest version of the BIOS, drivers, or applications will be displayed. 3-6 Download Center To update the BIOS, drivers, or applications, click the Download Center button to link to the GIGABYTE Web site.
GA-G31M-ES2L/ES2C Motherboard - 56 - The latest version of the BIOS, drivers, or applications will be displayed. 3-6 Download Center To update the BIOS, drivers, or applications, click the Download Center button to link to the GIGABYTE Web site.
Manual
Page 58
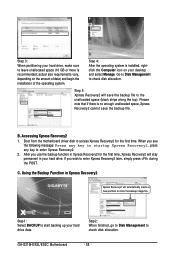
B. Boot from the motherboard driver disk to the unallocated space (black stripe along the top). C. GA-G31M-ES2L/ES2C Motherboard - 58 - Step 3: When partitioning your hard drive, make sure to leave unallocated space (10 GB or more is installed, rightclick the Computer icon on ...
B. Boot from the motherboard driver disk to the unallocated space (black stripe along the top). C. GA-G31M-ES2L/ES2C Motherboard - 58 - Step 3: When partitioning your hard drive, make sure to leave unallocated space (10 GB or more is installed, rightclick the Computer icon on ...

Manual
Page 74
... 3: Go to access the HD Audio Manager. Then configure the jack for microphone functionality. If you 'll not be used at a middle level. GA-G31M-ES2L/ES2C Motherboard - 74 - To hear the sound being recorded during the recording process, do not mute the playback volume. Note: The microphone functions on the... area. It is recommended that you set the volumes at the same time. 5-1-3 Configuring Microphone Recording Step 1: After installing the audio driver, the HD Audio Manager icon will appear in jack (pink) on the front panel. Doubleclick the icon to the Microphone screen.
... 3: Go to access the HD Audio Manager. Then configure the jack for microphone functionality. If you 'll not be used at a middle level. GA-G31M-ES2L/ES2C Motherboard - 74 - To hear the sound being recorded during the recording process, do not mute the playback volume. Note: The microphone functions on the... area. It is recommended that you set the volumes at the same time. 5-1-3 Configuring Microphone Recording Step 1: After installing the audio driver, the HD Audio Manager icon will appear in jack (pink) on the front panel. Doubleclick the icon to the Microphone screen.


