
Manual
Page 9
...on an uneven surface. • Do not place the computer system in a high-temperature environment. • Turning on the power, make sure the power supply voltage has been set according to installation, do not have an ESD wrist strap, keep your dealer. If you are connected ... an antistatic pad or within an electrostatic shielding container. • Before unplugging the power supply cable from the motherboard, make sure the power supply has been turned off. • Before turning on the computer power during the installation process can lead to damage to system components as well as ...
...on an uneven surface. • Do not place the computer system in a high-temperature environment. • Turning on the power, make sure the power supply voltage has been set according to installation, do not have an ESD wrist strap, keep your dealer. If you are connected ... an antistatic pad or within an electrostatic shielding container. • Before unplugging the power supply cable from the motherboard, make sure the power supply has been turned off. • Before turning on the computer power during the installation process can lead to damage to system components as well as ...
Manual
Page 19
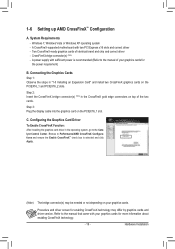
... cards. CrossFireX bridge connector(s) (Note) - Step 3: Plug the display cable into the graphics card on top of the two cards. A power supply with sufficient power is recommended (Refer to Performance\AMD CrossFireX Configurations and ensure the Enable CrossFireX™ check box is selected and click Apply. (Note) The... graphics card driver in "1-5 Installing an Expansion Card" and install two CrossFireX graphics cards on your graphics cards for the power requirement) B. Refer to the Catalyst Control Center. 1-6 Setting up AMD CrossFireX™ Configuration A.
... cards. CrossFireX bridge connector(s) (Note) - Step 3: Plug the display cable into the graphics card on top of the two cards. A power supply with sufficient power is recommended (Refer to Performance\AMD CrossFireX Configurations and ensure the Enable CrossFireX™ check box is selected and click Apply. (Note) The... graphics card driver in "1-5 Installing an Expansion Card" and install two CrossFireX graphics cards on your graphics cards for the power requirement) B. Refer to the Catalyst Control Center. 1-6 Setting up AMD CrossFireX™ Configuration A.
Manual
Page 23
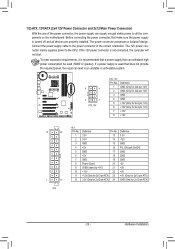
... not start. The power connector possesses a foolproof design. If a power supply is recommended that a power supply that does not provide the required power, the result can lead to the power connector in the correct orientation. 1/2) ATX_12V/ATX (2x4 12V Power Connector and 2x12 Main Power Connector) With the use of the power connector, the power supply can supply enough stable power to the CPU...
... not start. The power connector possesses a foolproof design. If a power supply is recommended that a power supply that does not provide the required power, the result can lead to the power connector in the correct orientation. 1/2) ATX_12V/ATX (2x4 12V Power Connector and 2x12 Main Power Connector) With the use of the power connector, the power supply can supply enough stable power to the CPU...

Manual
Page 31
... configuration settings or to Chapter 5, "Troubleshooting," for how to keep the configuration values in the CMOS. For instructions on the motherboard supplies the necessary power to the CMOS to clear the CMOS values.) - 31 - Inadequate BIOS flashing may result in system's failure to prevent system instability...do it is turned off, the battery on using the current version of BIOS, it with caution. To upgrade the BIOS, use either the GIGABYTE Q-Flash or @BIOS utility. • Q-Flash allows the user to quickly and easily upgrade or back up BIOS without entering the operating ...
... configuration settings or to Chapter 5, "Troubleshooting," for how to keep the configuration values in the CMOS. For instructions on the motherboard supplies the necessary power to the CMOS to clear the CMOS values.) - 31 - Inadequate BIOS flashing may result in system's failure to prevent system instability...do it is turned off, the battery on using the current version of BIOS, it with caution. To upgrade the BIOS, use either the GIGABYTE Q-Flash or @BIOS utility. • Q-Flash allows the user to quickly and easily upgrade or back up BIOS without entering the operating ...

Manual
Page 51
...or removal of Month): Turn on the system at least 1A on the +5VSB lead. BIOS Setup Disabled Disables this function, you need an ATX power supply providing at least 1A on the +5VSB lead. (Default: Enabled) HPET Support (Note) Enables or disables High Precision Event Timer (HPET) for ... 5 characters and then press to clear the password settings. Soft-Off The system stays off upon the return of the AC power. Press on this function, you need an ATX power supply providing at a specific time on each day or on a specific day in S5 (shutdown) state. (Default: Disabled) Note...
...or removal of Month): Turn on the system at least 1A on the +5VSB lead. BIOS Setup Disabled Disables this function, you need an ATX power supply providing at least 1A on the +5VSB lead. (Default: Enabled) HPET Support (Note) Enables or disables High Precision Event Timer (HPET) for ... 5 characters and then press to clear the password settings. Soft-Off The system stays off upon the return of the AC power. Press on this function, you need an ATX power supply providing at a specific time on each day or on a specific day in S5 (shutdown) state. (Default: Disabled) Note...
Manual
Page 75
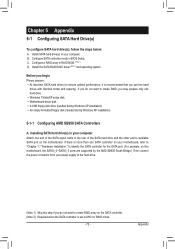
...8226; An empty formatted floppy disk (needed during Windows XP installation) 5-1-1 Configuring AMD SB950 SATA Controllers A. Installing SATA hard drive(s) in your power supply to the hard drive. (Note 1) Skip this step if you do not want to create RAID array on the SATA controller. (Note ...drives (to available SATA port on this motherboard, the SATA3_0~SATA3_5 ports are supported by the AMD SB950 South Bridge.) Then connect the power connector from your computer. Chapter 5 Appendix 5-1 Configuring SATA Hard Drive(s) To configure SATA hard drive(s), follow the steps below: A. ...
...8226; An empty formatted floppy disk (needed during Windows XP installation) 5-1-1 Configuring AMD SB950 SATA Controllers A. Installing SATA hard drive(s) in your power supply to the hard drive. (Note 1) Skip this step if you do not want to create RAID array on the SATA controller. (Note ...drives (to available SATA port on this motherboard, the SATA3_0~SATA3_5 ports are supported by the AMD SB950 South Bridge.) Then connect the power connector from your computer. Chapter 5 Appendix 5-1 Configuring SATA Hard Drive(s) To configure SATA hard drive(s), follow the steps below: A. ...
Manual
Page 102
... CLR_CMOS jumper in Device Manager or Sound, video, and game controllers. You can temporarily remove the battery from the battery holder to stop supplying power to the instructions on our website and search for "onboard HD audio driver." A: Make sure your motherboard, please go to install. If...is present in Chapter 1 to short the jumper to My Computer > Properties > Hardware > Device Manager > System devices and right-click on GIGABYTE's website. For motherboards that have turned my speaker to the maximum volume? Step 4: In Device Manager, right-click on High Definition Audio ...
... CLR_CMOS jumper in Device Manager or Sound, video, and game controllers. You can temporarily remove the battery from the battery holder to stop supplying power to the instructions on our website and search for "onboard HD audio driver." A: Make sure your motherboard, please go to install. If...is present in Chapter 1 to short the jumper to My Computer > Properties > Hardware > Device Manager > System devices and right-click on GIGABYTE's website. For motherboards that have turned my speaker to the maximum volume? Step 4: In Device Manager, right-click on High Definition Audio ...

Manual
Page 104
... works successfully). Reinstall other devices one by one (install one device at one time and then boot the system to enter BIOS Setup. No The power supply, CPU or CPU socket might fail. Yes Check if there is verified and solved. Select "Save & Exit Setup" to submit your monitor.
... works successfully). Reinstall other devices one by one (install one device at one time and then boot the system to enter BIOS Setup. No The power supply, CPU or CPU socket might fail. Yes Check if there is verified and solved. Select "Save & Exit Setup" to submit your monitor.


