
Manual
Page 4
Table of Contents ItemChecklist ...6 OptionalAccessories ...6 GA-946GM-DS2/GA-946GM-S2 (rev. 2.0) Motherboard Layout 7 Block Diagram ...8 Chapter 1 Hardware ...Installation 9 1-1 Considerations Prior to Installation 9 1-2 Feature Summary 10 1-3 Installation of the CPU and CPU Cooler 12 1-3-1 Installation of the CPU 12 1-3-2 Installation of the CPU Cooler 13 1-4 Installation of Memory 14 1-5 Installation of Expansion Cards 16 1-6 I/O Back Panel Introduction 17 1-7 Connectors Introduction 18 Chapter 2 BIOS...
Table of Contents ItemChecklist ...6 OptionalAccessories ...6 GA-946GM-DS2/GA-946GM-S2 (rev. 2.0) Motherboard Layout 7 Block Diagram ...8 Chapter 1 Hardware ...Installation 9 1-1 Considerations Prior to Installation 9 1-2 Feature Summary 10 1-3 Installation of the CPU and CPU Cooler 12 1-3-1 Installation of the CPU 12 1-3-2 Installation of the CPU Cooler 13 1-4 Installation of Memory 14 1-5 Installation of Expansion Cards 16 1-6 I/O Back Panel Introduction 17 1-7 Connectors Introduction 18 Chapter 2 BIOS...
Manual
Page 7
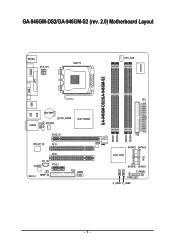
GA-946GM-DS2/GA-946GM-S2 (rev. 2.0) Motherboard Layout VGA KB_MS ATX_12V LGA775 CPU_FAN GA-946GM-DS2/GA-946GM-S2 IT8718 COMA LPT USB USB AUDIO LAN BATTERY SYS_FAN CLR_CMOS Intel® 946GZ F_AUDIO PCIE_16 RTL8111B PCI1 BIOS PCI2 CD_IN CODEC PCIE_1 REV: 2.0 SPDIF_IO FDD COMB DDRII1 DDRII2 DDRII3 DDRII4 ATX IDE SATAII2 SATAII3 Intel® ICH7 CI SATAII0 SATAII1 F_PANEL PWR_LED F_USB1 F_USB2 - 7 -
GA-946GM-DS2/GA-946GM-S2 (rev. 2.0) Motherboard Layout VGA KB_MS ATX_12V LGA775 CPU_FAN GA-946GM-DS2/GA-946GM-S2 IT8718 COMA LPT USB USB AUDIO LAN BATTERY SYS_FAN CLR_CMOS Intel® 946GZ F_AUDIO PCIE_16 RTL8111B PCI1 BIOS PCI2 CD_IN CODEC PCIE_1 REV: 2.0 SPDIF_IO FDD COMB DDRII1 DDRII2 DDRII3 DDRII4 ATX IDE SATAII2 SATAII3 Intel® ICH7 CI SATAII0 SATAII1 F_PANEL PWR_LED F_USB1 F_USB2 - 7 -
Manual
Page 12
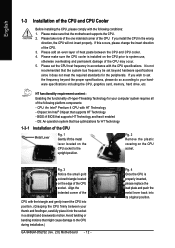
...HT functionality requirement content : Enabling the functionality of Hyper-Threading Technology for HT Technology 1-3-1 Installation of the following conditions: 1. BIOS: A BIOS that has optimizations for your thumb and forefinger, carefully place it enabled - OS: An operation system that supports HT Technology ... the CPU Metal Lever Fig. 1 Gently lift the metal lever located on the CPU prior to the CPU during installation.) GA-946GM-DS2/S2 (rev. 2.0) Motherboard - 12 - Chipset: An Intel® Chipset that might cause damage to system use, otherwise overheating and permanent...
...HT functionality requirement content : Enabling the functionality of Hyper-Threading Technology for HT Technology 1-3-1 Installation of the following conditions: 1. BIOS: A BIOS that has optimizations for your thumb and forefinger, carefully place it enabled - OS: An operation system that supports HT Technology ... the CPU Metal Lever Fig. 1 Gently lift the metal lever located on the CPU prior to the CPU during installation.) GA-946GM-DS2/S2 (rev. 2.0) Motherboard - 12 - Chipset: An Intel® Chipset that might cause damage to system use, otherwise overheating and permanent...
Manual
Page 14
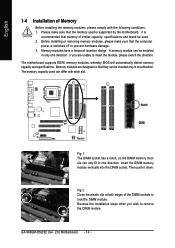
... each slot. English 1-4 Installation of the DIMM sockets to prevent hardware damage. 3. Memory modules have a foolproof insertion design. The motherboard supports DDRII memory modules, whereby BIOS will automatically detect memory capacity and specifications. GA-946GM-DS2/S2 (rev. 2.0) Motherboard - 14 -
... each slot. English 1-4 Installation of the DIMM sockets to prevent hardware damage. 3. Memory modules have a foolproof insertion design. The motherboard supports DDRII memory modules, whereby BIOS will automatically detect memory capacity and specifications. GA-946GM-DS2/S2 (rev. 2.0) Motherboard - 14 -

Manual
Page 16
... to the onboard PCI Express x16 slot and press firmly down on the computer, if necessary, setup BIOS utility of expansion card from BIOS. 8. Replace your VGA card is locked by following the steps outlined below: 1. Make sure your ...computer's chassis cover. 7. Press the expansion card firmly into the computer. 2. Installing a PCI Express x16 expansion card: Please carefully pull out the small whitedrawable bar at the end of the expansion card. 6. GA-946GM-DS2/S2 (rev...
... to the onboard PCI Express x16 slot and press firmly down on the computer, if necessary, setup BIOS utility of expansion card from BIOS. 8. Replace your VGA card is locked by following the steps outlined below: 1. Make sure your ...computer's chassis cover. 7. Press the expansion card firmly into the computer. 2. Installing a PCI Express x16 expansion card: Please carefully pull out the small whitedrawable bar at the end of the expansion card. 6. GA-946GM-DS2/S2 (rev...
Manual
Page 26
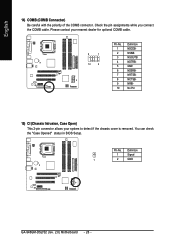
English 14) COMB (COMB Connector) Be careful with the polarity of the COMB connector. Pin No. You can check the "Case Opened" status in BIOS Setup. Definition 1 Signal 1 2 GND GA-946GM-DS2/S2 (rev. 2.0) Motherboard - 26 - Please contact your nearest dealer for optional COMB cable. 9 1 10 2 Pin No. 1 2 3 4 5 6 7 8 9 10 Definition NDCDBNSINB NSOUTB NDTRBGND NDSRBNRTSBNCTSBNRIBNo Pin 15) CI (Chassis Intrusion, Case Open) This 2-pin connector allows your system to detect if the chassis cover is removed. Check the pin assignments while you connect the COMB cable.
English 14) COMB (COMB Connector) Be careful with the polarity of the COMB connector. Pin No. You can check the "Case Opened" status in BIOS Setup. Definition 1 Signal 1 2 GND GA-946GM-DS2/S2 (rev. 2.0) Motherboard - 26 - Please contact your nearest dealer for optional COMB cable. 9 1 10 2 Pin No. 1 2 3 4 5 6 7 8 9 10 Definition NDCDBNSINB NSOUTB NDTRBGND NDSRBNRTSBNCTSBNRIBNo Pin 15) CI (Chassis Intrusion, Case Open) This 2-pin connector allows your system to detect if the chassis cover is removed. Check the pin assignments while you connect the COMB cable.

Manual
Page 30
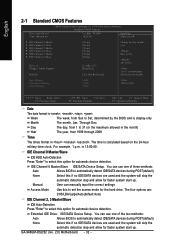
... among the items and press to access advanced options. 2. CMOS Setup Utility-Copyright (C) 1984-2006 Award Software ` Standard CMOS Features ` Advanced BIOS Features ` Integrated Peripherals ` Power Management Setup ` PnP/PCI Configurations ` PC Health Status ` Frequency/Voltage Control ESC: Quit F8: Q-Flash ...Select Item F10: Save & Exit Setup Time, Date, Hard Disk Type... 1. Select the Load Optimized Defaults item in this menu. GA-946GM-DS2/S2 (rev. 2.0) Motherboard - 30 - Press to exit this chapter are for reference only and may differ from the exact settings for your motherboard...
... among the items and press to access advanced options. 2. CMOS Setup Utility-Copyright (C) 1984-2006 Award Software ` Standard CMOS Features ` Advanced BIOS Features ` Integrated Peripherals ` Power Management Setup ` PnP/PCI Configurations ` PC Health Status ` Frequency/Voltage Control ESC: Quit F8: Q-Flash ...Select Item F10: Save & Exit Setup Time, Date, Hard Disk Type... 1. Select the Load Optimized Defaults item in this menu. GA-946GM-DS2/S2 (rev. 2.0) Motherboard - 30 - Press to exit this chapter are for reference only and may differ from the exact settings for your motherboard...
Manual
Page 32
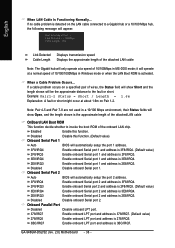
...detect IDE/SATA devices during POST(default) None Select this option for faster system start up . GA-946GM-DS2/S2 (rev. 2.0) Motherboard - 32 - Manual User can use one of three methods: Auto Allows BIOS to select this if no IDE/SATA devices are used and the system will skip the automatic...automatic device detection. IDE Channel 0 Master/Slave IDE HDD Auto-Detection Press "Enter" to select this to Sat, determined by the BIOS and is calculated based on the 24-hour military-time clock. You can manually input the correct settings Access Mode Use this option for...
...detect IDE/SATA devices during POST(default) None Select this option for faster system start up . GA-946GM-DS2/S2 (rev. 2.0) Motherboard - 32 - Manual User can use one of three methods: Auto Allows BIOS to select this if no IDE/SATA devices are used and the system will skip the automatic...automatic device detection. IDE Channel 0 Master/Slave IDE HDD Auto-Detection Press "Enter" to select this to Sat, determined by the BIOS and is calculated based on the 24-hour military-time clock. You can manually input the correct settings Access Mode Use this option for...

Manual
Page 34
... Select boot sequence for onboard(or add-on cards) SCSI, RAID, etc. English 2-2 Advanced BIOS Features CMOS Setup Utility-Copyright (C) 1984-2006 Award Software Advanced BIOS Features ` Hard Disk Boot Priority First Boot Device Second Boot Device Third Boot Device Password Check HDD...ZIP. LAN Select your boot device priority by ZIP. HDD S.M.A.R.T. LS120 Select your boot device priority by Floppy. Enabled Enable HDD S.M.A.R.T. GA-946GM-DS2/S2 (rev. 2.0) Motherboard - 34 - Capability CPU Hyper-Threading (Note) Limit CPUID Max. ZIP Select your boot device priority by Hard Disk...
... Select boot sequence for onboard(or add-on cards) SCSI, RAID, etc. English 2-2 Advanced BIOS Features CMOS Setup Utility-Copyright (C) 1984-2006 Award Software Advanced BIOS Features ` Hard Disk Boot Priority First Boot Device Second Boot Device Third Boot Device Password Check HDD...ZIP. LAN Select your boot device priority by ZIP. HDD S.M.A.R.T. LS120 Select your boot device priority by Floppy. Enabled Enable HDD S.M.A.R.T. GA-946GM-DS2/S2 (rev. 2.0) Motherboard - 34 - Capability CPU Hyper-Threading (Note) Limit CPUID Max. ZIP Select your boot device priority by Hard Disk...

Manual
Page 36
... Optimized Defaults On-Chip Primary PCI IDE Enabled Enable the first onboard IDE channel. (Default value) Disabled Disable the first onboard IDE channel. BIOS will auto detect. (Default value) Combined Set On-Chip SATA mode to 4 HDDs on the motherboard; 2 for SATA and the other... (Default value) Disabled Disable USB Controller. If PATA IDE were set to Ch. 1 Master/Slave,this function will auto set to PATA mode. GA-946GM-DS2/S2 (rev. 2.0) Motherboard - 36 - SATA Port 1/3 Set to This value will be simulated to Ch. 0 Master/Slave. PATA devices will auto make ...
... Optimized Defaults On-Chip Primary PCI IDE Enabled Enable the first onboard IDE channel. (Default value) Disabled Disable the first onboard IDE channel. BIOS will auto detect. (Default value) Combined Set On-Chip SATA mode to 4 HDDs on the motherboard; 2 for SATA and the other... (Default value) Disabled Disable USB Controller. If PATA IDE were set to Ch. 1 Master/Slave,this function will auto set to PATA mode. GA-946GM-DS2/S2 (rev. 2.0) Motherboard - 36 - SATA Port 1/3 Set to This value will be simulated to Ch. 0 Master/Slave. PATA devices will auto make ...
Manual
Page 38
Disabled Disable this function. GA-946GM-DS2/S2 (rev. 2.0) Motherboard - 38 - it will show Open, and the length shown is detected on Pair 1-2. If a cable problem occurs on a specified pair of the onboard LAN chip. Onboard Serial Port 2 Auto BIOS will automatically setup the port 1 ...port 1 and address is activated. When a Cable Problem Occurs... Enabled Enable this function. (Default value) Onboard Serial Port 1 Auto BIOS will automatically setup the port 2 address. 3F8/IRQ4 Enable onboard Serial port 2 and address is 3F8/IRQ4. 2F8/IRQ3 Enable onboard...
Disabled Disable this function. GA-946GM-DS2/S2 (rev. 2.0) Motherboard - 38 - it will show Open, and the length shown is detected on Pair 1-2. If a cable problem occurs on a specified pair of the onboard LAN chip. Onboard Serial Port 2 Auto BIOS will automatically setup the port 1 ...port 1 and address is activated. When a Cable Problem Occurs... Enabled Enable this function. (Default value) Onboard Serial Port 1 Auto BIOS will automatically setup the port 2 address. 3F8/IRQ4 Enable onboard Serial port 2 and address is 3F8/IRQ4. 2F8/IRQ3 Enable onboard...
Manual
Page 46
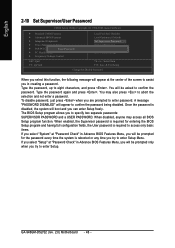
You may access all BIOS Setup program function. When disabled, anyone may also press to abort the selection and not enter a password. GA-946GM-DS2/S2 (rev. 2.0) Motherboard - 46 - To disable password, just press when you to specify two separate passwords: SUPERVISOR PASSWORD... and a USER PASSWORD. When enabled, the Supervisor password is required for entering the BIOS Setup program and having full ...
You may access all BIOS Setup program function. When disabled, anyone may also press to abort the selection and not enter a password. GA-946GM-DS2/S2 (rev. 2.0) Motherboard - 46 - To disable password, just press when you to specify two separate passwords: SUPERVISOR PASSWORD... and a USER PASSWORD. When enabled, the Supervisor password is required for entering the BIOS Setup program and having full ...
Manual
Page 54
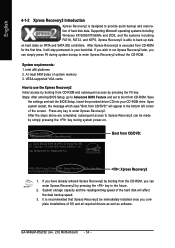
... stay permanent in the bottom left corner of hard disk data. System requirements: 1. Intel 946GZ BIOS for the first time, it will affect the data backup speed. 3. GA-946GM-DS2/S2 (rev. 2.0) Motherboard - 54 - English 4-1-2 Xpress Recovery2 Introduction Xpress Recovery2 is recommended that Xpress Recovery2... can be immediately installed once you can enter Xpress Recovery2 by pressing the F9 key: Steps: After entering BIOS Setup, go to Advanced BIOS Feature and set to startup XpressRecovery2..... System storage capacity and the reading/writing speed of system memory 3. Press...
... stay permanent in the bottom left corner of hard disk data. System requirements: 1. Intel 946GZ BIOS for the first time, it will affect the data backup speed. 3. GA-946GM-DS2/S2 (rev. 2.0) Motherboard - 54 - English 4-1-2 Xpress Recovery2 Introduction Xpress Recovery2 is recommended that Xpress Recovery2... can be immediately installed once you can enter Xpress Recovery2 by pressing the F9 key: Steps: After entering BIOS Setup, go to Advanced BIOS Feature and set to startup XpressRecovery2..... System storage capacity and the reading/writing speed of system memory 3. Press...

Manual
Page 56
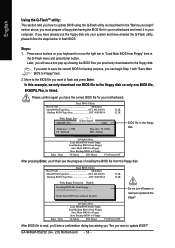
...instructions and operating system since it with any claims from an older version to Part One. Please note that Gigabyte Technology Co., Ltd is Fa3 before updating Award Modular BIOS v6.00PG, An Energy Star Ally Copyright (C) 1984-2003, Award Software, Inc. For example, 8KNXPU.Fba... the Q-FlashTM utility, please follow the steps below are equipped with how to enter SETUP / Dual BIOS / Q-Flash / F9 For Xpress Recovery 08/07/2003-i875P-6A79BG03C-00 GA-946GM-DS2/S2 (rev. 2.0) Motherboard - 56 - We are combined in Single Channel Primary Master : FUJITSU MPE3170AT ED-03-08 Primary ...
...instructions and operating system since it with any claims from an older version to Part One. Please note that Gigabyte Technology Co., Ltd is Fa3 before updating Award Modular BIOS v6.00PG, An Energy Star Ally Copyright (C) 1984-2003, Award Software, Inc. For example, 8KNXPU.Fba... the Q-FlashTM utility, please follow the steps below are equipped with how to enter SETUP / Dual BIOS / Q-Flash / F9 For Xpress Recovery 08/07/2003-i875P-6A79BG03C-00 GA-946GM-DS2/S2 (rev. 2.0) Motherboard - 56 - We are combined in Single Channel Primary Master : FUJITSU MPE3170AT ED-03-08 Primary ...
Manual
Page 58
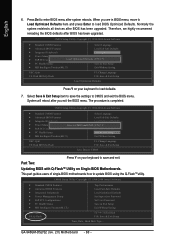
... the Q-Flash utility. Please confirm again you previously downloaded to the floppy disk. After BIOS file is listed. GA-946GM-DS2/S2 (rev. 2.0) Motherboard - 58 - As described in the floppy disk. Steps: 1. Dual BIOS Utility Boot From Main Bios Main ROM Type/Size SST 49LF003A Backup ROM Type/Size SST 49LF003A 512K 512K Wide Range Protection Disable...
... the Q-Flash utility. Please confirm again you previously downloaded to the floppy disk. After BIOS file is listed. GA-946GM-DS2/S2 (rev. 2.0) Motherboard - 58 - As described in the floppy disk. Steps: 1. Dual BIOS Utility Boot From Main Bios Main ROM Type/Size SST 49LF003A Backup ROM Type/Size SST 49LF003A 512K 512K Wide Range Protection Disable...
Manual
Page 60
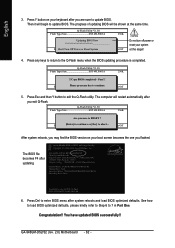
...Award Software Standard CMOS Features Select Language Advanced BIOS Features Load Fail-Safe Defaults Integrated Peripherals Load Optimized Defaults Power Management Setup Save to CMOS and exit the BIOS menu. GA-946GM-DS2/S2 (rev. 2.0) Motherboard - 60 - When you exit the BIOS menu. Select Save & Exit Setup item... to load defaults. 7. System will reboot after BIOS has been upgraded. Part Two: Updating BIOS with Q-FlashTM Utility on your ...
...Award Software Standard CMOS Features Select Language Advanced BIOS Features Load Fail-Safe Defaults Integrated Peripherals Load Optimized Defaults Power Management Setup Save to CMOS and exit the BIOS menu. GA-946GM-DS2/S2 (rev. 2.0) Motherboard - 60 - When you exit the BIOS menu. Select Save & Exit Setup item... to load defaults. 7. System will reboot after BIOS has been upgraded. Part Two: Updating BIOS with Q-FlashTM Utility on your ...
Manual
Page 62
... Utility V1.30 Flash Type/Size SST 49LF003A 256K Keep DUMpdIaDtiantga BIEOnSabNleow >>>>>>>U>p>d>a>te>>B>IO>>S>f>ro>m....F..l.o..p..p..y............ GA-946GM-DS2/S2 (rev. 2.0) Motherboard - 62 - Save BIOS to 7 in Part One. The BIOS file becomes F4 after you exit Q-Flash. Save BIOS to exit the Q-Flash utility. Press Esc and then Y button to Floppy EnteDr o: nR'tuTnurn Off P:oMwoevr eor...
... Utility V1.30 Flash Type/Size SST 49LF003A 256K Keep DUMpdIaDtiantga BIEOnSabNleow >>>>>>>U>p>d>a>te>>B>IO>>S>f>ro>m....F..l.o..p..p..y............ GA-946GM-DS2/S2 (rev. 2.0) Motherboard - 62 - Save BIOS to 7 in Part One. The BIOS file becomes F4 after you exit Q-Flash. Save BIOS to exit the Q-Flash utility. Press Esc and then Y button to Floppy EnteDr o: nR'tuTnurn Off P:oMwoevr eor...

Manual
Page 64
... system won't boot. IV. Selecting wrong model name will cause system unbooted. GA-946GM-DS2/S2 (rev. 2.0) Motherboard - 64 - Note: I , if it according to save the current BIOS version. In method I . Please note that motherboard's model name in @BIOSTM server, please go onto Gigabyte's web site for downloading and updating it shows two or more motherboard...
... system won't boot. IV. Selecting wrong model name will cause system unbooted. GA-946GM-DS2/S2 (rev. 2.0) Motherboard - 64 - Note: I , if it according to save the current BIOS version. In method I . Please note that motherboard's model name in @BIOSTM server, please go onto Gigabyte's web site for downloading and updating it shows two or more motherboard...
Manual
Page 70
...a small amount of electricity is the light of general asked questions based on a specific motherboard model, please log on to http://www.gigabyte.com.tw Question 1: I clear CMOS? Take out the battery gently and put it aside for 5 seconds). 4. Why? Answer: ... error 1 long 2 short: Monitor or display card error 1 long 3 short: Keyboard error 1 long 9 short: BIOS ROM error Continuous long beeps: DRAM error Continuous short beeps: Power error GA-946GM-DS2/S2 (rev. 2.0) Motherboard - 70 - English 4-2 Troubleshooting Below is still on -board battery to leak voltage to clear CMOS.
...a small amount of electricity is the light of general asked questions based on a specific motherboard model, please log on to http://www.gigabyte.com.tw Question 1: I clear CMOS? Take out the battery gently and put it aside for 5 seconds). 4. Why? Answer: ... error 1 long 2 short: Monitor or display card error 1 long 3 short: Keyboard error 1 long 9 short: BIOS ROM error Continuous long beeps: DRAM error Continuous short beeps: Power error GA-946GM-DS2/S2 (rev. 2.0) Motherboard - 70 - English 4-2 Troubleshooting Below is still on -board battery to leak voltage to clear CMOS.


