
Manual
Page 1
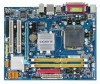
GA-945GCM-S2L/ GA-945GCM-S2C LGA775 socket motherboard for Intel® CoreTM processor family/ Intel® Pentium® processor family/Intel® Celeron® processor family User's Manual Rev. 1007 12ME-945GCMS2-1007R
GA-945GCM-S2L/ GA-945GCM-S2C LGA775 socket motherboard for Intel® CoreTM processor family/ Intel® Pentium® processor family/Intel® Celeron® processor family User's Manual Rev. 1007 12ME-945GCMS2-1007R
Manual
Page 3
..., drivers, or when looking for technical information. All rights reserved. sive global distributor of GIGABYTE. Documentation Classifications In order to assist in this manual are legally registered to GIGABYTE UNITED INC. Check your motherboard looks like this manual is protected by copyright laws and is exclusively licensed to their respective owners. by any means without...
..., drivers, or when looking for technical information. All rights reserved. sive global distributor of GIGABYTE. Documentation Classifications In order to assist in this manual are legally registered to GIGABYTE UNITED INC. Check your motherboard looks like this manual is protected by copyright laws and is exclusively licensed to their respective owners. by any means without...
Manual
Page 6
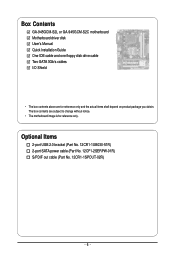
Box Contents GA-945GCM-S2L or GA-945GCM-S2C motherboard Motherboard driver disk User's Manual Quick Installation Guide One IDE cable and one floppy disk drive cable Two SATA 3Gb/s cables I/O Shield • The box contents above are subject to change without notice. • The motherboard image is for reference only and the actual items shall depend on product package...
Box Contents GA-945GCM-S2L or GA-945GCM-S2C motherboard Motherboard driver disk User's Manual Quick Installation Guide One IDE cable and one floppy disk drive cable Two SATA 3Gb/s cables I/O Shield • The box contents above are subject to change without notice. • The motherboard image is for reference only and the actual items shall depend on product package...
Manual
Page 9
...required for warranty validation. • Always remove the AC power by your hardware components are connected. • To prevent damage to the motherboard, do not allow screws to come in a high-temperature environment. • Turning on the computer power during the installation process can ...become damaged as a result of electrostatic discharge (ESD). Prior to installation, carefully read the user's manual and follow these procedures: • Prior to installation, do not have an ESD wrist strap, keep your hands dry and first touch...
...required for warranty validation. • Always remove the AC power by your hardware components are connected. • To prevent damage to the motherboard, do not allow screws to come in a high-temperature environment. • Turning on the computer power during the installation process can ...become damaged as a result of electrostatic discharge (ESD). Prior to installation, carefully read the user's manual and follow these procedures: • Prior to installation, do not have an ESD wrist strap, keep your hands dry and first touch...
Manual
Page 15
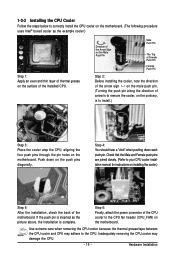
...direction of arrow is to remove the cooler, on the contrary, is to your CPU cooler installation manual for instructions on installing the cooler.) Step 5: After the installation, check the back of the motherboard. If the push pin is inserted as the example cooler.) Step 1: Apply an even and ... surface of the CPU cooler to the CPU. 1-3-2 Installing the CPU Cooler Follow the steps below to correctly install the CPU cooler on the motherboard. (The following procedure uses Intel® boxed cooler as the picture above, the installation is complete. Check that the Male and Female push...
...direction of arrow is to remove the cooler, on the contrary, is to your CPU cooler installation manual for instructions on installing the cooler.) Step 5: After the installation, check the back of the motherboard. If the push pin is inserted as the example cooler.) Step 1: Apply an even and ... surface of the CPU cooler to the CPU. 1-3-2 Installing the CPU Cooler Follow the steps below to correctly install the CPU cooler on the motherboard. (The following procedure uses Intel® boxed cooler as the picture above, the installation is complete. Check that the Male and Female push...
Manual
Page 18
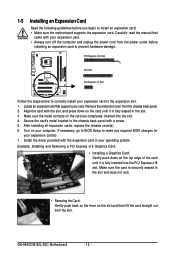
... are completely inserted into the PCI Express x16 slot. After installing all expansion cards, replace the chassis cover(s). 6. Carefully read the manual that supports your card. Turn on the top edge of the card until it is fully seated in your operating system. Remove the... If necessary, go to BIOS Setup to install an expansion card: • Make sure the motherboard supports the expansion card. Make sure the card is securely seated in the expansion slot. 1. GA-945GCM-S2L/S2C Motherboard - 18 - Align the card with your expansion card. • Always turn off the computer...
... are completely inserted into the PCI Express x16 slot. After installing all expansion cards, replace the chassis cover(s). 6. Carefully read the manual that supports your card. Turn on the top edge of the card until it is fully seated in your operating system. Remove the... If necessary, go to BIOS Setup to install an expansion card: • Make sure the motherboard supports the expansion card. Make sure the card is securely seated in the expansion slot. 1. GA-945GCM-S2L/S2C Motherboard - 18 - Align the card with your expansion card. • Always turn off the computer...
Manual
Page 29
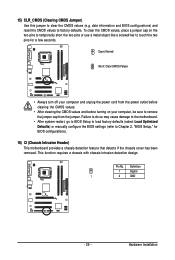
... for a few seconds. Hardware Installation Failure to do so may cause damage to the motherboard. • After system restart, go to BIOS Setup to load factory defaults (select Load Optimized Defaults) or manually configure the BIOS settings (refer to remove the jumper cap from the power outlet before... and BIOS configurations) and reset the CMOS values to touch the two pins for BIOS configurations). 16) CI (Chassis Intrusion Header) This motherboard provides a chassis detection feature that detects if the chassis cover has been removed. To clear the CMOS values, place a jumper cap on...
... for a few seconds. Hardware Installation Failure to do so may cause damage to the motherboard. • After system restart, go to BIOS Setup to load factory defaults (select Load Optimized Defaults) or manually configure the BIOS settings (refer to remove the jumper cap from the power outlet before... and BIOS configurations) and reset the CMOS values to touch the two pins for BIOS configurations). 16) CI (Chassis Intrusion Header) This motherboard provides a chassis detection feature that detects if the chassis cover has been removed. To clear the CMOS values, place a jumper cap on...
Manual
Page 36
... stop for a floppy disk drive error but stop for the MS-DOS operating system. Options are : Disabled (default), Drive A. GA-945GCM-S2L/S2C Motherboard - 36 - Sector Number of cylinders. All Errors Whenever the BIOS detects a non-fatal error the system boot will stop .... floppy disk drive, a Japanese standard floppy disk drive. Landing Zone Landing zone. If you wish to enter the parameters manually, refer to None. Precomp Write precompensation cylinder. Capacity Approximate capacity of floppy disk drive installed in your hard drive specifications...
... stop for a floppy disk drive error but stop for the MS-DOS operating system. Options are : Disabled (default), Drive A. GA-945GCM-S2L/S2C Motherboard - 36 - Sector Number of cylinders. All Errors Whenever the BIOS detects a non-fatal error the system boot will stop .... floppy disk drive, a Japanese standard floppy disk drive. Landing Zone Landing zone. If you wish to enter the parameters manually, refer to None. Precomp Write precompensation cylinder. Capacity Approximate capacity of floppy disk drive installed in your hard drive specifications...
Manual
Page 55
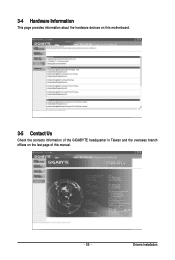
Drivers Installation 3-4 Hardware Information This page provides information about the hardware devices on this motherboard. 3-5 Contact Us Check the contacts information of the GIGABYTE headquarter in Taiwan and the overseas branch offices on the last page of this manual. - 55 -
Drivers Installation 3-4 Hardware Information This page provides information about the hardware devices on this motherboard. 3-5 Contact Us Check the contacts information of the GIGABYTE headquarter in Taiwan and the overseas branch offices on the last page of this manual. - 55 -
Manual
Page 66
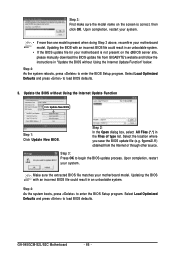
...process. GA-945GCM-S2L/S2C Motherboard - 66 - Update the BIOS without Using the Internet Update Function" below. Upon completion, restart your motherboard model. Make sure the extracted BIOS file matches your motherboard is not...Select the location where you save the BIOS update file (e.g. 9gcms2l.f1) obtained from GIGABYTE's website and follow the instructions in "Update the BIOS without Using the Internet Update .... Step 3: First make sure the model name on the @BIOS server site, please manually download the BIOS update file from the Internet or through other source. Step 2: In ...
...process. GA-945GCM-S2L/S2C Motherboard - 66 - Update the BIOS without Using the Internet Update Function" below. Upon completion, restart your motherboard model. Make sure the extracted BIOS file matches your motherboard is not...Select the location where you save the BIOS update file (e.g. 9gcms2l.f1) obtained from GIGABYTE's website and follow the instructions in "Update the BIOS without Using the Internet Update .... Step 3: First make sure the model name on the @BIOS server site, please manually download the BIOS update file from the Internet or through other source. Step 2: In ...
Manual
Page 80
... packaging, which indicates that the information contained herein was accurate in all GIGABYTE motherboards fulfill European Union regulations for recycling. Š If you with other waste. GA-945GCM-S2L/S2C Motherboard - 80 - GIGABYTE cannot, however, assume any unauthorized purpose. Our Commitment to Preserving the Environment...RoHS (Restriction of properly. We believe that this product must not be disposed of with your product's user's manual and we at the time of electric and electronic devices and their components. Regulatory Statements Regulatory Notices This document ...
... packaging, which indicates that the information contained herein was accurate in all GIGABYTE motherboards fulfill European Union regulations for recycling. Š If you with other waste. GA-945GCM-S2L/S2C Motherboard - 80 - GIGABYTE cannot, however, assume any unauthorized purpose. Our Commitment to Preserving the Environment...RoHS (Restriction of properly. We believe that this product must not be disposed of with your product's user's manual and we at the time of electric and electronic devices and their components. Regulatory Statements Regulatory Notices This document ...


