
Manual
Page 2
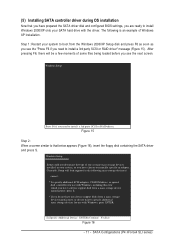
... Configure RAID set BIOS boot sequence for the connector. SATA Configurations (P4 nForce4 SLI series) - 2 - Before you begin Please prepare: (a) At least two SATA hard drives (to enter the submenu . Step 1: Turn on the IDE/SATAII RAID Config item to ensure optimal performance, it is enabled (Serial-ATAII1 controls the SATAII0/1 connectors and Serial-ATAII2 controls the SATAII2/3 connectors). In the example in RAID BIOS. (4) Make a floppy disk containing the SATA controller driver. (5) Install the SATA controller driver during POST (Power-On Self Test). Then connect the power...
... Configure RAID set BIOS boot sequence for the connector. SATA Configurations (P4 nForce4 SLI series) - 2 - Before you begin Please prepare: (a) At least two SATA hard drives (to enter the submenu . Step 1: Turn on the IDE/SATAII RAID Config item to ensure optimal performance, it is enabled (Serial-ATAII1 controls the SATAII0/1 connectors and Serial-ATAII2 controls the SATAII2/3 connectors). In the example in RAID BIOS. (4) Make a floppy disk containing the SATA controller driver. (5) Install the SATA controller driver during POST (Power-On Self Test). Then connect the power...

Manual
Page 9
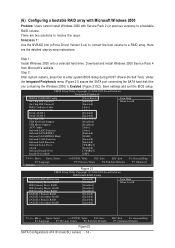
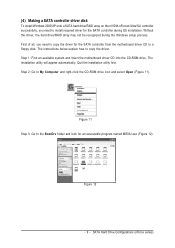
... to copy the driver for the SATA controller from the motherboard driver CD to a floppy disk. Quit the installation utility first. Figure 13 - 9 - Step 2: Go to the BootDrv folder and look for an executable program named MENU.exe (Figure 13). SATA Configurations (P4 nForce4 SLI series) Step 1: Find an available system and insert the motherboard driver CD into the CD-ROM drive. Without the driver, the hard drive/RAID array may not...
... to copy the driver for the SATA controller from the motherboard driver CD to a floppy disk. Quit the installation utility first. Figure 13 - 9 - Step 2: Go to the BootDrv folder and look for an executable program named MENU.exe (Figure 13). SATA Configurations (P4 nForce4 SLI series) Step 1: Find an available system and insert the motherboard driver CD into the CD-ROM drive. Without the driver, the hard drive/RAID array may not...
Manual
Page 11
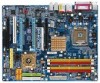
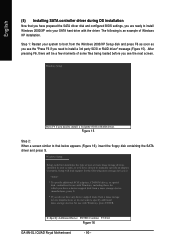
... prepared the SATA driver disk and configured BIOS settings, you are ready to manually specify an adapter. SATA Configurations (P4 nForce4 SLI series) Windows Setup Setup could not determine the type of Windows XP installation. Windows Setup Press F6 if you need to specify additional mass storage devices for use with Windows, including those for which you have chosen to install Windows 2000/XP onto your system, or you see the next screen. (5) Installing SATA controller driver during OS installation Now...
... prepared the SATA driver disk and configured BIOS settings, you are ready to manually specify an adapter. SATA Configurations (P4 nForce4 SLI series) Windows Setup Setup could not determine the type of Windows XP installation. Windows Setup Press F6 if you need to specify additional mass storage devices for use with Windows, including those for which you have chosen to install Windows 2000/XP onto your system, or you see the next screen. (5) Installing SATA controller driver during OS installation Now...
Manual
Page 14
CMOS Setup Utility-Copyright (C) 1984-2005 Award Software Integrated Peripherals IDE/SATAII RAID Config On-Chip IDE Channel0 On-Chip IDE Channel1 IDE1 Conductor Cable IDE2 Conductor Cable Serial-ATAII 1 Serial-ATAII 2 On-Chip USB USB Keyboard Support USB Mouse Support AC97 Audio Onboard LAN2 Function Onboard SATAII/IDE3 Onboard SATAII/IDE3 Mode Onboard 1394b Function Onboard LAN Function Onboard Serial Port 1 i-Lock Onboard Parallel Port Parallel Port Mode [Press Enter] [Enabled] [Enabled] [Auto] [Auto] [Enabled] [Enabled] [V1.1+V2.0] [Disabled] [Disabled] [Auto] [Auto] [E n a b l e...
CMOS Setup Utility-Copyright (C) 1984-2005 Award Software Integrated Peripherals IDE/SATAII RAID Config On-Chip IDE Channel0 On-Chip IDE Channel1 IDE1 Conductor Cable IDE2 Conductor Cable Serial-ATAII 1 Serial-ATAII 2 On-Chip USB USB Keyboard Support USB Mouse Support AC97 Audio Onboard LAN2 Function Onboard SATAII/IDE3 Onboard SATAII/IDE3 Mode Onboard 1394b Function Onboard LAN Function Onboard Serial Port 1 i-Lock Onboard Parallel Port Parallel Port Mode [Press Enter] [Enabled] [Enabled] [Auto] [Auto] [Enabled] [Enabled] [V1.1+V2.0] [Disabled] [Disabled] [Auto] [Auto] [E n a b l e...

Manual
Page 3
... hard drive(s)/RAID array. SATA Hard Drive Configurations (nForce series) CMOS Setup Utility-Copyright (C) 1984-2005 Award Software Integrated Peripherals On-Chip IDE Channel0 On-Chip IDE Channel1 IDE DMA transfer access On-Chip MAC Lan On-Chip LAN BOOT ROM IDE/SATA RAID function IDE Primary Master RAID IDE Primary Slave RAID IDE Secndry Master RAID IDE Secndry Slave RAID Serial-ATA 1 SATA 1 Primary RAID SATA 1 Secondary RAID Serial-ATA 2 SATA 2 Primary RAID SATA 2 Secondary RAID IDE Prefetch Mode On-Chip USB USB Memory Type [Enabled] [Enabled] [Enabled] [Auto] [Disabled] [Enabled] [Disabled...
... hard drive(s)/RAID array. SATA Hard Drive Configurations (nForce series) CMOS Setup Utility-Copyright (C) 1984-2005 Award Software Integrated Peripherals On-Chip IDE Channel0 On-Chip IDE Channel1 IDE DMA transfer access On-Chip MAC Lan On-Chip LAN BOOT ROM IDE/SATA RAID function IDE Primary Master RAID IDE Primary Slave RAID IDE Secndry Master RAID IDE Secndry Slave RAID Serial-ATA 1 SATA 1 Primary RAID SATA 1 Secondary RAID Serial-ATA 2 SATA 2 Primary RAID SATA 2 Secondary RAID IDE Prefetch Mode On-Chip USB USB Memory Type [Enabled] [Enabled] [Enabled] [Auto] [Disabled] [Enabled] [Disabled...
Manual
Page 9
... the motherboard driver CD into the CD-ROM drive. First of all, you need to copy the driver for an executable program named MENU.exe (Figure 12). Figure 12 - 9 - (4) Making a SATA controller driver disk To install Windows 2000/XP onto a SATA hard drive/RAID array on the nVIDIA nForce4 Ultra/SLI controller successfully, you need to install required driver for the SATA controller during the Windows setup process. SATA Hard Drive Configurations (nForce series) Quit the installation utility first. The installation utility will...
... the motherboard driver CD into the CD-ROM drive. First of all, you need to copy the driver for an executable program named MENU.exe (Figure 12). Figure 12 - 9 - (4) Making a SATA controller driver disk To install Windows 2000/XP onto a SATA hard drive/RAID array on the nVIDIA nForce4 Ultra/SLI controller successfully, you need to install required driver for the SATA controller during the Windows setup process. SATA Hard Drive Configurations (nForce series) Quit the installation utility first. The installation utility will...

Manual
Page 11
... not have a device support disk from the Windows 2000/XP Setup disk and press F6 as soon as you see the next screen. SATA Hard Drive Configurations (nForce series) Windows Setup Setup could not determine the type of some files being loaded before you are ready to install a 3rd party SCSI or RAID driver" message (Figure 14). (5) Installing SATA controller driver during OS installation Now that below appears (Figure 15), insert the floppy disk containing the SATA driver and press...
... not have a device support disk from the Windows 2000/XP Setup disk and press F6 as soon as you see the next screen. SATA Hard Drive Configurations (nForce series) Windows Setup Setup could not determine the type of some files being loaded before you are ready to install a 3rd party SCSI or RAID driver" message (Figure 14). (5) Installing SATA controller driver during OS installation Now that below appears (Figure 15), insert the floppy disk containing the SATA driver and press...
Manual
Page 14
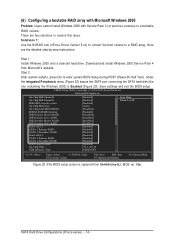
... Step 1: Install Windows 2000 onto a selected hard drive. CMOS Setup Utility-Copyright (C) 1984-2005 Award Software Integrated Peripherals On-Chip IDE Channel0 On-Chip IDE Channel1 IDE DMA transfer access On-Chip MAC Lan On-Chip LAN BOOT ROM IDE/SATA RAID function IDE Primary Master RAID IDE Primary Slave RAID IDE Secndry Master RAID IDE Secndry Slave RAID Serial-ATA 1 SATA 1 Primary RAID SATA 1 Secondary RAID Serial-ATA 2 SATA 2 Primary RAID SATA 2 Secondary RAID IDE Prefetch Mode On-Chip USB USB Memory Type [Enabled] [Enabled] [Enabled] [Auto] [Disabled] [Enabled] [Disabled] [Disabled...
... Step 1: Install Windows 2000 onto a selected hard drive. CMOS Setup Utility-Copyright (C) 1984-2005 Award Software Integrated Peripherals On-Chip IDE Channel0 On-Chip IDE Channel1 IDE DMA transfer access On-Chip MAC Lan On-Chip LAN BOOT ROM IDE/SATA RAID function IDE Primary Master RAID IDE Primary Slave RAID IDE Secndry Master RAID IDE Secndry Slave RAID Serial-ATA 1 SATA 1 Primary RAID SATA 1 Secondary RAID Serial-ATA 2 SATA 2 Primary RAID SATA 2 Secondary RAID IDE Prefetch Mode On-Chip USB USB Memory Type [Enabled] [Enabled] [Enabled] [Auto] [Disabled] [Enabled] [Disabled] [Disabled...
Manual
Page 11
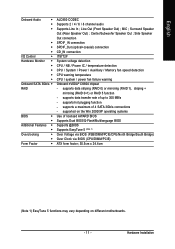
...+coaxial) connection CD_IN connection IT8712F System voltage detection CPU / NB / Power IC / temperature detection CPU / System / Power / Auxilliary / Memory fan speed detection CPU warning temperature CPU / system / power fan failure warning Onboard nVIDIA® CK804 chipset - Surround Speaker Out (Rear Speaker Out) ; supported on the Win 2000/XP operating systems Use of licensed AWARD BIOS Supports Dual BIOS/Q-Flash/Multilanguage BIOS Supports @BIOS Supports EasyTune 5 (Note 1) Over Voltage via BIOS (FSB/DIMM/PCIE/CPU/North Bridge/South Bridge) Over Clock via BIOS (CPU/DIMM/PCIE) ATX form...
...+coaxial) connection CD_IN connection IT8712F System voltage detection CPU / NB / Power IC / temperature detection CPU / System / Power / Auxilliary / Memory fan speed detection CPU warning temperature CPU / system / power fan failure warning Onboard nVIDIA® CK804 chipset - Surround Speaker Out (Rear Speaker Out) ; supported on the Win 2000/XP operating systems Use of licensed AWARD BIOS Supports Dual BIOS/Q-Flash/Multilanguage BIOS Supports @BIOS Supports EasyTune 5 (Note 1) Over Voltage via BIOS (FSB/DIMM/PCIE/CPU/North Bridge/South Bridge) Over Clock via BIOS (CPU/DIMM/PCIE) ATX form...
Manual
Page 14
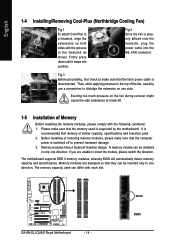
... side. GA-8N-SLI QUAD Royal Motherboard - 14 - Firmly press down until it snaps into the NB_FAN connector. Fig.2 Once the fan is disconnected. Fig.3 Before proceeding, first check to break-off to dislodge the extension on both sides with each slot. Before installing or removing memory modules, please make sure that the fan's power cable is properly affixed onto the heatsink, plug the power cable into position. Memory modules...
... side. GA-8N-SLI QUAD Royal Motherboard - 14 - Firmly press down until it snaps into the NB_FAN connector. Fig.2 Once the fan is disconnected. Fig.3 Before proceeding, first check to break-off to dislodge the extension on both sides with each slot. Before installing or removing memory modules, please make sure that the fan's power cable is properly affixed onto the heatsink, plug the power cable into position. Memory modules...
Manual
Page 15
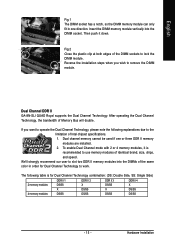
... work. Dual Channel DDR II GA-8N-SLI QUAD Royal supports the Dual Channel Technology. Fig.2 Close the plastic clip at both edges of the DIMM sockets to remove the DIMM module. After operating the Dual Channel Technology, the bandwidth of the same color in one or three DDR II memory modules are installed. 2. To enable Dual Channel mode with 2 or 4 memory modules, it down. Then push it is for Dual Channel Technology to use memory modules of Intel chipset specifications...
... work. Dual Channel DDR II GA-8N-SLI QUAD Royal supports the Dual Channel Technology. Fig.2 Close the plastic clip at both edges of the DIMM sockets to remove the DIMM module. After operating the Dual Channel Technology, the bandwidth of the same color in one or three DDR II memory modules are installed. 2. To enable Dual Channel mode with 2 or 4 memory modules, it down. Then push it is for Dual Channel Technology to use memory modules of Intel chipset specifications...
Manual
Page 17
... system configurations. We recommend a power supply that case, both of the PCIE x 16 slots will depend on two sides. English 1-7 Setup of the GC-SLISW-C19 module.) GC-SLISW-3D1 We do not recommend removing the SLI switch module (GC-SLISW-C19 or GC-SLISW3D1) from the motherboard because in the SLI switch module socket by the NVIDIA SLI technology. Note: As the SLI on the GA-8N-SLI QUAD Royal motherboard. 1-7-1 Before...
... system configurations. We recommend a power supply that case, both of the PCIE x 16 slots will depend on two sides. English 1-7 Setup of the GC-SLISW-C19 module.) GC-SLISW-3D1 We do not recommend removing the SLI switch module (GC-SLISW-C19 or GC-SLISW3D1) from the motherboard because in the SLI switch module socket by the NVIDIA SLI technology. Note: As the SLI on the GA-8N-SLI QUAD Royal motherboard. 1-7-1 Before...
Manual
Page 20
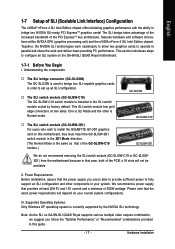
...) nVidia (x8) GC-SLISW-C19 YES (SLl Mode) Combination 3 nVidia (x8) nVidia (x8) Don't Care YES Note 1. Graphic cards not listed below are not supported by this M/B. English 1-7-2 Combination of SLI Applications Please make sure the BIOS settings and graphics cards conforms to the following conditions, to page 55). Condition 2: Set PCIex16 Slot Lanes to "Auto" in BIOS setup. (Please refer to enable the SLI function. GA-8N-SLI QUAD Royal Motherboard - 20 -
...) nVidia (x8) GC-SLISW-C19 YES (SLl Mode) Combination 3 nVidia (x8) nVidia (x8) Don't Care YES Note 1. Graphic cards not listed below are not supported by this M/B. English 1-7-2 Combination of SLI Applications Please make sure the BIOS settings and graphics cards conforms to the following conditions, to page 55). Condition 2: Set PCIex16 Slot Lanes to "Auto" in BIOS setup. (Please refer to enable the SLI function. GA-8N-SLI QUAD Royal Motherboard - 20 -

Manual
Page 22
... configurations. With Multi View technology from GIGABYTE, Quad Graphic enabled motherboards offer multiple display support on up to spread multiple windows over eight monitors and view them to eight separate monitors. You need a power supply that supplies 500W (or above) and 25A (or above) +12V current. II. GA-8N-SLI QUAD Royal Motherboard - 22 - English 1-8 Configuring a Multi View System This function is supported only on your system and the two graphics cards. Power requirement: The exact power...
... configurations. With Multi View technology from GIGABYTE, Quad Graphic enabled motherboards offer multiple display support on up to spread multiple windows over eight monitors and view them to eight separate monitors. You need a power supply that supplies 500W (or above) and 25A (or above) +12V current. II. GA-8N-SLI QUAD Royal Motherboard - 22 - English 1-8 Configuring a Multi View System This function is supported only on your system and the two graphics cards. Power requirement: The exact power...

Manual
Page 24
... keyboard to this connector. Line In Devices like CD-ROM, walkman etc. USB port Before you connect your device(s) into USB connector(s), please make sureyour OS supports USB controller. COAXIAL (SPDIF_RCA) The SPDIF coaxial output port is capable of providing digital audio to external speakers or com pressed AC3 data to MIC In jack. MIC In Microphone can be connected to an external Dolby Digital Decoder via a coaxial cable. GA-8N-SLI QUAD Royal Motherboard...
... keyboard to this connector. Line In Devices like CD-ROM, walkman etc. USB port Before you connect your device(s) into USB connector(s), please make sureyour OS supports USB controller. COAXIAL (SPDIF_RCA) The SPDIF coaxial output port is capable of providing digital audio to external speakers or com pressed AC3 data to MIC In jack. MIC In Microphone can be connected to an external Dolby Digital Decoder via a coaxial cable. GA-8N-SLI QUAD Royal Motherboard...

Manual
Page 65
... as well as displaying a detailed list of all platform performance settings into different modes within BIOS setup in order to change system settings such as providing the most up the PC chassis and short-circuit the "Clear CMOS" pins or the battery on the original M.I.B., the new Memory Intelligent Booster 2 (M.I .T.) allows user to factory default settings. and @BIOS at the same time.) - 65 - automatically resets the overclocked system settings back to their...
... as well as displaying a detailed list of all platform performance settings into different modes within BIOS setup in order to change system settings such as providing the most up the PC chassis and short-circuit the "Clear CMOS" pins or the battery on the original M.I.B., the new Memory Intelligent Booster 2 (M.I .T.) allows user to factory default settings. and @BIOS at the same time.) - 65 - automatically resets the overclocked system settings back to their...

Manual
Page 72
...the boot screen to enter the Dual BIOS/Q-Flash utility. CMOS Setup Utility-Copyright (C) 1984-2004 Award Software ` Standard CMOS Features ` Advanced BIOS Features ` Integrated Peripherals ` Power Management Setup ` PnP/PCI Configurations ` PC Health Status ` MB Intelligent Tweaker(M.I.T.) ESC: Quit F8: Dual BIOS/Q-Flash Select Language Load Fail-Safe Defaults Load Optimized Defaults Set Supervisor Password Set User Password Save & Exit Setup Exit Without Saving F3: Change Language F10: Save & Exit Setup Time, Date, Hard Disk Type... GA-8N-SLI QUAD Royal Motherboard - 72 - Task menu for...
...the boot screen to enter the Dual BIOS/Q-Flash utility. CMOS Setup Utility-Copyright (C) 1984-2004 Award Software ` Standard CMOS Features ` Advanced BIOS Features ` Integrated Peripherals ` Power Management Setup ` PnP/PCI Configurations ` PC Health Status ` MB Intelligent Tweaker(M.I.T.) ESC: Quit F8: Dual BIOS/Q-Flash Select Language Load Fail-Safe Defaults Load Optimized Defaults Set Supervisor Password Set User Password Save & Exit Setup Exit Without Saving F3: Change Language F10: Save & Exit Setup Time, Date, Hard Disk Type... GA-8N-SLI QUAD Royal Motherboard - 72 - Task menu for...
Manual
Page 78
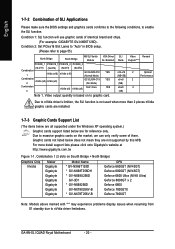
... automatically download and update the BIOS. Do not click "Internet Update" icon b. e. Update BIOS through Internet: a. Select the desired @BIOS server Click "3" Click "Update New BIOS" 1. Click "Update New BIOS" c. Fig 1. Installing the @BIOS utility Fig 2. Methods and steps: I. Click "Update New BIOS" icon c. Select the exact model name on your motherboard e. II. Please search for BIOS unzip file, downloading from internet or any other methods (such as: 8NSLIQ.F1). GA-8N-SLI QUAD Royal Motherboard - 78...
... automatically download and update the BIOS. Do not click "Internet Update" icon b. e. Update BIOS through Internet: a. Select the desired @BIOS server Click "3" Click "Update New BIOS" 1. Click "Update New BIOS" c. Fig 1. Installing the @BIOS utility Fig 2. Methods and steps: I. Click "Update New BIOS" icon c. Select the exact model name on your motherboard e. II. Please search for BIOS unzip file, downloading from internet or any other methods (such as: 8NSLIQ.F1). GA-8N-SLI QUAD Royal Motherboard - 78...
Manual
Page 90
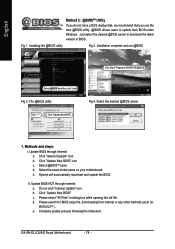
... will load support for the following is an example of some files being loaded before you need to install a 3rd party SCSI or RAID driver. Step 1: Restart your SATA hard drive with Windows, press ENTER. Currently, Setup will be a few moments of Windows XP installation. S=Specify Additional Device ENTER=Continue F3=Exit Figure 16 GA-8N-SLI QUAD Royal Motherboard - 90 - The following mass storage devices(s) * To specify additional SCSI adapters, CD-ROM drives, or special disk controllers for use...
... will load support for the following is an example of some files being loaded before you need to install a 3rd party SCSI or RAID driver. Step 1: Restart your SATA hard drive with Windows, press ENTER. Currently, Setup will be a few moments of Windows XP installation. S=Specify Additional Device ENTER=Continue F3=Exit Figure 16 GA-8N-SLI QUAD Royal Motherboard - 90 - The following mass storage devices(s) * To specify additional SCSI adapters, CD-ROM drives, or special disk controllers for use...
Manual
Page 100
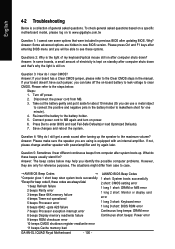
... Codes AWARD BIOS Beep Codes *Computer gives 1 short beep when system boots successfully. 1 short: System boots successfully *Except for ? Answer: Please make sure the speaker you are hidden in the manual. gate A20 failure 1 long 9 short: BIOS ROM error 7 beeps Processor exception interrupt error Continuous long beeps: DRAM error 8 beeps Display memory read/write failure Continuous short beeps: Power error 9 beeps ROM checksum error 10 beeps CMOS shutdown register read/write error 11 beeps Cache memory bad GA-8N-SLI QUAD Royal Motherboard - 100 - English 4-2 Troubleshooting...
... Codes AWARD BIOS Beep Codes *Computer gives 1 short beep when system boots successfully. 1 short: System boots successfully *Except for ? Answer: Please make sure the speaker you are hidden in the manual. gate A20 failure 1 long 9 short: BIOS ROM error 7 beeps Processor exception interrupt error Continuous long beeps: DRAM error 8 beeps Display memory read/write failure Continuous short beeps: Power error 9 beeps ROM checksum error 10 beeps CMOS shutdown register read/write error 11 beeps Cache memory bad GA-8N-SLI QUAD Royal Motherboard - 100 - English 4-2 Troubleshooting...


