
Manual
Page 2
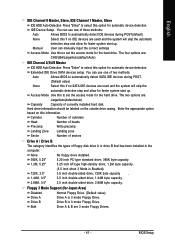
... (Serial-ATAII1 controls the SATAII0/1 connectors and Serial-ATAII2 controls the SATAII2/3 connectors). Ác Configuring SATA Hard Drive(s) (Controller: nVIDIA nForce4 SLI) Åé ¤¤ ¤å To configure SATA hard drive(s), follow the steps below: (1) Install SATA hard drive(s) in...Configure RAID set BIOS boot sequence for the SATA hard drive(s)/RAID array. SATA Configurations (P4 nForce4 SLI series) - 2 - Before you may refer to the motherboard user's manual to available SATA port(s) on the IDE/SATAII RAID Config item to make sure that Serial-ATAII ...
... (Serial-ATAII1 controls the SATAII0/1 connectors and Serial-ATAII2 controls the SATAII2/3 connectors). Ác Configuring SATA Hard Drive(s) (Controller: nVIDIA nForce4 SLI) Åé ¤¤ ¤å To configure SATA hard drive(s), follow the steps below: (1) Install SATA hard drive(s) in...Configure RAID set BIOS boot sequence for the SATA hard drive(s)/RAID array. SATA Configurations (P4 nForce4 SLI series) - 2 - Before you may refer to the motherboard user's manual to available SATA port(s) on the IDE/SATAII RAID Config item to make sure that Serial-ATAII ...
Manual
Page 6
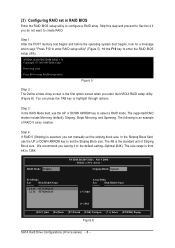
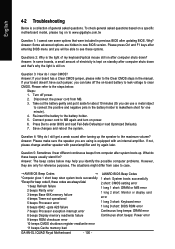
... Loc Disk Model Name [g] Add [f ] Del [ESC] Quit [F6] Back [F7] Finish [TAB] Navigate [hi] Select [ENTER] Popup Figure 7 SATA Configurations (P4 nForce4 SLI series) - 6 - Step 3: In the RAID Mode field, use the UP or DOWN ARROW key to select a RAID mode. The size range is the standard unit... of RAID 0 array creation. Figure 6 Step 2 The Define a New Array screen is an example of Striping Block size. You can manually set the Striping Block size. In the Striping Block field, use the UP or DOWN ARROW key to set the striping block size. Skip this...
... Loc Disk Model Name [g] Add [f ] Del [ESC] Quit [F6] Back [F7] Finish [TAB] Navigate [hi] Select [ENTER] Popup Figure 7 SATA Configurations (P4 nForce4 SLI series) - 6 - Step 3: In the RAID Mode field, use the UP or DOWN ARROW key to select a RAID mode. The size range is the standard unit... of RAID 0 array creation. Figure 6 Step 2 The Define a New Array screen is an example of Striping Block size. You can manually set the Striping Block size. In the Striping Block field, use the UP or DOWN ARROW key to set the striping block size. Skip this...
Manual
Page 11
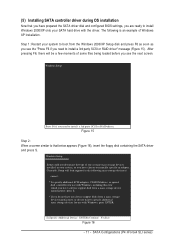
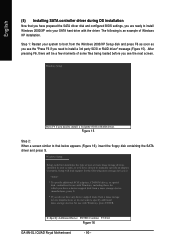
...device support disks from the Windows 2000/XP Setup disk and press F6 as soon as you see the next screen. SATA Configurations (P4 nForce4 SLI series) Windows Setup Setup could not determine the type of one or more mass storage devices installed in your system, or you see the "... a 3rd party SCSI or RAID driver. S=Specify Additional Device ENTER=Continue F3=Exit Figure 16 - 11 - Windows Setup Press F6 if you need to manually specify an adapter. Step 1: Restart your SATA hard drive with Windows, press ENTER. Currently, Setup will be a few moments of Windows XP installation.
...device support disks from the Windows 2000/XP Setup disk and press F6 as soon as you see the next screen. SATA Configurations (P4 nForce4 SLI series) Windows Setup Setup could not determine the type of one or more mass storage devices installed in your system, or you see the "... a 3rd party SCSI or RAID driver. S=Specify Additional Device ENTER=Continue F3=Exit Figure 16 - 11 - Windows Setup Press F6 if you need to manually specify an adapter. Step 1: Restart your SATA hard drive with Windows, press ENTER. Currently, Setup will be a few moments of Windows XP installation.
Manual
Page 6
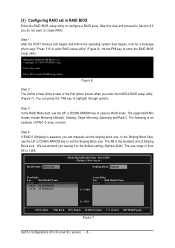
... RAID setup utility. (Figure 6). Ác (3) Configuring RAID set in RAID BIOS Åé Enter the RAID BIOS setup utility to highlight through options. You can manually set the Striping Block size. The KB is an example of Striping Block size. Press F10 to the default setting--Optimal (64K). We recommend you...
... RAID setup utility. (Figure 6). Ác (3) Configuring RAID set in RAID BIOS Åé Enter the RAID BIOS setup utility to highlight through options. You can manually set the Striping Block size. The KB is an example of Striping Block size. Press F10 to the default setting--Optimal (64K). We recommend you...

Manual
Page 11
... system, or you see the "Press F6 if you do not have prepared the SATA driver disk and configured BIOS settings, you are ready to manually specify an adapter. Currently, Setup will be a few moments of some files being loaded before you have chosen to install Windows 2000/XP onto your...
... system, or you see the "Press F6 if you do not have prepared the SATA driver disk and configured BIOS settings, you are ready to manually specify an adapter. Currently, Setup will be a few moments of some files being loaded before you have chosen to install Windows 2000/XP onto your...
Manual
Page 1
GA-8N-SLI QUAD Royal Intel® Pentium® Processor Extreme Edition Intel® Pentium® D / Pentium® 4 LGA775 Processor Motherboard User's Manual Rev. 1002 12ME-8NSLIQU-1002R * The WEEE marking on the product indicates this product must not be disposed of with user's other household waste and must be handed over to a designated collection point for the recycling of waste electrical and electronic equipment!! * The WEEE marking applies only in European Union's member states.
GA-8N-SLI QUAD Royal Intel® Pentium® Processor Extreme Edition Intel® Pentium® D / Pentium® 4 LGA775 Processor Motherboard User's Manual Rev. 1002 12ME-8NSLIQU-1002R * The WEEE marking on the product indicates this product must not be disposed of with user's other household waste and must be handed over to a designated collection point for the recycling of waste electrical and electronic equipment!! * The WEEE marking applies only in European Union's member states.

Manual
Page 3
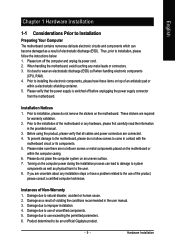
... written content provided with the product. „ For detailed product information and specifications, please carefully read the "Product User Manual". „ For detailed information related to Gigabyte's unique features, please go to "Technology Guide" section on Gigabyte's website to change without Gigabyte's prior written permission. Copyright © 2005 GIGA-BYTE TECHNOLOGY CO., LTD. Product...
... written content provided with the product. „ For detailed product information and specifications, please carefully read the "Product User Manual". „ For detailed information related to Gigabyte's unique features, please go to "Technology Guide" section on Gigabyte's website to change without Gigabyte's prior written permission. Copyright © 2005 GIGA-BYTE TECHNOLOGY CO., LTD. Product...
Manual
Page 9
...the computer and unplug its components. 5. Before using the product, please verify that the power supply is best to be an unofficial Gigabyte product. - 9 - Turning on the computer power during the installation process can become damaged as a result of electrostatic discharge (ESD... prior to installing the electronic components, please have a problem related to the installation of violating the conditions recommended in the provided manual. 3. When handling the motherboard, avoid touching any installation steps or have these items on top of uncertified components. 5. Prior to...
...the computer and unplug its components. 5. Before using the product, please verify that the power supply is best to be an unofficial Gigabyte product. - 9 - Turning on the computer power during the installation process can become damaged as a result of electrostatic discharge (ESD... prior to installing the electronic components, please have a problem related to the installation of violating the conditions recommended in the provided manual. 3. When handling the motherboard, avoid touching any installation steps or have these items on top of uncertified components. 5. Prior to...
Manual
Page 13
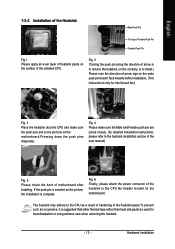
... that either thermal tape rather than heat sink paste be used for detailed installation instructions, please refer to the heatsink installation section of the user manual) Fig. 5 Please check the back of motherboard after installing. Hardware Installation Fig. 4 Please make sure the push pins aim to the pin hole on the...
... that either thermal tape rather than heat sink paste be used for detailed installation instructions, please refer to the heatsink installation section of the user manual) Fig. 5 Please check the back of motherboard after installing. Hardware Installation Fig. 4 Please make sure the push pins aim to the pin hole on the...
Manual
Page 41
Manual User can manually input the correct settings Access Mode Use this to set the access mode for automatic device detection. Drive A & B are used and the system will skip ...
Manual User can manually input the correct settings Access Mode Use this to set the access mode for automatic device detection. Drive A & B are used and the system will skip ...
Manual
Page 54
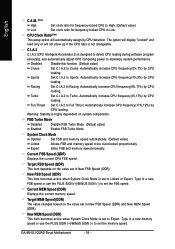
...on the value set the FSB speed. Automatically increase CPU frequency(7%,9%) by CPU Turbo loading. Racing Set C.I .A.2 to Sports. Enter FSB and memory speed manually. Full Thrust Set C.I .A.2 to set in New FSB Speed (QDR) and New MEM Speed (DDR). English C.A.M. (Note) High Set clock ratio ... a new memory speed or use the PLUS SIGN (+)/MINUS SIGN (-) to Racing. Current MEM Speed (DDR) Displays the current memory speed. GA-8N-SLI QUAD Royal Motherboard - 54 - CPU Clock Ratio(Note) This setup option will not show up if the CPU ratio is set in New FSB Speed (QDR)....
...on the value set the FSB speed. Automatically increase CPU frequency(7%,9%) by CPU Turbo loading. Racing Set C.I .A.2 to Sports. Enter FSB and memory speed manually. Full Thrust Set C.I .A.2 to set in New FSB Speed (QDR) and New MEM Speed (DDR). English C.A.M. (Note) High Set clock ratio ... a new memory speed or use the PLUS SIGN (+)/MINUS SIGN (-) to Racing. Current MEM Speed (DDR) Displays the current memory speed. GA-8N-SLI QUAD Royal Motherboard - 54 - CPU Clock Ratio(Note) This setup option will not show up if the CPU ratio is set in New FSB Speed (QDR)....
Manual
Page 81
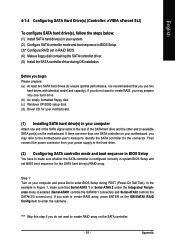
...- 81 - "*" Skip this step if you do not want to create RAID array on your motherboard, you may refer to the motherboard user's manual to enter BIOS Setup during OS installation. Appendix If there are more than one end of the SATA signal cable to the rear of the... sequence in BIOS Setup You have to make sure that you wish to enter the submenu . English 4-1-4 Configuring SATA Hard Drive(s) (Controller: nVIDIA nForce4 SLI) To configure SATA hard drive(s), follow the steps below: (1) Install SATA hard drive(s) in your system. (2) Configure SATA controller mode and boot sequence...
...- 81 - "*" Skip this step if you do not want to create RAID array on your motherboard, you may refer to the motherboard user's manual to enter BIOS Setup during OS installation. Appendix If there are more than one end of the SATA signal cable to the rear of the... sequence in BIOS Setup You have to make sure that you wish to enter the submenu . English 4-1-4 Configuring SATA Hard Drive(s) (Controller: nVIDIA nForce4 SLI) To configure SATA hard drive(s), follow the steps below: (1) Install SATA hard drive(s) in your system. (2) Configure SATA controller mode and boot sequence...

Manual
Page 85
... to create RAID. Figure 6 Step 2: The Define a New Array screen is selected, you do not want to enter the RAID BIOS setup utility. You can manually set the striping block size. The supported RAID modes include Mirroring (default), Striping, Stripe Mirroring, Spanning and Raid 5. The size range is from 4K to...
... to create RAID. Figure 6 Step 2: The Define a New Array screen is selected, you do not want to enter the RAID BIOS setup utility. You can manually set the striping block size. The supported RAID modes include Mirroring (default), Striping, Stripe Mirroring, Spanning and Raid 5. The size range is from 4K to...
Manual
Page 90
... be a few moments of Windows XP installation. S=Specify Additional Device ENTER=Continue F3=Exit Figure 16 GA-8N-SLI QUAD Royal Motherboard - 90 - Windows Setup Press F6 if you see the "Press F6 if you are ready to manually specify an adapter. After pressing F6, there will load support for use with Windows, including those for...
... be a few moments of Windows XP installation. S=Specify Additional Device ENTER=Continue F3=Exit Figure 16 GA-8N-SLI QUAD Royal Motherboard - 90 - Windows Setup Press F6 if you see the "Press F6 if you are ready to manually specify an adapter. After pressing F6, there will load support for use with Windows, including those for...
Manual
Page 100
...- If your board has a Clear CMOS jumper, please refer to the Clear CMOS steps in the battery holder to www.gigabyte.com.tw Question 1: I clear CMOS? Turn off the on-board battery to leak voltage to clear CMOS. Take out the... your board doesn't have such jumper, you can use a metal object to connect the positive and negative pins in the manual. Please refer to case. Disconnect the power cord from case to the steps below may help you are only for one ... error 10 beeps CMOS shutdown register read/write error 11 beeps Cache memory bad GA-8N-SLI QUAD Royal Motherboard - 100 -
...- If your board has a Clear CMOS jumper, please refer to the Clear CMOS steps in the battery holder to www.gigabyte.com.tw Question 1: I clear CMOS? Turn off the on-board battery to leak voltage to clear CMOS. Take out the... your board doesn't have such jumper, you can use a metal object to connect the positive and negative pins in the manual. Please refer to case. Disconnect the power cord from case to the steps below may help you are only for one ... error 10 beeps CMOS shutdown register read/write error 11 beeps Cache memory bad GA-8N-SLI QUAD Royal Motherboard - 100 -


