Manual
Page 4
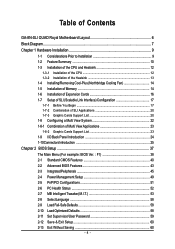
Table of Contents GA-8N-SLI QUAD Royal Motherboard Layout 6 Block Diagram ...7 Chapter 1 Hardware Installation 9 1-1 Considerations Prior to Installation 9 1-2 Feature Summary 10 1-3 Installation of the CPU and Heatsink 12 1-3-1... Cool-Plus (Northbridge Cooling Fan 14 1-5 Installation of Memory 14 1-6 Installation of Expansion Cards 16 1-7 Setup of SLI (Scalable Link Interface) Configuration 17 1-7-1 Before You Begin 17 1-7-2 Combination of SLI Applications 20 1-7-3 Graphic Cards Support List 20 1-8 Configuring a Multi View System 22 1-8-1 Combination of Multi View Applications...
Table of Contents GA-8N-SLI QUAD Royal Motherboard Layout 6 Block Diagram ...7 Chapter 1 Hardware Installation 9 1-1 Considerations Prior to Installation 9 1-2 Feature Summary 10 1-3 Installation of the CPU and Heatsink 12 1-3-1... Cool-Plus (Northbridge Cooling Fan 14 1-5 Installation of Memory 14 1-6 Installation of Expansion Cards 16 1-7 Setup of SLI (Scalable Link Interface) Configuration 17 1-7-1 Before You Begin 17 1-7-2 Combination of SLI Applications 20 1-7-3 Graphic Cards Support List 20 1-8 Configuring a Multi View System 22 1-8-1 Combination of Multi View Applications...
Manual
Page 6
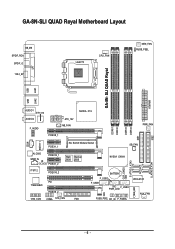
... C19 PWR_FAN CD_IN 88E1111 PCIEX1_1 SLI Switch Module Socket SB_FAN S_ATA0 S_ATA1 ALC850 SPDIF_IN IR IT8712 PCIEX16_1 PCIEX1_2 PCIEX16_2 Main Backup BIOS BIOS PCI TSB43AB23 PCIEX8_2 1394_CON COMA SYS_FAN FDD NVIDIA CK804 CLR_CMOS S_ATA2 S_ATA3 BATTERY F_USB2 F_USB1 PWR_LED F_USB3 FUSB_PSEL RF_ID F_PANEL 7_SEG_LED W83L951F AUX_FAN - 6 - GA-8N-SLI QUAD Royal Motherboard Layout KB_MS SPDIF_RCA SPDIF_O 1394_6P...
... C19 PWR_FAN CD_IN 88E1111 PCIEX1_1 SLI Switch Module Socket SB_FAN S_ATA0 S_ATA1 ALC850 SPDIF_IN IR IT8712 PCIEX16_1 PCIEX1_2 PCIEX16_2 Main Backup BIOS BIOS PCI TSB43AB23 PCIEX8_2 1394_CON COMA SYS_FAN FDD NVIDIA CK804 CLR_CMOS S_ATA2 S_ATA3 BATTERY F_USB2 F_USB1 PWR_LED F_USB3 FUSB_PSEL RF_ID F_PANEL 7_SEG_LED W83L951F AUX_FAN - 6 - GA-8N-SLI QUAD Royal Motherboard Layout KB_MS SPDIF_RCA SPDIF_O 1394_6P...
Manual
Page 10
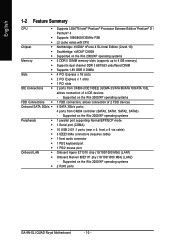
...Edition/ Pentium® D / Pentium® 4 Supports 1066/800/533MHz FSB L2 cache varies with CPU Northbridge: nVIDIA® nForce 4 SLI Intel Edition (Crush 19) Southbridge: nVIDIA® CK804 Supported on the Win 2000/XP operating systems 4 DDR II DIMM memory slots (... 1 slots 1 PCI slots 2 ports from CK804 controller (SATA0, SATA1, SATA2, SATA3) - Supported on the Win 2000/XP operating systems 2 RJ45 ports GA-8N-SLI QUAD Royal Motherboard - 10 - Supported on the Win 2000/XP operating systems 1 FDD connection, allows connection of 2 FDD devices 4 SATA 3Gb/s ports: 4 ports from CK804...
...Edition/ Pentium® D / Pentium® 4 Supports 1066/800/533MHz FSB L2 cache varies with CPU Northbridge: nVIDIA® nForce 4 SLI Intel Edition (Crush 19) Southbridge: nVIDIA® CK804 Supported on the Win 2000/XP operating systems 4 DDR II DIMM memory slots (... 1 slots 1 PCI slots 2 ports from CK804 controller (SATA0, SATA1, SATA2, SATA3) - Supported on the Win 2000/XP operating systems 2 RJ45 ports GA-8N-SLI QUAD Royal Motherboard - 10 - Supported on the Win 2000/XP operating systems 1 FDD connection, allows connection of 2 FDD devices 4 SATA 3Gb/s ports: 4 ports from CK804...
Manual
Page 12
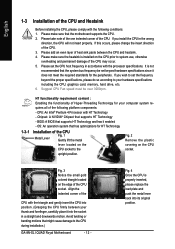
... prior to your thumb and forefinger, carefully place it into its original position. Fig. 4 Once the CPU is not recommended that the motherboard supports the CPU. 2. Please take note of the one indented corner of the CPU. 3. Please set the CPU host frequency in a...CPU Fig. 1 Metal Lever Gently lift the metal Fig. 2 Remove the plastic lever located on the CPU socket to the CPU during installation.) GA-8N-SLI QUAD Royal Motherboard - 12 - Please add an even layer of heat sink paste between your hardware specifications including the CPU, graphics card, memory, hard drive,...
... prior to your thumb and forefinger, carefully place it into its original position. Fig. 4 Once the CPU is not recommended that the motherboard supports the CPU. 2. Please take note of the one indented corner of the CPU. 3. Please set the CPU host frequency in a...CPU Fig. 1 Metal Lever Gently lift the metal Fig. 2 Remove the plastic lever located on the CPU socket to the CPU during installation.) GA-8N-SLI QUAD Royal Motherboard - 12 - Please add an even layer of heat sink paste between your hardware specifications including the CPU, graphics card, memory, hard drive,...
Manual
Page 14
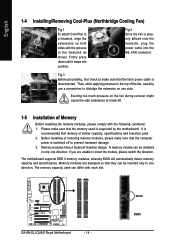
... module, please switch the direction. It is properly affixed onto the heatsink, plug the power cable into position. The motherboard supports DDR II memory modules, whereby BIOS will automatically detect memory capacity and specifications. If you are designed so that...Before installing the memory modules, please comply with the following conditions: 1. A memory module can differ with the grooves in only one direction. GA-8N-SLI QUAD Royal Motherboard - 14 - Firmly press down until it snaps into the NB_FAN connector. Fig.2 Once the fan is recommended that the memory used ....
... module, please switch the direction. It is properly affixed onto the heatsink, plug the power cable into position. The motherboard supports DDR II memory modules, whereby BIOS will automatically detect memory capacity and specifications. If you are designed so that...Before installing the memory modules, please comply with the following conditions: 1. A memory module can differ with the grooves in only one direction. GA-8N-SLI QUAD Royal Motherboard - 14 - Firmly press down until it snaps into the NB_FAN connector. Fig.2 Once the fan is recommended that the memory used ....

Manual
Page 16
Power on the card are indeed seated in motherboard. 4. GA-8N-SLI QUAD Royal Motherboard - 16 - Be sure the metal contacts on the computer, if necessary, setup BIOS utility of expansion card from BIOS. 8. Install related driver from the computer. 3. ...
Power on the card are indeed seated in motherboard. 4. GA-8N-SLI QUAD Royal Motherboard - 16 - Be sure the metal contacts on the computer, if necessary, setup BIOS utility of expansion card from BIOS. 8. Install related driver from the computer. 3. ...
Manual
Page 17
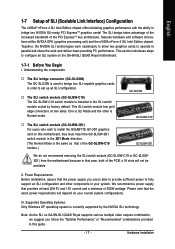
... cards to configure an SLI system on the GA-8N-SLI QUAD Royal motherboard. 1-7-1 Before You Begin I. II. Note: As the SLI on your system. English 1-7 Setup of the PCIE x 16 slots will not be available. Please note that the exact power requirements will depend on GA-8N-SLI QUAD Royal supports various multiple video ...GC-SLISW-3D1 We do not recommend removing the SLI switch module (GC-SLISW-C19 or GC-SLISW3D1) from the motherboard because in order to install the GIGABYTE GV-3D1 graphics card on two sides. One is SLI Mode and the other components in parallel and share...
... cards to configure an SLI system on the GA-8N-SLI QUAD Royal motherboard. 1-7-1 Before You Begin I. II. Note: As the SLI on your system. English 1-7 Setup of the PCIE x 16 slots will not be available. Please note that the exact power requirements will depend on GA-8N-SLI QUAD Royal supports various multiple video ...GC-SLISW-3D1 We do not recommend removing the SLI switch module (GC-SLISW-C19 or GC-SLISW3D1) from the motherboard because in order to install the GIGABYTE GV-3D1 graphics card on two sides. One is SLI Mode and the other components in parallel and share...
Manual
Page 18
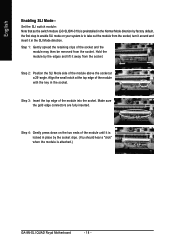
...4: Gently press down on your system is attached.) GA-8N-SLI QUAD Royal Motherboard - 18 - Make sure the gold edge connectors are fully inserted. Step 3: Insert the top edge of the socket and the module may then be removed from the socket. English Enabling SLI Mode-- Step 2: Position the SLI Mode side of the module above the socket...it away from the socket, turn it around and insert it in the Normal Mode direction by factory default, the first step to enable SLI mode on the two ends of the module with the key in place by the edges and lift it is locked in the socket. Hold...
...4: Gently press down on your system is attached.) GA-8N-SLI QUAD Royal Motherboard - 18 - Make sure the gold edge connectors are fully inserted. Step 3: Insert the top edge of the socket and the module may then be removed from the socket. English Enabling SLI Mode-- Step 2: Position the SLI Mode side of the module above the socket...it away from the socket, turn it around and insert it in the Normal Mode direction by factory default, the first step to enable SLI mode on the two ends of the module with the key in place by the edges and lift it is locked in the socket. Hold...
Manual
Page 20
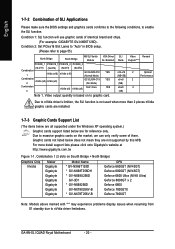
... are for reference only. GA-8N-SLI QUAD Royal Motherboard - 20 - SLI Mode Video Remark Outputs(Note1) x16-x16 2 (NB+SB) x8-x8 2 (NB) x8-x8 2 (SB) Optimal Performance Due to graphic card. Graphic cards not listed below are not supported by this M/B. Combination 1 (2 slots on Sourth Bridge + North Bridge) Graphics Chip Nvidia Maker Gigabyte Gigabyte Gigabyte Gigabyte Gigabyte Gigabyte Gigabyte Model Name * GV...
... are for reference only. GA-8N-SLI QUAD Royal Motherboard - 20 - SLI Mode Video Remark Outputs(Note1) x16-x16 2 (NB+SB) x8-x8 2 (NB) x8-x8 2 (SB) Optimal Performance Due to graphic card. Graphic cards not listed below are not supported by this M/B. Combination 1 (2 slots on Sourth Bridge + North Bridge) Graphics Chip Nvidia Maker Gigabyte Gigabyte Gigabyte Gigabyte Gigabyte Gigabyte Gigabyte Model Name * GV...

Manual
Page 22
... will depend on Windows XP operating system. GA-8N-SLI QUAD Royal Motherboard - 22 - English 1-8 Configuring a Multi View System This function is supported only on your system and the two graphics cards. NVIDIA video driver of the user by allowing them simultaneously. With Multi View technology from GIGABYTE, Quad Graphic enabled motherboards offer multiple display support on up to...
... will depend on Windows XP operating system. GA-8N-SLI QUAD Royal Motherboard - 22 - English 1-8 Configuring a Multi View System This function is supported only on your system and the two graphics cards. NVIDIA video driver of the user by allowing them simultaneously. With Multi View technology from GIGABYTE, Quad Graphic enabled motherboards offer multiple display support on up to...

Manual
Page 24
... external speakers or compressed AC3 data to this connector. IEEE1394 Port Connects the IEEE1394 devices to an external Dolby Digital Decoder via an optical cable. GA-8N-SLI QUAD Royal Motherboard - 24 - USB port Before you connect your device(s) into USB connector(s), please make sureyour OS supports USB controller. If your OS does not support USB...
... external speakers or compressed AC3 data to this connector. IEEE1394 Port Connects the IEEE1394 devices to an external Dolby Digital Decoder via an optical cable. GA-8N-SLI QUAD Royal Motherboard - 24 - USB port Before you connect your device(s) into USB connector(s), please make sureyour OS supports USB controller. If your OS does not support USB...
Manual
Page 26
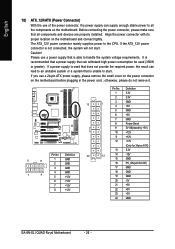
...) 17 GND 18 GND 19 GND 20 -5V 21 +5V 22 +5V 23 +5V 24 GND GA-8N-SLI QUAD Royal Motherboard - 26 - Please use a power supply that is recommended that a power supply that all the components on the motherboard. If you use a 24-pin ATX power supply, please remove the small cover on the power connector... on the motherboard and connect tightly. English 1/2) ATX_12V/ATX (Power Connector) With the use of the power connector, the power supply can withstand high power consumption be used ...
...) 17 GND 18 GND 19 GND 20 -5V 21 +5V 22 +5V 23 +5V 24 GND GA-8N-SLI QUAD Royal Motherboard - 26 - Please use a power supply that is recommended that a power supply that all the components on the motherboard. If you use a 24-pin ATX power supply, please remove the small cover on the power connector... on the motherboard and connect tightly. English 1/2) ATX_12V/ATX (Power Connector) With the use of the power connector, the power supply can withstand high power consumption be used ...
Manual
Page 28
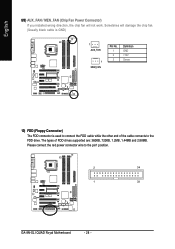
... not work. Please connect the red power connector wire to the FDD drive. The types of the cable connects to the pin1 position. 2 34 1 33 GA-8N-SLI QUAD Royal Motherboard - 28 -
... not work. Please connect the red power connector wire to the FDD drive. The types of the cable connects to the pin1 position. 2 34 1 33 GA-8N-SLI QUAD Royal Motherboard - 28 -
Manual
Page 30
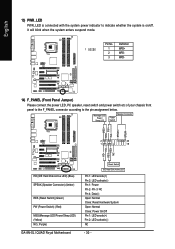
... Disk Active LED) (Blue) SPEAK (Speaker Connector) (Amber) RES (Reset Switch) (Green) PW (Power Switch) (Red) MSG(Message LED/Power/Sleep LED) (Yellow) NC ( Purple) GA-8N-SLI QUAD Royal Motherboard Reset Switch IDE Hard Disk Active LED Pin 1: LED anode(+) Pin 2: LED cathode(-) Pin 1: Power Pin 2- English 13) PWR_LED PWR_LED is on/off. Message LED...
... Disk Active LED) (Blue) SPEAK (Speaker Connector) (Amber) RES (Reset Switch) (Green) PW (Power Switch) (Red) MSG(Message LED/Power/Sleep LED) (Yellow) NC ( Purple) GA-8N-SLI QUAD Royal Motherboard Reset Switch IDE Hard Disk Active LED Pin 1: LED anode(+) Pin 2: LED cathode(-) Pin 1: Power Pin 2- English 13) PWR_LED PWR_LED is on/off. Message LED...
Manual
Page 32
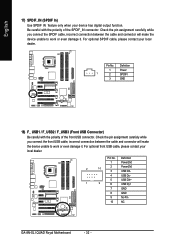
... of the front USB connector. Definition 1 Power(5V) 2 10 2 Power(5V) 3 USB DX- 4 USB Dy- 5 USB DX+ 1 9 6 USB Dy+ 7 GND 8 GND 9 No Pin 10 NC GA-8N-SLI QUAD Royal Motherboard - 32 - For optional front USB cable, please contact your local dealer. For optional SPDIF cable, please contact your local dealer. Check the pin assignment carefully...
... of the front USB connector. Definition 1 Power(5V) 2 10 2 Power(5V) 3 USB DX- 4 USB Dy- 5 USB DX+ 1 9 6 USB Dy+ 7 GND 8 GND 9 No Pin 10 NC GA-8N-SLI QUAD Royal Motherboard - 32 - For optional front USB cable, please contact your local dealer. For optional SPDIF cable, please contact your local dealer. Check the pin assignment carefully...
Manual
Page 34
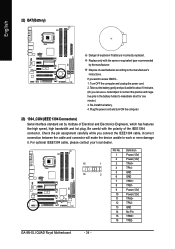
Turn OFF the computer and unplug the power cord. 2. Pin No. GA-8N-SLI QUAD Royal Motherboard - 34 - Dispose of the IEEE1394 connector. Re-install the battery. 4. If you can use a metal object to connect the positive and negative pins in the ...
Turn OFF the computer and unplug the power cord. 2. Pin No. GA-8N-SLI QUAD Royal Motherboard - 34 - Dispose of the IEEE1394 connector. Re-install the battery. 4. If you can use a metal object to connect the positive and negative pins in the ...
Manual
Page 36
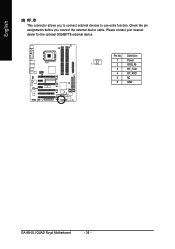
English 26) RF_ID This connector allows you connect the external device cable. Please contact your nearest dealer for the optional GIGABYTE external device. Pin No. Definition 1 Power 1 2 RFID_RI- 3 RF_TXD 4 RF_RXD 5 NC 6 GND GA-8N-SLI QUAD Royal Motherboard - 36 - Check the pin assignments before you to connect external devices to use extra function.
English 26) RF_ID This connector allows you connect the external device cable. Please contact your nearest dealer for the optional GIGABYTE external device. Pin No. Definition 1 Power 1 2 RFID_RI- 3 RF_TXD 4 RF_RXD 5 NC 6 GND GA-8N-SLI QUAD Royal Motherboard - 36 - Check the pin assignments before you to connect external devices to use extra function.
Manual
Page 38
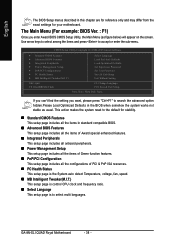
... setting you enter Award BIOS CMOS Setup Utility, the Main Menu (as usual. This action makes the system reset to select multi languages. GA-8N-SLI QUAD Royal Motherboard - 38 - CMOS Setup Utility-Copyright (C) 1984-2005 Award Software ` Standard CMOS Features ` Advanced BIOS Features ` Integrated Peripherals ` Power Management... configurations of PCI & PnP ISA resources. „ PC Health Status This setup page is to the default for your motherboard. English The BIOS Setup menus described in this chapter are for reference only and may differ from the exact settings for ...
... setting you enter Award BIOS CMOS Setup Utility, the Main Menu (as usual. This action makes the system reset to select multi languages. GA-8N-SLI QUAD Royal Motherboard - 38 - CMOS Setup Utility-Copyright (C) 1984-2005 Award Software ` Standard CMOS Features ` Advanced BIOS Features ` Integrated Peripherals ` Power Management... configurations of PCI & PnP ISA resources. „ PC Health Status This setup page is to the default for your motherboard. English The BIOS Setup menus described in this chapter are for reference only and may differ from the exact settings for ...

Manual
Page 40
... times format in the month) Halt On Base Memory [All, But Keyboard] 640K < Ye a r > 1999 to Sat. For example, 1 p.m. The time is 13:00:00. GA-8N-SLI QUAD Royal Motherboard - 40 - is calculated based on the 24-hour military-time clock. English 2-1 Standard CMOS Features Date (mm:dd:yy) Time (hh:mm:ss) CMOS Setup...
... times format in the month) Halt On Base Memory [All, But Keyboard] 640K < Ye a r > 1999 to Sat. For example, 1 p.m. The time is 13:00:00. GA-8N-SLI QUAD Royal Motherboard - 40 - is calculated based on the 24-hour military-time clock. English 2-1 Standard CMOS Features Date (mm:dd:yy) Time (hh:mm:ss) CMOS Setup...
Manual
Page 42
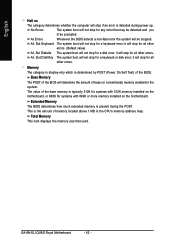
... for all other errors. it will not stop for a keyboard or disk error; English Halt on the motherboard. The value of the base memory is the amount of memory located above 1 MB in the system. GA-8N-SLI QUAD Royal Motherboard - 42 - No Errors The system boot will stop for any error that used. Total Memory This...
... for all other errors. it will not stop for a keyboard or disk error; English Halt on the motherboard. The value of the base memory is the amount of memory located above 1 MB in the system. GA-8N-SLI QUAD Royal Motherboard - 42 - No Errors The system boot will stop for any error that used. Total Memory This...


