Manual
Page 29
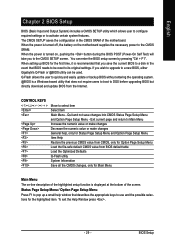
... during the BIOS POST (Power-On Self Test) will take you to use and the possible selections for the highlighted item. To exit the Help Window press . - 29 - CONTROL KEYS Enter> Move to Main Menu Increase the numeric value or make changes Decrease the numeric value or make changes ... CMOS SETUP saves the configuration in the event that you wish to upgrade to its original settings. You can be reset to a new BIOS, either Gigabyte's Q-Flash or @BIOS utility can enter the BIOS setup screen by pressing "Ctrl + F1". When the power is turned on -line description of ...
... during the BIOS POST (Power-On Self Test) will take you to use and the possible selections for the highlighted item. To exit the Help Window press . - 29 - CONTROL KEYS Enter> Move to Main Menu Increase the numeric value or make changes Decrease the numeric value or make changes ... CMOS SETUP saves the configuration in the event that you wish to upgrade to its original settings. You can be reset to a new BIOS, either Gigabyte's Q-Flash or @BIOS utility can enter the BIOS setup screen by pressing "Ctrl + F1". When the power is turned on -line description of ...
Manual
Page 36
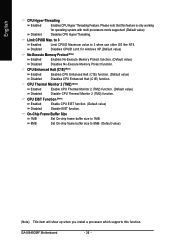
...) function. (Default value) Disable CPU Thermal Monitor 2 (TM2) function. GA-8I945GMF Motherboard - 36 - to 3 Enabled Disabled Limit CPUID Maximum value to 8MB. (Default value) (Note) This item will show up when you install a processor which supports this feature is only working for windows XP.(Default value) No-Execute Memory Protect (Note) Enabled Enables...
...) function. (Default value) Disable CPU Thermal Monitor 2 (TM2) function. GA-8I945GMF Motherboard - 36 - to 3 Enabled Disabled Limit CPUID Maximum value to 8MB. (Default value) (Note) This item will show up when you install a processor which supports this feature is only working for windows XP.(Default value) No-Execute Memory Protect (Note) Enabled Enables...
Manual
Page 51
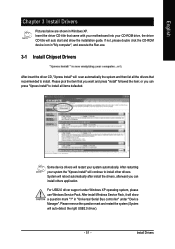
.... After restarting your system the "Xpress Install" will show the installation guide. For USB2.0 driver support under "Device Manager". After install Windows Service Pack, it will continue to install. in Windows XP. Please pick the item that you can install others application. If not, please double click the CD-ROM device icon...
.... After restarting your system the "Xpress Install" will show the installation guide. For USB2.0 driver support under "Device Manager". After install Windows Service Pack, it will continue to install. in Windows XP. Please pick the item that you can install others application. If not, please double click the CD-ROM device icon...
Manual
Page 56
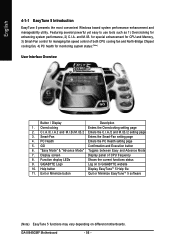
... Overview Button / Display Description 1. GA-8I945GMF Motherboard - 56 - English 4-1-1 EasyTune 5 Introduction EasyTune 5 presents the most convenient Windows based system performance enhancement and manageability ...utility. Display screen Display panel of both CPU cooling fan and North-Bridge Chipset cooling fan, 4) PC health for enhancing system performance, 2) C.I.A. Help button Display EasyTuneTM 5 Help file 11. GO Confirmation and Execution button 6. Featuring several powerful yet easy to GIGABYTE...
... Overview Button / Display Description 1. GA-8I945GMF Motherboard - 56 - English 4-1-1 EasyTune 5 Introduction EasyTune 5 presents the most convenient Windows based system performance enhancement and manageability ...utility. Display screen Display panel of both CPU cooling fan and North-Bridge Chipset cooling fan, 4) PC health for enhancing system performance, 2) C.I.A. Help button Display EasyTuneTM 5 Help file 11. GO Confirmation and Execution button 6. Featuring several powerful yet easy to GIGABYTE...
Manual
Page 57
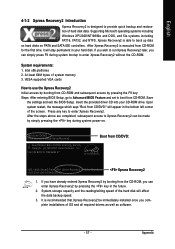
... CD/DVD: Press any key to startup XpressRecovery2..... System storage capacity and the reading/writing speed of the screen. Appendix Supporting Microsoft operating systems including Windows XP/2000/NT/98/Me and DOS, and file systems including FAT16, FAT32, and NTFS, Xpress Recovery2 is able to enter Xpress Recovery2 without the...
... CD/DVD: Press any key to startup XpressRecovery2..... System storage capacity and the reading/writing speed of the screen. Appendix Supporting Microsoft operating systems including Windows XP/2000/NT/98/Me and DOS, and file systems including FAT16, FAT32, and NTFS, Xpress Recovery2 is able to enter Xpress Recovery2 without the...
Manual
Page 58
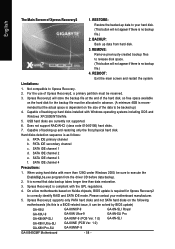
...for the backup file must be solved by BIOS update) GA-K8U GA-K8U-9 GA-K8NXP-SLI GA-K8N Ultra-SLI GA-K8N Pro-SLI GA-K8NXP-9 GA-K8N Ultra-9 GA-K8NF-9 (PCB Ver. 1.0) GA-K8NE (PCB Ver. 1.0) GA-K8NMF-9 GA-8N-SLI Royal GA-8N-SLI Pro GA-8N-SLI GA-8I945GMF Motherboard - 58 - SATA IDE channel 2 e. Capable...Xpress Recovery2, a primary partition must be allocated in advance. (A minimum 4GB is normal that data backup takes longer time than 128G under Windows 2000, be backed up) 4. It is recom- When using hard disks with the GPL regulations. 4. BACKUP: Back up data to execute...
...for the backup file must be solved by BIOS update) GA-K8U GA-K8U-9 GA-K8NXP-SLI GA-K8N Ultra-SLI GA-K8N Pro-SLI GA-K8NXP-9 GA-K8N Ultra-9 GA-K8NF-9 (PCB Ver. 1.0) GA-K8NE (PCB Ver. 1.0) GA-K8NMF-9 GA-8N-SLI Royal GA-8N-SLI Pro GA-8N-SLI GA-8I945GMF Motherboard - 58 - SATA IDE channel 2 e. Capable...Xpress Recovery2, a primary partition must be allocated in advance. (A minimum 4GB is normal that data backup takes longer time than 128G under Windows 2000, be backed up) 4. It is recom- When using hard disks with the GPL regulations. 4. BACKUP: Back up data to execute...
Manual
Page 59
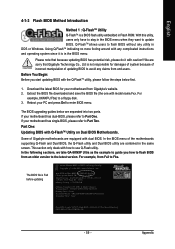
... utility, please follow the steps below are equipped with Q-FlashTM Utility on Dual BIOS Motherboards. Some of Gigabyte motherboards are separated into two parts. In the following sections, we take GA-8KNXP Ultra as the example to flash BIOS without any utility in the same screen. For example, from... Slave : None Press DEL to update BIOS. We are combined in DOS or Windows. Extract the BIOS file downloaded and save the BIOS file (the one with how to Part One. Please note that Gigabyte Technology Co., Ltd is not responsible for your motherboard has dual-BIOS, please refer...
... utility, please follow the steps below are equipped with Q-FlashTM Utility on Dual BIOS Motherboards. Some of Gigabyte motherboards are separated into two parts. In the following sections, we take GA-8KNXP Ultra as the example to flash BIOS without any utility in the same screen. For example, from... Slave : None Press DEL to update BIOS. We are combined in DOS or Windows. Extract the BIOS file downloaded and save the BIOS file (the one with how to Part One. Please note that Gigabyte Technology Co., Ltd is not responsible for your motherboard has dual-BIOS, please refer...
Manual
Page 66
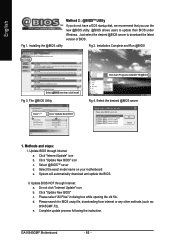
...name on your motherboard e. Please search for BIOS unzip file, downloading from internet or any other methods (such as: 8I945GMF.F2). e. Update BIOS through Internet: a. Select @BIOSTM sever d. Update BIOS NOT through Internet a. Complete update process...Windows. Installation Complete and Run @BIOS Click Sart/ Programs/ GIGABYTE/@BIOS Select @BIOS item than click Install Fig 3. Methods and steps: I. Fig 1. Select the desired @BIOS server Click " " Click "Update New BIOS" 1. Click "Update New BIOS" icon c. System will automatically download and update the BIOS. GA-8I945GMF...
...name on your motherboard e. Please search for BIOS unzip file, downloading from internet or any other methods (such as: 8I945GMF.F2). e. Update BIOS through Internet: a. Select @BIOSTM sever d. Update BIOS NOT through Internet a. Complete update process...Windows. Installation Complete and Run @BIOS Click Sart/ Programs/ GIGABYTE/@BIOS Select @BIOS item than click Install Fig 3. Methods and steps: I. Fig 1. Select the desired @BIOS server Click " " Click "Update New BIOS" 1. Click "Update New BIOS" icon c. System will automatically download and update the BIOS. GA-8I945GMF...
Manual
Page 68
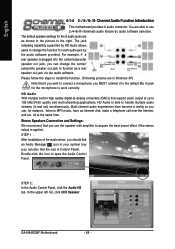
...quality digital-to-analog converters (DACs) that support audio output at the same time. In the upper left list, click 2CH Speaker. GA-8I945GMF Motherboard - 68 - Channel Audio Function Introduction This motherboard provides 6 audio connector. For example, if a rear speaker is able to ...rear speaker out jack via the audio software. Stereo Speakers Connection and Settings: We recommend that if you wish to handle multiple audio streams (in Windows XP) Note that you use 2-/4-/6-/8-channnels audio feature by the audio software provided. English 4-1-4 2- / 4- / 6- / 8- Line In ...
...quality digital-to-analog converters (DACs) that support audio output at the same time. In the upper left list, click 2CH Speaker. GA-8I945GMF Motherboard - 68 - Channel Audio Function Introduction This motherboard provides 6 audio connector. For example, if a rear speaker is able to ...rear speaker out jack via the audio software. Stereo Speakers Connection and Settings: We recommend that if you wish to handle multiple audio streams (in Windows XP) Note that you use 2-/4-/6-/8-channnels audio feature by the audio software provided. English 4-1-4 2- / 4- / 6- / 8- Line In ...
Manual
Page 69
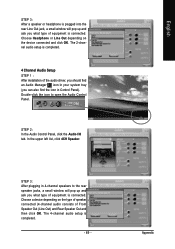
.... In the upper left list, click 4CH Speaker. The 4-channel audio setup is completed. - 69 - Double-click the icon to the rear speaker jacks, a small window will pop up and ask you what type of equipment is connected. The 2-channel audio setup is completed. 4 Channel Audio Setup STEP 1 : After installation of... Out (Line Out) and Rear Speaker Out and then click OK. STEP 3: After a speaker or headphone is plugged into the rear Line Out jack, a small window will pop up and ask you can also find an Audio Manager icon in Control Panel).
.... In the upper left list, click 4CH Speaker. The 4-channel audio setup is completed. - 69 - Double-click the icon to the rear speaker jacks, a small window will pop up and ask you what type of equipment is connected. The 2-channel audio setup is completed. 4 Channel Audio Setup STEP 1 : After installation of... Out (Line Out) and Rear Speaker Out and then click OK. STEP 3: After a speaker or headphone is plugged into the rear Line Out jack, a small window will pop up and ask you can also find an Audio Manager icon in Control Panel).
Manual
Page 70
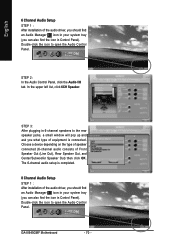
..., a small window will pop up and ask you can also find the icon in Control Panel). The 6-channel audio setup is connected. In the upper left list, click 6CH Speaker. Double-click the icon to open the Audio Control Panel. STEP 2: In the Audio Control Panel, click the Audio I/O tab. GA-8I945GMF Motherboard...
..., a small window will pop up and ask you can also find the icon in Control Panel). The 6-channel audio setup is connected. In the upper left list, click 6CH Speaker. Double-click the icon to open the Audio Control Panel. STEP 2: In the Audio Control Panel, click the Audio I/O tab. GA-8I945GMF Motherboard...

Manual
Page 71
... Audio I /O tab. AC'97 Audio Configuration: To enable the front panel audio connector to support AC97 Audio mode, go to the rear speaker jacks, a small window will pop up and ask you what type of Front Speaker Out (Line Out), Rear Speaker Out, Center/Subwoofer Speaker Out, and Side Speaker Out...
... Audio I /O tab. AC'97 Audio Configuration: To enable the front panel audio connector to support AC97 Audio mode, go to the rear speaker jacks, a small window will pop up and ask you what type of Front Speaker Out (Line Out), Rear Speaker Out, Center/Subwoofer Speaker Out, and Side Speaker Out...


