
Manual
Page 12
... support disks from the Windows 2000/XP Setup disk and press F6 as soon as you see the next screen for you have chosen to manually specify an adapter. Windows Setup Setup could not determine the type of some files being loaded before you see a message which you to specify the...
... support disks from the Windows 2000/XP Setup disk and press F6 as soon as you see the next screen for you have chosen to manually specify an adapter. Windows Setup Setup could not determine the type of some files being loaded before you see a message which you to specify the...

Manual
Page 3
... options you will see shall depend on the motherboard you want to create RAID, set SATA RAID/AHCI Mode under the Integrated Peripherals menu to Manual or Auto (default) based on your motherboard. Then, set BIOS boot sequence for your computer and press Del to enter BIOS Setup during POST (Power...
... options you will see shall depend on the motherboard you want to create RAID, set SATA RAID/AHCI Mode under the Integrated Peripherals menu to Manual or Auto (default) based on your motherboard. Then, set BIOS boot sequence for your computer and press Del to enter BIOS Setup during POST (Power...
Manual
Page 1
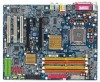
GA-8I915P Dual Graphic Intel® Pentium® 4 LGA775 Processor Motherboard User's Manual Rev. 1002 12ME-8I915PDG-1002
GA-8I915P Dual Graphic Intel® Pentium® 4 LGA775 Processor Motherboard User's Manual Rev. 1002 12ME-8I915PDG-1002
Manual
Page 3
... product. „ For detailed product information and specifications, please carefully read or download the information you need. Product Manual Classification In order to assist in the use of this product, Gigabyte has categorized the user manual in the following: „ For quick installation, please refer to the "Hardware Installation Guide" included with this...
... product. „ For detailed product information and specifications, please carefully read or download the information you need. Product Manual Classification In order to assist in the use of this product, Gigabyte has categorized the user manual in the following: „ For quick installation, please refer to the "Hardware Installation Guide" included with this...
Manual
Page 9
... electrostatic discharge (ESD). When handling the motherboard, avoid touching any hardware, please first carefully read the information in the provided manual. 3. Please verify that all cables and power connectors are uncertain about any installation steps or have these items on the motherboard...the installation process can become damaged as a result of the motherboard or any metal leads or connectors. 3. Prior to be an unofficial Gigabyte product. - 9 - Before using the product, please verify that you are connected. 4. Please make sure there are required for warranty...
... electrostatic discharge (ESD). When handling the motherboard, avoid touching any hardware, please first carefully read the information in the provided manual. 3. Please verify that all cables and power connectors are uncertain about any installation steps or have these items on the motherboard...the installation process can become damaged as a result of the motherboard or any metal leads or connectors. 3. Prior to be an unofficial Gigabyte product. - 9 - Before using the product, please verify that you are connected. 4. Please make sure there are required for warranty...

Manual
Page 13
Fig. 6 Finally, please attach the power connector of the heatsink to the heatsink installation section of the user manual) Fig. 5 Please check the back of motherboard after installing. If the push pin is inserted as a result of hardening of the installed CPU. The heatsink ...
Fig. 6 Finally, please attach the power connector of the heatsink to the heatsink installation section of the user manual) Fig. 5 Please check the back of motherboard after installing. If the push pin is inserted as a result of hardening of the installed CPU. The heatsink ...
Manual
Page 18
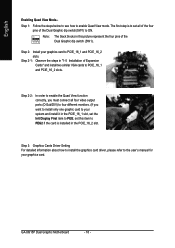
...GA-8I915P Dual Graphic Motherboard - 18 - English Enabling Quad View Mode-Step 1: Follow the steps below to see how to the user's manual for your graphics card. Note: The black blocks in "1-5 Installation of Expansion Cards" and install two similar VGA cards to PEG; Step 3: Graphics Cards Driver Setting For detailed information about how to install the graphics...Step 2-2: In order to enable the Quad View function correctly, you must connect all of the four pins of the Dual Graphic dip switch (SW1). 1 234 Step 2: Install your system and install it in the PCIE_16_2 slot. set the Init...
...GA-8I915P Dual Graphic Motherboard - 18 - English Enabling Quad View Mode-Step 1: Follow the steps below to see how to the user's manual for your graphics card. Note: The black blocks in "1-5 Installation of Expansion Cards" and install two similar VGA cards to PEG; Step 3: Graphics Cards Driver Setting For detailed information about how to install the graphics...Step 2-2: In order to enable the Quad View function correctly, you must connect all of the four pins of the Dual Graphic dip switch (SW1). 1 234 Step 2: Install your system and install it in the PCIE_16_2 slot. set the Init...
Manual
Page 34
...(default:Auto) Hard drive information should be labeled on the outside drive casing. For example, 1 p.m. is , , , . You can manually input the correct settings Access Mode Use this to Sat, determined by the BIOS and is calculated base on this option for automatic device detection...) 1999 to select this information. Enter the appropriate option based on the 24-hour military-time clock. GA-8I915P Dual Graphic Motherboard - 34 - The time is display only The month, Jan. Manual User can use one of sectors If a hard disk has not been installed, select NONE and press ...
...(default:Auto) Hard drive information should be labeled on the outside drive casing. For example, 1 p.m. is , , , . You can manually input the correct settings Access Mode Use this to Sat, determined by the BIOS and is calculated base on this option for automatic device detection...) 1999 to select this information. Enter the appropriate option based on the 24-hour military-time clock. GA-8I915P Dual Graphic Motherboard - 34 - The time is display only The month, Jan. Manual User can use one of sectors If a hard disk has not been installed, select NONE and press ...
Manual
Page 79
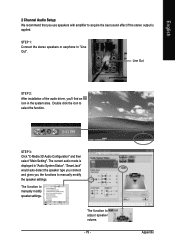
... is applied. The function to acquire the best sound effect if the stereo output is displayed in the system area. Double click the icon to manually modify speaker settings. The function to select the function. "Smart Jack" would auto-detect the speaker type you connect and gives you 'll find an...
... is applied. The function to acquire the best sound effect if the stereo output is displayed in the system area. Double click the icon to manually modify speaker settings. The function to select the function. "Smart Jack" would auto-detect the speaker type you connect and gives you 'll find an...
Manual
Page 80
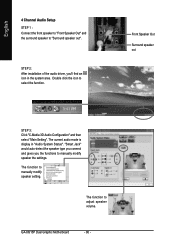
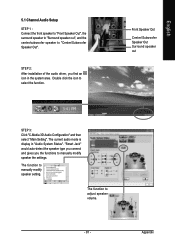
... the system area. GA-8I915P Dual Graphic Motherboard - 80 - Front Speaker Out Surround speaker out STEP 3: Click "C-Media 3D Audio Configuration" and then select "Main Setting". English 4 Channel Audio Setup STEP 1 : Connect the front speaker to "Front Speaker Out" and the surround speaker to select the function. The function to manually modify speaker setting. The...
... the system area. GA-8I915P Dual Graphic Motherboard - 80 - Front Speaker Out Surround speaker out STEP 3: Click "C-Media 3D Audio Configuration" and then select "Main Setting". English 4 Channel Audio Setup STEP 1 : Connect the front speaker to "Front Speaker Out" and the surround speaker to select the function. The function to manually modify speaker setting. The...
Manual
Page 81
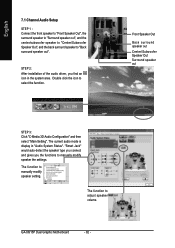
... out STEP 3: Click "C-Media 3D Audio Configuration" and then select "Main Setting". The current audio mode is display in the system area. The function to manually modify speaker the settings. "Smart Jack" would auto-detect the speaker type you connect and gives you find an icon in "Audio System Status". The...
... out STEP 3: Click "C-Media 3D Audio Configuration" and then select "Main Setting". The current audio mode is display in the system area. The function to manually modify speaker the settings. "Smart Jack" would auto-detect the speaker type you connect and gives you find an icon in "Audio System Status". The...
Manual
Page 82
.../subwoofer speaker to "Center/Subwoofer Speaker Out", and the back surround speaker to select the function. GA-8I915P Dual Graphic Motherboard - 82 - Double click the icon to "Back surround speaker out". The function to manually modify speaker setting. The function to adjust speaker volume. "Smart Jack" would auto-detect the speaker... 3: Click "C-Media 3D Audio Configuration" and then select "Main Setting". STEP 2: After installation of the audio driver, you the functions to manually modify speaker the settings. The current audio mode is display in the system area.
.../subwoofer speaker to "Center/Subwoofer Speaker Out", and the back surround speaker to select the function. GA-8I915P Dual Graphic Motherboard - 82 - Double click the icon to "Back surround speaker out". The function to manually modify speaker setting. The function to adjust speaker volume. "Smart Jack" would auto-detect the speaker... 3: Click "C-Media 3D Audio Configuration" and then select "Main Setting". STEP 2: After installation of the audio driver, you the functions to manually modify speaker the settings. The current audio mode is display in the system area.
Manual
Page 84
... onboard VGA card in order to the Clear CMOS steps in the manual. Re-insert the battery to the maximum volume? Save changes and reboot the system. Question 5: Why do I cannot see these options. Answer: Gigabyte motherboards will be able to makethem short for about 10 minutes (Or...: Steps: 1. Connect power cord to MB again and turn on -board battery to leak voltage to enter BIOS and load Fail-Safe Defaults. 7. GA-8I915P Dual Graphic Motherboard - 84 - To check general asked questions. Please refer to http://tw.giga-byte.com/faq/faq.htm Question 1: I clear CMOS? Answer:...
... onboard VGA card in order to the Clear CMOS steps in the manual. Re-insert the battery to the maximum volume? Save changes and reboot the system. Question 5: Why do I cannot see these options. Answer: Gigabyte motherboards will be able to makethem short for about 10 minutes (Or...: Steps: 1. Connect power cord to MB again and turn on -board battery to leak voltage to enter BIOS and load Fail-Safe Defaults. 7. GA-8I915P Dual Graphic Motherboard - 84 - To check general asked questions. Please refer to http://tw.giga-byte.com/faq/faq.htm Question 1: I clear CMOS? Answer:...
Manual
Page 85
... refer to the USB Over Current pin in the Front USB Panel. If the cable is not provided with the motherboard package to the user manual and check whether you identify the possible computer problems. However, they are always fatal. 1 beep Refresh failure 2 beeps Parity error 3 beeps Base 64K memory failure...
... refer to the USB Over Current pin in the Front USB Panel. If the cable is not provided with the motherboard package to the user manual and check whether you identify the possible computer problems. However, they are always fatal. 1 beep Refresh failure 2 beeps Parity error 3 beeps Base 64K memory failure...


