Manual
Page 1
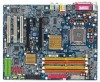
GA-8I915P Dual Graphic Intel® Pentium® 4 LGA775 Processor Motherboard User's Manual Rev. 1002 12ME-8I915PDG-1002
GA-8I915P Dual Graphic Intel® Pentium® 4 LGA775 Processor Motherboard User's Manual Rev. 1002 12ME-8I915PDG-1002

Manual
Page 3
... content provided with the product. „ For detailed product information and specifications, please carefully read the "Product User Manual". „ For detailed information related to Gigabyte's unique features, please go to "Technology Guide" section on Gigabyte's website to read or download the information you need. Specifications and features are legally registered to the "Hardware...
... content provided with the product. „ For detailed product information and specifications, please carefully read the "Product User Manual". „ For detailed information related to Gigabyte's unique features, please go to "Technology Guide" section on Gigabyte's website to read or download the information you need. Specifications and features are legally registered to the "Hardware...
Manual
Page 9
...stickers on the computer power during the installation process can become damaged as a result of violating the conditions recommended in the user manual. 3. Turning on the motherboard. Damage as a result of electrostatic discharge (ESD). Hardware Installation When handling the motherboard, ..., please follow the instructions below: 1. Prior to installing the electronic components, please have a problem related to be an unofficial Gigabyte product. - 9 - Please verify that all cables and power connectors are no leftover screws or metal components placed on the motherboard...
...stickers on the computer power during the installation process can become damaged as a result of violating the conditions recommended in the user manual. 3. Turning on the motherboard. Damage as a result of electrostatic discharge (ESD). Hardware Installation When handling the motherboard, ..., please follow the instructions below: 1. Prior to installing the electronic components, please have a problem related to be an unofficial Gigabyte product. - 9 - Please verify that all cables and power connectors are no leftover screws or metal components placed on the motherboard...

Manual
Page 13
... dissipation or using extreme care when removing the heatsink. - 13 - Fig. 4 Please make sure the push pins aim to the heatsink installation section of the user manual) Fig. 5 Please check the back of motherboard after installing.
... dissipation or using extreme care when removing the heatsink. - 13 - Fig. 4 Please make sure the push pins aim to the heatsink installation section of the user manual) Fig. 5 Please check the back of motherboard after installing.
Manual
Page 18
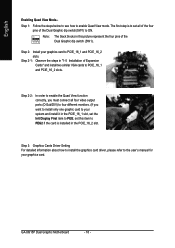
Step 2-2: In order to enable the Quad View function correctly, you want to install only one graphic card to PEG; GA-8I915P Dual Graphic Motherboard - 18 - English Enabling Quad View Mode-Step 1: Follow the steps below to see how to PCIE_16_1 and PCIE_16_2 slots. Step .... (If you must connect all of the four pins of the Dual Graphic dip switch(SW1) to PCIE_16_1 and PCIE_16_2 slots. Step 3: Graphics Cards Driver Setting For detailed information about how to install the graphics card driver, please refer to the user's manual for your graphics card to enable Quad View mode.
Step 2-2: In order to enable the Quad View function correctly, you want to install only one graphic card to PEG; GA-8I915P Dual Graphic Motherboard - 18 - English Enabling Quad View Mode-Step 1: Follow the steps below to see how to PCIE_16_1 and PCIE_16_2 slots. Step .... (If you must connect all of the four pins of the Dual Graphic dip switch(SW1) to PCIE_16_1 and PCIE_16_2 slots. Step 3: Graphics Cards Driver Setting For detailed information about how to install the graphics card driver, please refer to the user's manual for your graphics card to enable Quad View mode.
Manual
Page 34
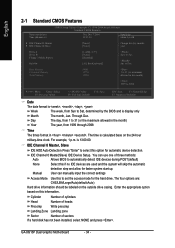
... on the 24-hour military-time clock. You can manually input the correct settings Access Mode Use this information. The four options are used and the system will skip the automatic detection step and allow for automatic device detection. to Dec. GA-8I915P Dual Graphic Motherboard - 34 - English 2-1 Standard CMOS Features Date... in the month) 1999 to automatically detect IDE devices during POST(default) None Select this option for faster system start up. Manual User can use one of sectors If a hard disk has not been installed, select NONE and press .
... on the 24-hour military-time clock. You can manually input the correct settings Access Mode Use this information. The four options are used and the system will skip the automatic detection step and allow for automatic device detection. to Dec. GA-8I915P Dual Graphic Motherboard - 34 - English 2-1 Standard CMOS Features Date... in the month) 1999 to automatically detect IDE devices during POST(default) None Select this option for faster system start up. Manual User can use one of sectors If a hard disk has not been installed, select NONE and press .
Manual
Page 85
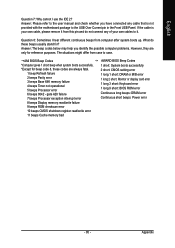
... USB Panel. Answer: The beep codes below may help you have connected any of your own cable, please remove it . Answer: Please refer to the user manual and check whether you identify the possible computer problems. However, they are always fatal. 1 beep Refresh failure 2 beeps Parity error 3 beeps Base 64K memory failure...
... USB Panel. Answer: The beep codes below may help you have connected any of your own cable, please remove it . Answer: Please refer to the user manual and check whether you identify the possible computer problems. However, they are always fatal. 1 beep Refresh failure 2 beeps Parity error 3 beeps Base 64K memory failure...


