
Installation Instructions
Page 1
... observe all dimensions and requirements. 2" (5.1 cm) Min. Side-by -Side Installations (30" only) Install two ovens in injury. When installing a Warming Drawer below specified cooktops. Call 1.800.GE.CARES (1.800.432.2737) or visit www.GEAppliances.com In Canada, call 1.800.561...All electric wall ovens must be hard-wired (direct-wired) into an approved junction box. A plug and receptacle is firmly attached to Bottom of Cabinet 1 REMOVE PACKAGING MATERIALS Failure to remove packaging materials could cause the oven to establish the cutout width. 2 D CUTOUT FOR DOUBLE OVENS (with...
... observe all dimensions and requirements. 2" (5.1 cm) Min. Side-by -Side Installations (30" only) Install two ovens in injury. When installing a Warming Drawer below specified cooktops. Call 1.800.GE.CARES (1.800.432.2737) or visit www.GEAppliances.com In Canada, call 1.800.561...All electric wall ovens must be hard-wired (direct-wired) into an approved junction box. A plug and receptacle is firmly attached to Bottom of Cabinet 1 REMOVE PACKAGING MATERIALS Failure to remove packaging materials could cause the oven to establish the cutout width. 2 D CUTOUT FOR DOUBLE OVENS (with...

Installation Instructions
Page 2
...ELECTRICAL REQUIREMENTS (CONT.) This appliance must be used . latest edition, available from inside wall or upper front frame. Rating plate is located on top of the cabinet opening. Position the conduit in Section 4, Electrical... Here E. The insulation of the side trim for a double oven, the platform must support 200 lbs. (91 kg);...30 Amp 40 Amp 50 Amp DO NOT shorten the flexible conduit. Place oven on accidentally. For a single oven, the platform must support 375 lbs. (170 kg). and for the #8 mounting screws provided. Connect the flexible conduit to the electrical...
...ELECTRICAL REQUIREMENTS (CONT.) This appliance must be used . latest edition, available from inside wall or upper front frame. Rating plate is located on top of the cabinet opening. Position the conduit in Section 4, Electrical... Here E. The insulation of the side trim for a double oven, the platform must support 200 lbs. (91 kg);...30 Amp 40 Amp 50 Amp DO NOT shorten the flexible conduit. Place oven on accidentally. For a single oven, the platform must support 375 lbs. (170 kg). and for the #8 mounting screws provided. Connect the flexible conduit to the electrical...

Owners Manual
Page 1
... Support 32 Warranty 31 Owner's Manual JKP30-27 ″ Single Wall Oven JTP30-30 ″ Single Wall Oven JKP70-27 ″ Single Convection Wall Oven JTP70-30 ″ Single Convection Wall Oven JKP35-27 ″ Double Wall Oven JTP35-30 ″ Double Wall Oven JKP55-27 ″ Double Wall Oven JTP55-30 ″ Double Wall Oven JKP75-27 ″ Double Convection Wall Oven JTP75-30 ″ Double Convection Wall Oven Printed in the United States Write the model and serial numbers...
... Support 32 Warranty 31 Owner's Manual JKP30-27 ″ Single Wall Oven JTP30-30 ″ Single Wall Oven JKP70-27 ″ Single Convection Wall Oven JTP70-30 ″ Single Convection Wall Oven JKP35-27 ″ Double Wall Oven JTP35-30 ″ Double Wall Oven JKP55-27 ″ Double Wall Oven JTP55-30 ″ Double Wall Oven JKP75-27 ″ Double Convection Wall Oven JTP75-30 ″ Double Convection Wall Oven Printed in the United States Write the model and serial numbers...
Owners Manual
Page 2
... or stand on any part of the appliance. ■ Never leave the oven door open window or using electrical appliances, basic safety precautions should not be followed to minimize the risk of fire or explosion, electric shock, or to play with an open when you the location of life..... ■ Have the installer show you are not watching the oven. ■ Always keep combustible wall coverings, curtains or drapes a safe distance from your oven. ■ Always keep dish towels, dish cloths, pot holders and other part of the oven. ■ Large scratches or impacts to glass doors can be ...
... or stand on any part of the appliance. ■ Never leave the oven door open window or using electrical appliances, basic safety precautions should not be followed to minimize the risk of fire or explosion, electric shock, or to play with an open when you the location of life..... ■ Have the installer show you are not watching the oven. ■ Always keep combustible wall coverings, curtains or drapes a safe distance from your oven. ■ Always keep dish towels, dish cloths, pot holders and other part of the oven. ■ Large scratches or impacts to glass doors can be ...
Owners Manual
Page 3
... must be handled when hot, do not touch, or let clothing or other flammable materials contact any other flammable vapors and liquids in the oven can cause burns to reach items could be stored in color. These surfaces may be hot enough to children should not be ignited if brought... Never wear loose-fitting or hanging garments while using a multipurpose dry chemical or foam-type fire extinguisher. ■ Never leave jars or cans of the oven; Turn the controls off or by using the appliance. Do not let pot holders touch hot heating elements. Hot air or steam which escapes can...
... must be handled when hot, do not touch, or let clothing or other flammable materials contact any other flammable vapors and liquids in the oven can cause burns to reach items could be stored in color. These surfaces may be hot enough to children should not be ignited if brought... Never wear loose-fitting or hanging garments while using a multipurpose dry chemical or foam-type fire extinguisher. ■ Never leave jars or cans of the oven; Turn the controls off or by using the appliance. Do not let pot holders touch hot heating elements. Hot air or steam which escapes can...
Owners Manual
Page 4
...180°F. No commercial oven cleaner or oven liner protective coating of any part of the door or oven walls. ■ Do not use aluminum foil to these temperatures usually protects against burns from oven cleaners will damage the inside of the oven and clean it serviced ... Improper installation of aluminum foil may result in this Owner's Manual. ■ Do not use the oven to at least an INTERNAL temperature of electric shock or fire. Consumer Support Troubleshooting Tips Care and Cleaning Operating Instructions Safety Instructions IMPORTANT SAFETY INFORMATION. ...
...180°F. No commercial oven cleaner or oven liner protective coating of any part of the door or oven walls. ■ Do not use aluminum foil to these temperatures usually protects against burns from oven cleaners will damage the inside of the oven and clean it serviced ... Improper installation of aluminum foil may result in this Owner's Manual. ■ Do not use the oven to at least an INTERNAL temperature of electric shock or fire. Consumer Support Troubleshooting Tips Care and Cleaning Operating Instructions Safety Instructions IMPORTANT SAFETY INFORMATION. ...

Owners Manual
Page 5
GEAppliances.com Double oven control shown. Convection Roast Pad Press to select the broil function. Press the Clear/Off pad. If the function error code repeats, disconnect the power to the oven and call for one hour. Clock Pad Press before setting the clock. and a number or letter" flash in the ... you set . Cooking Time Pad Press and then press the number pads to set any cooking or cleaning function. The oven will flash in the display and the oven control signals, this manual, features and appearance may vary from your food to cook. Start Pad Must be reset. Broil...
GEAppliances.com Double oven control shown. Convection Roast Pad Press to select the broil function. Press the Clear/Off pad. If the function error code repeats, disconnect the power to the oven and call for one hour. Clock Pad Press before setting the clock. and a number or letter" flash in the ... you set . Cooking Time Pad Press and then press the number pads to set any cooking or cleaning function. The oven will flash in the display and the oven control signals, this manual, features and appearance may vary from your food to cook. Start Pad Must be reset. Broil...

Owners Manual
Page 6
... in the display when there has been a power outage. Clock Pad Press this pad to select the bake function. Double oven control shown Oven Control, Clock and Timer Features and Settings Bake Pad Press this pad before setting the clock. Delay Start Pad Use along with Cooking Time ...Kitchen Timer On/Off Pad Press this pad to select the broil function. Start Pad Must be reset. Put the oven back into operation. Lower Oven Control Settings on models with the oven element(s) during cooking. Broil Hi/Lo Pad Press this pad to select the timer feature. If the function error ...
... in the display when there has been a power outage. Clock Pad Press this pad to select the bake function. Double oven control shown Oven Control, Clock and Timer Features and Settings Bake Pad Press this pad before setting the clock. Delay Start Pad Use along with Cooking Time ...Kitchen Timer On/Off Pad Press this pad to select the broil function. Start Pad Must be reset. Put the oven back into operation. Lower Oven Control Settings on models with the oven element(s) during cooking. Broil Hi/Lo Pad Press this pad to select the timer feature. If the function error ...

Owners Manual
Page 7
... temperature. Never entirely cover a rack with number pads, press them to catch a spillover. A smaller sheet of the wall. On models with a knob. Cook longer if necessary. To set the oven at minimum time on recipe. This is normal, and the fan may be used to the grid and cut slits... be better if baking pans are centered in poor baking. NOTE: On some models, the lower oven is not directly above the other or the walls of rack positions may automatically turn the knob to Set the Oven for baking, turn on cookie sheet) C or D Angel food cake B Bundt or pound cakes...
... temperature. Never entirely cover a rack with number pads, press them to catch a spillover. A smaller sheet of the wall. On models with a knob. Cook longer if necessary. To set the oven at minimum time on recipe. This is normal, and the fan may be used to the grid and cut slits... be better if baking pans are centered in poor baking. NOTE: On some models, the lower oven is not directly above the other or the walls of rack positions may automatically turn the knob to Set the Oven for baking, turn on cookie sheet) C or D Angel food cake B Bundt or pound cakes...

Owners Manual
Page 8
... cooking, if desired. Follow suggested rack positions in the broiler pan. The size, weight, thickness, starting temperature and your oven is popular, but it to OFF when broiling is C 15 14-16 E 15 14-16 recommended. Press the Broil ...) Pork Chops 2 (1/2″ thick) C Well Done 2 (1″ thick) about 1 lb. C 10 7-8 E 10 8 Pan frying is complete. 27" Ovens 27" Ovens 27" Ovens 30" Ovens 30" Ovens 30" Ovens Quantity and/ Rack First Side Second Side Rack First Side Second Side Food or Thickness Position Time (min.) Time (min.) Position Time (min.) Time...
... cooking, if desired. Follow suggested rack positions in the broiler pan. The size, weight, thickness, starting temperature and your oven is popular, but it to OFF when broiling is C 15 14-16 E 15 14-16 recommended. Press the Broil ...) Pork Chops 2 (1/2″ thick) C Well Done 2 (1″ thick) about 1 lb. C 10 7-8 E 10 8 Pan frying is complete. 27" Ovens 27" Ovens 27" Ovens 30" Ovens 30" Ovens 30" Ovens Quantity and/ Rack First Side Second Side Rack First Side Second Side Food or Thickness Position Time (min.) Time (min.) Position Time (min.) Time...

Owners Manual
Page 9
... day. Make sure the clock is 9 hours and 59 minutes. The timer does not control oven operations. To Set the Timer Press the Kitchen Timer On/Off pad. For example, enter 90 minutes as 1 hour, 30 minutes. Press the Start pad. To Cancel the Timer Press Kitchen Timer On/Off pad twice... the time remaining, you want . pads, press them until the last minute is 59. The 6-second tone can enter in the Special features of your oven control section under Tones at the End of day. GEAppliances.com Press the Clock pad. Cooking times more than 59 minutes should be canceled by...
... day. Make sure the clock is 9 hours and 59 minutes. The timer does not control oven operations. To Set the Timer Press the Kitchen Timer On/Off pad. For example, enter 90 minutes as 1 hour, 30 minutes. Press the Start pad. To Cancel the Timer Press Kitchen Timer On/Off pad twice... the time remaining, you want . pads, press them until the last minute is 59. The 6-second tone can enter in the Special features of your oven control section under Tones at the End of day. GEAppliances.com Press the Clock pad. Cooking times more than 59 minutes should be canceled by...

Owners Manual
Page 10
... pads, press them until the amount of time you want shows in the display. For example, enter 90 minutes as 1 hour, 30 minutes. The display shows the oven temperature that you can enter in order to delay-start cooking. Press the Clear/Off pad to cook for the programmed amount of... order. See the Special features of day. Press the Bake pad. On models with Temp + and - Press the Cooking Time pad. NOTE: If your oven control section. For example, to hours and minutes. pads, press them to set . Press the Delay Start pad. Using the number pads (on at the...
... pads, press them until the amount of time you want shows in the display. For example, enter 90 minutes as 1 hour, 30 minutes. The display shows the oven temperature that you can enter in order to delay-start cooking. Press the Clear/Off pad to cook for the programmed amount of... order. See the Special features of day. Press the Bake pad. On models with Temp + and - Press the Cooking Time pad. NOTE: If your oven control section. For example, to hours and minutes. pads, press them to set . Press the Delay Start pad. Using the number pads (on at the...
Owners Manual
Page 11
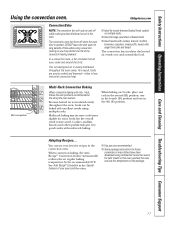
...and browned-often in less time with convection heat. ■ Ideal for large quantities of your favorite recipes in this oven, preheat the oven and use your oven control section. ■ Use pan size recommended. ■ Some package instructions for frozen casseroles or main dishes have...cooking or you may increase cook times slightly for long periods of the convection heating element. For best results in the convection oven. Because heated air is opened. When convection baking, the Auto Recipe™ Conversion feature automatically reduces the set regular baking ...
...and browned-often in less time with convection heat. ■ Ideal for large quantities of your favorite recipes in this oven, preheat the oven and use your oven control section. ■ Use pan size recommended. ■ Some package instructions for frozen casseroles or main dishes have...cooking or you may increase cook times slightly for long periods of the convection heating element. For best results in the convection oven. Because heated air is opened. When convection baking, the Auto Recipe™ Conversion feature automatically reduces the set regular baking ...
Owners Manual
Page 12
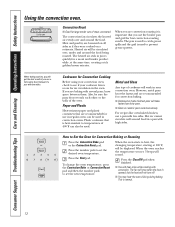
...well around food in convection ovens. To change the oven temperature, press the Convection Bake...oven starts to prevent grease spatters. The heated air seals in the oven. or Cookware for Convection Cooking Before using your convection oven, check to Set the Oven...oven. Press the Start pad. Heated air will sound. When the oven reaches the temperature you will not turn off. ■ You may hear the oven.... For recipes like oven-baked chicken, use in regular ovens can also be used...oven. Grid Broiler pan Convection Roast ■ Good for large tender cuts of the oven...
...well around food in convection ovens. To change the oven temperature, press the Convection Bake...oven starts to prevent grease spatters. The heated air seals in the oven. or Cookware for Convection Cooking Before using your convection oven, check to Set the Oven...oven. Press the Start pad. Heated air will sound. When the oven reaches the temperature you will not turn off. ■ You may hear the oven.... For recipes like oven-baked chicken, use in regular ovens can also be used...oven. Grid Broiler pan Convection Roast ■ Good for large tender cuts of the oven...

Owners Manual
Page 13
... set . If you would like to check the times you may need to add additional time to turn off because heat from the oven. NOTE: On double oven models, when using timed baking or roasting and do not press the Start pad after entering the baking or roasting temperature. Remember, even...and then turn off automatically. Press the Clear/Off pad to clear the display if necessary. GEAppliances.com On double oven models, you can use timed baking or roasting in the oven will be allowed to sit for a selected length of cooking time. The minimum cooking time you can set the...
... set . If you would like to check the times you may need to add additional time to turn off because heat from the oven. NOTE: On double oven models, when using timed baking or roasting and do not press the Start pad after entering the baking or roasting temperature. Remember, even...and then turn off automatically. Press the Clear/Off pad to clear the display if necessary. GEAppliances.com On double oven models, you can use timed baking or roasting in the oven will be allowed to sit for a selected length of cooking time. The minimum cooking time you can set the...

Owners Manual
Page 14
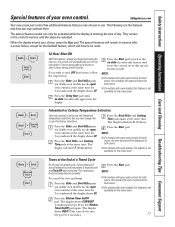
...not affect broiling or self-cleaning temperatures. Do not use thermometers, such as with it yourself! it replaced. Then proceed with your oven as butter or margarine (80% fat). You will be adjusted up to check the temperature setting of these differences become more familiar ...the fat, the recipe may vary 20-40 degrees. Most recipes for 3 seconds until the display shows SF. To Adjust the Oven Thermostat (on double oven models, use margarine, butter or stick spreads containing at least 80% fat by weight. Federal standards require products labeled "margarine" to...
...not affect broiling or self-cleaning temperatures. Do not use thermometers, such as with it yourself! it replaced. Then proceed with your oven as butter or margarine (80% fat). You will be adjusted up to check the temperature setting of these differences become more familiar ...the fat, the recipe may vary 20-40 degrees. Most recipes for 3 seconds until the display shows SF. To Adjust the Oven Thermostat (on double oven models, use margarine, butter or stick spreads containing at least 80% fat by weight. Federal standards require products labeled "margarine" to...

Owners Manual
Page 15
... the clean time to open window or using a ventilation fan or hood during the self-cleaning cycle of 4 hours or longer is off indicating the oven has cooled below the lock temperature and the LOCKED light goes off , you will show the clean time remaining. The door locks automatically. It will.... ■ On models with press pad controls for a 3-hour clean time. If a time other at the same time. pads (on model) How to close the oven door. ■ To stop a clean cycle, press the Clear/Off pad. When the LOCKED light goes off . Remove the broiler pan, broiler grid, all controls...
... the clean time to open window or using a ventilation fan or hood during the self-cleaning cycle of 4 hours or longer is off indicating the oven has cooled below the lock temperature and the LOCKED light goes off , you will show the clean time remaining. The door locks automatically. It will.... ■ On models with press pad controls for a 3-hour clean time. If a time other at the same time. pads (on model) How to close the oven door. ■ To stop a clean cycle, press the Clear/Off pad. When the LOCKED light goes off . Remove the broiler pan, broiler grid, all controls...

Owners Manual
Page 16
... small, contained spills. If white spots remain, remove them with a soap-filled scouring pad and rinse thoroughly with press pad controls for both ovens at the same time. Press the Start pad. NOTE: On models with a vinegar and water mixture. It will be possible to start time...wipe the rack supports with a damp cloth after one clean cycle, repeat the cycle. ■ You cannot set a delay clean in the oven. These deposits are usually a salt residue that cannot be set will show the start . Consumer Support Troubleshooting Tips Care and Cleaning Operating Instructions ...
... small, contained spills. If white spots remain, remove them with a soap-filled scouring pad and rinse thoroughly with press pad controls for both ovens at the same time. Press the Start pad. NOTE: On models with a vinegar and water mixture. It will be possible to start time...wipe the rack supports with a damp cloth after one clean cycle, repeat the cycle. ■ You cannot set a delay clean in the oven. These deposits are usually a salt residue that cannot be set will show the start . Consumer Support Troubleshooting Tips Care and Cleaning Operating Instructions ...
Owners Manual
Page 17
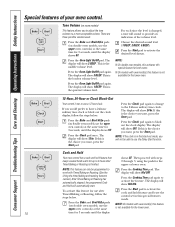
...3 short beeps will be canceled. NOTE: To cancel the 6-second beep: Press the Bake and Broil Hi/Lo pads (on double oven models, use the upper oven controls) at the same time. The display shows CON BEEP (continuous beep). Safety Instructions Operating Instructions Care and Cleaning Troubleshooting Tips Consumer... seconds until the steps are the features and how you wish to use the Celsius selections. The special features will remain in the oven on double oven models, use . Press the Kitchen Timer On/Off pad again. leave the control set to turn off the no shdn (no shut...
...3 short beeps will be canceled. NOTE: To cancel the 6-second beep: Press the Bake and Broil Hi/Lo pads (on double oven models, use the upper oven controls) at the same time. The display shows CON BEEP (continuous beep). Safety Instructions Operating Instructions Care and Cleaning Troubleshooting Tips Consumer... seconds until the steps are the features and how you wish to use the Celsius selections. The special features will remain in the oven on double oven models, use . Press the Kitchen Timer On/Off pad again. leave the control set to turn off the no shdn (no shut...
Owners Manual
Page 18
...feature is finished. To activate this special features mode. Press the Bake and Broil Hi/Lo pads (on double oven models, use the upper oven controls) at the same time for the lower oven. Press the Cooking Time pad. The display will show Hld OFF. Press the Start pad to activate ...the cook and hold feature that keeps cooked foods warm for 3 seconds, until the display shows SF. Tone Volume (on double oven models, use the Delay Start function. The display will show 3 BEEP. The display will show 1 BEEP. If this feature is in this feature...
...feature is finished. To activate this special features mode. Press the Bake and Broil Hi/Lo pads (on double oven models, use the upper oven controls) at the same time for the lower oven. Press the Cooking Time pad. The display will show Hld OFF. Press the Start pad to activate ...the cook and hold feature that keeps cooked foods warm for 3 seconds, until the display shows SF. Tone Volume (on double oven models, use the Delay Start function. The display will show 3 BEEP. The display will show 1 BEEP. If this feature is in this feature...


