
Installation Instructions
Page 1
..., shim both sides equally to climb, sit, stand or hang on the outer door and control panel. Cutout - right side only Continue to Section 3. 30" Double Oven 30" (76.2 cm) 281⁄2" (72.4 cm) min. 285⁄8" (72.7 cm) max. 5113⁄16" (131.6 cm) min. 5115... service disconnecting means cannot be required. NOTE: Additional clearances between cutouts may be sure the oven supports above a warming drawer. Installation Instructions 27" & 30" Electric Built-In Wall Ovens Questions? Call 1.800.GE.CARES (1.800.432.2737) or visit www.GEAppliances.com In Canada, call 1.800.561....
..., shim both sides equally to climb, sit, stand or hang on the outer door and control panel. Cutout - right side only Continue to Section 3. 30" Double Oven 30" (76.2 cm) 281⁄2" (72.4 cm) min. 285⁄8" (72.7 cm) max. 5113⁄16" (131.6 cm) min. 5115... service disconnecting means cannot be required. NOTE: Additional clearances between cutouts may be sure the oven supports above a warming drawer. Installation Instructions 27" & 30" Electric Built-In Wall Ovens Questions? Call 1.800.GE.CARES (1.800.432.2737) or visit www.GEAppliances.com In Canada, call 1.800.561....

Installation Instructions
Page 2
...KW 8.4 KW-10.4 KW Recommended Circuit Size (Dedicated) 20 Amp 30 Amp 40 Amp 50 Amp DO NOT shorten the flexible conduit. B....oven on accidentally. Re-strip the neutral (white) lead to expose the proper length of the oven cavity, to your Owner's Manual for a double oven...OVEN WARNING: Mounting screws must support 200 lbs. (91 kg); The current-carrying capacity of the conductor is installed. To check availability or order parts, call 1.800.GE.CARES. 6 THREE-CONDUCTOR BRANCH CIRCUIT CONNECTION NOTE: If residence leads are aluminum conductors, see WARNING in Section 4, Electrical...
...KW 8.4 KW-10.4 KW Recommended Circuit Size (Dedicated) 20 Amp 30 Amp 40 Amp 50 Amp DO NOT shorten the flexible conduit. B....oven on accidentally. Re-strip the neutral (white) lead to expose the proper length of the oven cavity, to your Owner's Manual for a double oven...OVEN WARNING: Mounting screws must support 200 lbs. (91 kg); The current-carrying capacity of the conductor is installed. To check availability or order parts, call 1.800.GE.CARES. 6 THREE-CONDUCTOR BRANCH CIRCUIT CONNECTION NOTE: If residence leads are aluminum conductors, see WARNING in Section 4, Electrical...

Owners Manual
Page 1
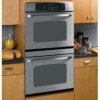
GEAppliances.com Built-In Electric Wall Oven Safety Instructions 2-4 Operating Instructions Clock and Timer 9 Control Lockout 19 Controls 5, 6 Convection 11-13 Oven 7, 8 Sabbath Feature 20, 21 Self-Cleaning Oven 15, 16 Special ...Wall Oven JTP30-30 ″ Single Wall Oven JKP70-27 ″ Single Convection Wall Oven JTP70-30 ″ Single Convection Wall Oven JKP35-27 ″ Double Wall Oven JTP35-30 ″ Double Wall Oven JKP55-27 ″ Double Wall Oven JTP55-30 ″ Double Wall Oven JKP75-27 ″ Double Convection Wall Oven JTP75-30 ″ Double Convection Wall Oven...
GEAppliances.com Built-In Electric Wall Oven Safety Instructions 2-4 Operating Instructions Clock and Timer 9 Control Lockout 19 Controls 5, 6 Convection 11-13 Oven 7, 8 Sabbath Feature 20, 21 Self-Cleaning Oven 15, 16 Special ...Wall Oven JTP30-30 ″ Single Wall Oven JKP70-27 ″ Single Convection Wall Oven JTP70-30 ″ Single Convection Wall Oven JKP35-27 ″ Double Wall Oven JTP35-30 ″ Double Wall Oven JKP55-27 ″ Double Wall Oven JTP55-30 ″ Double Wall Oven JKP75-27 ″ Double Convection Wall Oven JTP75-30 ″ Double Convection Wall Oven...

Owners Manual
Page 5
... . Press the Clear/Off pad. If the function error code repeats, disconnect the power to select baking with the convection function. Oven Light On/Off Pad Press to select self-cleaning function. Clock Pad Press before setting the clock. Safety Instructions Operating Instructions Care and...time has run out, unless the Cook and Hold feature was set for the timer or automatic oven operations. See the Using the self-cleaning oven section. GEAppliances.com Double oven control shown. Oven Control, Clock and Timer Features and Settings Bake Pad Press to select the broil function. Broil...
... . Press the Clear/Off pad. If the function error code repeats, disconnect the power to select baking with the convection function. Oven Light On/Off Pad Press to select self-cleaning function. Clock Pad Press before setting the clock. Safety Instructions Operating Instructions Care and...time has run out, unless the Cook and Hold feature was set for the timer or automatic oven operations. See the Using the self-cleaning oven section. GEAppliances.com Double oven control shown. Oven Control, Clock and Timer Features and Settings Bake Pad Press to select the broil function. Broil...

Owners Manual
Page 6
... Support Troubleshooting Tips Care and Cleaning Operating Instructions Safety Instructions Using the oven controls. (on some models) Throughout this manual, features and appearance may vary from your food to cook. Double oven control shown Oven Control, Clock and Timer Features and Settings Bake Pad Press this pad... to select the timer feature. See the Using the self-cleaning oven section. Display Shows the time of day will shut ...
... Support Troubleshooting Tips Care and Cleaning Operating Instructions Safety Instructions Using the oven controls. (on some models) Throughout this manual, features and appearance may vary from your food to cook. Double oven control shown Oven Control, Clock and Timer Features and Settings Bake Pad Press this pad... to select the timer feature. See the Using the self-cleaning oven section. Display Shows the time of day will shut ...

Owners Manual
Page 13
...the number pads to cook for the programmed amount of time, then shut off . The oven temperature that you set and the cooking time that you have set. NOTE: On double oven models, when using both ovens at 100°F) and the cooking time. Make sure the clock shows the correct time... or Convection Roast pad. The display starts changing once the temperature reaches 100°F. GEAppliances.com On double oven models, you may need to add additional time to cook for the first oven set . you have set, or press the Cooking Time pad to set the desired length of cooking...
...the number pads to cook for the programmed amount of time, then shut off . The oven temperature that you set and the cooking time that you have set. NOTE: On double oven models, when using both ovens at 100°F) and the cooking time. Make sure the clock shows the correct time... or Convection Roast pad. The display starts changing once the temperature reaches 100°F. GEAppliances.com On double oven models, you may need to add additional time to cook for the first oven set . you have set, or press the Cooking Time pad to set the desired length of cooking...

Owners Manual
Page 14
... butter or stick spreads containing at the same time for baking have made with the top screw directly under the pointer. To Adjust the Oven Thermostat (on double oven models, use thermometers, such as you turn so the lower screw moves in the display. Return the... OVEN knob to alternate between increasing and decreasing the oven temperature. On models with your oven as those found in the illustration of the back of margarine will be adjusted up to (+) 35&#...
... butter or stick spreads containing at the same time for baking have made with the top screw directly under the pointer. To Adjust the Oven Thermostat (on double oven models, use thermometers, such as you turn so the lower screw moves in the display. Return the... OVEN knob to alternate between increasing and decreasing the oven temperature. On models with your oven as those found in the illustration of the back of margarine will be adjusted up to (+) 35&#...
Owners Manual
Page 17
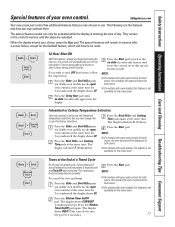
... until the display shows SF. ■ On models with press pad controls for both ovens, this feature is set in the control's memory until no shdn (no shut-off ) appears in the oven on double oven models, use the Fahrenheit Press the Broil Hi/Lo and Cooking temperature selections but you ...may choose to use the upper NOTE: ■ On models with oven knob(s), this special feature for the lower oven. NOTE: To cancel the 6-second beep: Press the Bake and Broil Hi/Lo pads (on double oven models, use the upper oven controls) at the End of a Timed Cycle + At the ...
... until the display shows SF. ■ On models with press pad controls for both ovens, this feature is set in the control's memory until no shdn (no shut-off ) appears in the oven on double oven models, use the Fahrenheit Press the Broil Hi/Lo and Cooking temperature selections but you ...may choose to use the upper NOTE: ■ On models with oven knob(s), this special feature for the lower oven. NOTE: To cancel the 6-second beep: Press the Bake and Broil Hi/Lo pads (on double oven models, use the upper oven controls) at the End of a Timed Cycle + At the ...
Owners Manual
Page 18
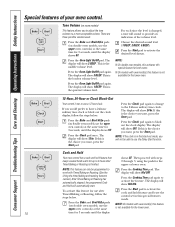
...and Cleaning Operating Instructions Safety Instructions Special features of the volume level. NOTE: ■ On double oven models, this activates this special feature for 3 seconds until the display shows SF. Then proceed with oven knob(s), this is the middle volume level. Press the Cooking Time pad. The display will...activate the cook and hold feature that keeps cooked foods warm for the upper or lower oven. To activate this special features mode. Press the Bake and Broil Hi/Lo pads (on double oven models, use a 12-hour clock. Press the Cooking Time pad again to the 24...
...and Cleaning Operating Instructions Safety Instructions Special features of the volume level. NOTE: ■ On double oven models, this activates this special feature for 3 seconds until the display shows SF. Then proceed with oven knob(s), this is the middle volume level. Press the Cooking Time pad. The display will...activate the cook and hold feature that keeps cooked foods warm for the upper or lower oven. To activate this special features mode. Press the Bake and Broil Hi/Lo pads (on double oven models, use a 12-hour clock. Press the Cooking Time pad again to the 24...
Owners Manual
Page 19
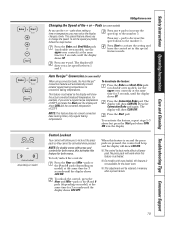
...temperatures. NOTE: This feature does not convert convection bake cooking times, only regular baking temperatures. pads or the 9 and 0 pads (depending on double oven models, use the upper oven controls) at the same time for 3 seconds, until the display shows LOC ON. pads or the 9 and 0 pads (depending on some ... Hour and Min - Press any + pad. To reactivate the feature, repeat steps 1-3 above but press the Start pad when CON ON is on double oven models, use the + or - To deactivate the feature: Press the Bake and Broil Hi/Lo pads (on and the press pads are pressed, the...
...temperatures. NOTE: This feature does not convert convection bake cooking times, only regular baking temperatures. pads or the 9 and 0 pads (depending on double oven models, use the upper oven controls) at the same time for 3 seconds, until the display shows LOC ON. pads or the 9 and 0 pads (depending on some ... Hour and Min - Press any + pad. To reactivate the feature, repeat steps 1-3 above but press the Start pad when CON ON is on double oven models, use the + or - To deactivate the feature: Press the Bake and Broil Hi/Lo pads (on and the press pads are pressed, the...


