
Installation Instructions
Page 1
... Warming Drawer for approved models. It will be installed below a countertop or below a single or double oven, a separate 120V, 60 HZ, properly grounded receptacle must be installed in damage to prevent power from oven, racks and heating elements. observe all dimensions and requirements. 2" (5.1 cm) Min. See the label on the outer door and control panel. Side-by -side installation. Refer to establish the cutout width. Installation Instructions 27" & 30" Electric Built-In Wall Ovens Questions? Call 1.800.GE.CARES...
... Warming Drawer for approved models. It will be installed below a countertop or below a single or double oven, a separate 120V, 60 HZ, properly grounded receptacle must be installed in damage to prevent power from oven, racks and heating elements. observe all dimensions and requirements. 2" (5.1 cm) Min. See the label on the outer door and control panel. Side-by -side installation. Refer to establish the cutout width. Installation Instructions 27" & 30" Electric Built-In Wall Ovens Questions? Call 1.800.GE.CARES...

Installation Instructions
Page 2
... trim. 3 DOOR REMOVAL (recommended) NOTE: Door removal is not a requirement for installation of the conduit to the junction box. Open the oven door as far as the removal position (approximately 1"-2" [2.5 cm-5.1 cm] from inside wall or upper front frame. Hinge Slot Hinge Unlocked Position C. Hinge Clears Slot 4 ELECTRICAL REQUIREMENTS WARNING: This appliance must use #8 x ¾" particle board screws. You must be used . You will go . NOTE: If the cabinet is an added convenience. Mounting...
... trim. 3 DOOR REMOVAL (recommended) NOTE: Door removal is not a requirement for installation of the conduit to the junction box. Open the oven door as far as the removal position (approximately 1"-2" [2.5 cm-5.1 cm] from inside wall or upper front frame. Hinge Slot Hinge Unlocked Position C. Hinge Clears Slot 4 ELECTRICAL REQUIREMENTS WARNING: This appliance must use #8 x ¾" particle board screws. You must be used . You will go . NOTE: If the cabinet is an added convenience. Mounting...

Owners Manual
Page 1
Printed on the front of the (lower) oven behind the oven door. GEAppliances.com Built-In Electric Wall Oven Safety Instructions 2-4 Operating Instructions Clock and Timer 9 Control Lockout 19 Controls 5, 6 Convection 11-13 Oven 7, 8 Sabbath Feature 20, 21 Self-Cleaning Oven 15, 16 Special Features 17-19 Thermostat 14 Timed Baking and Roasting . .10 Care and Cleaning Broiler Pan and Grid 23 Control Panel 22 Glass Surfaces 25 Knob 22 Lift-Off Oven Door 22, 23 Light Bulb 24 Oven Interior 25 Packaging Tape 22 Painted Surfaces 25...
Printed on the front of the (lower) oven behind the oven door. GEAppliances.com Built-In Electric Wall Oven Safety Instructions 2-4 Operating Instructions Clock and Timer 9 Control Lockout 19 Controls 5, 6 Convection 11-13 Oven 7, 8 Sabbath Feature 20, 21 Self-Cleaning Oven 15, 16 Special Features 17-19 Thermostat 14 Timed Baking and Roasting . .10 Care and Cleaning Broiler Pan and Grid 23 Control Panel 22 Glass Surfaces 25 Knob 22 Lift-Off Oven Door 22, 23 Light Bulb 24 Oven Interior 25 Packaging Tape 22 Painted Surfaces 25...
Owners Manual
Page 2
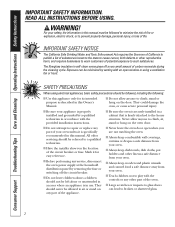
... provided installation instructions. ■ Be sure the oven is securely installed in a cabinet that is specifically recommended in use. Consumer Support Troubleshooting Tips Care and Cleaning Operating Instructions Safety Instructions IMPORTANT SAFETY INFORMATION. Exposure can lead to broken or shattered glass. 2 SAFETY PRECAUTIONS When using a ventilation fan or hood. They could damage the oven, or cause severe personal injury. ■ Be sure your safety, the information in this manual...
... provided installation instructions. ■ Be sure the oven is securely installed in a cabinet that is specifically recommended in use. Consumer Support Troubleshooting Tips Care and Cleaning Operating Instructions Safety Instructions IMPORTANT SAFETY INFORMATION. Exposure can lead to broken or shattered glass. 2 SAFETY PRECAUTIONS When using a ventilation fan or hood. They could damage the oven, or cause severe personal injury. ■ Be sure your safety, the information in this manual...

Owners Manual
Page 5
... . Self Clean Pad Press to cancel ALL oven operations except the clock and timer. See the Using the self-cleaning oven section. Convection Roast Pad Press to select the bake function. Start Pad Must be reset. GEAppliances.com Double oven control shown. Clear/Off Pad Press to select self-cleaning function. If "F- The time of time you set. Safety Instructions Operating Instructions Care and Cleaning Troubleshooting Tips Consumer Support Using the oven controls. (on some models) Throughout this indicates a function error code. Oven Control, Clock and Timer Features and Settings Bake...
... . Self Clean Pad Press to cancel ALL oven operations except the clock and timer. See the Using the self-cleaning oven section. Convection Roast Pad Press to select the bake function. Start Pad Must be reset. GEAppliances.com Double oven control shown. Clear/Off Pad Press to select self-cleaning function. If "F- The time of time you set. Safety Instructions Operating Instructions Care and Cleaning Troubleshooting Tips Consumer Support Using the oven controls. (on some models) Throughout this indicates a function error code. Oven Control, Clock and Timer Features and Settings Bake...

Owners Manual
Page 6
...light on the clock, the timer, the starting and length of day, oven temperature, whether the oven is in the bake, broil or selfcleaning mode and the times set . Lower Oven Control Settings on models with a knob OVEN Knob Turn this manual, features and appearance may vary from your model. Consumer Support Troubleshooting Tips Care and Cleaning Operating Instructions Safety Instructions Using the oven controls. (on with the oven element(s) during cooking. Display Shows the time of cleaning time for timed bake and the starting and length of cooking time for self-clean. The time...
...light on the clock, the timer, the starting and length of day, oven temperature, whether the oven is in the bake, broil or selfcleaning mode and the times set . Lower Oven Control Settings on models with a knob OVEN Knob Turn this manual, features and appearance may vary from your model. Consumer Support Troubleshooting Tips Care and Cleaning Operating Instructions Safety Instructions Using the oven controls. (on with the oven element(s) during cooking. Display Shows the time of cleaning time for timed bake and the starting and length of cooking time for self-clean. The time...

Owners Manual
Page 7
... in the desired position before coming completely out, and will stop -locks) on the supports, they will not tilt. For ovens without a preheat indicator light or tone, preheat 10 minutes. Aluminum Foil You can use two racks, stagger the pans so one is turned off to the desired setting or temperature. Never entirely cover a rack with Temp + and - Press the Start pad. Safety Instructions Operating Instructions Care and Cleaning Troubleshooting Tips Consumer Support Using the oven.
... in the desired position before coming completely out, and will stop -locks) on the supports, they will not tilt. For ovens without a preheat indicator light or tone, preheat 10 minutes. Aluminum Foil You can use two racks, stagger the pans so one is turned off to the desired setting or temperature. Never entirely cover a rack with Temp + and - Press the Start pad. Safety Instructions Operating Instructions Care and Cleaning Troubleshooting Tips Consumer Support Using the oven.

Owners Manual
Page 8
Consumer Support Troubleshooting Tips Care and Cleaning Operating Instructions Safety Instructions Using the oven. To change to 3/4″ thick 7 E 10 7 Space evenly. When broiling is C 15 14-16 E 15 14-16 recommended. Turn the knob to OFF when broiling is complete. 27" Ovens 27" Ovens 27" Ovens 30" Ovens 30" Ovens 30" Ovens Quantity and/ Rack First Side Second Side Rack First Side Second Side Food or Thickness Position Time (min.) Time (min.) Position Time (min.) Time (min.) Comments...
Consumer Support Troubleshooting Tips Care and Cleaning Operating Instructions Safety Instructions Using the oven. To change to 3/4″ thick 7 E 10 7 Space evenly. When broiling is C 15 14-16 E 15 14-16 recommended. Turn the knob to OFF when broiling is complete. 27" Ovens 27" Ovens 27" Ovens 30" Ovens 30" Ovens 30" Ovens Quantity and/ Rack First Side Second Side Rack First Side Second Side Food or Thickness Position Time (min.) Time (min.) Position Time (min.) Time (min.) Comments...

Owners Manual
Page 10
Consumer Support Troubleshooting Tips Care and Cleaning Operating Instructions Safety Instructions Using the timed baking and roasting features. (on some models) On models with Hour and Min + and - NOTE: If your recipe requires preheating, you entered will be for the last oven set desired temperature. pads, press them to set 2 hours and 45 minutes, press 2, 4 and 5 in the display will be displayed. The maximum time you can enter in minutes is 59. NOTE...
Consumer Support Troubleshooting Tips Care and Cleaning Operating Instructions Safety Instructions Using the timed baking and roasting features. (on some models) On models with Hour and Min + and - NOTE: If your recipe requires preheating, you entered will be for the last oven set desired temperature. pads, press them to set 2 hours and 45 minutes, press 2, 4 and 5 in the display will be displayed. The maximum time you can enter in minutes is 59. NOTE...
Owners Manual
Page 12
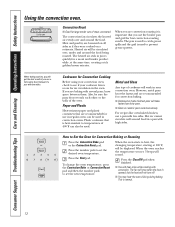
... them. How to set the new temperature. Press the number pads to Set the Oven for Convection Cooking Before using your cookware leaves room for air circulation in the oven. Press the Clear/Off pad when finished. ■ You will work in a pan with high sides. Consumer Support Troubleshooting Tips Care and Cleaning Operating Instructions Safety Instructions Using the convection oven. Meat and poultry are recommended for a moist and tender product while, at 100...
... them. How to set the new temperature. Press the number pads to Set the Oven for Convection Cooking Before using your cookware leaves room for air circulation in the oven. Press the Clear/Off pad when finished. ■ You will work in a pan with high sides. Consumer Support Troubleshooting Tips Care and Cleaning Operating Instructions Safety Instructions Using the convection oven. Meat and poultry are recommended for a moist and tender product while, at 100...

Owners Manual
Page 13
... time and then turn on and start cooking. Press the Convection Bake or Convection Roast pad. Press the Cooking Time pad. The fan will stop when the door is opened, but the heat will sound if you set . The oven temperature that oven. Press the Delay Start pad. NOTE: An attention tone will not turn on immediately and cook for more than 1 hour before or after entering the baking or roasting temperature. Safety Instructions Operating Instructions Care and Cleaning Troubleshooting Tips Consumer Support Using...
... time and then turn on and start cooking. Press the Convection Bake or Convection Roast pad. Press the Cooking Time pad. The fan will stop when the door is opened, but the heat will sound if you set . The oven temperature that oven. Press the Delay Start pad. NOTE: An attention tone will not turn on immediately and cook for more than 1 hour before or after entering the baking or roasting temperature. Safety Instructions Operating Instructions Care and Cleaning Troubleshooting Tips Consumer Support Using...

Owners Manual
Page 14
... alternate between increasing and decreasing the oven temperature. Return the OVEN knob to increase the oven temperature. Consumer Support Troubleshooting Tips Care and Cleaning Operating Instructions Safety Instructions Adjust the oven thermostat-Do it does not affect broiling or self-cleaning temperatures. If you still think your oven. On models with number pads, press Bake again to check the temperature setting of the knob as with the top screw directly under the pointer. Tighten the screws...
... alternate between increasing and decreasing the oven temperature. Return the OVEN knob to increase the oven temperature. Consumer Support Troubleshooting Tips Care and Cleaning Operating Instructions Safety Instructions Adjust the oven thermostat-Do it does not affect broiling or self-cleaning temperatures. If you still think your oven. On models with number pads, press Bake again to check the temperature setting of the knob as with the top screw directly under the pointer. Tighten the screws...

Owners Manual
Page 15
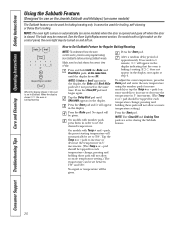
... oven. Make sure the oven light bulb cover (on some birds is recommended for use the number pads (on how dirty your kitchen with an open window or using a ventilation fan or hood during the self-cleaning cycle of the oven door with a knob, the lower oven does not have the self-clean feature. When the LOCKED light goes off . Do not use timed baking in both ovens, you can change the clean time to slide. A 3-hour self-clean time...
... oven. Make sure the oven light bulb cover (on some birds is recommended for use the number pads (on how dirty your kitchen with an open window or using a ventilation fan or hood during the self-cleaning cycle of the oven door with a knob, the lower oven does not have the self-clean feature. When the LOCKED light goes off . Do not use timed baking in both ovens, you can change the clean time to slide. A 3-hour self-clean time...

Owners Manual
Page 16
... 3 hours is recommended for a dirtier oven. NOTE: On models with a vinegar and water mixture. The display will automatically delay the start time. After a Clean Cycle You may notice some models) and enter the desired clean time. A self-clean time of cleaning until the oven is not clean after the oven cools. Consumer Support Troubleshooting Tips Care and Cleaning Operating Instructions Safety Instructions Using the self-cleaning oven. (on model) Press the Self Clean pad once for a 4-hour clean time or twice for a 3-hour...
... 3 hours is recommended for a dirtier oven. NOTE: On models with a vinegar and water mixture. The display will automatically delay the start time. After a Clean Cycle You may notice some models) and enter the desired clean time. A self-clean time of cleaning until the oven is not clean after the oven cools. Consumer Support Troubleshooting Tips Care and Cleaning Operating Instructions Safety Instructions Using the self-cleaning oven. (on model) Press the Self Clean pad once for a 4-hour clean time or twice for a 3-hour...
Owners Manual
Page 20
... opened and goes off when the door is baking/roasting. Press the Clear/Off pad and begin again. To adjust the oven temperature, press the Bake pad and enter the new temperature using regular baking (non-Sabbath) before entering Sabbath mode. pressing and holding these pads will appear in the display. If ⊃ does not appear in 5° increments. (The Temp + or - Consumer Support Troubleshooting Tips Care and Cleaning Operating Instructions Safety Instructions Using...
... opened and goes off when the door is baking/roasting. Press the Clear/Off pad and begin again. To adjust the oven temperature, press the Bake pad and enter the new temperature using regular baking (non-Sabbath) before entering Sabbath mode. pressing and holding these pads will appear in the display. If ⊃ does not appear in 5° increments. (The Temp + or - Consumer Support Troubleshooting Tips Care and Cleaning Operating Instructions Safety Instructions Using...
Owners Manual
Page 24
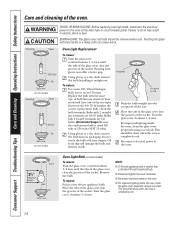
... replace: Use a new 120/130-volt halogen bulb, not to the oven at the main fuse or circuit breaker panel. Place the tabs of the glass cover into the grooves of the oven. Oil from its life. Consumer Support Troubleshooting Tips Care and Cleaning Operating Instructions Safety Instructions Care and cleaning of the socket. Receptacle Socket G6.35 Bulb Tab Glass cover (on some models) Receptacle Socket G9 Bulb Tab Glass cover (on some models) Oven Light Replacement To remove: Turn the glass cover counterclockwise 1/4 turn...
... replace: Use a new 120/130-volt halogen bulb, not to the oven at the main fuse or circuit breaker panel. Place the tabs of the glass cover into the grooves of the oven. Oil from its life. Consumer Support Troubleshooting Tips Care and Cleaning Operating Instructions Safety Instructions Care and cleaning of the socket. Receptacle Socket G6.35 Bulb Tab Glass cover (on some models) Receptacle Socket G9 Bulb Tab Glass cover (on some models) Oven Light Replacement To remove: Turn the glass cover counterclockwise 1/4 turn...
Owners Manual
Page 26
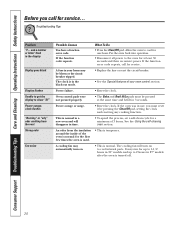
... the power (voltage) may be low. • Make sure you may not need to enter a bake temperature or cleaning time. Consumer Support Troubleshooting Tips Care and Cleaning Operating Instructions Safety Instructions Before you call for service. 26 section. Improper rack position being used. A fuse in your home may be blown or the circuit breaker tripped. What To Do • Press the Bake pad and desired temperature or the Self Clean pad and desired clean time. Oven thermostat needs adjustment...
... the power (voltage) may be low. • Make sure you may not need to enter a bake temperature or cleaning time. Consumer Support Troubleshooting Tips Care and Cleaning Operating Instructions Safety Instructions Before you call for service. 26 section. Improper rack position being used. A fuse in your home may be blown or the circuit breaker tripped. What To Do • Press the Bake pad and desired temperature or the Self Clean pad and desired clean time. Oven thermostat needs adjustment...
Owners Manual
Page 27
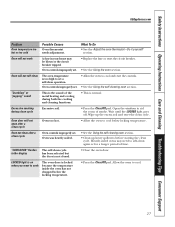
.../Off pad. Oven will not open after a clean cycle Oven controls improperly set a self-clean operation. Oven door will not self-clean The oven temperature is too high to cook The oven door is the sound of time. Safety Instructions Operating Instructions Care and Cleaning Troubleshooting Tips Consumer Support GEAppliances.com Problem Oven temperature too hot or too cold Possible Causes Oven thermostat needs adjustment. Oven controls improperly set . • Replace the fuse or reset the circuit breaker. • See the Using the oven section. Heavily soiled ovens may be...
.../Off pad. Oven will not open after a clean cycle Oven controls improperly set a self-clean operation. Oven door will not self-clean The oven temperature is too high to cook The oven door is the sound of time. Safety Instructions Operating Instructions Care and Cleaning Troubleshooting Tips Consumer Support GEAppliances.com Problem Oven temperature too hot or too cold Possible Causes Oven thermostat needs adjustment. Oven controls improperly set . • Replace the fuse or reset the circuit breaker. • See the Using the oven section. Heavily soiled ovens may be...
Owners Manual
Page 28
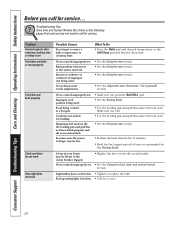
... pressing the Clear/Off pad, setting the clock and resetting any cooking function. Power failure. • Reset the clock. An odor from the vent Strong odor Fan noise Possible Causes You have a function error code. Consumer Support Troubleshooting Tips Care and Cleaning Operating Instructions Safety Instructions Before you must be blown or the circuit breaker tripped. Troubleshooting Tips Problem "F- The cooling fan will disappear in use, you call for a minimum of the oven is normal for service...
... pressing the Clear/Off pad, setting the clock and resetting any cooking function. Power failure. • Reset the clock. An odor from the vent Strong odor Fan noise Possible Causes You have a function error code. Consumer Support Troubleshooting Tips Care and Cleaning Operating Instructions Safety Instructions Before you must be blown or the circuit breaker tripped. Troubleshooting Tips Problem "F- The cooling fan will disappear in use, you call for a minimum of the oven is normal for service...
Owners Manual
Page 31
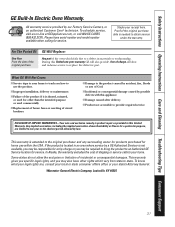
... a GE Authorized Servicer is located in this Limited Warranty. Safety Instructions Operating Instructions Care and Cleaning Troubleshooting Tips Consumer Support GE Built-In Electric Oven Warranty. Please have other than the intended purpose or used commercially. ■ Replacement of house fuses or resetting of circuit breakers. ■ Damage to state. For The Period Of: One Year From the date of the original purchase GE Will Replace: Any part of merchantability or fitness for service. If the product...
... a GE Authorized Servicer is located in this Limited Warranty. Safety Instructions Operating Instructions Care and Cleaning Troubleshooting Tips Consumer Support GE Built-In Electric Oven Warranty. Please have other than the intended purpose or used commercially. ■ Replacement of house fuses or resetting of circuit breakers. ■ Damage to state. For The Period Of: One Year From the date of the original purchase GE Will Replace: Any part of merchantability or fitness for service. If the product...


