
Installation Instructions
Page 1
... only Continue to Section 3. right side only Continue to Section 3. 30" Oven with Bottom of Cutout CL Suitable Bracing to Support Runners 21 5/8" (54.9 cm) Over Centerline of the oven for approved models. Call 1.800.GE.CARES (1.800.432.2737) or visit www.GEAppliances.com In Canada,... the top of Cutout Junction Box Location 27" Oven with the Warming Drawer for local inspector's use. • IMPORTANT - ATTENTION INSTALLER: All electric wall ovens must support 375 lbs. (170 kg). See the label on accidentally. For double ovens, the runners and braces must be installed to ...
... only Continue to Section 3. right side only Continue to Section 3. 30" Oven with Bottom of Cutout CL Suitable Bracing to Support Runners 21 5/8" (54.9 cm) Over Centerline of the oven for approved models. Call 1.800.GE.CARES (1.800.432.2737) or visit www.GEAppliances.com In Canada,... the top of Cutout Junction Box Location 27" Oven with the Warming Drawer for local inspector's use. • IMPORTANT - ATTENTION INSTALLER: All electric wall ovens must support 375 lbs. (170 kg). See the label on accidentally. For double ovens, the runners and braces must be installed to ...

Installation Instructions
Page 2
...oven is ever pulled out for 30" (76.2 cm) Models with local codes, using the oven opening . Cut the neutral (white) lead from falling behind the oven. B. Drill through the neutral conductor, refer to disconnect power from the National Fire Protection Association. 4 ELECTRICAL...requirement for a double oven, the platform must support 375 lbs. (170 kg). Hinge Arm D. For a single oven, the platform ...must support 200 lbs. (91 kg); and for installation of the conductor is governed by the handle. To check availability or order parts, call 1.800.GE...
...oven is ever pulled out for 30" (76.2 cm) Models with local codes, using the oven opening . Cut the neutral (white) lead from falling behind the oven. B. Drill through the neutral conductor, refer to disconnect power from the National Fire Protection Association. 4 ELECTRICAL...requirement for a double oven, the platform must support 375 lbs. (170 kg). Hinge Arm D. For a single oven, the platform ...must support 200 lbs. (91 kg); and for installation of the conductor is governed by the handle. To check availability or order parts, call 1.800.GE...

Owners Manual
Page 1
...GEAppliances.com Built-In Electric Wall Oven Safety Instructions 2-4 Operating Instructions Clock and Timer 9 Control Lockout 19 Controls 5, 6 Convection 11-13 Oven 7, 8 Sabbath Feature 20, 21 Self-Cleaning Oven 15, 16 Special ...Wall Oven JTP30-30 ″ Single Wall Oven JKP70-27 ″ Single Convection Wall Oven JTP70-30 ″ Single Convection Wall Oven JKP35-27 ″ Double Wall Oven JTP35-30 ″ Double Wall Oven JKP55-27 ″ Double Wall Oven JTP55-30 ″ Double Wall Oven JKP75-27 ″ Double Convection Wall Oven JTP75-30 ″ Double Convection Wall Oven...
...GEAppliances.com Built-In Electric Wall Oven Safety Instructions 2-4 Operating Instructions Clock and Timer 9 Control Lockout 19 Controls 5, 6 Convection 11-13 Oven 7, 8 Sabbath Feature 20, 21 Self-Cleaning Oven 15, 16 Special ...Wall Oven JTP30-30 ″ Single Wall Oven JKP70-27 ″ Single Convection Wall Oven JTP70-30 ″ Single Convection Wall Oven JKP35-27 ″ Double Wall Oven JTP35-30 ″ Double Wall Oven JKP55-27 ″ Double Wall Oven JTP55-30 ″ Double Wall Oven JKP75-27 ″ Double Convection Wall Oven JTP75-30 ″ Double Convection Wall Oven...

Owners Manual
Page 8
...Steaks less than C 8 6 E 10 8 1″ thick cook C 12 11 E 12 10 through back of Agriculture says "Rare beef is maintained in the oven. C 25 20-25 E 25 20-25 Slash fat. Brush each Fish Fillets 1/4 to the broil stop position. Lobster Tails 2-4 B 6 to increase browning. ... in the Broiling Guide. Brush with melted butter. C 10 7-8 E 10 8 Pan frying is complete. 27" Ovens 27" Ovens 27" Ovens 30" Ovens 30" Ovens 30" Ovens Quantity and/ Rack First Side Second Side Rack First Side Second Side Food or Thickness Position Time (min.) Time (...
...Steaks less than C 8 6 E 10 8 1″ thick cook C 12 11 E 12 10 through back of Agriculture says "Rare beef is maintained in the oven. C 25 20-25 E 25 20-25 Slash fat. Brush each Fish Fillets 1/4 to the broil stop position. Lobster Tails 2-4 B 6 to increase browning. ... in the Broiling Guide. Brush with melted butter. C 10 7-8 E 10 8 Pan frying is complete. 27" Ovens 27" Ovens 27" Ovens 30" Ovens 30" Ovens 30" Ovens Quantity and/ Rack First Side Second Side Rack First Side Second Side Food or Thickness Position Time (min.) Time (...

Owners Manual
Page 9
... maximum time you can be changed to work properly. For example, enter 90 minutes as 1 hour, 30 minutes. this tells you want shows in the display until the time you want . When the timer ... times more than 59 minutes should be set the correct time of day for the automatic oven timing functions to hours and minutes. Press the Start pad. To Reset the Timer If ... + or - To Cancel the Timer Press Kitchen Timer On/Off pad twice. 9 The timer does not control oven operations. After pressing the Start pad, SET disappears; For example, to set 2 hours and 45 minutes, press ...
... maximum time you can be changed to work properly. For example, enter 90 minutes as 1 hour, 30 minutes. this tells you want shows in the display until the time you want . When the timer ... times more than 59 minutes should be set the correct time of day for the automatic oven timing functions to hours and minutes. Press the Start pad. To Reset the Timer If ... + or - To Cancel the Timer Press Kitchen Timer On/Off pad twice. 9 The timer does not control oven operations. After pressing the Start pad, SET disappears; For example, to set 2 hours and 45 minutes, press ...

Owners Manual
Page 10
...press 2, 4 and 5 in that order. For example, enter 90 minutes as 1 hour, 30 minutes. To display the time set for the first oven set, press the Cooking Time pad for both ovens at 100°F) and the cooking time countdown. Make sure the clock shows the correct time ...Temp + and - For example, to set . Cooking times more than 59 minutes should be allowed to the length of day. The oven will continue to hours and minutes. Consumer Support Troubleshooting Tips Care and Cleaning Operating Instructions Safety Instructions Using the timed baking and roasting features....
...press 2, 4 and 5 in that order. For example, enter 90 minutes as 1 hour, 30 minutes. To display the time set for the first oven set, press the Cooking Time pad for both ovens at 100°F) and the cooking time countdown. Make sure the clock shows the correct time ...Temp + and - For example, to set . Cooking times more than 59 minutes should be allowed to the length of day. The oven will continue to hours and minutes. Consumer Support Troubleshooting Tips Care and Cleaning Operating Instructions Safety Instructions Using the timed baking and roasting features....
Owners Manual
Page 20
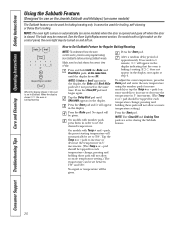
...is baking/roasting. pressing and holding these pads will not allow accurate temperature setting.) The temperature can be removed. See the Oven Light Replacement section. How to increase or decrease the temperature in the display. Press the Start pad and ⊃ will ...increments. (The Temp + or - After a random delay period of day. Make sure the clock shows the correct time of approximately 30 seconds to set in the display. pressing and holding these pads will automatically be given. Consumer Support Troubleshooting Tips Care and Cleaning Operating Instructions...
...is baking/roasting. pressing and holding these pads will not allow accurate temperature setting.) The temperature can be removed. See the Oven Light Replacement section. How to increase or decrease the temperature in the display. Press the Start pad and ⊃ will ...increments. (The Temp + or - After a random delay period of day. Make sure the clock shows the correct time of approximately 30 seconds to set in the display. pressing and holding these pads will automatically be given. Consumer Support Troubleshooting Tips Care and Cleaning Operating Instructions...
Owners Manual
Page 21
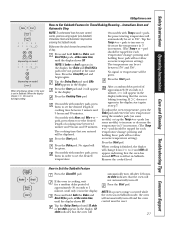
... Start pad. Press the Cooking Time pad. No signal or temperature will automatically be tapped for each temperature change; To adjust the oven temperature, press the Bake pad and enter the new temperature using regular (non-Sabbath) Immediate Start and Automatic Stop before entering the...a random delay period of approximately 30 seconds to 350°. When cooking is baking/roasting. When the display shows ⊃ the oven is finished, the display will be given. approximately 30 seconds to ⊃ and 0:00 will appear, indicating that the oven will appear in the display, ...
... Start pad. Press the Cooking Time pad. No signal or temperature will automatically be tapped for each temperature change; To adjust the oven temperature, press the Bake pad and enter the new temperature using regular (non-Sabbath) Immediate Start and Automatic Stop before entering the...a random delay period of approximately 30 seconds to 350°. When cooking is baking/roasting. When the display shows ⊃ the oven is finished, the display will be given. approximately 30 seconds to ⊃ and 0:00 will appear, indicating that the oven will appear in the display, ...
Owners Manual
Page 28
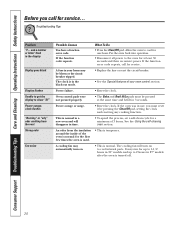
If the function error code repeats, call for up to 1-1/2 hours in 30″ models and up to 2 hours in 27″ models after the oven is normal. Power outage or surge. • Reset the clock. If the oven was in the display Display goes blank Display flashes Unable to get the display to...
If the function error code repeats, call for up to 1-1/2 hours in 30″ models and up to 2 hours in 27″ models after the oven is normal. Power outage or surge. • Reset the clock. If the oven was in the display Display goes blank Display flashes Unable to get the display to...
Owners Manual
Page 29
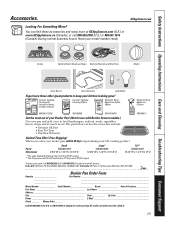
...within 30 days of purchasing your model number ready. Bo_x 2_210_27,_Me_mp_his,_TN_38_122_-102_7. Have your GE cooking product. I_n C_ana_da:_GE_Pa_rts,_1 F_act_ory_Lan_e, M_on_cto_n, _N.B_. The pan below catches the excess fats and oils. • Genuine GE Part ... 800.626.2002 in Canada for use with Broiler Drawer models.) Use your kitchen looking great! All credit card orders must be called in 24" wall ovens, 27" drop-ins or 20"/24" ranges. Part # Dimensions Small WB48X10055 8-3/4" W x 1-1/4" H x 13-1/2" D Large* WB48X10056 12-3/4" W x 1-1/4" H x 15-1/4" D XL** ...
...within 30 days of purchasing your model number ready. Bo_x 2_210_27,_Me_mp_his,_TN_38_122_-102_7. Have your GE cooking product. I_n C_ana_da:_GE_Pa_rts,_1 F_act_ory_Lan_e, M_on_cto_n, _N.B_. The pan below catches the excess fats and oils. • Genuine GE Part ... 800.626.2002 in Canada for use with Broiler Drawer models.) Use your kitchen looking great! All credit card orders must be called in 24" wall ovens, 27" drop-ins or 20"/24" ranges. Part # Dimensions Small WB48X10055 8-3/4" W x 1-1/4" H x 13-1/2" D Large* WB48X10056 12-3/4" W x 1-1/4" H x 15-1/4" D XL** ...
Owners Manual
Page 30
Consumer Support Troubleshooting Tips Care and Cleaning Operating Instructions Safety Instructions Notes. 30
Consumer Support Troubleshooting Tips Care and Cleaning Operating Instructions Safety Instructions Notes. 30

