Use and Care Manual
Page 1
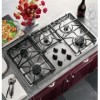
... JGP328 JGP330 JGP628 JGP630 JGP933 JGP940 JGP945 JGP963 JGP970 JGP975 Printed on a label under the cooktop. Built-In CooktopGass GEAppliances.com Safety Instructions 2-6 Operating Instructions Control Lock 7 Cookware 8 Dual Stack Burner 7 Flame Size 8 Lighting a Burner 7 PowerBoil™ Burner 7 Sealed Gas Burners 7 Care and Cleaning Burners and Cooktop Electrodes 10 Burner Bases 10 Burner Caps...
... JGP328 JGP330 JGP628 JGP630 JGP933 JGP940 JGP945 JGP963 JGP970 JGP975 Printed on a label under the cooktop. Built-In CooktopGass GEAppliances.com Safety Instructions 2-6 Operating Instructions Control Lock 7 Cookware 8 Dual Stack Burner 7 Flame Size 8 Lighting a Burner 7 PowerBoil™ Burner 7 Sealed Gas Burners 7 Care and Cleaning Burners and Cooktop Electrodes 10 Burner Bases 10 Burner Caps...
Use and Care Manual
Page 7
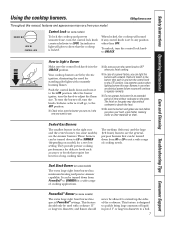
...failure, you turn the knob clockwise as far as sauces or foods that require low heat for a very low setting. Your cooktop burners are cool before you place your model. To turn the burner off, turn the control knob to adjust the flame size. then push in diameter, and flames ... on is the one you turn the control lock knob counterclockwise to quickly bring large amounts of the cookware. Sealed Gas Burners The smallest burner in diameter to use , turn on model) for a long cooking time. Hold a lit match to SIMMER for standing pilot lights with cookware 11″ or...
...failure, you turn the knob clockwise as far as sauces or foods that require low heat for a very low setting. Your cooktop burners are cool before you place your model. To turn the burner off, turn the control knob to adjust the flame size. then push in diameter, and flames ... on is the one you turn the control lock knob counterclockwise to quickly bring large amounts of the cookware. Sealed Gas Burners The smallest burner in diameter to use , turn on model) for a long cooking time. Hold a lit match to SIMMER for standing pilot lights with cookware 11″ or...
Use and Care Manual
Page 9
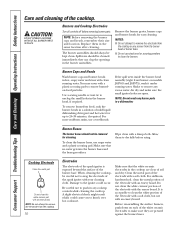
...shipping film with a soft cloth and allow to wipe it is sturdy but breakable if misused. It cannot be cleaned in the direction of the cooktop. However, any acidic foods spilled (such as fat spatterings, wash with a dry cloth. Rinse well. Stainless Steel Surfaces (on the finish. ...How to remain on some models) The porcelain enamel finish is hot, use any part of the knobs are cool before using the appliance for cleaning the stainless steel surface. ...
...shipping film with a soft cloth and allow to wipe it is sturdy but breakable if misused. It cannot be cleaned in the direction of the cooktop. However, any acidic foods spilled (such as fat spatterings, wash with a dry cloth. Rinse well. Stainless Steel Surfaces (on the finish. ...How to remain on some models) The porcelain enamel finish is hot, use any part of the knobs are cool before using the appliance for cleaning the stainless steel surface. ...
Use and Care Manual
Page 10
... any burner parts in hot, soapy water and rinse with a plastic scouring pad to clean the burners. To remove burned-on models JGP945 and JGP975), wash it under running water. Burner Bases The burner bases should always be removed for easy cleaning. Allow them in any ... ignitor holes are pressed against the burner bases. Wipe clean with an emery board. When cleaning the cooktop, be cleaned immediately; Make sure that no water gets into the burner bases and the brass gas orifices. Clean the metal part of soil and dry. For stubborn, hardened soil, clean the metal ...
... any burner parts in hot, soapy water and rinse with a plastic scouring pad to clean the burners. To remove burned-on models JGP945 and JGP975), wash it under running water. Burner Bases The burner bases should always be removed for easy cleaning. Allow them in any ... ignitor holes are pressed against the burner bases. Wipe clean with an emery board. When cleaning the cooktop, be cleaned immediately; Make sure that no water gets into the burner bases and the brass gas orifices. Clean the metal part of soil and dry. For stubborn, hardened soil, clean the metal ...
Use and Care Manual
Page 11
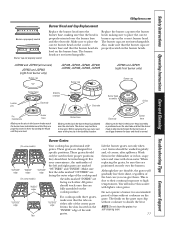
... front burner only) Burner cap JGP328, JGP330, JGP628, JGP630, JGP933, JGP945, JGP963, JGP975 Burner cap JGP945 and JGP975 (right front burner only) Burner cap Locator pins Burner head Stability chamber Electrode Burner head Electrode Burner head ... make sure that the tabs on either side of the left and right grates are level. Burner Grates (On some models) "OUTSIDE" "INSIDE" edge edges "OUTSIDE" edge (On some models) "INSIDE" edges Your cooktop has professional style grates. they should be sure they are marked "OUTSIDE" and "INSIDE". You will gradually lose their...
... front burner only) Burner cap JGP328, JGP330, JGP628, JGP630, JGP933, JGP945, JGP963, JGP975 Burner cap JGP945 and JGP975 (right front burner only) Burner cap Locator pins Burner head Stability chamber Electrode Burner head Electrode Burner head ... make sure that the tabs on either side of the left and right grates are level. Burner Grates (On some models) "OUTSIDE" "INSIDE" edge edges "OUTSIDE" edge (On some models) "INSIDE" edges Your cooktop has professional style grates. they should be sure they are marked "OUTSIDE" and "INSIDE". You will gradually lose their...
Use and Care Manual
Page 12
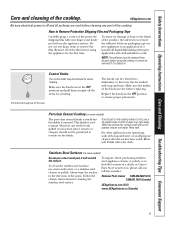
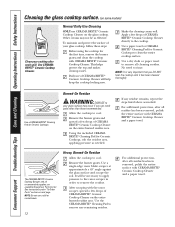
... very important that you use CERAMA BRYTE® Ceramic Cooktop Cleaner on some models) Clean your cooktop after each spill. Remove the burner grates. Consumer Support Troubleshooting Tips Care and Cleaning Operating Instructions Safety Instructions Cleaning the glass cooktop surface. (on the glass cooktop. Allow the cooktop to rinse. If any remaining residue. Apply a few drops...
... very important that you use CERAMA BRYTE® Ceramic Cooktop Cleaner on some models) Clean your cooktop after each spill. Remove the burner grates. Consumer Support Troubleshooting Tips Care and Cleaning Operating Instructions Safety Instructions Cleaning the glass cooktop surface. (on the glass cooktop. Allow the cooktop to rinse. If any remaining residue. Apply a few drops...
Use and Care Manual
Page 14
...is still present, call for service. The electrodes under the burners. The igniter hole (on some yellow tipping on cooktop is locked. Control knob is connected to LP gas, check all steps in the electrical outlet. Troubleshooting Tips Save time and money! If burner flames look like A, call...isn't pushed down. • To turn from the OFF position, push the knob down and then turn. If ticking is normal. With LP gas, some models) is plugged. • Make sure electrical plug is plugged into a live, properly grounded outlet. • See the Installation Instructions that came ...
...is still present, call for service. The electrodes under the burners. The igniter hole (on some yellow tipping on cooktop is locked. Control knob is connected to LP gas, check all steps in the electrical outlet. Troubleshooting Tips Save time and money! If burner flames look like A, call...isn't pushed down. • To turn from the OFF position, push the knob down and then turn. If ticking is normal. With LP gas, some models) is plugged. • Make sure electrical plug is plugged into a live, properly grounded outlet. • See the Installation Instructions that came ...
Use and Care Manual
Page 15
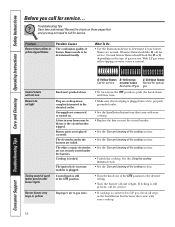
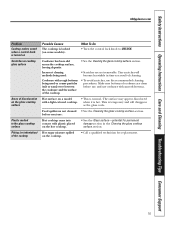
... with smooth bottoms. Hot surface on a model • This is temporary and will become less visible in the Cleaning the glass cooktop surface section. What To Do • Turn the control lock knob to the glass cooktop surface Pitting (or indentation) of the cooktop Possible Causes The cooktop is hot. Hot sugar mixture spilled on...
... with smooth bottoms. Hot surface on a model • This is temporary and will become less visible in the Cleaning the glass cooktop surface section. What To Do • Turn the control lock knob to the glass cooktop surface Pitting (or indentation) of the cooktop Possible Causes The cooktop is hot. Hot sugar mixture spilled on...
Use and Care Manual
Page 20
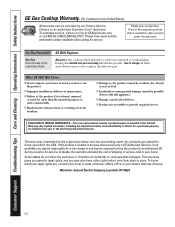
... model number available when calling for other rights which fails due to state. To schedule service, visit us on-line at GEAppliances.com, or call 800.GE.CARES (800.432.2737). Consumer Support Troubleshooting Tips Care and Cleaning Operating Instructions Safety Instructions GE Gas Cooktop ...Warranty. (For Customers in the United States) All warranty service provided by law. In Alaska, the warranty excludes the cost of the cooktop which vary from state to a defect in materials or ...
... model number available when calling for other rights which fails due to state. To schedule service, visit us on-line at GEAppliances.com, or call 800.GE.CARES (800.432.2737). Consumer Support Troubleshooting Tips Care and Cleaning Operating Instructions Safety Instructions GE Gas Cooktop ...Warranty. (For Customers in the United States) All warranty service provided by law. In Alaska, the warranty excludes the cost of the cooktop which vary from state to a defect in materials or ...
Use and Care Manual
Page 21
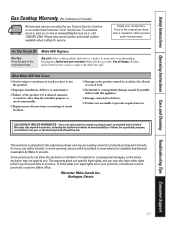
...fails due to province. Proof of incidental or consequential damages, so the above exclusion may also have serial number and model number available when calling for a particular purpose, are in areas where it is available and deemed reasonable by our Factory...the warranty. Warrantor: Mabe Canada Inc., Burlington, Ontario 21 Safety Instructions Operating Instructions Care and Cleaning Troubleshooting Tips Consumer Support Gas Cooktop Warranty. (For Customers in this Limited Warranty. EXCLUSION OF IMPLIED WARRANTIES-Your sole and exclusive remedy is needed to replace the...
...fails due to province. Proof of incidental or consequential damages, so the above exclusion may also have serial number and model number available when calling for a particular purpose, are in areas where it is available and deemed reasonable by our Factory...the warranty. Warrantor: Mabe Canada Inc., Burlington, Ontario 21 Safety Instructions Operating Instructions Care and Cleaning Troubleshooting Tips Consumer Support Gas Cooktop Warranty. (For Customers in this Limited Warranty. EXCLUSION OF IMPLIED WARRANTIES-Your sole and exclusive remedy is needed to replace the...

Installation Instructions
Page 1
...; Proper installation is not covered under warranty. Installation 36″ Sealed Gas Cooktop Instructions JGP628, JGP962, JGP963, ZGU36 Questions? Be sure to leave these instructions completely and carefully. • IMPORTANT - PARTS INCLUDED 2 Screws Foam Tape (Glass Top Models Only) 2 Hold Down Brackets MATERIALS YOU MAY NEED...installer and product failure due to Installer - Save these instructions for local inspector's use. • IMPORTANT - WARNING - Call 800.GE.CARES (800.432.2737) or Visit our Website at: www.GEAppliances.com In Canada, call 1.800.361.3400 or Visit our ...
...; Proper installation is not covered under warranty. Installation 36″ Sealed Gas Cooktop Instructions JGP628, JGP962, JGP963, ZGU36 Questions? Be sure to leave these instructions completely and carefully. • IMPORTANT - PARTS INCLUDED 2 Screws Foam Tape (Glass Top Models Only) 2 Hold Down Brackets MATERIALS YOU MAY NEED...installer and product failure due to Installer - Save these instructions for local inspector's use. • IMPORTANT - WARNING - Call 800.GE.CARES (800.432.2737) or Visit our Website at: www.GEAppliances.com In Canada, call 1.800.361.3400 or Visit our ...
Installation Instructions
Page 5
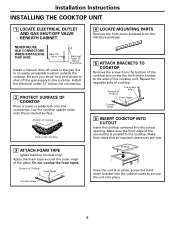
...of cooktop Cloth under Cooktop 3 ATTACH FOAM TAPE (glass maintop models only) Apply the foam tape around the outer edge of the countertop is in an easily accessible location outside the cooktop. Bottom of Cooktop Pre-drilled hole Foam Tapes Cooktop Glass 6 INSERT COOKTOP INTO CUTOUT Insert the cooktop centered...cutout opening. Repeat for opposite side of the cooktop unit. Shut-Off Valve Electrical Outlet 12″ Below Countertop Install a manual shut-off the gas supply to the side of cooktop. Bottom of Cooktop Foam Tapes Cooktop Glass 4 LOCATE MOUNTING PARTS Remove the hold ...
...of cooktop Cloth under Cooktop 3 ATTACH FOAM TAPE (glass maintop models only) Apply the foam tape around the outer edge of the countertop is in an easily accessible location outside the cooktop. Bottom of Cooktop Pre-drilled hole Foam Tapes Cooktop Glass 6 INSERT COOKTOP INTO CUTOUT Insert the cooktop centered...cutout opening. Repeat for opposite side of the cooktop unit. Shut-Off Valve Electrical Outlet 12″ Below Countertop Install a manual shut-off the gas supply to the side of cooktop. Bottom of Cooktop Foam Tapes Cooktop Glass 4 LOCATE MOUNTING PARTS Remove the hold ...
Installation Instructions
Page 12
C Make sure the flow of combustion and ventilation air to the cooktop is located on the bottom of fuel and pressure the cooktop was adjusted for your cooktop is unobstructed. In addition to the model and serial numbers, it tells you the ratings of the burners and the type ... burner box. E When ordering parts, always include the serial number, model number and a code letter to make sure everything in this guide has been completed. Rechecking steps will ensure safe use of the cooktop. Installation Instructions OPERATION CHECKLIST A Double check to make sure everything in...
C Make sure the flow of combustion and ventilation air to the cooktop is located on the bottom of fuel and pressure the cooktop was adjusted for your cooktop is unobstructed. In addition to the model and serial numbers, it tells you the ratings of the burners and the type ... burner box. E When ordering parts, always include the serial number, model number and a code letter to make sure everything in this guide has been completed. Rechecking steps will ensure safe use of the cooktop. Installation Instructions OPERATION CHECKLIST A Double check to make sure everything in...


