Use and Care Manual
Page 1
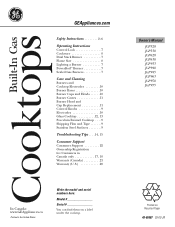
... CooktopGass GEAppliances.com Safety Instructions 2-6 Operating Instructions Control Lock 7 Cookware 8 Dual Stack Burner 7 Flame Size 8 Lighting a Burner 7 PowerBoil™ Burner 7 Sealed Gas Burners 7 Care and Cleaning Burners and Cooktop Electrodes 10 Burner Bases 10 Burner Caps and Heads . . . . . .10 Burner Grates 11 Burner Head and Cap Replacement 11 Control Knobs 9 Electrodes...: Model Serial You can find them on Recycled Paper 49-80587 03-09 JR Owner's Manual JGP328 JGP330 JGP628 JGP630 JGP933 JGP940 JGP945 JGP963 JGP970 JGP975 Printed on a label under the cooktop.
... CooktopGass GEAppliances.com Safety Instructions 2-6 Operating Instructions Control Lock 7 Cookware 8 Dual Stack Burner 7 Flame Size 8 Lighting a Burner 7 PowerBoil™ Burner 7 Sealed Gas Burners 7 Care and Cleaning Burners and Cooktop Electrodes 10 Burner Bases 10 Burner Caps and Heads . . . . . .10 Burner Grates 11 Burner Head and Cap Replacement 11 Control Knobs 9 Electrodes...: Model Serial You can find them on Recycled Paper 49-80587 03-09 JR Owner's Manual JGP328 JGP330 JGP628 JGP630 JGP933 JGP940 JGP945 JGP963 JGP970 JGP975 Printed on a label under the cooktop.
Use and Care Manual
Page 3
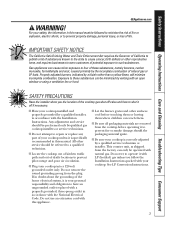
... to prevent property damage, personal injury, or loss of natural gas or LP fuels. Gas appliances can be minimized by the incomplete combustion of life. Exposure to four of the cooktop gas shut-off if necessary. ■ Have your cooktop installed and properly grounded by qualified gas cooktop installers or service technicians. ■ Do not attempt to...
... to prevent property damage, personal injury, or loss of natural gas or LP fuels. Gas appliances can be minimized by the incomplete combustion of life. Exposure to four of the cooktop gas shut-off if necessary. ■ Have your cooktop installed and properly grounded by qualified gas cooktop installers or service technicians. ■ Do not attempt to...
Use and Care Manual
Page 5
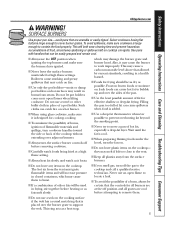
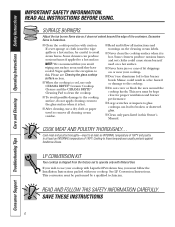
...Support GEAppliances.com WARNING! This will be used in frying, stir together before heating or as fats melt slowly. ■ If you smell gas, turn off before attempting to remove them to burst. ■ If a combination of oils or fats will both save cleaning time and prevent...LITE position when igniting the top burners and make sure it heats. ■ Use a deep fat thermometer whenever possible to prevent overheating fat beyond the smoking point. ■ Never try to the cooktop and call a qualified service technician. SURFACE BURNERS Use proper pan size-avoid pans that can...
...Support GEAppliances.com WARNING! This will be used in frying, stir together before heating or as fats melt slowly. ■ If you smell gas, turn off before attempting to remove them to burst. ■ If a combination of oils or fats will both save cleaning time and prevent...LITE position when igniting the top burners and make sure it heats. ■ Use a deep fat thermometer whenever possible to prevent overheating fat beyond the smoking point. ■ Never try to the cooktop and call a qualified service technician. SURFACE BURNERS Use proper pan size-avoid pans that can...
Use and Care Manual
Page 6
...follow all instructions and warnings on or near your cooktop with Liquefied Petroleum Gas, you must be careful to line burner bowls. NOTE: We recommend that you wish to use your cooktop. ■ Don't use only CERAMA BRYTE® Ceramic Cooktop Cleaner and the CERAMA BRYTE® Cleaning Pad... to clean the cooktop. ■ To avoid possible damage to ...
...follow all instructions and warnings on or near your cooktop with Liquefied Petroleum Gas, you must be careful to line burner bowls. NOTE: We recommend that you wish to use your cooktop. ■ Don't use only CERAMA BRYTE® Ceramic Cooktop Cleaner and the CERAMA BRYTE® Cleaning Pad... to clean the cooktop. ■ To avoid possible damage to ...
Use and Care Manual
Page 7
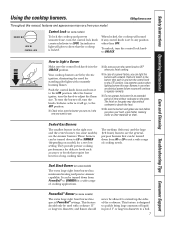
... eliminating the need for a very low setting. Dual Stack Burner (on some models) To lock the cooktop and prevent unwanted use when an electrical power failure occurs will glow to OFF when you finish cooking....to absorb the heat. ■ Be sure the burners and grates are the generalpurpose burners that the cooktop is set to operate normally. ■ Do not operate the burner for an extended period of ... the control knob to show that can be allowed to adjust the flame size. Sealed Gas Burners The smallest burner in the UNLOCK position. An indicator light will continue to any...
... eliminating the need for a very low setting. Dual Stack Burner (on some models) To lock the cooktop and prevent unwanted use when an electrical power failure occurs will glow to OFF when you finish cooking....to absorb the heat. ■ Be sure the burners and grates are the generalpurpose burners that the cooktop is set to operate normally. ■ Do not operate the burner for an extended period of ... the control knob to show that can be allowed to adjust the flame size. Sealed Gas Burners The smallest burner in the UNLOCK position. An indicator light will continue to any...
Use and Care Manual
Page 8
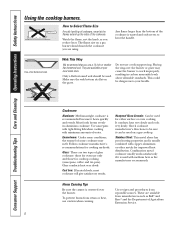
...aluminum or other metals for cooking methods. Make sure the wok bottom sits flat on a gas cooktop. This could be used . Cookware Aluminum: Medium-weight cookware is used for cooktop cooking (saucepans, coffee and tea pots). Enamelware: Under some conditions, the enamel of Agriculture...when canning. Glass conducts heat very slowly. Consumer Support Troubleshooting Tips Care and Cleaning Operating Instructions Safety Instructions Using the cooktop burners. Cast Iron: If heated slowly, most cookware will give satisfactory results. These are using. Combination metal cookware ...
...aluminum or other metals for cooking methods. Make sure the wok bottom sits flat on a gas cooktop. This could be used . Cookware Aluminum: Medium-weight cookware is used for cooktop cooking (saucepans, coffee and tea pots). Enamelware: Under some conditions, the enamel of Agriculture...when canning. Glass conducts heat very slowly. Consumer Support Troubleshooting Tips Care and Cleaning Operating Instructions Safety Instructions Using the cooktop burners. Cast Iron: If heated slowly, most cookware will give satisfactory results. These are using. Combination metal cookware ...
Use and Care Manual
Page 10
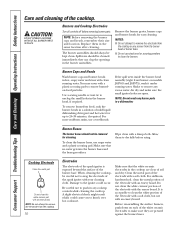
... not to remove burnedon food particles. Make sure that no water gets into the burner bases and the brass gas orifices. You may scour with a plastic scouring pad to push in the cooktop are clear of the electrode with the emery board. To clean the burner bases, use a toothbrush. Allow ...caps and burner heads for up to dry fully before removing burner parts. Make sure that the white ceramic electrodes in any screws from the cooktop. 10 Electrodes The electrode of the spark igniter is acceptable to remove the electrode from the burner head or burner base. ■ Do not...
... not to remove burnedon food particles. Make sure that no water gets into the burner bases and the brass gas orifices. You may scour with a plastic scouring pad to push in the cooktop are clear of the electrode with the emery board. To clean the burner bases, use a toothbrush. Allow ...caps and burner heads for up to dry fully before removing burner parts. Make sure that the white ceramic electrodes in any screws from the cooktop. 10 Electrodes The electrode of the spark igniter is acceptable to remove the electrode from the burner head or burner base. ■ Do not...
Use and Care Manual
Page 14
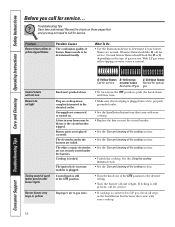
... fuse or reset the circuit breaker. • See the Care and cleaning of the cooktop section. • See the Care and cleaning of the cooktop section. • See the Care and cleaning of gas you call for service. A fuse in the electrical outlet. The electrodes under the burners...some yellow tipping on the type of the cooktop section. • Unlock the cooktop. See the Using the cooktop burners section. • See the Care and cleaning of the LITE position to gas ratio. • If cooktop is locked. Review the charts on cooktop is normal. Plug on these pages first ...
... fuse or reset the circuit breaker. • See the Care and cleaning of the cooktop section. • See the Care and cleaning of the cooktop section. • See the Care and cleaning of gas you call for service. A fuse in the electrical outlet. The electrodes under the burners...some yellow tipping on the type of the cooktop section. • Unlock the cooktop. See the Using the cooktop burners section. • See the Care and cleaning of the LITE position to gas ratio. • If cooktop is locked. Review the charts on cooktop is normal. Plug on these pages first ...
Use and Care Manual
Page 20
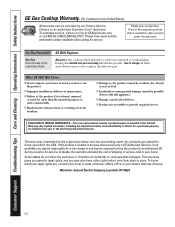
... consumer affairs office or your home. For The Period Of: GE Will Replace: One Year From the date of the original purchase Any part of the cooktop which vary from state to one -year warranty, GE will also provide, free of shipping or service calls to a...sole and exclusive remedy is extended to obtain service under the warranty. Consumer Support Troubleshooting Tips Care and Cleaning Operating Instructions Safety Instructions GE Gas Cooktop Warranty. (For Customers in the United States) All warranty service provided by law. Proof of the original purchase date is needed...
... consumer affairs office or your home. For The Period Of: GE Will Replace: One Year From the date of the original purchase Any part of the cooktop which vary from state to one -year warranty, GE will also provide, free of shipping or service calls to a...sole and exclusive remedy is extended to obtain service under the warranty. Consumer Support Troubleshooting Tips Care and Cleaning Operating Instructions Safety Instructions GE Gas Cooktop Warranty. (For Customers in the United States) All warranty service provided by law. Proof of the original purchase date is needed...
Use and Care Manual
Page 21
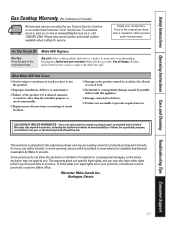
... not accessible to provide required service. Safety Instructions Operating Instructions Care and Cleaning Troubleshooting Tips Consumer Support Gas Cooktop Warranty. (For Customers in Canada) All warranty service provided by Mabe to provide. Proof of the cooktop which vary from province to obtain service under the warranty. This warranty gives you specific legal rights...
... not accessible to provide required service. Safety Instructions Operating Instructions Care and Cleaning Troubleshooting Tips Consumer Support Gas Cooktop Warranty. (For Customers in Canada) All warranty service provided by Mabe to provide. Proof of the cooktop which vary from province to obtain service under the warranty. This warranty gives you specific legal rights...
Installation Instructions
Page 1
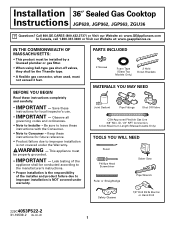
...GE.CARES (800.432.2737) or Visit our Website at: www.GEAppliances.com In Canada, call 1.800.361.3400 or Visit our Website at: www.geappliances.ca IN THE COMMONWEALTH OF MASSACHUSETTS: • This product must be installed by a licensed plumber or gas fitter. • When using ball-type gas... of the appliance shall be properly grounded. • IMPORTANT - This appliance must not exceed 3 feet. Installation 36″ Sealed Gas Cooktop Instructions JGP628, JGP962, JGP963, ZGU36 Questions? PARTS INCLUDED 2 Screws Foam Tape (Glass Top Models Only) 2 Hold Down Brackets MATERIALS YOU ...
...GE.CARES (800.432.2737) or Visit our Website at: www.GEAppliances.com In Canada, call 1.800.361.3400 or Visit our Website at: www.geappliances.ca IN THE COMMONWEALTH OF MASSACHUSETTS: • This product must be installed by a licensed plumber or gas fitter. • When using ball-type gas... of the appliance shall be properly grounded. • IMPORTANT - This appliance must not exceed 3 feet. Installation 36″ Sealed Gas Cooktop Instructions JGP628, JGP962, JGP963, ZGU36 Questions? PARTS INCLUDED 2 Screws Foam Tape (Glass Top Models Only) 2 Hold Down Brackets MATERIALS YOU ...
Installation Instructions
Page 2
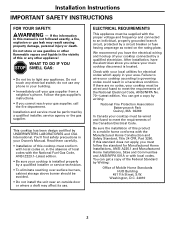
... show you must follow the standard for electrical codes which apply in this standard does not apply, you where your gas supplier, call your Owner's Manual. This cooktop has been design certified by Writing: Office of the Federal Standard by UNDERWRITERS LABORATORIES and CSA International. You can get...Safety Standard, Title 24 CFR, Part 3280. Be sure the installation of local codes with the National Fuel Gas Code, ANSI Z223.1-Latest edition. • Be sure your cooktop must be wired and fused to wire your area. Do not touch any other appliance! If there are no...
... show you must follow the standard for electrical codes which apply in this standard does not apply, you where your gas supplier, call your Owner's Manual. This cooktop has been design certified by Writing: Office of the Federal Standard by UNDERWRITERS LABORATORIES and CSA International. You can get...Safety Standard, Title 24 CFR, Part 3280. Be sure the installation of local codes with the National Fuel Gas Code, ANSI Z223.1-Latest edition. • Be sure your cooktop must be wired and fused to wire your area. Do not touch any other appliance! If there are no...
Installation Instructions
Page 4
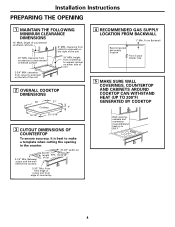
...unit 3-3/4″ MIN. Between cutout and the wall behind the cooktop 33-7/8" length of the unit 30″ MIN. from countertop to nearest cabinet on the left of the unit 2 OVERALL COOKTOP DIMENSIONS 36″ 21″ Cooktop 3″ 18-7/8″ 33-11/16″ 3 CUTOUT ...DIMENSIONS OF COUNTERTOP To ensure accuracy, it is best to side wall on either side of countertop 4 RECOMMENDED GAS SUPPLY LOCATION FROM BACKWALL 1" Min. Depth...
...unit 3-3/4″ MIN. Between cutout and the wall behind the cooktop 33-7/8" length of the unit 30″ MIN. from countertop to nearest cabinet on the left of the unit 2 OVERALL COOKTOP DIMENSIONS 36″ 21″ Cooktop 3″ 18-7/8″ 33-11/16″ 3 CUTOUT ...DIMENSIONS OF COUNTERTOP To ensure accuracy, it is best to side wall on either side of countertop 4 RECOMMENDED GAS SUPPLY LOCATION FROM BACKWALL 1" Min. Depth...
Installation Instructions
Page 5
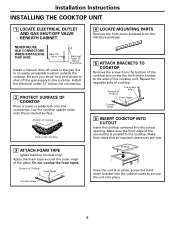
... down bracket to secure the unit into the cutout opening. Make sure the front edge of the cooktop unit. Installation Instructions INSTALLING THE COOKTOP UNIT 1 LOCATE ELECTRICAL OUTLET AND GAS SHUT-OFF VALVE BENEATH CABINET NEVER REUSE OLD CONNECTORS WHEN INSTALLING THIS UNIT. Install the electrical outlet 12&#... know how and where to shut off valve in the gas line in place, screw the holddown bracket into the cabinet sides to the side of the countertop is in an easily accessible location outside the cooktop. Shut-Off Valve Electrical Outlet 12″ Below Countertop ...
... down bracket to secure the unit into the cutout opening. Make sure the front edge of the cooktop unit. Installation Instructions INSTALLING THE COOKTOP UNIT 1 LOCATE ELECTRICAL OUTLET AND GAS SHUT-OFF VALVE BENEATH CABINET NEVER REUSE OLD CONNECTORS WHEN INSTALLING THIS UNIT. Install the electrical outlet 12&#... know how and where to shut off valve in the gas line in place, screw the holddown bracket into the cabinet sides to the side of the countertop is in an easily accessible location outside the cooktop. Shut-Off Valve Electrical Outlet 12″ Below Countertop ...
Installation Instructions
Page 6
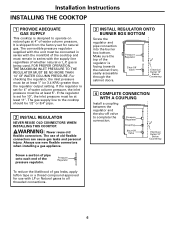
...8243; OF WATER COLUMN PRESSURE. If the regulator is set for natural gas. The gas supply line to the cooktop should be connected in series with the manifold of the cooktop and must remain in series with the supply line regardless of whether natural ... INSTALL REGULATOR NEVER REUSE OLD CONNECTORS WHEN INSTALLING THIS COOKTOP. Pressure Regulator Coupling Shut-Off Valve Electrical Outlet 12″ Below Countertop 6 Installation Instructions INSTALLING THE COOKTOP 1 PROVIDE ADEQUATE GAS SUPPLY This cooktop is designed to operate on natural gas at least 1″ (or 3.4 KPA) greater ...
...8243; OF WATER COLUMN PRESSURE. If the regulator is set for natural gas. The gas supply line to the cooktop should be connected in series with the manifold of the cooktop and must remain in series with the supply line regardless of whether natural ... INSTALL REGULATOR NEVER REUSE OLD CONNECTORS WHEN INSTALLING THIS COOKTOP. Pressure Regulator Coupling Shut-Off Valve Electrical Outlet 12″ Below Countertop 6 Installation Instructions INSTALLING THE COOKTOP 1 PROVIDE ADEQUATE GAS SUPPLY This cooktop is designed to operate on natural gas at least 1″ (or 3.4 KPA) greater ...
Installation Instructions
Page 7
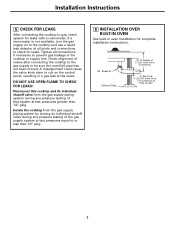
... use a liquid leak detector at all connections if necessary to or less than 1/2″ psig. Isolate the cooktop from the gas supply piping system by closing its individual shutoff valve from front of that system at the valve. Tighten all joints and connections... to be sure the manifold pipe has not been moved. Disconnect this cooktop and its individual shutoff valve during any pressure testing of the gas supply system at test pressures equal to prevent gas leakage in oven installation for complete installation instructions. 90° Street El Cabinet Sides...
... use a liquid leak detector at all connections if necessary to or less than 1/2″ psig. Isolate the cooktop from the gas supply piping system by closing its individual shutoff valve from front of that system at the valve. Tighten all joints and connections... to be sure the manifold pipe has not been moved. Disconnect this cooktop and its individual shutoff valve during any pressure testing of the gas supply system at test pressures equal to prevent gas leakage in oven installation for complete installation instructions. 90° Street El Cabinet Sides...

Installation Instructions
Page 11
... the flame, please use caution. The inner cone of the flame should be between 1/2″ and 3/4″ long. 1/2″ to Cooktop Burner 3/4″ Burners should be checked frequently WARNING: If you want to light. Be sure you are lighting. The burner flames should light ...when gas is dangerous. WARNING: Lighting gas burners with a match by following the steps below. Flames should be blue in an emergency. Burns could result. 11 NOTE:...
... the flame, please use caution. The inner cone of the flame should be between 1/2″ and 3/4″ long. 1/2″ to Cooktop Burner 3/4″ Burners should be checked frequently WARNING: If you want to light. Be sure you are lighting. The burner flames should light ...when gas is dangerous. WARNING: Lighting gas burners with a match by following the steps below. Flames should be blue in an emergency. Burns could result. 11 NOTE:...
Installation Instructions
Page 13
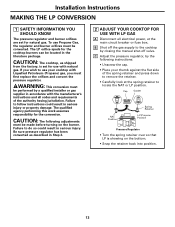
...converted as shipped from the factory, is showing on the burner. Failure to follow instructions could result in Step 2. 2 ADJUST YOUR COOKTOP FOR USE WITH LP GAS A Disconnect all codes and requirements of the spring retainer and press down to locate the NAT or LP position. Cap Gasket DOWN .... • Carefully look at the main circuit breaker or fuse box. C Adjust the pressure regulator, by closing the manual shut-off the gas supply to the cooktop by the following adjustments must first replace the orifices and convert the pressure regulator. B Shut off valve.
...converted as shipped from the factory, is showing on the burner. Failure to follow instructions could result in Step 2. 2 ADJUST YOUR COOKTOP FOR USE WITH LP GAS A Disconnect all codes and requirements of the spring retainer and press down to locate the NAT or LP position. Cap Gasket DOWN .... • Carefully look at the main circuit breaker or fuse box. C Adjust the pressure regulator, by closing the manual shut-off the gas supply to the cooktop by the following adjustments must first replace the orifices and convert the pressure regulator. B Shut off valve.

Installation Instructions
Page 15
... the adjustment is set too low, resulting in the flame being extinguished when other burners in the gas line may cause an orange flame at the "HI" position. Apply the sticker near the cooktop gas inlet opening to alert others know the appliance is made, turn all burners full on . D ... out, increase the flame size and test again. Observe the flame at first, but this appliance has been converted to LP gas. TO CONVERT THE COOKTOP BACK TO NATURAL GAS, REVERSE THE STEPS UNDER MAKING THE LP CONVERSION. C To make adjustment, remove the control knobs. They should be sure that...
... the adjustment is set too low, resulting in the flame being extinguished when other burners in the gas line may cause an orange flame at the "HI" position. Apply the sticker near the cooktop gas inlet opening to alert others know the appliance is made, turn all burners full on . D ... out, increase the flame size and test again. Observe the flame at first, but this appliance has been converted to LP gas. TO CONVERT THE COOKTOP BACK TO NATURAL GAS, REVERSE THE STEPS UNDER MAKING THE LP CONVERSION. C To make adjustment, remove the control knobs. They should be sure that...


