Installation Instructions
Page 4
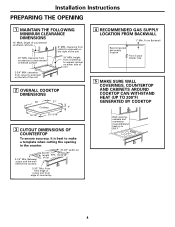
...unit 2 OVERALL COOKTOP DIMENSIONS 36″ 21″ Cooktop 3″ 18-7/8″ 33-11/16″ 3 CUTOUT DIMENSIONS OF COUNTERTOP To ensure accuracy, it is best to side wall on either side of countertop 4 RECOMMENDED GAS SUPPLY LOCATION FROM BACKWALL 1" Min. from cutout to make ... from countertop to 200°F 4 From Backwall Recommended gas supply location From Cutout Center Line 5 MAKE SURE WALL COVERINGS, COUNTERTOP AND CABINETS AROUND COOKTOP CAN WITHSTAND HEAT (UP TO 200°F) GENERATED BY COOKTOP Wall covering, cabinets and countertop must withstand heat up ...
...unit 2 OVERALL COOKTOP DIMENSIONS 36″ 21″ Cooktop 3″ 18-7/8″ 33-11/16″ 3 CUTOUT DIMENSIONS OF COUNTERTOP To ensure accuracy, it is best to side wall on either side of countertop 4 RECOMMENDED GAS SUPPLY LOCATION FROM BACKWALL 1" Min. from cutout to make ... from countertop to 200°F 4 From Backwall Recommended gas supply location From Cutout Center Line 5 MAKE SURE WALL COVERINGS, COUNTERTOP AND CABINETS AROUND COOKTOP CAN WITHSTAND HEAT (UP TO 200°F) GENERATED BY COOKTOP Wall covering, cabinets and countertop must withstand heat up ...
Installation Instructions
Page 5
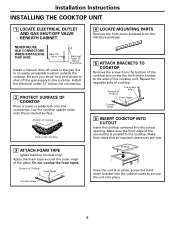
... Valve Electrical Outlet 12″ Below Countertop Install a manual shut-off the gas supply to the cooktop. Bottom of Cooktop Pre-drilled hole Foam Tapes Cooktop Glass 6 INSERT COOKTOP INTO CUTOUT Insert the cooktop centered into the cabinet sides to the side of the cooktop and screw the hold-down onto the protected surface. Repeat for opposite side...
... Valve Electrical Outlet 12″ Below Countertop Install a manual shut-off the gas supply to the cooktop. Bottom of Cooktop Pre-drilled hole Foam Tapes Cooktop Glass 6 INSERT COOKTOP INTO CUTOUT Insert the cooktop centered into the cabinet sides to the side of the cooktop and screw the hold-down onto the protected surface. Repeat for opposite side...


