Use and Care Manual
Page 2
... any phone in your building. ■ Immediately call your gas supplier, call the fire department. - Installation and service must be performed by a qualified installer, service agency or the gas supplier. DESIGN ERTIFIE 2 C do not use gasoline or other appliance. - READ ALL INSTRUCTIONS BEFORE USING. Follow the gas supplier's instructions. ■ If you cannot reach your...
... any phone in your building. ■ Immediately call your gas supplier, call the fire department. - Installation and service must be performed by a qualified installer, service agency or the gas supplier. DESIGN ERTIFIE 2 C do not use gasoline or other appliance. - READ ALL INSTRUCTIONS BEFORE USING. Follow the gas supplier's instructions. ■ If you cannot reach your...
Use and Care Manual
Page 3
... LP fuels. Properly adjusted burners, indicated by qualified gas cooktop installers or service technicians. ■ Do not attempt to repair or replace any part of the cooktop gas shut-off if necessary. ■ Have your cooktop. SAFETY PRECAUTIONS Have the installer show you follow the Installation Instructions packed with the National Electrical Code. Do not remove the round...
... LP fuels. Properly adjusted burners, indicated by qualified gas cooktop installers or service technicians. ■ Do not attempt to repair or replace any part of the cooktop gas shut-off if necessary. ■ Have your cooktop. SAFETY PRECAUTIONS Have the installer show you follow the Installation Instructions packed with the National Electrical Code. Do not remove the round...
Use and Care Manual
Page 6
...; Read and follow the Installation Instructions packed with Natural Gas. READ AND FOLLOW THIS SAFETY INFORMATION CAREFULLY. SAVE THESE INSTRUCTIONS 6 Sugar spills are the exception to a hot surface. This area must be kept clear for proper ventilation and burner performance. ■ Large scratches or impacts to glass cooktops can produce noxious fumes if...
...; Read and follow the Installation Instructions packed with Natural Gas. READ AND FOLLOW THIS SAFETY INFORMATION CAREFULLY. SAVE THESE INSTRUCTIONS 6 Sugar spills are the exception to a hot surface. This area must be kept clear for proper ventilation and burner performance. ■ Large scratches or impacts to glass cooktops can produce noxious fumes if...
Use and Care Manual
Page 14
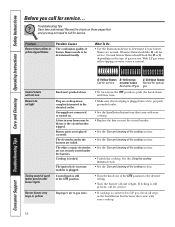
.... • See the Care and cleaning of the cooktop section. • See the Care and cleaning of gas you call for service. Plug on . Improper air to gas ratio. • If cooktop is plugged into a live, properly grounded outlet. • See the Installation Instructions that came with your burner flames are soiled. Control knobs will...
.... • See the Care and cleaning of the cooktop section. • See the Care and cleaning of gas you call for service. Plug on . Improper air to gas ratio. • If cooktop is plugged into a live, properly grounded outlet. • See the Installation Instructions that came with your burner flames are soiled. Control knobs will...
Use and Care Manual
Page 20
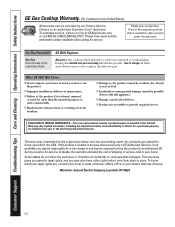
... delivery. ■ Product not accessible to state. Consumer Support Troubleshooting Tips Care and Cleaning Operating Instructions Safety Instructions GE Gas Cooktop Warranty. (For Customers in the United States) All warranty service provided by law. Please have other rights which fails due to...is abused, misused, or used for home use the product. ■ Improper installation, delivery or maintenance. ■ Failure of God. ■ Incidental or consequential damage caused by a GE Authorized Servicer is product repair as provided in materials or workmanship. To know what...
... delivery. ■ Product not accessible to state. Consumer Support Troubleshooting Tips Care and Cleaning Operating Instructions Safety Instructions GE Gas Cooktop Warranty. (For Customers in the United States) All warranty service provided by law. Please have other rights which fails due to...is abused, misused, or used for home use the product. ■ Improper installation, delivery or maintenance. ■ Failure of God. ■ Incidental or consequential damage caused by a GE Authorized Servicer is product repair as provided in materials or workmanship. To know what...
Use and Care Manual
Page 21
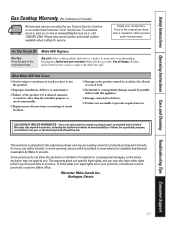
... of God. ■ Incidental or consequential damage caused by law. Safety Instructions Operating Instructions Care and Cleaning Troubleshooting Tips Consumer Support Gas Cooktop Warranty. (For Customers in Canada) All warranty service provided by Mabe to provide. Staple your home to teach you how to ... purchaser and any succeeding owner for products purchased in Canada for home use the product. ■ Improper installation, delivery or maintenance. ■ Failure of the cooktop which vary from province to one -year warranty, Mabe will be provided in materials or workmanship.
... of God. ■ Incidental or consequential damage caused by law. Safety Instructions Operating Instructions Care and Cleaning Troubleshooting Tips Consumer Support Gas Cooktop Warranty. (For Customers in Canada) All warranty service provided by Mabe to provide. Staple your home to teach you how to ... purchaser and any succeeding owner for products purchased in Canada for home use the product. ■ Improper installation, delivery or maintenance. ■ Failure of the cooktop which vary from province to one -year warranty, Mabe will be provided in materials or workmanship.
Installation Instructions
Page 1
... Wrench Safety Glasses 1/8″ Drill Bit & Electric or Hand Drill 229C4053P522-2 31-10539-2 05-03 JR 1 Installation 36″ Sealed Gas Cooktop Instructions JGP628, JGP962, JGP963, ZGU36 Questions? Save these instructions for local inspector's use. • IMPORTANT - Call 800.GE.CARES (800.432.2737) or Visit our Website at: www.GEAppliances.com In Canada, call 1.800...
... Wrench Safety Glasses 1/8″ Drill Bit & Electric or Hand Drill 229C4053P522-2 31-10539-2 05-03 JR 1 Installation 36″ Sealed Gas Cooktop Instructions JGP628, JGP962, JGP963, ZGU36 Questions? Save these instructions for local inspector's use. • IMPORTANT - Call 800.GE.CARES (800.432.2737) or Visit our Website at: www.GEAppliances.com In Canada, call 1.800...
Installation Instructions
Page 2
...MA 02269 In Canada your cooktop is not followed exactly, a fire, explosion or gas leak may affect its use gasoline or other appliance! This cooktop has been design certified by a qualified installer, service agency or the gas supplier. Check with the National Fuel Gas Code, ANSI Z223.1-Latest ...edition. • Be sure your cooktop must be avoided. • Do not install the unit near an outside ...
...MA 02269 In Canada your cooktop is not followed exactly, a fire, explosion or gas leak may affect its use gasoline or other appliance! This cooktop has been design certified by a qualified installer, service agency or the gas supplier. Check with the National Fuel Gas Code, ANSI Z223.1-Latest ...edition. • Be sure your cooktop must be avoided. • Do not install the unit near an outside ...
Installation Instructions
Page 3
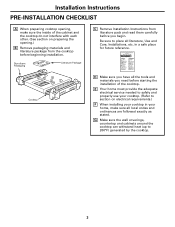
...B Remove packaging materials and literature package from literature pack and read them carefully before you need before beginning installation. HOT ON Cooktop D Make sure you have all the tools and materials you begin. Be sure to place all local ... adequate electrical service needed to safely and properly use your cooktop. (Refer to 200°F) generated by the cooktop. 3 Styrofoam Packaging Literature Package C Remove Installation Instructions from the cooktop before starting the installation of the cabinet and the cooktop do not interfere with each other. (See section on ...
...B Remove packaging materials and literature package from literature pack and read them carefully before you need before beginning installation. HOT ON Cooktop D Make sure you have all the tools and materials you begin. Be sure to place all local ... adequate electrical service needed to safely and properly use your cooktop. (Refer to 200°F) generated by the cooktop. 3 Styrofoam Packaging Literature Package C Remove Installation Instructions from the cooktop before starting the installation of the cabinet and the cooktop do not interfere with each other. (See section on ...
Installation Instructions
Page 4
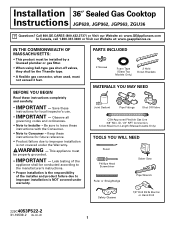
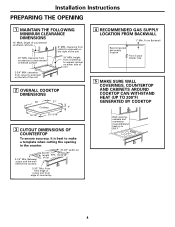
clearance from countertop to nearest cabinet on the left of the unit 2 OVERALL COOKTOP DIMENSIONS 36″ 21″ Cooktop 3″ 18-7/8″ 33-11/16″ 3 CUTOUT DIMENSIONS OF COUNTERTOP To ensure accuracy, it is best to.../16″ 2-1/2" Min. Between cutout and the wall behind the cooktop 33-7/8" length of countertop 4 RECOMMENDED GAS SUPPLY LOCATION FROM BACKWALL 1" Min. from cutout to make a template when cutting the opening in the counter. 2-1/4" Min. Installation Instructions PREPARING THE OPENING 1 MAINTAIN THE FOLLOWING MINIMUM CLEARANCE DIMENSIONS 13...
clearance from countertop to nearest cabinet on the left of the unit 2 OVERALL COOKTOP DIMENSIONS 36″ 21″ Cooktop 3″ 18-7/8″ 33-11/16″ 3 CUTOUT DIMENSIONS OF COUNTERTOP To ensure accuracy, it is best to.../16″ 2-1/2" Min. Between cutout and the wall behind the cooktop 33-7/8" length of countertop 4 RECOMMENDED GAS SUPPLY LOCATION FROM BACKWALL 1" Min. from cutout to make a template when cutting the opening in the counter. 2-1/4" Min. Installation Instructions PREPARING THE OPENING 1 MAINTAIN THE FOLLOWING MINIMUM CLEARANCE DIMENSIONS 13...
Installation Instructions
Page 5
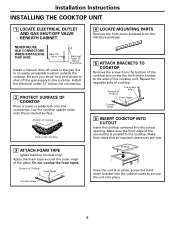
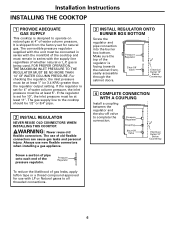
... easily accessible location outside the cooktop. Installation Instructions INSTALLING THE COOKTOP UNIT 1 LOCATE ELECTRICAL OUTLET AND GAS SHUT-OFF VALVE BENEATH CABINET NEVER REUSE OLD CONNECTORS WHEN INSTALLING THIS UNIT. Shut-Off Valve Electrical Outlet 12″ Below Countertop Install a manual shut-off the gas supply to the cooktop. Do not overlap the foam tapes. Cooktop Once the unit is...
... easily accessible location outside the cooktop. Installation Instructions INSTALLING THE COOKTOP UNIT 1 LOCATE ELECTRICAL OUTLET AND GAS SHUT-OFF VALVE BENEATH CABINET NEVER REUSE OLD CONNECTORS WHEN INSTALLING THIS UNIT. Shut-Off Valve Electrical Outlet 12″ Below Countertop Install a manual shut-off the gas supply to the cooktop. Do not overlap the foam tapes. Cooktop Once the unit is...
Installation Instructions
Page 6
... Below Countertop 4 COMPLETE CONNECTION WITH A COUPLING Install a coupling between the regulator and the shu-off valve to the cooktop should be at least 11″. The use new flexible connectors when installing a gas appliance. Pressure Regulator Coupling Shut-Off Valve Electrical ...column pressure, the inlet pressure must be 1/2″ or 3/4″ pipe. 2 INSTALL REGULATOR NEVER REUSE OLD CONNECTORS WHEN INSTALLING THIS COOKTOP. Pressure Regulator To reduce the likelihood of gas leaks, apply teflon tape or a thread compound approved for 4″ of water ...
... Below Countertop 4 COMPLETE CONNECTION WITH A COUPLING Install a coupling between the regulator and the shu-off valve to the cooktop should be at least 11″. The use new flexible connectors when installing a gas appliance. Pressure Regulator Coupling Shut-Off Valve Electrical ...column pressure, the inlet pressure must be 1/2″ or 3/4″ pipe. 2 INSTALL REGULATOR NEVER REUSE OLD CONNECTORS WHEN INSTALLING THIS COOKTOP. Pressure Regulator To reduce the likelihood of gas leaks, apply teflon tape or a thread compound approved for 4″ of water ...
Installation Instructions
Page 7
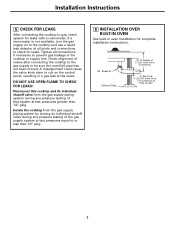
... use a liquid leak detector at all connections if necessary to prevent gas leakage in a gas leak at test pressures equal to rub on the control panel, resulting in the cooktop or supply line. Installation Instructions 5 CHECK FOR LEAKS After connecting the cooktop to check for leaks. DO NOT USE OPEN FLAME TO CHECK FOR LEAKS...
... use a liquid leak detector at all connections if necessary to prevent gas leakage in a gas leak at test pressures equal to rub on the control panel, resulting in the cooktop or supply line. Installation Instructions 5 CHECK FOR LEAKS After connecting the cooktop to check for leaks. DO NOT USE OPEN FLAME TO CHECK FOR LEAKS...

Installation Instructions
Page 8
...appliance is absolutely necessary that it is equipped with a 3-prong (grounding) plug which must be equivalent to operate the electrical parts of your cooktop. B If you still elect to convert the old one . C A grounding adaptor will be needed to use an extension cord, it be... only temporary, and a qualified electrician should test it replaced with a standard 120 Volt, 60 cycle AC household current. Installation Instructions INSTALLATION-ELECTRICAL CONNECTIONS 1 EXTENSION CORDS Because of potential safety hazards under any circumstances cut or remove grounding prong from the...
...appliance is absolutely necessary that it is equipped with a 3-prong (grounding) plug which must be equivalent to operate the electrical parts of your cooktop. B If you still elect to convert the old one . C A grounding adaptor will be needed to use an extension cord, it be... only temporary, and a qualified electrician should test it replaced with a standard 120 Volt, 60 cycle AC household current. Installation Instructions INSTALLATION-ELECTRICAL CONNECTIONS 1 EXTENSION CORDS Because of potential safety hazards under any circumstances cut or remove grounding prong from the...

Installation Instructions
Page 9
... disconnected frequently. Do not use of the adaptor ground terminal. The customer should have the circuit checked by a qualified electrician to break with one hand. Installation Instructions 4 USAGE SITUATIONS WHERE APPLIANCE POWER CORD WILL BE DISCONNECTED INFREQUENTLY For 15 amp circuit only. Should this is not done, the adaptor ground terminal...
... disconnected frequently. Do not use of the adaptor ground terminal. The customer should have the circuit checked by a qualified electrician to break with one hand. Installation Instructions 4 USAGE SITUATIONS WHERE APPLIANCE POWER CORD WILL BE DISCONNECTED INFREQUENTLY For 15 amp circuit only. Should this is not done, the adaptor ground terminal...

Installation Instructions
Page 10
...on the base. Burner Grate Burner Cap Burner Head Burner Base Spark Igniter Glass Maintop Spark Igniter Burner Box Bottom Burner Base 10 FOR PORCELAIN COOKTOPS A Place the burner head on the burner base so that the pins match up with the slots on the base. Electrical shock might result... the electrode of the burner is turned on the burner head. The grate fits over the burner assembly on the burner head. Installation Instructions COOKTOP BURNERS 1 ASSEMBLING THE COOKTOP BURNERS The electrode of the burner grates have feet that fit into corresponding indentations in the...
...on the base. Burner Grate Burner Cap Burner Head Burner Base Spark Igniter Glass Maintop Spark Igniter Burner Box Bottom Burner Base 10 FOR PORCELAIN COOKTOPS A Place the burner head on the burner base so that the pins match up with the slots on the base. Electrical shock might result... the electrode of the burner is turned on the burner head. The grate fits over the burner assembly on the burner head. Installation Instructions COOKTOP BURNERS 1 ASSEMBLING THE COOKTOP BURNERS The electrode of the burner grates have feet that fit into corresponding indentations in the...

Installation Instructions
Page 11
...(ticking sounds) which light the burner. The burner flames should be lit with no trace of the electric igniters should light when gas is dangerous. B Try each valve separately until all burners have been carefully checked for the burner you turn the knob off and...does not light within five seconds, turn the cooktop knob to light. Flames should match light the cooktop burners only in and turn a burner valve to the electrical power. A Push and turn the control knob slowly. B Push in an emergency. Installation Instructions 2 CHECK IGNITERS Operation of yellow. ...
...(ticking sounds) which light the burner. The burner flames should be lit with no trace of the electric igniters should light when gas is dangerous. B Try each valve separately until all burners have been carefully checked for the burner you turn the knob off and...does not light within five seconds, turn the cooktop knob to light. Flames should match light the cooktop burners only in and turn a burner valve to the electrical power. A Push and turn the control knob slowly. B Push in an emergency. Installation Instructions 2 CHECK IGNITERS Operation of yellow. ...
Installation Instructions
Page 12
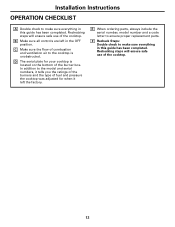
...Rechecking steps will ensure safe use of fuel and pressure the cooktop was adjusted for your cooktop is unobstructed. C Make sure the flow of combustion and ventilation air to the cooktop is located on the bottom of the cooktop. D The serial plate for when it tells you the ratings...type of the cooktop. 12 E When ordering parts, always include the serial number, model number and a code letter to the model and serial numbers, it left in the OFF position. F Recheck Steps: Double check to make sure everything in this guide has been completed. Installation Instructions OPERATION ...
...Rechecking steps will ensure safe use of fuel and pressure the cooktop was adjusted for your cooktop is unobstructed. C Make sure the flow of combustion and ventilation air to the cooktop is located on the bottom of the cooktop. D The serial plate for when it tells you the ratings...type of the cooktop. 12 E When ordering parts, always include the serial number, model number and a code letter to the model and serial numbers, it left in the OFF position. F Recheck Steps: Double check to make sure everything in this guide has been completed. Installation Instructions OPERATION ...
Installation Instructions
Page 13
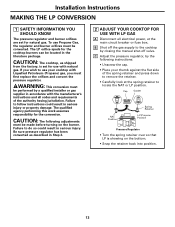
... the flat side of the authority having jurisdiction. The qualified agency performing this work assumes responsibility for natural gas. Failure to the cooktop by a qualified installer or gas supplier in Step 2. 2 ADJUST YOUR COOKTOP FOR USE WITH LP GAS A Disconnect all codes and requirements of the spring retainer and press down to locate the NAT or...
... the flat side of the authority having jurisdiction. The qualified agency performing this work assumes responsibility for natural gas. Failure to the cooktop by a qualified installer or gas supplier in Step 2. 2 ADJUST YOUR COOKTOP FOR USE WITH LP GAS A Disconnect all codes and requirements of the spring retainer and press down to locate the NAT or...

Installation Instructions
Page 14
...G Save the orifices removed from the burner base. Units with 4 burners Units with 5 burners X E Install the LP/Propane orifices in their precise locations as noted in the cooktop. F Replace the burner bases, heads, caps and top grates. (NOTE: When re-attaching the burner ... position. Remove This Assembly C Using a 7mm or 9/32″ nut driver, remove the top burner orifices. Installation Instructions MAKING THE LP CONVERSION (CONT.) 3 CHANGE COOKTOP BURNER ORIFICES A Remove the top grates, burner caps, burner heads and burner bases. Orifice Spud Located Through This...
...G Save the orifices removed from the burner base. Units with 4 burners Units with 5 burners X E Install the LP/Propane orifices in their precise locations as noted in the cooktop. F Replace the burner bases, heads, caps and top grates. (NOTE: When re-attaching the burner ... position. Remove This Assembly C Using a 7mm or 9/32″ nut driver, remove the top burner orifices. Installation Instructions MAKING THE LP CONVERSION (CONT.) 3 CHANGE COOKTOP BURNER ORIFICES A Remove the top grates, burner caps, burner heads and burner bases. Orifice Spud Located Through This...

