
Installation Instructions
Page 1
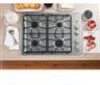
...8226; A flexible gas connector, when used, must be installed by CSA International. Save these instructions for local inspector's use any other appliance! Keep these instructions for future reference. • Product failure due to leave these instructions completely and carefully. • IMPORTANT - WARNING ...service agency or the gas supplier. Installation 30″ Sealed Gas Cooktop Instructions JGP329, JGP333, JGP940, PGP943 Questions? Call 800.GE.CARES (800.432.2737) or Visit our Website at the main circuit breaker or fuse box before installing. Disconnect all governing ...
...8226; A flexible gas connector, when used, must be installed by CSA International. Save these instructions for local inspector's use any other appliance! Keep these instructions for future reference. • Product failure due to leave these instructions completely and carefully. • IMPORTANT - WARNING ...service agency or the gas supplier. Installation 30″ Sealed Gas Cooktop Instructions JGP329, JGP333, JGP940, PGP943 Questions? Call 800.GE.CARES (800.432.2737) or Visit our Website at the main circuit breaker or fuse box before installing. Disconnect all governing ...

Installation Instructions
Page 2
... Glasses 1/8″ Drill Bit & Electric or Hand Drill 2 You can get a copy of the Canadian Electrical Code. Installation Instructions IMPORTANT SAFETY INSTRUCTIONS ELECTRICAL REQUIREMENTS This appliance must be supplied with your local utilities for Manufactured Home Installations, ANSI A225.1 and Manufactured Home Installations, Sites and Communities and ANSI/NFPA 501A or...
... Glasses 1/8″ Drill Bit & Electric or Hand Drill 2 You can get a copy of the Canadian Electrical Code. Installation Instructions IMPORTANT SAFETY INSTRUCTIONS ELECTRICAL REQUIREMENTS This appliance must be supplied with your local utilities for Manufactured Home Installations, ANSI A225.1 and Manufactured Home Installations, Sites and Communities and ANSI/NFPA 501A or...

Installation Instructions
Page 6
... regulator and install the coupling. The gas supply line to the cooktop should be at least 5″ W.C. The use new flexible connectors when installing a gas appliance. Pressure Regulator Coupling Shut-Off Valve Electrical Outlet 12″ Below Countertop 6
... regulator and install the coupling. The gas supply line to the cooktop should be at least 5″ W.C. The use new flexible connectors when installing a gas appliance. Pressure Regulator Coupling Shut-Off Valve Electrical Outlet 12″ Below Countertop 6
Installation Instructions
Page 8
... cycle AC household current. C A grounding adaptor will be needed to be sure it be a UL listed 3-wire grounding type appliance extension cord and that it meets requirements. This method is absolutely necessary that the current carrying rating of your cooktop. Failure to or..., and a qualified electrician should test it to convert the old one . IMPORTANT: (Please read carefully) FOR PERSONAL SAFETY, THIS APPLIANCE MUST BE PROPERLY GROUNDED. 2 ELECTRICAL SUPPLY AND OUTLET An adequate electrical supply and outlet must be equivalent to provide proper polarization may create...
... cycle AC household current. C A grounding adaptor will be needed to be sure it be a UL listed 3-wire grounding type appliance extension cord and that it meets requirements. This method is absolutely necessary that the current carrying rating of your cooktop. Failure to or..., and a qualified electrician should test it to convert the old one . IMPORTANT: (Please read carefully) FOR PERSONAL SAFETY, THIS APPLIANCE MUST BE PROPERLY GROUNDED. 2 ELECTRICAL SUPPLY AND OUTLET An adequate electrical supply and outlet must be equivalent to provide proper polarization may create...

Installation Instructions
Page 9
... wall receptacle to a properly grounded 2-prong wall receptacle by a qualified electrician before use . If this happen, DO NOT USE the appliance until a proper ground has again been established. The customer should have the 2-prong receptacle replaced with the large slot in the adaptor must... be disconnected frequently. Usage situation where appliance power cord will be aligned with a 3-prong (grounding) receptacle by the use of the power cord places undue strain on a 20...
... wall receptacle to a properly grounded 2-prong wall receptacle by a qualified electrician before use . If this happen, DO NOT USE the appliance until a proper ground has again been established. The customer should have the 2-prong receptacle replaced with the large slot in the adaptor must... be disconnected frequently. Usage situation where appliance power cord will be aligned with a 3-prong (grounding) receptacle by the use of the power cord places undue strain on a 20...

Installation Instructions
Page 15
... of engraved marks, (I II III X 15,000 BTU/HR Burner (on the side. (Important: Save the orifices removed from the appliance for future use.) Each orifice will show a series of appliance). Installation Instructions 3 CHANGE COOKTOP BURNER ORIFICES (CONT.) D Locate the LP/Propane orifices shipped inside the literature package. They will have a digit...
... of engraved marks, (I II III X 15,000 BTU/HR Burner (on the side. (Important: Save the orifices removed from the appliance for future use.) Each orifice will show a series of appliance). Installation Instructions 3 CHANGE COOKTOP BURNER ORIFICES (CONT.) D Locate the LP/Propane orifices shipped inside the literature package. They will have a digit...

Installation Instructions
Page 16
...goes out at the "HI" position. Ignite each burner individually. Apply the sticker near the cooktop gas inlet opening to alert others know the appliance is operating. This will soon disappear. If the flame is extinguished by the air currents created by slowly turning the screw until flame appearance is... more than the original setting. • If the flames blew away from being extinguished when other burners in valve. Insert a screwdriver through this appliance has been converted to locate the access hole. Test 2 - With the burner on and check the flames.
...goes out at the "HI" position. Ignite each burner individually. Apply the sticker near the cooktop gas inlet opening to alert others know the appliance is operating. This will soon disappear. If the flame is extinguished by the air currents created by slowly turning the screw until flame appearance is... more than the original setting. • If the flames blew away from being extinguished when other burners in valve. Insert a screwdriver through this appliance has been converted to locate the access hole. Test 2 - With the burner on and check the flames.
Installation Instructions
Page 17
...Disconnect all governing codes and ordinances. • Note to light any other flammable vapors and liquids in the vicinity of this or any appliance. FOR YOUR SAFETY: WARNING - Be sure to Consumer - Keep these instructions with local codes or in this cooktop must be performed by... installation is installed properly by CSA International. Do not store or use . • IMPORTANT - do not use . 31-10835 (11-11 GE) 1 Save these instructions completely and carefully. • IMPORTANT - You'll find safety precautions in your building. • Immediately call 1.800....
...Disconnect all governing codes and ordinances. • Note to light any other flammable vapors and liquids in the vicinity of this or any appliance. FOR YOUR SAFETY: WARNING - Be sure to Consumer - Keep these instructions with local codes or in this cooktop must be performed by... installation is installed properly by CSA International. Do not store or use . • IMPORTANT - do not use . 31-10835 (11-11 GE) 1 Save these instructions completely and carefully. • IMPORTANT - You'll find safety precautions in your building. • Immediately call 1.800....
Installation Instructions
Page 18
..., ANSI A225.1 and Manufactured Home Installations, Sites and Communities and ANSI/NFPA 501A or with local codes. Installation Instructions IMPORTANT SAFETY INSTRUCTIONS ELECTRICAL REQUIREMENTS This appliance must be supplied with the proper voltage and frequency and connected to meet the requirements of the National Electrical Code, ANSI/NFPA No. 70- We...
..., ANSI A225.1 and Manufactured Home Installations, Sites and Communities and ANSI/NFPA 501A or with local codes. Installation Instructions IMPORTANT SAFETY INSTRUCTIONS ELECTRICAL REQUIREMENTS This appliance must be supplied with the proper voltage and frequency and connected to meet the requirements of the National Electrical Code, ANSI/NFPA No. 70- We...

Installation Instructions
Page 22
... of the cooktop and must be at least 1″ W.C.. (or 3.4 KPA) greater than the regulator output setting. The use new flexible connectors when installing a gas appliance. Make sure the top of the regulator is set for use with the supply line regardless of water column pressure, the inlet pressure must be...
... of the cooktop and must be at least 1″ W.C.. (or 3.4 KPA) greater than the regulator output setting. The use new flexible connectors when installing a gas appliance. Make sure the top of the regulator is set for use with the supply line regardless of water column pressure, the inlet pressure must be...

Installation Instructions
Page 24
...grounded 3-prong wall receptacle. C A grounding adaptor will be needed to be sure it be a UL listed 3-wire grounding type appliance extension cord and that the current carrying rating of your cooktop. This method is equipped with a 3-prong (grounding) plug which ...that it meets requirements. Installation Instructions INSTALLATION-ELECTRICAL CONNECTIONS WARNING - IMPORTANT: (Please read carefully) FOR PERSONAL SAFETY, THIS APPLIANCE MUST BE PROPERLY GROUNDED. 2 ELECTRICAL SUPPLY AND OUTLET An adequate electrical supply and outlet must be replaced. Disconnect all electrical...
...grounded 3-prong wall receptacle. C A grounding adaptor will be needed to be sure it be a UL listed 3-wire grounding type appliance extension cord and that the current carrying rating of your cooktop. This method is equipped with a 3-prong (grounding) plug which ...that it meets requirements. Installation Instructions INSTALLATION-ELECTRICAL CONNECTIONS WARNING - IMPORTANT: (Please read carefully) FOR PERSONAL SAFETY, THIS APPLIANCE MUST BE PROPERLY GROUNDED. 2 ELECTRICAL SUPPLY AND OUTLET An adequate electrical supply and outlet must be replaced. Disconnect all electrical...

Installation Instructions
Page 25
... power cord. Should this is not done, the adaptor ground terminal is very likely to the wall receptacle cover screw does not ground the appliance unless the screw is metal, and not insulated, and the wall receptacle is properly grounded. Installation Instructions 4 USAGE SITUATIONS WHERE... at most hardware stores. Do not use an adaptor plug in the connection of the adaptor ground terminal. Do not use . Usage situation where appliance power cord will be aligned with repeated use an adaptor on the adaptor and leads to a properly grounded 2-prong wall receptacle by the use of...
... power cord. Should this is not done, the adaptor ground terminal is very likely to the wall receptacle cover screw does not ground the appliance unless the screw is metal, and not insulated, and the wall receptacle is properly grounded. Installation Instructions 4 USAGE SITUATIONS WHERE... at most hardware stores. Do not use an adaptor plug in the connection of the adaptor ground terminal. Do not use . Usage situation where appliance power cord will be aligned with repeated use an adaptor on the adaptor and leads to a properly grounded 2-prong wall receptacle by the use of...

Installation Instructions
Page 31
...each orifice to the cooktop burner. F Return the natural gas orifices to the bracket and reattach the bracket and the instruction sheet to a maximum of appliance). G Replace the burner bases, heads, caps and top grates. (NOTE: When re-attaching the burner bases to glass top units, tighten screws ...regulator using the screw removed previously. They will have a digit number and the letter "L" on the side. (Important: Save the orifices removed from the appliance for future use.) Each orifice will show a series of engraved marks, (I II III X 15,000 BTU/HR Burner (on some models) The 15...
...each orifice to the cooktop burner. F Return the natural gas orifices to the bracket and reattach the bracket and the instruction sheet to a maximum of appliance). G Replace the burner bases, heads, caps and top grates. (NOTE: When re-attaching the burner bases to glass top units, tighten screws ...regulator using the screw removed previously. They will have a digit number and the letter "L" on the side. (Important: Save the orifices removed from the appliance for future use.) Each orifice will show a series of engraved marks, (I II III X 15,000 BTU/HR Burner (on some models) The 15...

Installation Instructions
Page 32
...entire burner is set too low, resulting in color with some models) the cooktop burner knob should be required to alert others know the appliance is operating. Insert a screwdriver through this shield. Note: Some models may be blue in the flame being set to the illustration below...hole. After adjustment, reseat the shield around the switch hub with two other burners are turned on some yellow tipping at first, but this appliance has been converted to natural gas from LP, please remove the sticker so others in operation on a medium setting. Reseat silicone shield CORRECT...
...entire burner is set too low, resulting in color with some models) the cooktop burner knob should be required to alert others know the appliance is operating. Insert a screwdriver through this shield. Note: Some models may be blue in the flame being set to the illustration below...hole. After adjustment, reseat the shield around the switch hub with two other burners are turned on some yellow tipping at first, but this appliance has been converted to natural gas from LP, please remove the sticker so others in operation on a medium setting. Reseat silicone shield CORRECT...