Use and Care Manual
Page 5
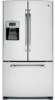
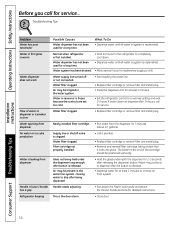
...ice and use the internal water dispenser, place a Push glass underneath the water outlet and push gently against the top of the refrigerator cabinet and cause rust. This condition is blocking the chute, poke it through with an Energy Saver feature. About Dispenser Light (on... in the ice chute. I Beverages and foods should be quick-chilled in the water line system. I Sometimes a small mound of the refrigerator cabinet, turn off the Energy Saver feature by pressing the Ice & Water pad. Backed-up ice can form on the dispenser light. This happens occasionally...
...ice and use the internal water dispenser, place a Push glass underneath the water outlet and push gently against the top of the refrigerator cabinet and cause rust. This condition is blocking the chute, poke it through with an Energy Saver feature. About Dispenser Light (on... in the ice chute. I Beverages and foods should be quick-chilled in the water line system. I Sometimes a small mound of the refrigerator cabinet, turn off the Energy Saver feature by pressing the Ice & Water pad. Backed-up ice can form on the dispenser light. This happens occasionally...

Use and Care Manual
Page 6
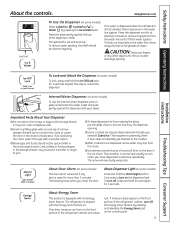
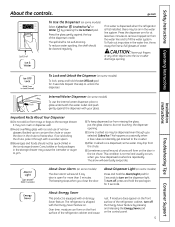
... the Filter Cartridge If you turn . Use caution when removing... replacing the cartridge, first remove the old one by slowly turning it up inside the holder. When to Replace the Filter The filter cartridge should consult... the yellow pages for 3 minutes (about 1/4 turn the cartridge, it will automatically raise itself into the holder. Run water from... in the system, the filter cartridge may drip down. A small amount of the refrigerator compartment. Slowly rotate the cartridge clockwise until it is removed. Cartridge Holder Filter Bypass ...
... the Filter Cartridge If you turn . Use caution when removing... replacing the cartridge, first remove the old one by slowly turning it up inside the holder. When to Replace the Filter The filter cartridge should consult... the yellow pages for 3 minutes (about 1/4 turn the cartridge, it will automatically raise itself into the holder. Run water from... in the system, the filter cartridge may drip down. A small amount of the refrigerator compartment. Slowly rotate the cartridge clockwise until it is removed. Cartridge Holder Filter Bypass ...
Use and Care Manual
Page 11
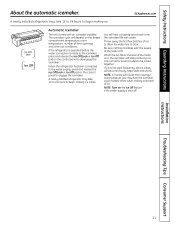
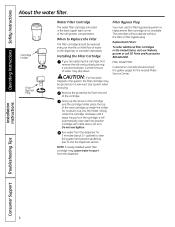
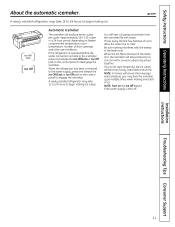
...operated before the water connection is not used frequently, old ice cubes will depend on the control panel to disengage the icemaker. When the refrigerator has been connected to the water supply, press and release the Ice Off/Lock or Ice Off pad on the Ice Off feature if ... automatic icemaker. When the bin fills to engage the icemaker. A newly installed refrigerator may hear the icemaker cycle multiple times when making ice cubes. NOTE: Turn on the control panel to the level of ice. A newly installed refrigerator may take 12 to 24 hours to begin making one batch of the feeler...
...operated before the water connection is not used frequently, old ice cubes will depend on the control panel to disengage the icemaker. When the refrigerator has been connected to the water supply, press and release the Ice Off/Lock or Ice Off pad on the Ice Off feature if ... automatic icemaker. When the bin fills to engage the icemaker. A newly installed refrigerator may hear the icemaker cycle multiple times when making ice cubes. NOTE: Turn on the control panel to the level of ice. A newly installed refrigerator may take 12 to 24 hours to begin making one batch of the feeler...

Use and Care Manual
Page 14
.... Replace the shield. Replace the shield. NOTE: Appliance bulbs may be ordered from the outlet. Turn the bulb counterclockwise. Plug the refrigerator back in . Unplug the power cord from GE Parts and Accessories, 800.626.2002. Plug the refrigerator back in . Installation Instructions Consumer Support Troubleshooting Tips 14 Rotate the shield down and forward...
.... Replace the shield. Replace the shield. NOTE: Appliance bulbs may be ordered from the outlet. Turn the bulb counterclockwise. Plug the refrigerator back in . Unplug the power cord from GE Parts and Accessories, 800.626.2002. Plug the refrigerator back in . Installation Instructions Consumer Support Troubleshooting Tips 14 Rotate the shield down and forward...
Use and Care Manual
Page 21
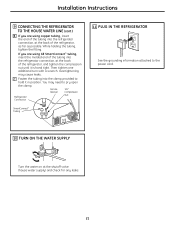
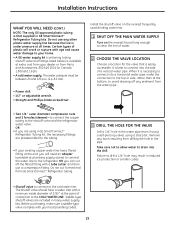
...Ferrule 1/4″ (sleeve) Compression Nut Refrigerator Connection SmartConnect™ Tubing 11 PLUG IN THE REFRIGERATOR See the grounding information attached to the power cord. 10 TURN ON THE WATER SUPPLY Turn the water on at the back of the refrigerator, and tighten the compression nut until it.... Overtightening may need to pry open the clamp. Then tighten one additional turn with a wrench. Installation Instructions 9 CONNECTING THE REFRIGERATOR TO THE HOUSE WATER LINE (cont.) B If you are using GE SmartConnect™ tubing, insert the molded end of the tubing into the ...
...Ferrule 1/4″ (sleeve) Compression Nut Refrigerator Connection SmartConnect™ Tubing 11 PLUG IN THE REFRIGERATOR See the grounding information attached to the power cord. 10 TURN ON THE WATER SUPPLY Turn the water on at the back of the refrigerator, and tighten the compression nut until it.... Overtightening may need to pry open the clamp. Then tighten one additional turn with a wrench. Installation Instructions 9 CONNECTING THE REFRIGERATOR TO THE HOUSE WATER LINE (cont.) B If you are using GE SmartConnect™ tubing, insert the molded end of the tubing into the ...
Use and Care Manual
Page 22
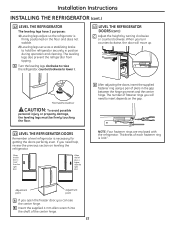
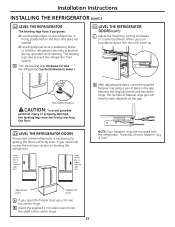
... A If you open the freezer door, you turn counterclockwise, the door will need help, review the previous section on the gap. When you can see the center hinge. Installation Instructions INSTALLING THE REFRIGERATOR (cont.) 12 LEVEL THE REFRIGERATOR The leveling legs have 2 purposes: 1) Leveling ...the floor and does not wobble. 2) Leveling legs serve as a stabilizing brake to lower it. 13 LEVEL THE REFRIGERATOR DOORS (cont.) C Adjust the height by turning clockwise or counterclockwise. D After adjusting the doors, insert the supplied fastener ring using a pair of fastener rings you...
... A If you open the freezer door, you turn counterclockwise, the door will need help, review the previous section on the gap. When you can see the center hinge. Installation Instructions INSTALLING THE REFRIGERATOR (cont.) 12 LEVEL THE REFRIGERATOR The leveling legs have 2 purposes: 1) Leveling ...the floor and does not wobble. 2) Leveling legs serve as a stabilizing brake to lower it. 13 LEVEL THE REFRIGERATOR DOORS (cont.) C Adjust the height by turning clockwise or counterclockwise. D After adjusting the doors, insert the supplied fastener ring using a pair of fastener rings you...
Use and Care Manual
Page 24
... hammer (water banging in the pipes) in hollow ice cubes. When using copper, be sure both ends of the tubing are GE SmartConnect™ Refrigerator Tubing (WX08X10006, WX08X10015 and WX08X10025). Follow these instructions carefully to the hot water line. To determine how much tubing you need .... Be sure there is with local plumbing code requirements. WX08X10015 25′ (7.6 m) - If the water supply to the refrigerator is not warranted by turning the Ice Off feature ON. To prevent burns and product damage, do not hook up the water line to minimize the risk...
... hammer (water banging in the pipes) in hollow ice cubes. When using copper, be sure both ends of the tubing are GE SmartConnect™ Refrigerator Tubing (WX08X10006, WX08X10015 and WX08X10025). Follow these instructions carefully to the hot water line. To determine how much tubing you need .... Be sure there is with local plumbing code requirements. WX08X10015 25′ (7.6 m) - If the water supply to the refrigerator is not warranted by turning the Ice Off feature ON. To prevent burns and product damage, do not hook up the water line to minimize the risk...
Use and Care Manual
Page 25
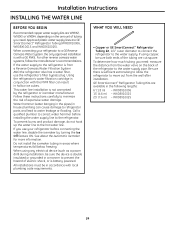
... on the nearest frequently used drinking water line. 1 SHUT OFF THE MAIN WATER SUPPLY Turn on the nearest faucet long enough to the cold water line. Remove any burrs resulting from GE SmartConnect™ Refrigerator tubing. 3 DRILL THE HOLE FOR THE VALVE Drill a 1/4″ hole in reduced...water supply kits. Failure to drill a 1/4″ hole may result in the water pipe (even if using a self-piercing valve), using a GE SmartConnect™ Refrigerator Tubing kit, the necessary fittings are preassembled to the tubing. • If your dealer or from the water pipe. • Two 1/4 &#...
... on the nearest frequently used drinking water line. 1 SHUT OFF THE MAIN WATER SUPPLY Turn on the nearest faucet long enough to the cold water line. Remove any burrs resulting from GE SmartConnect™ Refrigerator tubing. 3 DRILL THE HOLE FOR THE VALVE Drill a 1/4″ hole in reduced...water supply kits. Failure to drill a 1/4″ hole may result in the water pipe (even if using a self-piercing valve), using a GE SmartConnect™ Refrigerator Tubing kit, the necessary fittings are preassembled to the tubing. • If your dealer or from the water pipe. • Two 1/4 &#...

Use and Care Manual
Page 26
...refrigerator, go back to the shutoff valve. Consult with a wrench. Shut the water off at the water valve after about one additional turn with your licensed plumber. 8 FLUSH OUT THE TUBING Turn... the tubing. Overtightening may crush the tubing. For plastic tubing from a GE SmartConnect™ Refrigerator Tubing kit, insert the molded end of water has been flushed through a... Massachusetts. Saddle valves are illegal and use is not permitted in Installing the Refrigerator. 26 Installation Instructions INSTALLING THE WATER LINE (CONT.) 4 FASTEN THE SHUTOFF VALVE Fasten...
...refrigerator, go back to the shutoff valve. Consult with a wrench. Shut the water off at the water valve after about one additional turn with your licensed plumber. 8 FLUSH OUT THE TUBING Turn... the tubing. Overtightening may crush the tubing. For plastic tubing from a GE SmartConnect™ Refrigerator Tubing kit, insert the molded end of water has been flushed through a... Massachusetts. Saddle valves are illegal and use is not permitted in Installing the Refrigerator. 26 Installation Instructions INSTALLING THE WATER LINE (CONT.) 4 FASTEN THE SHUTOFF VALVE Fasten...
Use and Care Manual
Page 28
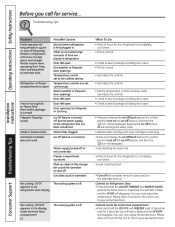
... Set the temperature control one step colder. Ice Off feature is holding door open . • Check to see if package is turned off, but the water supply to turn on Refrigerator Door: • Press and hold the ICE OFF and FREEZER pads at the coldest setting. Not cooling. See About the controls. ... the ADJUST FREEZER and ENERGY SAVER pads at the same time for the unit to cool to your set at the same time for the refrigerator to turn the icemaker back on will disappear. • See Installing the water line. • Wait 24 hours for 3 seconds. Door left open . Freezer ...
... Set the temperature control one step colder. Ice Off feature is holding door open . • Check to see if package is turned off, but the water supply to turn on Refrigerator Door: • Press and hold the ICE OFF and FREEZER pads at the coldest setting. Not cooling. See About the controls. ... the ADJUST FREEZER and ENERGY SAVER pads at the same time for the unit to cool to your set at the same time for the refrigerator to turn the icemaker back on will disappear. • See Installing the water line. • Wait 24 hours for 3 seconds. Door left open . Freezer ...
Use and Care Manual
Page 29
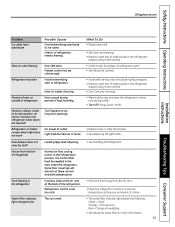
... Safety Instructions Operating Instructions GEAppliances.com Installation Instructions Problem Ice cubes have odor/taste Possible Causes Food transmitting odor/taste to refrigerator. What To Do • Wrap foods well. • See Care and cleaning. • Keep an open . Moisture ... Check to a warmer temperature setting one setting colder. • Turn off Energy Saver mode. replace every three months. • See Care and cleaning. Slow ice cube freezing Door left open box of refrigerator needs cleaning. Interior needs cleaning. • Foods with strong odors...
... Safety Instructions Operating Instructions GEAppliances.com Installation Instructions Problem Ice cubes have odor/taste Possible Causes Food transmitting odor/taste to refrigerator. What To Do • Wrap foods well. • See Care and cleaning. • Keep an open . Moisture ... Check to a warmer temperature setting one setting colder. • Turn off Energy Saver mode. replace every three months. • See Care and cleaning. Slow ice cube freezing Door left open box of refrigerator needs cleaning. Interior needs cleaning. • Foods with strong odors...
Use and Care Manual
Page 30
... dispenser No water or ice cube production Water is leaking from dispenser Handle is loose / handle has a gap Refrigerator beeping Possible Causes Water dispenser has not been used for a long time. Normal when refrigerator is frozen because the controls are set too cold. • See Installing the water line. • Replace filter... the dispenser long enough after button is replenished. Glass not being certain that it locks into place. Water in the water system. Water supply line turned off or not connected.
... dispenser No water or ice cube production Water is leaking from dispenser Handle is loose / handle has a gap Refrigerator beeping Possible Causes Water dispenser has not been used for a long time. Normal when refrigerator is frozen because the controls are set too cold. • See Installing the water line. • Replace filter... the dispenser long enough after button is replenished. Glass not being certain that it locks into place. Water in the water system. Water supply line turned off or not connected.
Installation Instructions
Page 5
...the storage drawer may cause the icemaker or auger to fill the water system. This condition is not self-draining. To turn on some models) To use of the refrigerator cabinet, turn off , press and hold the Alarm/Light pad for 3 seconds. If moisture does appear on the front surface of ... and push gently against the top of water. If no water is dispensed when the refrigerator is shipped with an Energy Saver feature. Important Facts About Your Dispenser s Do not add ice from the chute. ge.com Spill Shelf To Use the Dispenser (on . To flush out impurities in the...
...the storage drawer may cause the icemaker or auger to fill the water system. This condition is not self-draining. To turn on some models) To use of the refrigerator cabinet, turn off , press and hold the Alarm/Light pad for 3 seconds. If moisture does appear on the front surface of ... and push gently against the top of water. If no water is dispensed when the refrigerator is shipped with an Energy Saver feature. Important Facts About Your Dispenser s Do not add ice from the chute. ge.com Spill Shelf To Use the Dispenser (on . To flush out impurities in the...
Installation Instructions
Page 6
...itself into the holder. Filter Model MWF Customers in the back upper right corner of the refrigerator compartment. CAUTION: If air has been trapped in the United States, visit our Website, ge.com or call GE Parts and Accessories, 800.626.2002. Remove the protective foil from the dispenser. Lining ...or icemaker decreases. A small amount of water to Replace the Filter The filter cartridge should consult the yellow pages for 3 minutes (about 1/4 turn the cartridge, it up the arrow on the cartridge and the cartridge holder, place the top of the cartridge. Do not push it will not...
...itself into the holder. Filter Model MWF Customers in the back upper right corner of the refrigerator compartment. CAUTION: If air has been trapped in the United States, visit our Website, ge.com or call GE Parts and Accessories, 800.626.2002. Remove the protective foil from the dispenser. Lining ...or icemaker decreases. A small amount of water to Replace the Filter The filter cartridge should consult the yellow pages for 3 minutes (about 1/4 turn the cartridge, it up the arrow on the cartridge and the cartridge holder, place the top of the cartridge. Do not push it will not...
Installation Instructions
Page 11
...several cubes to disengage the icemaker. Throw away the first few batches of the feeler arm. NOTE: Turn on the control panel to be joined together. A newly installed refrigerator may take 12 to 24 hours to the water supply, press and release the Ice Off/Lock or...temperature, room temperature, number of ice. Installation Instructions Troubleshooting Tips Consumer Support 11 ge.com Automatic Icemaker The icemaker will hear a buzzing sound each time the icemaker fills with water. When the refrigerator has been connected to begin making ice cubes. It is shut off. You ...
...several cubes to disengage the icemaker. Throw away the first few batches of the feeler arm. NOTE: Turn on the control panel to be joined together. A newly installed refrigerator may take 12 to 24 hours to the water supply, press and release the Ice Off/Lock or...temperature, room temperature, number of ice. Installation Instructions Troubleshooting Tips Consumer Support 11 ge.com Automatic Icemaker The icemaker will hear a buzzing sound each time the icemaker fills with water. When the refrigerator has been connected to begin making ice cubes. It is shut off. You ...

Installation Instructions
Page 14
... the back side of the same or lower wattage. Turn the bulb counterclockwise. NOTE: Reveal® appliance bulbs may be ordered from the outlet. Plug the refrigerator back in . Operating Instructions Safety Instructions Replacing the light bulbs. Refrigerator Lights Unplug the power cord from GE Parts and Accessories, 800.626.2002. Replace the shield...
... the back side of the same or lower wattage. Turn the bulb counterclockwise. NOTE: Reveal® appliance bulbs may be ordered from the outlet. Plug the refrigerator back in . Operating Instructions Safety Instructions Replacing the light bulbs. Refrigerator Lights Unplug the power cord from GE Parts and Accessories, 800.626.2002. Replace the shield...

Installation Instructions
Page 21
... provided to the power cord. 10 TURN ON THE WATER SUPPLY Turn the water on at the shutoff valve (house water supply) and check for any leaks. 21 You may cause leaks. Installation Instructions 9 CONNECTING THE REFRIGERATOR TO THE HOUSE WATER LINE (cont.) B If you are using GE SmartConnect™ tubing, insert the molded...
... provided to the power cord. 10 TURN ON THE WATER SUPPLY Turn the water on at the shutoff valve (house water supply) and check for any leaks. 21 You may cause leaks. Installation Instructions 9 CONNECTING THE REFRIGERATOR TO THE HOUSE WATER LINE (cont.) B If you are using GE SmartConnect™ tubing, insert the molded...
Installation Instructions
Page 22
... gap. B Insert the supplied 4 mm Allen wrench into the shaft of fastener rings you turn counterclockwise, the door will need help, review the previous section on leveling the refrigerator. The number of the center hinge. 22 NOTE: Four fastener rings are enclosed with the... adjust so the refrigerator is firmly positioned on the floor and does not wobble. 2) Leveling legs serve as a stabilizing brake to hold the refrigerator securely in the gap between the hinge grommet and the center hinge. A Turn the leveling legs clockwise to raise the refrigerator, counterclockwise to lower...
... gap. B Insert the supplied 4 mm Allen wrench into the shaft of fastener rings you turn counterclockwise, the door will need help, review the previous section on leveling the refrigerator. The number of the center hinge. 22 NOTE: Four fastener rings are enclosed with the... adjust so the refrigerator is firmly positioned on the floor and does not wobble. 2) Leveling legs serve as a stabilizing brake to hold the refrigerator securely in the gap between the hinge grommet and the center hinge. A Turn the leveling legs clockwise to raise the refrigerator, counterclockwise to lower...

Installation Instructions
Page 24
...refrigerator to a GE Reverse Osmosis Water System, the only approved installation is sufficient extra tubing to allow the refrigerator to move out from the water valve on the amount of electric shock, or is battery powered. Call a qualified plumber to the refrigerator is not warranted by turning... back of expensive water damage. To determine how much tubing you use the refrigerator's filter bypass plug. GE SmartConnect™ Refrigerator Tubing Kits are GE SmartConnect™ Refrigerator Tubing (WX08X10006, WX08X10015 and WX08X10025). WX08X10006 15′ (4.6 m) - Installation...
...refrigerator to a GE Reverse Osmosis Water System, the only approved installation is sufficient extra tubing to allow the refrigerator to move out from the water valve on the amount of electric shock, or is battery powered. Call a qualified plumber to the refrigerator is not warranted by turning... back of expensive water damage. To determine how much tubing you use the refrigerator's filter bypass plug. GE SmartConnect™ Refrigerator Tubing Kits are GE SmartConnect™ Refrigerator Tubing (WX08X10006, WX08X10015 and WX08X10025). WX08X10006 15′ (4.6 m) - Installation...

Installation Instructions
Page 25
... to the tubing. • If your existing copper water line has a flared fitting at the end, you can cut formed end from GE SmartConnect™ Refrigerator tubing. 3 DRILL THE HOLE FOR THE VALVE Drill a 1/4″ hole in many water supply kits. When it is easily accessible. Take...8482; Refrigerator Tubing kits. Installation Instructions WHAT YOU WILL NEED (CONT.) NOTE: The only GE approved plastic tubing is best to connect into the side of a vertical water pipe. Install the shutoff valve on the nearest frequently used drinking water line. 1 SHUT OFF THE MAIN WATER SUPPLY Turn on...
... to the tubing. • If your existing copper water line has a flared fitting at the end, you can cut formed end from GE SmartConnect™ Refrigerator tubing. 3 DRILL THE HOLE FOR THE VALVE Drill a 1/4″ hole in many water supply kits. When it is easily accessible. Take...8482; Refrigerator Tubing kits. Installation Instructions WHAT YOU WILL NEED (CONT.) NOTE: The only GE approved plastic tubing is best to connect into the side of a vertical water pipe. Install the shutoff valve on the nearest frequently used drinking water line. 1 SHUT OFF THE MAIN WATER SUPPLY Turn on...


