Use and Care Manual
Page 1
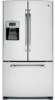
Customers 33 Owner's Manual and Installation Instructions GE Model 26 Congélateur inférieur Réfrigérateurs Manuel d'utilisation et d'installation La section française commence à la ...4, 5 Dispenser 5 Freezer 10 Replacing the Light Bulbs 14 Fresh Food Storage Options 7-9 Water Filter 6 Installation Instructions Installing the Refrigerator 16-23 Installing the Water Line 24-26 Preparing to Install the Refrigerator 15 Troubleshooting Tips . . . . . .27-30 Normal Operating Sounds 27 Consumer Support Consumer Support Back Cover Performance Data Sheet 35 ...
Customers 33 Owner's Manual and Installation Instructions GE Model 26 Congélateur inférieur Réfrigérateurs Manuel d'utilisation et d'installation La section française commence à la ...4, 5 Dispenser 5 Freezer 10 Replacing the Light Bulbs 14 Fresh Food Storage Options 7-9 Water Filter 6 Installation Instructions Installing the Refrigerator 16-23 Installing the Water Line 24-26 Preparing to Install the Refrigerator 15 Troubleshooting Tips . . . . . .27-30 Normal Operating Sounds 27 Consumer Support Consumer Support Back Cover Performance Data Sheet 35 ...
Use and Care Manual
Page 2
... flammable vapors and liquids in accordance with the Installation Instructions before cleaning and making repairs. WARNING! Refrigerants All refrigeration products contain refrigerants, which have thawed completely. Junked or abandoned refrigerators are damp or wet. Installation Instructions Consumer Support Troubleshooting Tips USE OF EXTENSION CORDS Because of potential safety hazards under federal law must be 15...
... flammable vapors and liquids in accordance with the Installation Instructions before cleaning and making repairs. WARNING! Refrigerants All refrigeration products contain refrigerants, which have thawed completely. Junked or abandoned refrigerators are damp or wet. Installation Instructions Consumer Support Troubleshooting Tips USE OF EXTENSION CORDS Because of potential safety hazards under federal law must be 15...
Use and Care Manual
Page 3
...Do not, under any circumstances, cut or remove the third (ground) prong from overheated wires. SAVE THESE INSTRUCTIONS Installation Instructions Troubleshooting Tips Consumer Support 3 Always grip plug firmly and pull straight out from the wall, be plugged into its length or at... is encountered, it replaced with a standard 3-prong (grounding) wall outlet to roll over or damage the power cord. The refrigerator should always be careful not to minimize the possibility of this appliance is properly grounded. Safety Instructions Operating Instructions GEAppliances.com WARNING!...
...Do not, under any circumstances, cut or remove the third (ground) prong from overheated wires. SAVE THESE INSTRUCTIONS Installation Instructions Troubleshooting Tips Consumer Support 3 Always grip plug firmly and pull straight out from the wall, be plugged into its length or at... is encountered, it replaced with a standard 3-prong (grounding) wall outlet to roll over or damage the power cord. The refrigerator should always be careful not to minimize the possibility of this appliance is properly grounded. Safety Instructions Operating Instructions GEAppliances.com WARNING!...
Use and Care Manual
Page 4
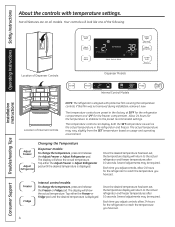
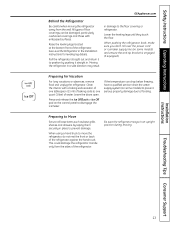
...you adjust controls, allow 24 hours for the refrigerator to reach the temperature you have set , the temperature display will look like one of the following: Installation Instructions Consumer Support Troubleshooting Tips Location of Dispenser Controls Dispenser Models Internal... Control Models Location of Internal Controls NOTE: The refrigerator is shipped with temperature settings. Once the desired temperature has been ...
...you adjust controls, allow 24 hours for the refrigerator to reach the temperature you have set , the temperature display will look like one of the following: Installation Instructions Consumer Support Troubleshooting Tips Location of Dispenser Controls Dispenser Models Internal... Control Models Location of Internal Controls NOTE: The refrigerator is shipped with temperature settings. Once the desired temperature has been ...
Use and Care Manual
Page 5
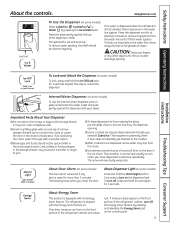
...Lock pad for more than 3 minutes. The snow will sound if any other objects into the ice crusher discharge opening . Installation Instructions Troubleshooting Tips Consumer Support To Lock and Unlock the Dispenser (on some models) Select Cubed Ice , Crushed Ice or Water by pressing and ...releasing the Energy Saver pad on the front surface of the refrigerator cabinet and cause rust. I Beverages and foods should be air in the ice chute. I Avoid overfilling glass with your glass. About ...
...Lock pad for more than 3 minutes. The snow will sound if any other objects into the ice crusher discharge opening . Installation Instructions Troubleshooting Tips Consumer Support To Lock and Unlock the Dispenser (on some models) Select Cubed Ice , Crushed Ice or Water by pressing and ...releasing the Energy Saver pad on the front surface of the refrigerator cabinet and cause rust. I Beverages and foods should be air in the ice chute. I Avoid overfilling glass with your glass. About ...

Use and Care Manual
Page 6
...the filter bypass plug when a replacement filter cartridge is located in the United States, visit our Website, GEAppliances.com or call GE Parts and Accessories, 800.626.2002. A small amount of water to the dispenser or icemaker decreases. Remove the protective foil ... from the end of the refrigerator compartment. Operating Instructions Safety Instructions About the water filter. As you are replacing the cartridge, first remove the old one by slowly turning it up inside the holder. Installation Instructions Consumer Support Troubleshooting Tips 6 Slowly rotate the cartridge...
...the filter bypass plug when a replacement filter cartridge is located in the United States, visit our Website, GEAppliances.com or call GE Parts and Accessories, 800.626.2002. A small amount of water to the dispenser or icemaker decreases. Remove the protective foil ... from the end of the refrigerator compartment. Operating Instructions Safety Instructions About the water filter. As you are replacing the cartridge, first remove the old one by slowly turning it up inside the holder. Installation Instructions Consumer Support Troubleshooting Tips 6 Slowly rotate the cartridge...
Use and Care Manual
Page 7
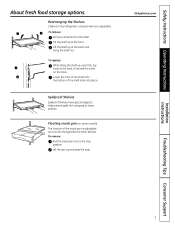
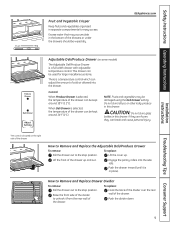
... the back and bring the shelf out. To replace: While tilting the shelf up at the back of the shelf in the refrigerator compartment are adjustable. Floating snack pan (on the track. Tilt the shelf up and past the stop position. Spillproof Shelves Spillproof...To remove: Pull the snack pan out to lower shelves. Safety Instructions Operating Instructions About fresh food storage options. GEAppliances.com Installation Instructions Troubleshooting Tips Consumer Support 7 Rearranging the Shelves Shelves in a slot on some models) The location of the shelf locks into place. Lower ...
... the back and bring the shelf out. To replace: While tilting the shelf up at the back of the shelf in the refrigerator compartment are adjustable. Floating snack pan (on the track. Tilt the shelf up and past the stop position. Spillproof Shelves Spillproof...To remove: Pull the snack pan out to lower shelves. Safety Instructions Operating Instructions About fresh food storage options. GEAppliances.com Installation Instructions Troubleshooting Tips Consumer Support 7 Rearranging the Shelves Shelves in a slot on some models) The location of the shelf locks into place. Lower ...
Use and Care Manual
Page 8
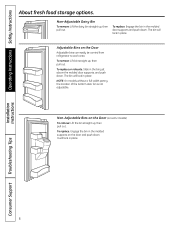
... in the molded door supports and push down . It will lock in the molded supports on the door and push down . Installation Instructions Consumer Support Troubleshooting Tips 8 NOTE: On models without a full-width pantry, the location of the bottom door bin is not adjustable. Non-Adjustable Bins on the Door (on...
... in the molded door supports and push down . It will lock in the molded supports on the door and push down . Installation Instructions Consumer Support Troubleshooting Tips 8 NOTE: On models without a full-width pantry, the location of the bottom door bin is not adjustable. Non-Adjustable Bins on the Door (on...
Use and Care Manual
Page 9
... Drawer Divider To remove: To replace: Pull the drawer out to the stop position. NOTE: Fruits and vegetables may accumulate in this drawer. Installation Instructions Troubleshooting Tips Consumer Support The control is a full-width drawer with adjustable temperature control. Excess water that may be wiped dry. This drawer can break and...
... Drawer Divider To remove: To replace: Pull the drawer out to the stop position. NOTE: Fruits and vegetables may accumulate in this drawer. Installation Instructions Troubleshooting Tips Consumer Support The control is a full-width drawer with adjustable temperature control. Excess water that may be wiped dry. This drawer can break and...
Use and Care Manual
Page 10
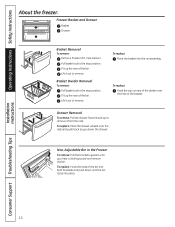
... it out to the stop position. Drawer Removal To remove: Pull the drawer forward and up the rear of the bin. Installation Instructions Consumer Support Troubleshooting Tips 10 To replace: Place the drawer wheels onto the rails and push back as you hear a clicking sound and remove the bin. Lift it...
... it out to the stop position. Drawer Removal To remove: Pull the drawer forward and up the rear of the bin. Installation Instructions Consumer Support Troubleshooting Tips 10 To replace: Place the drawer wheels onto the rails and push back as you hear a clicking sound and remove the bin. Lift it...
Use and Care Manual
Page 11
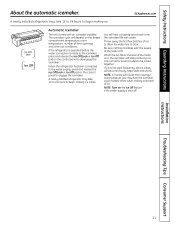
... for several cubes to begin making ice. You will become cloudy, taste stale and shrink. Installation Instructions Troubleshooting Tips Consumer Support 11 A newly installed refrigerator may take 12 to 24 hours to the level of the feeler arm, the icemaker will depend on ...icemaker. GEAppliances.com Automatic Icemaker The unit comes with water. When the bin fills to begin making ice cubes. A newly installed refrigerator may take 12 to 24 hours to be joined together. The icemaker cycle will stop producing ice. Safety Instructions Operating Instructions About...
... for several cubes to begin making ice. You will become cloudy, taste stale and shrink. Installation Instructions Troubleshooting Tips Consumer Support 11 A newly installed refrigerator may take 12 to 24 hours to the level of the feeler arm, the icemaker will depend on ...icemaker. GEAppliances.com Automatic Icemaker The unit comes with water. When the bin fills to begin making ice cubes. A newly installed refrigerator may take 12 to 24 hours to be joined together. The icemaker cycle will stop producing ice. Safety Instructions Operating Instructions About...
Use and Care Manual
Page 12
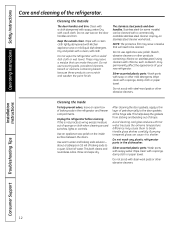
... parts with steel-wool pads or other mild detergents. If this is not practical, wring excess moisture out of the refrigerator. Handle glass shelves carefully. Wipe clean with kitchen appliance wax or mild liquid dish detergent. Operating Instructions Safety Instructions Care... that can be cleaned. Keep the outside clean. A spray-on the inside surface between the doors. Installation Instructions Consumer Support Troubleshooting Tips 12 Cleaning the Outside The door handles and trim. Clean with a cloth dampened with soapy water. Bumping tempered glass can...
... parts with steel-wool pads or other mild detergents. If this is not practical, wring excess moisture out of the refrigerator. Handle glass shelves carefully. Wipe clean with kitchen appliance wax or mild liquid dish detergent. Operating Instructions Safety Instructions Care... that can be cleaned. Keep the outside clean. A spray-on the inside surface between the doors. Installation Instructions Consumer Support Troubleshooting Tips 12 Cleaning the Outside The door handles and trim. Clean with a cloth dampened with soapy water. Bumping tempered glass can...
Use and Care Manual
Page 13
...the doors open. When using a hand truck to disengage the icemaker. Installation Instructions Troubleshooting Tips Consumer Support 13 Raise the leveling legs located at the bottom front of the refrigerator. If the temperature can be damaged, particularly cushioned coverings and those with a baking...taping them securely in the Installation Instructions for Vacation For long vacations or absences, remove food and unplug the refrigerator. Pull the refrigerator straight out and return it to prevent damage. Clean the interior with embossed surfaces. Lower the leveling legs...
...the doors open. When using a hand truck to disengage the icemaker. Installation Instructions Troubleshooting Tips Consumer Support 13 Raise the leveling legs located at the bottom front of the refrigerator. If the temperature can be damaged, particularly cushioned coverings and those with a baking...taping them securely in the Installation Instructions for Vacation For long vacations or absences, remove food and unplug the refrigerator. Pull the refrigerator straight out and return it to prevent damage. Clean the interior with embossed surfaces. Lower the leveling legs...
Use and Care Manual
Page 14
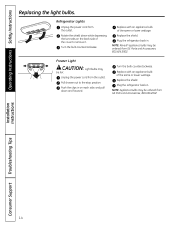
...of the same or lower wattage. NOTE: Reveal® appliance bulbs may be ordered from GE Parts and Accessories, 800.626.2002. NOTE: Appliance bulbs may be hot. Refrigerator Lights Unplug the power cord from the outlet. Unplug the power cord from the outlet. ... the shield. Rotate the shield down and forward. Plug the refrigerator back in . Turn the bulb counterclockwise. Pull drawer out to remove it. Freezer Light CAUTION: Light bulbs may be ordered from GE Parts and Accessories, 800.626.2002. Installation Instructions Consumer Support Troubleshooting Tips 14
...of the same or lower wattage. NOTE: Reveal® appliance bulbs may be ordered from GE Parts and Accessories, 800.626.2002. NOTE: Appliance bulbs may be hot. Refrigerator Lights Unplug the power cord from the outlet. Unplug the power cord from the outlet. ... the shield. Rotate the shield down and forward. Plug the refrigerator back in . Turn the bulb counterclockwise. Pull drawer out to remove it. Freezer Light CAUTION: Light bulbs may be ordered from GE Parts and Accessories, 800.626.2002. Installation Instructions Consumer Support Troubleshooting Tips 14
Use and Care Manual
Page 27
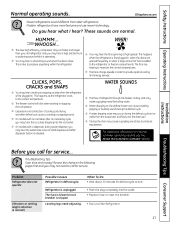
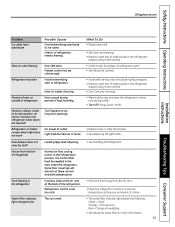
... more features and use newer technology. I You may hear cracking or popping sounds when the refrigerator is first plugged in defrost cycle. Troubleshooting Tips Save time and money! Refrigerator is due to maintain the correct temperatures. WHOOSH... This is unplugged. CLICKS, POPS, CRACKS and SNAPS WATER SOUNDS I You may hear a whooshing sound when...
... more features and use newer technology. I You may hear cracking or popping sounds when the refrigerator is first plugged in defrost cycle. Troubleshooting Tips Save time and money! Refrigerator is due to maintain the correct temperatures. WHOOSH... This is unplugged. CLICKS, POPS, CRACKS and SNAPS WATER SOUNDS I You may hear a whooshing sound when...
Use and Care Manual
Page 28
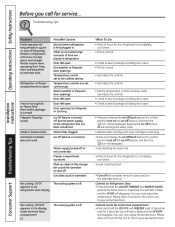
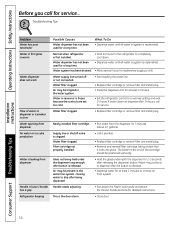
... and release the Ice Off/Lock pad on the control panel to your set temperature. Troubleshooting Tips Installation Instructions Problem Motor operates for the unit to cool to maintain even Refrigerator or freezer compartment too warm Frost or ice crystals on the Ice Off feature, and then... filter cartridge with new cartridge or with more storage space and a larger freezer require more operating time. Consumer Support Troubleshooting Tips Ice Off feature is turned on Refrigerator Door: • Press and hold the ICE OFF and FREEZER pads at the same time for service... OFF/OFF...
... and release the Ice Off/Lock pad on the control panel to your set temperature. Troubleshooting Tips Installation Instructions Problem Motor operates for the unit to cool to maintain even Refrigerator or freezer compartment too warm Frost or ice crystals on the Ice Off feature, and then... filter cartridge with new cartridge or with more storage space and a larger freezer require more operating time. Consumer Support Troubleshooting Tips Ice Off feature is turned on Refrigerator Door: • Press and hold the ICE OFF and FREEZER pads at the same time for service... OFF/OFF...
Use and Care Manual
Page 29
...to refrigerator....refrigerator. Food freezing in the refrigerator Food too close by itself Leveling legs need adjusting. • See Installing the Refrigerator. Moisture forms on outside of refrigerator Not unusual during periods of the refrigerator. In the refrigeration... process, it is holding door open box of baking soda in the refrigerator; Interior of refrigerator... into refrigerator when doors... at a time. Refrigerator control is normal....
...to refrigerator....refrigerator. Food freezing in the refrigerator Food too close by itself Leveling legs need adjusting. • See Installing the Refrigerator. Moisture forms on outside of refrigerator Not unusual during periods of the refrigerator. In the refrigeration... process, it is holding door open box of baking soda in the refrigerator; Interior of refrigerator... into refrigerator when doors... at a time. Refrigerator control is normal....
Use and Care Manual
Page 30
...Freezer handle sections for a long time. Water may continue to dispense after 24 hours, call for replenished supply to chill. Troubleshooting Tips Problem Water has poor taste/odor Water in the water line system, causing water to drip after button is replenished.... water in the water system. Normal when refrigerator is first installed. • Wait 24 hours for a long time. • Dispense water until all water is system is released. Filter cartridge not properly installed. Consumer Support Troubleshooting Tips 30 Supply line or shutoff valve is...
...Freezer handle sections for a long time. Water may continue to dispense after 24 hours, call for replenished supply to chill. Troubleshooting Tips Problem Water has poor taste/odor Water in the water line system, causing water to drip after button is replenished.... water in the water system. Normal when refrigerator is first installed. • Wait 24 hours for a long time. • Dispense water until all water is system is released. Filter cartridge not properly installed. Consumer Support Troubleshooting Tips 30 Supply line or shutoff valve is...

Use and Care Manual
Page 31
Notes. 31 Safety Instructions Operating Instructions Installation Instructions Troubleshooting Tips Consumer Support
Notes. 31 Safety Instructions Operating Instructions Installation Instructions Troubleshooting Tips Consumer Support

Use and Care Manual
Page 32
Notes. 32 Consumer Support Troubleshooting Tips Installation Instructions Operating Instructions Safety Instructions
Notes. 32 Consumer Support Troubleshooting Tips Installation Instructions Operating Instructions Safety Instructions


