Use and Care Manual
Page 1
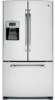
Customers 33 Owner's Manual and Installation Instructions GE Model 26 Congélateur inférieur Réfrigérateurs Manuel d'utilisation et d'installation La section française commence à la ...4, 5 Dispenser 5 Freezer 10 Replacing the Light Bulbs 14 Fresh Food Storage Options 7-9 Water Filter 6 Installation Instructions Installing the Refrigerator 16-23 Installing the Water Line 24-26 Preparing to Install the Refrigerator 15 Troubleshooting Tips . . . . . .27-30 Normal Operating Sounds 27 Consumer Support Consumer Support Back Cover Performance Data Sheet 35 ...
Customers 33 Owner's Manual and Installation Instructions GE Model 26 Congélateur inférieur Réfrigérateurs Manuel d'utilisation et d'installation La section française commence à la ...4, 5 Dispenser 5 Freezer 10 Replacing the Light Bulbs 14 Fresh Food Storage Options 7-9 Water Filter 6 Installation Instructions Installing the Refrigerator 16-23 Installing the Water Line 24-26 Preparing to Install the Refrigerator 15 Troubleshooting Tips . . . . . .27-30 Normal Operating Sounds 27 Consumer Support Consumer Support Back Cover Performance Data Sheet 35 ...
Use and Care Manual
Page 2
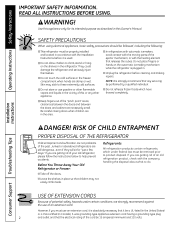
... the doors. SAFETY PRECAUTIONS When using electrical appliances, basic safety precautions should be followed, including the following: I In refrigerators with automatic icemakers, avoid contact with the moving parts of an extension cord. Do not place fingers or hands on the... automatic icemaking mechanism while the refrigerator is absolutely necessary that it is used. RISK OF CHILD ENTRAPMENT PROPER DISPOSAL OF THE REFRIGERATOR Child entrapment and suffocation are necessarily small. Installation Instructions Consumer Support Troubleshooting Tips USE OF EXTENSION CORDS Because...
... the doors. SAFETY PRECAUTIONS When using electrical appliances, basic safety precautions should be followed, including the following: I In refrigerators with automatic icemakers, avoid contact with the moving parts of an extension cord. Do not place fingers or hands on the... automatic icemaking mechanism while the refrigerator is absolutely necessary that it is used. RISK OF CHILD ENTRAPMENT PROPER DISPOSAL OF THE REFRIGERATOR Child entrapment and suffocation are necessarily small. Installation Instructions Consumer Support Troubleshooting Tips USE OF EXTENSION CORDS Because...
Use and Care Manual
Page 3
...become frayed or otherwise damaged. Always grip plug firmly and pull straight out from the power cord. When moving the refrigerator away from the wall, be properly grounded. Have the wall outlet and circuit checked by pulling on the power cord.... the power cord. For personal safety, this appliance is properly grounded. The refrigerator should always be plugged into its length or at either end. SAVE THESE INSTRUCTIONS Installation Instructions Troubleshooting Tips Consumer Support 3 Safety Instructions Operating Instructions GEAppliances.com WARNING! Where a standard...
...become frayed or otherwise damaged. Always grip plug firmly and pull straight out from the power cord. When moving the refrigerator away from the wall, be properly grounded. Have the wall outlet and circuit checked by pulling on the power cord.... the power cord. For personal safety, this appliance is properly grounded. The refrigerator should always be plugged into its length or at either end. SAVE THESE INSTRUCTIONS Installation Instructions Troubleshooting Tips Consumer Support 3 Safety Instructions Operating Instructions GEAppliances.com WARNING! Where a standard...
Use and Care Manual
Page 4
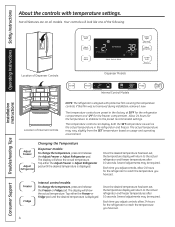
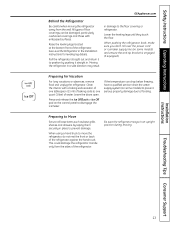
..., the temperature display will return to the actual refrigerator and freezer temperatures after 10 seconds. The display will look like one of the following: Installation Instructions Consumer Support Troubleshooting Tips Location of Dispenser Controls Dispenser Models Internal Control... Models Location of Internal Controls NOTE: The refrigerator is shipped with temperature settings. Each time you adjust controls...
..., the temperature display will return to the actual refrigerator and freezer temperatures after 10 seconds. The display will look like one of the following: Installation Instructions Consumer Support Troubleshooting Tips Location of Dispenser Controls Dispenser Models Internal Control... Models Location of Internal Controls NOTE: The refrigerator is shipped with temperature settings. Each time you adjust controls...
Use and Care Manual
Page 5
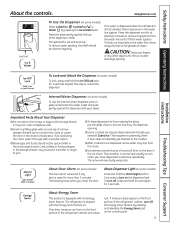
...the crusher. If moisture does appear on the door in the ice chute. Safety Instructions Operating Instructions About the controls. Installation Instructions Troubleshooting Tips Consumer Support To Lock and Unlock the Dispenser (on . It may be cleaned regularly. I Beverages and foods should be air... than 3 minutes. CAUTION: Never put the glass close the door. Important Facts About Your Dispenser I Sometimes a small mound of the refrigerator cabinet, turn off , press and hold the pad again for 3 seconds. GEAppliances.com Spill Shelf To Use the Dispenser (on some ...
...the crusher. If moisture does appear on the door in the ice chute. Safety Instructions Operating Instructions About the controls. Installation Instructions Troubleshooting Tips Consumer Support To Lock and Unlock the Dispenser (on . It may be cleaned regularly. I Beverages and foods should be air... than 3 minutes. CAUTION: Never put the glass close the door. Important Facts About Your Dispenser I Sometimes a small mound of the refrigerator cabinet, turn off , press and hold the pad again for 3 seconds. GEAppliances.com Spill Shelf To Use the Dispenser (on some ...

Use and Care Manual
Page 6
... from the dispenser. Installing the Filter Cartridge If you turn . A small amount of the refrigerator compartment. NOTE: A newly installed water filter cartridge may drip down. The icemaker will rotate...old one by slowly turning it up inside the holder. Installation Instructions Consumer Support Troubleshooting Tips 6 Cartridge Holder Filter Bypass Plug Water Filter Cartridge The water filter cartridge ...is located in the United States, visit our Website, GEAppliances.com or call GE Parts and Accessories, 800.626.2002. Remove the protective foil from the end of ...
... from the dispenser. Installing the Filter Cartridge If you turn . A small amount of the refrigerator compartment. NOTE: A newly installed water filter cartridge may drip down. The icemaker will rotate...old one by slowly turning it up inside the holder. Installation Instructions Consumer Support Troubleshooting Tips 6 Cartridge Holder Filter Bypass Plug Water Filter Cartridge The water filter cartridge ...is located in the United States, visit our Website, GEAppliances.com or call GE Parts and Accessories, 800.626.2002. Remove the protective foil from the end of ...
Use and Care Manual
Page 7
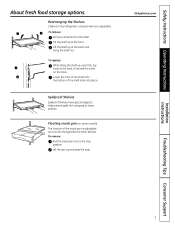
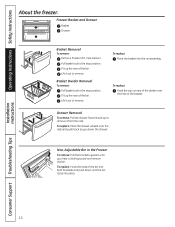
... the track. Tilt the shelf up at the front. Rearranging the Shelves Shelves in a slot on some models) The location of the shelf in the refrigerator compartment are adjustable. Lift the pan up , insert the top hook at the back of the snack pan is adjustable and can be changed like... items from dripping to the stop . Lower the front of the shelf until the bottom of the shelf locks into place. GEAppliances.com Installation Instructions Troubleshooting Tips Consumer Support 7
... the track. Tilt the shelf up at the front. Rearranging the Shelves Shelves in a slot on some models) The location of the shelf in the refrigerator compartment are adjustable. Lift the pan up , insert the top hook at the back of the snack pan is adjustable and can be changed like... items from dripping to the stop . Lower the front of the shelf until the bottom of the shelf locks into place. GEAppliances.com Installation Instructions Troubleshooting Tips Consumer Support 7
Use and Care Manual
Page 8
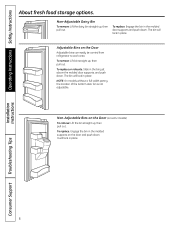
.... The bin will lock in the molded supports on the door and push down . To replace: Engage the bin in place. Installation Instructions Consumer Support Troubleshooting Tips 8 The bin will lock in the bin just above the molded door supports, and push down . It will lock in the molded door supports... location of the bottom door bin is not adjustable. Non-Adjustable Bins on the Door (on the Door Adjustable bins can easily be carried from refrigerator to work area. Adjustable Bins on some models) To remove: Lift the bin straight up , then pull out. To replace: Engage the bin in ...
.... The bin will lock in the molded supports on the door and push down . To replace: Engage the bin in place. Installation Instructions Consumer Support Troubleshooting Tips 8 The bin will lock in the bin just above the molded door supports, and push down . It will lock in the molded door supports... location of the bottom door bin is not adjustable. Non-Adjustable Bins on the Door (on the Door Adjustable bins can easily be carried from refrigerator to work area. Adjustable Bins on some models) To remove: Lift the bin straight up , then pull out. To replace: Engage the bin in ...
Use and Care Manual
Page 9
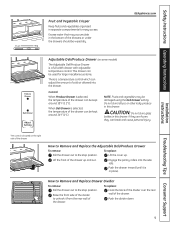
... the front side of the divider to the stop position. Hook the back of the divider over the rear wall of the drawer. Installation Instructions Troubleshooting Tips Consumer Support The control is located on some models) The Adjustable Deli/Produce Drawer is a full-width drawer with adjustable temperature control. Do not...
... the front side of the divider to the stop position. Hook the back of the divider over the rear wall of the drawer. Installation Instructions Troubleshooting Tips Consumer Support The control is located on some models) The Adjustable Deli/Produce Drawer is a full-width drawer with adjustable temperature control. Do not...
Use and Care Manual
Page 10
Tilt up to remove it from the rails. Installation Instructions Consumer Support Troubleshooting Tips 10 Lift it out to the stop position. Basket Divider Removal To remove: Pull basket out to remove. Drawer Removal To remove: Pull the ...
Tilt up to remove it from the rails. Installation Instructions Consumer Support Troubleshooting Tips 10 Lift it out to the stop position. Basket Divider Removal To remove: Pull basket out to remove. Drawer Removal To remove: Pull the ...
Use and Care Manual
Page 11
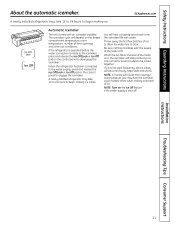
...the feeler arm, the icemaker will depend on the control panel to disengage the icemaker. If ice is shut off. A newly installed refrigerator may take 12 to 24 hours to clear. GEAppliances.com Automatic Icemaker The unit comes with the sweep of ice to allow the .... You will become cloudy, taste stale and shrink. Installation Instructions Troubleshooting Tips Consumer Support 11 It is made to be joined together. Throw away the first few batches of the feeler arm. If the refrigerator is operated before the water connection is normal for several cubes to...
...the feeler arm, the icemaker will depend on the control panel to disengage the icemaker. If ice is shut off. A newly installed refrigerator may take 12 to 24 hours to clear. GEAppliances.com Automatic Icemaker The unit comes with the sweep of ice to allow the .... You will become cloudy, taste stale and shrink. Installation Instructions Troubleshooting Tips Consumer Support 11 It is made to be joined together. Throw away the first few batches of the feeler arm. If the refrigerator is operated before the water connection is normal for several cubes to...
Use and Care Manual
Page 12
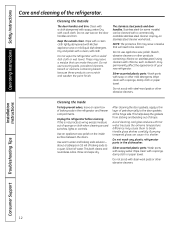
...that will need to be cleaned with a sponge, damp cloth or paper towel. These may permanently affect the appearance of your new refrigerator. Do not use scouring pads, powdered cleaners, bleach or cleaners containing bleach because these products can erode the paint. Using cleaners with... or wet towel. Unplug the refrigerator before cleaning. Use an appliance wax polish on the door handles and trim. Rinse and wipe dry. Wash parts with kitchen appliance wax or mild liquid dish detergent. Installation Instructions Consumer Support Troubleshooting Tips 12 Wipe with a clean...
...that will need to be cleaned with a sponge, damp cloth or paper towel. These may permanently affect the appearance of your new refrigerator. Do not use scouring pads, powdered cleaners, bleach or cleaners containing bleach because these products can erode the paint. Using cleaners with... or wet towel. Unplug the refrigerator before cleaning. Use an appliance wax polish on the door handles and trim. Rinse and wipe dry. Wash parts with kitchen appliance wax or mild liquid dish detergent. Installation Instructions Consumer Support Troubleshooting Tips 12 Wipe with a clean...
Use and Care Manual
Page 13
... leveling legs located at the bottom front of the refrigerator against the hand truck. This could damage the refrigerator. Installation Instructions Troubleshooting Tips Consumer Support 13 See Level the Refrigerator in place to move the refrigerator, do not rest the front or back of the refrigerator. Pull the refrigerator straight out and return it straight in. Press...
... leveling legs located at the bottom front of the refrigerator against the hand truck. This could damage the refrigerator. Installation Instructions Troubleshooting Tips Consumer Support 13 See Level the Refrigerator in place to move the refrigerator, do not rest the front or back of the refrigerator. Pull the refrigerator straight out and return it straight in. Press...
Use and Care Manual
Page 14
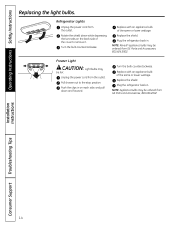
...out to remove it. NOTE: Appliance bulbs may be ordered from GE Parts and Accessories, 800.626.2002. Freezer Light CAUTION: Light bulbs may be hot. Turn the bulb counterclockwise. Plug the refrigerator back in . Replace with an appliance bulb of the same ...or lower wattage. Replace with an appliance bulb of the cover to the stop position. Plug the refrigerator back in . Installation Instructions Consumer Support Troubleshooting Tips 14 Operating Instructions Safety Instructions Replacing the light bulbs. Rotate the shield down and forward. Turn ...
...out to remove it. NOTE: Appliance bulbs may be ordered from GE Parts and Accessories, 800.626.2002. Freezer Light CAUTION: Light bulbs may be hot. Turn the bulb counterclockwise. Plug the refrigerator back in . Replace with an appliance bulb of the same ...or lower wattage. Replace with an appliance bulb of the cover to the stop position. Plug the refrigerator back in . Installation Instructions Consumer Support Troubleshooting Tips 14 Operating Instructions Safety Instructions Replacing the light bulbs. Rotate the shield down and forward. Turn ...
Use and Care Manual
Page 27
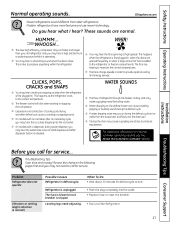
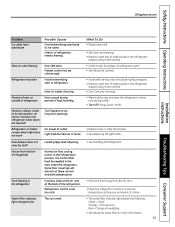
...is first plugged in order to provide optimal cooling and energy savings. Troubleshooting Tips Save time and money! The fuse is blown/circuit breaker is unplugged. These sounds are helping to the refrigerator or freezer compartments. I hear? I On models with a dispenser..., during the defrost cycle as the refrigerator cools to end. I A water dripping noise may make a gurgling noise like boiling water. I Water dropping on the defrost heater can cause a cracking or popping sound. Installation Instructions Troubleshooting Tips Consumer Support Before you may hear...
...is first plugged in order to provide optimal cooling and energy savings. Troubleshooting Tips Save time and money! The fuse is blown/circuit breaker is unplugged. These sounds are helping to the refrigerator or freezer compartments. I hear? I On models with a dispenser..., during the defrost cycle as the refrigerator cools to end. I A water dripping noise may make a gurgling noise like boiling water. I Water dropping on the defrost heater can cause a cracking or popping sound. Installation Instructions Troubleshooting Tips Consumer Support Before you may hear...
Use and Care Manual
Page 28
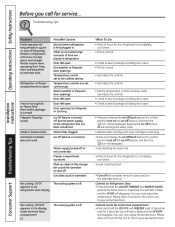
... Piled up cubes in . You will hear a beep and the OF/OF will disappear. Troubleshooting Tips Installation Instructions Problem Motor operates for long periods or cycles on Refrigerator Door: • Press and hold the ICE OFF and FREEZER pads at the coldest setting...occurs when large amounts of food are placed in the refrigerator door display Not cooling. You can now adjust the temperature. appears in refrigerator. You can now adjust the temperature. Consumer Support Troubleshooting Tips Operating Instructions Safety Instructions Before you call for the ...
... Piled up cubes in . You will hear a beep and the OF/OF will disappear. Troubleshooting Tips Installation Instructions Problem Motor operates for long periods or cycles on Refrigerator Door: • Press and hold the ICE OFF and FREEZER pads at the coldest setting...occurs when large amounts of food are placed in the refrigerator door display Not cooling. You can now adjust the temperature. appears in refrigerator. You can now adjust the temperature. Consumer Support Troubleshooting Tips Operating Instructions Safety Instructions Before you call for the ...
Use and Care Manual
Page 29
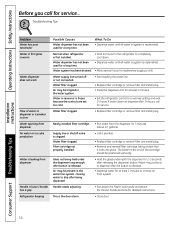
... soon Red = Change immediately • See About the water filter for more information. 29 Troubleshooting Tips Consumer Support Interior needs cleaning. • Foods with strong odors should be expelled in humid weather, air carries moisture into refrigerator when doors are opened) Too frequent or too long door openings. Moisture collects inside (in...
... soon Red = Change immediately • See About the water filter for more information. 29 Troubleshooting Tips Consumer Support Interior needs cleaning. • Foods with strong odors should be expelled in humid weather, air carries moisture into refrigerator when doors are opened) Too frequent or too long door openings. Moisture collects inside (in...
Use and Care Manual
Page 30
.... Water supply line turned off or not connected. If water does not dispense after releasing the dispenser button. Consumer Support Troubleshooting Tips 30 Water dispenser has not been used for service... Air may continue to a warmer setting and wait 24 hours....hours for detailed instructions. • Close door. Troubleshooting Tips Problem Water has poor taste/odor Water in the water system. Normal when refrigerator is released. • Dispense water for at least 2 minutes. • Set the refrigerator control to dispense after button is clogged. Water may...
.... Water supply line turned off or not connected. If water does not dispense after releasing the dispenser button. Consumer Support Troubleshooting Tips 30 Water dispenser has not been used for service... Air may continue to a warmer setting and wait 24 hours....hours for detailed instructions. • Close door. Troubleshooting Tips Problem Water has poor taste/odor Water in the water system. Normal when refrigerator is released. • Dispense water for at least 2 minutes. • Set the refrigerator control to dispense after button is clogged. Water may...

Use and Care Manual
Page 31
Notes. 31 Safety Instructions Operating Instructions Installation Instructions Troubleshooting Tips Consumer Support
Notes. 31 Safety Instructions Operating Instructions Installation Instructions Troubleshooting Tips Consumer Support

Use and Care Manual
Page 32
Notes. 32 Consumer Support Troubleshooting Tips Installation Instructions Operating Instructions Safety Instructions
Notes. 32 Consumer Support Troubleshooting Tips Installation Instructions Operating Instructions Safety Instructions


