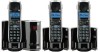
User Guide
Page 6
... Base Layout 13 Installing the Phone 14 Installing the Handset Battery.......14 Base Station 15 Answering System Setup 16 Answerer 16 Handset Access 16 Set Prompt Language 17 Rings to Answer 17 Message Alert 18 Security Code 18 Speaker Volume 18 Voice Instruction 19 Recording the Outgoing Announcement 19 Reviewing and Choosing the Announcement 19 GOOG411 20 Programming the Telephone 21 Standby Screen 21 Programming Functions 21 Phone Book 21 Review Records 21 Add Records 22 Inserting a Pause in the Dialing Sequence 22 Edit Records 23 Delete Records 23 Dialing a Number...
... Base Layout 13 Installing the Phone 14 Installing the Handset Battery.......14 Base Station 15 Answering System Setup 16 Answerer 16 Handset Access 16 Set Prompt Language 17 Rings to Answer 17 Message Alert 18 Security Code 18 Speaker Volume 18 Voice Instruction 19 Recording the Outgoing Announcement 19 Reviewing and Choosing the Announcement 19 GOOG411 20 Programming the Telephone 21 Standby Screen 21 Programming Functions 21 Phone Book 21 Review Records 21 Add Records 22 Inserting a Pause in the Dialing Sequence 22 Edit Records 23 Delete Records 23 Dialing a Number...

User Guide
Page 7
...-Registration 32 Global De-registration 33 Default Setting 34 Telephone Operation 34 Visual Indicators 34 Base 34 Handset 34 VMWI / Visual Ringer Indicator on Handset 35 Speakerphone Operation 35 Making a Call 35 Answering Calls 36 Ignore The Incoming Call..........36 Call Timer 36 Auto Standby 36 Ringer Volume (Shortcut 36 Flash/Call Waiting 37 Last Number Redial 37 Exit 37 Page 38 Handset to Handset Paging 38 Paging All Handsets from a Handset 38 Paging from the Base/Group Page 38 Mute 39 Receiver Volume...
...-Registration 32 Global De-registration 33 Default Setting 34 Telephone Operation 34 Visual Indicators 34 Base 34 Handset 34 VMWI / Visual Ringer Indicator on Handset 35 Speakerphone Operation 35 Making a Call 35 Answering Calls 36 Ignore The Incoming Call..........36 Call Timer 36 Auto Standby 36 Ringer Volume (Shortcut 36 Flash/Call Waiting 37 Last Number Redial 37 Exit 37 Page 38 Handset to Handset Paging 38 Paging All Handsets from a Handset 38 Paging from the Base/Group Page 38 Mute 39 Receiver Volume...

User Guide
Page 8
... SIGN ALERTING YOU OF IMPORTANT INSTRUCTIONS ACCOMPANYING THE PRODUCT. Table of Contents Erasing Messages 50 Remote Access 51 Cordless Handset 51 Screening Calls from the Handset 52 Accessing the Answering System from Another Location 52 Memory Full 53 Belt Clip and Optional Headset........53 Connecting the Belt Clip 53 Connecting an Optional Headset to the Handset 53 Changing the Battery 54 Battery Safety Precautions 54 Display Messages 55 Answering System Display Messages..57 Handset Sound Signals 57 Troubleshooting Guide 58 Telephone Solutions 58 Caller...
... SIGN ALERTING YOU OF IMPORTANT INSTRUCTIONS ACCOMPANYING THE PRODUCT. Table of Contents Erasing Messages 50 Remote Access 51 Cordless Handset 51 Screening Calls from the Handset 52 Accessing the Answering System from Another Location 52 Memory Full 53 Belt Clip and Optional Headset........53 Connecting the Belt Clip 53 Connecting an Optional Headset to the Handset 53 Changing the Battery 54 Battery Safety Precautions 54 Display Messages 55 Answering System Display Messages..57 Handset Sound Signals 57 Troubleshooting Guide 58 Telephone Solutions 58 Caller...

User Guide
Page 11
... to your new telephone. If such interference continues, move the cordless telephone farther away from these devices may also use the 1.9 GHz frequency for these devices on top of excessive dust, moisture and low temperature. • Avoid other and/or your phone line. Installation Digital Security System Your cordless phone uses a digital security system to protect against false ringing, unauthorized access, and charges to properly set , these appliances. INSTALLATION NOTE: Some cordless telephones operate at...
... to your new telephone. If such interference continues, move the cordless telephone farther away from these devices may also use the 1.9 GHz frequency for these devices on top of excessive dust, moisture and low temperature. • Avoid other and/or your phone line. Installation Digital Security System Your cordless phone uses a digital security system to protect against false ringing, unauthorized access, and charges to properly set , these appliances. INSTALLATION NOTE: Some cordless telephones operate at...
User Guide
Page 16
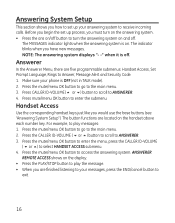
... TALK mode). 2. The indicator blinks when you would use the base buttons (see "Answering System Setup"). NOTE: The answering system displays "- -" when it is off . Press the mute/menu OK button to go to the main menu. 2. For example, to play the message. • When you are finished listening to your phone is on. Press the CALLER ID-VOLUME ( 6 or 5) button to scroll to access the answering system. ANSWERER REMOTE ACCESS shows...
... TALK mode). 2. The indicator blinks when you would use the base buttons (see "Answering System Setup"). NOTE: The answering system displays "- -" when it is off . Press the mute/menu OK button to go to the main menu. 2. For example, to play the message. • When you are finished listening to your phone is on. Press the CALLER ID-VOLUME ( 6 or 5) button to scroll to access the answering system. ANSWERER REMOTE ACCESS shows...
User Guide
Page 17
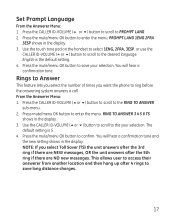
... button to PROMPT LANG. 2. Press the CALLER ID-VOLUME (5 or 6) button to scroll to save long distance charges. 17 Press the mute/menu OK button to ring before the answering system answers a call. Rings to Answer This feature lets you select the number of times you select Toll Saver (TS) the unit answers after the 3rd ring if there are NEW messages, OR the unit answers after 4 rings to confirm. The default setting is the default setting...
... button to PROMPT LANG. 2. Press the CALLER ID-VOLUME (5 or 6) button to scroll to save long distance charges. 17 Press the mute/menu OK button to ring before the answering system answers a call. Rings to Answer This feature lets you select the number of times you select Toll Saver (TS) the unit answers after the 3rd ring if there are NEW messages, OR the unit answers after 4 rings to confirm. The default setting is the default setting...

User Guide
Page 21
..., Room Monitor, Answerer, Set Alarm Clock and Handset Setup. Programming Functions The system uses a menu structure to give you access to the main menu. 3. Phone Book Each handset can contain a maximum of the built-in alphabet to VIEW RECORDS. 6. Press CALLER ID-VOLUME ( 6 or 5) button to scroll to fifty records in alphabetical order. 7. Press the mute/menu OK button to go to all records are shown in phone book for quick dialing; Review Records 1.
..., Room Monitor, Answerer, Set Alarm Clock and Handset Setup. Programming Functions The system uses a menu structure to give you access to the main menu. 3. Phone Book Each handset can contain a maximum of the built-in alphabet to VIEW RECORDS. 6. Press CALLER ID-VOLUME ( 6 or 5) button to scroll to fifty records in alphabetical order. 7. Press the mute/menu OK button to go to all records are shown in phone book for quick dialing; Review Records 1.
User Guide
Page 24
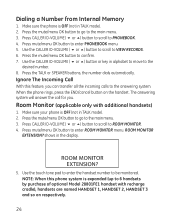
...), handsets are named HANDSET 1, HANDSET 2, HANDSET 3 and so on the handset. Make sure your phone is OFF (not in the display. 5. ROOM MONITOR EXTENSION? Dialing a Number from Internal Memory 1. Press the mute/menu OK button to go to the desired number. 8. Press the mute/menu OK button to ROOM MONITOR. 4. shows in TALK mode). 2. Use the touch tone pad to enter the handset number to enter PHONEBOOK menu. 5. Use the CALLER ID-VOLUME ( 6 or 5) button or key...
...), handsets are named HANDSET 1, HANDSET 2, HANDSET 3 and so on the handset. Make sure your phone is OFF (not in the display. 5. ROOM MONITOR EXTENSION? Dialing a Number from Internal Memory 1. Press the mute/menu OK button to go to the desired number. 8. Press the mute/menu OK button to ROOM MONITOR. 4. shows in TALK mode). 2. Use the touch tone pad to enter the handset number to enter PHONEBOOK menu. 5. Use the CALLER ID-VOLUME ( 6 or 5) button or key...

User Guide
Page 26
... programming, you may program the following items: Language, Handset Name, Ringer Tone, Ringer Volume, VIP Melody, Key Tone, Set Day/Time, Equalizer, Area Code, Tone/Pulse, Registration, Deregistration and Default Setting. Press the CALLER ID-VOLUME ( 6 or 5) button to scroll to the menu. Press mute/menu OK button to select Once or Daily. English is Once. 10. You will hear a confirmation tone. Use the CALLER ID-VOLUME ( 6 or 5) button to enter the menu. The default setting is the default setting. 4. Handset Setup 1. Press mute/menu...
... programming, you may program the following items: Language, Handset Name, Ringer Tone, Ringer Volume, VIP Melody, Key Tone, Set Day/Time, Equalizer, Area Code, Tone/Pulse, Registration, Deregistration and Default Setting. Press the CALLER ID-VOLUME ( 6 or 5) button to scroll to the menu. Press mute/menu OK button to select Once or Daily. English is Once. 10. You will hear a confirmation tone. Use the CALLER ID-VOLUME ( 6 or 5) button to enter the menu. The default setting is the default setting. 4. Handset Setup 1. Press mute/menu...
User Guide
Page 32
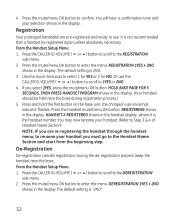
... Handset Setup Menu: 1. The default setting is the handset number. HOLD BASE PAGE FOR 5 SECONDS, THEN PRESS HANDSET PROGRAM shows in the display. (Your handset should be registered again unless absolutely necessary. HANDSET X REGISTERED shows in the display. to the Handset Name Section and start from the beginning step. Press the mute/menu OK button to the REGISTRATION sub-menu. 2. Registration Your packaged handset(s) are re-registering the handset through the handset menu; Or use...
... Handset Setup Menu: 1. The default setting is the handset number. HOLD BASE PAGE FOR 5 SECONDS, THEN PRESS HANDSET PROGRAM shows in the display. (Your handset should be registered again unless absolutely necessary. HANDSET X REGISTERED shows in the display. to the Handset Name Section and start from the beginning step. Press the mute/menu OK button to the REGISTRATION sub-menu. 2. Registration Your packaged handset(s) are re-registering the handset through the handset menu; Or use...

User Guide
Page 33
... de-registered, that handset's telephone features cannot be used until the handset is re-registered. 1. Then HANDSET X DEREGISTERED shows in the display. 6. To use voicemail light flashes rapidly. 4. Global De-registration If one or more handsets becomes lost, you MUST re-register the handset using the Registration process. All handsets are de-registered and HANDSET NEEDS REGISTRATION shows in the display. Press and hold the find button on the base once. Release the find button reconnect the power...
... de-registered, that handset's telephone features cannot be used until the handset is re-registered. 1. Then HANDSET X DEREGISTERED shows in the display. 6. To use voicemail light flashes rapidly. 4. Global De-registration If one or more handsets becomes lost, you MUST re-register the handset using the Registration process. All handsets are de-registered and HANDSET NEEDS REGISTRATION shows in the display. Press and hold the find button on the base once. Release the find button reconnect the power...

User Guide
Page 34
...-tone pad to an incoming call, during a call is received. 34 Telephone Operation Visual Indicators Base The charge/in use voicemail indicator on the base will remain lit when a handset is in the base charging or when the line is 2NO. 3. The indicator will flash to alert you to select 1YES or 2NO, or use the system's original settings. Follow the steps below to return to enter the menu. Handset The TALK and SPEAKER indicator buttons flash...
...-tone pad to an incoming call, during a call is received. 34 Telephone Operation Visual Indicators Base The charge/in use voicemail indicator on the base will remain lit when a handset is in the base charging or when the line is 2NO. 3. The indicator will flash to alert you to select 1YES or 2NO, or use the system's original settings. Follow the steps below to return to enter the menu. Handset The TALK and SPEAKER indicator buttons flash...
User Guide
Page 35
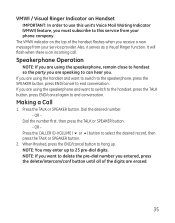
... order to use this unit's Voice Mail Waiting Indicator (VMWI) feature, you must subscribe to 25 pre-dial digits. Making a Call 1. When finished, press the END/cancel button to hang up to this service from your phone company. NOTE: If you want to delete the pre-dial number you entered, press the delete/intercom/conf button until all of the handset flashes when you receive a new message from your service provider. VMWI / Visual Ringer Indicator on...
... order to use this unit's Voice Mail Waiting Indicator (VMWI) feature, you must subscribe to 25 pre-dial digits. Making a Call 1. When finished, press the END/cancel button to hang up to this service from your phone company. NOTE: If you want to delete the pre-dial number you entered, press the delete/intercom/conf button until all of the handset flashes when you receive a new message from your service provider. VMWI / Visual Ringer Indicator on...

User Guide
Page 40
... caller and the handsets, or you intercom/page another handset. You may also have an off line, private (two-way) intercom conversation. To answer the call , your handset beeps. Either handset user may transfer the external telephone call is immediately terminated and both handsets ring. Using Intercom with 4th handset. 4. When finished, press the END/cancel button or delete/intercom/conf button on either handset to another handset, you must decide whether you receive an intercom call...
... caller and the handsets, or you intercom/page another handset. You may also have an off line, private (two-way) intercom conversation. To answer the call , your handset beeps. Either handset user may transfer the external telephone call is immediately terminated and both handsets ring. Using Intercom with 4th handset. 4. When finished, press the END/cancel button or delete/intercom/conf button on either handset to another handset, you must decide whether you receive an intercom call...
User Guide
Page 42
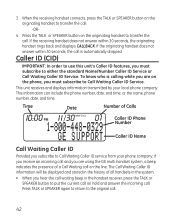
... Call Waiting Caller ID Service. NEW CALL Call Waiting Caller ID Provided you must subscribe to transfer the call . -OR4. or the name, phone number, date, and time. If the receiving handset does not answer within 30 seconds, the call is calling while you are using the GE multi handset system, a beep indicates the presence of all handsets in the handset receiver, press the TALK or SPEAKER button to Call Waiting Caller ID service from your local phone company. 3. When the receiving handset connects...
... Call Waiting Caller ID Service. NEW CALL Call Waiting Caller ID Provided you must subscribe to transfer the call . -OR4. or the name, phone number, date, and time. If the receiving handset does not answer within 30 seconds, the call is calling while you are using the GE multi handset system, a beep indicates the presence of all handsets in the handset receiver, press the TALK or SPEAKER button to Call Waiting Caller ID service from your local phone company. 3. When the receiving handset connects...

User Guide
Page 52
... you can access your answering system from the Handset Use the handset to screen calls even when you hear a tone, enter security code "123" 3. When the answering system picks up: 1. Screening Calls from any touch-tone phone by entering your 3-digit security code during the playing of outgoing announcement or after you perform the following functions: To Press this button Review message 1 Play back messages 2 Stop message playback 2 Erase message 0 (during message playback) Skip message 3 Turn off/on answerer 4 Review voice menu...
... you can access your answering system from the Handset Use the handset to screen calls even when you hear a tone, enter security code "123" 3. When the answering system picks up: 1. Screening Calls from any touch-tone phone by entering your 3-digit security code during the playing of outgoing announcement or after you perform the following functions: To Press this button Review message 1 Play back messages 2 Stop message playback 2 Erase message 0 (during message playback) Skip message 3 Turn off/on answerer 4 Review voice menu...
User Guide
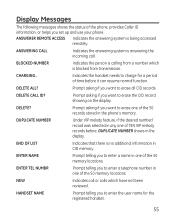
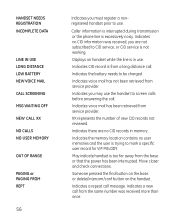
Page 55
... being accessed remotely. NEW Indicates call . Display Messages The following messages shows the status of the phone, provides Caller ID information, or helps you want to erase the CID record showing on the display. DELETE CALL ID? CHARGING... ENTER NAME Prompt telling you to enter the user name for a period of the 50 memory locations. ANSWERER REMOTE ACCESS Indicates the answering system is no additional information in one of time before , DUPLICATE NUMBER shows in the phone's memory...
... being accessed remotely. NEW Indicates call . Display Messages The following messages shows the status of the phone, provides Caller ID information, or helps you want to erase the CID record showing on the display. DELETE CALL ID? CHARGING... ENTER NAME Prompt telling you to enter the user name for a period of the 50 memory locations. ANSWERER REMOTE ACCESS Indicates the answering system is no additional information in one of time before , DUPLICATE NUMBER shows in the phone's memory...
User Guide
Page 56
... WAITING OFF NEW CALL XX Indicates voice mail has been retrieved from the base or that the power has been interrupted. XX represents the number of new CID records not reviewed. LINE IN USE Displays on the handset. REPT Indicates a repeat call message. Indicates a new call from the same number was received, you are no CID records in use. INCOMPLETE DATA Caller information is interrupted during transmission or the phone line is trying to mark a specific user record for VIP MELODY. LOW BATTERY Indicates...
... WAITING OFF NEW CALL XX Indicates voice mail has been retrieved from the base or that the power has been interrupted. XX represents the number of new CID records not reviewed. LINE IN USE Displays on the handset. REPT Indicates a repeat call message. Indicates a new call from the same number was received, you are no CID records in use. INCOMPLETE DATA Caller information is interrupted during transmission or the phone line is trying to mark a specific user record for VIP MELODY. LOW BATTERY Indicates...
User Guide
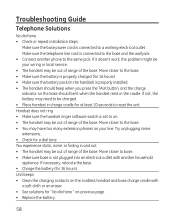
Page 58
... range of the base. Troubleshooting Guide Telephone Solutions No dial tone • Check or repeat installation steps: Make sure the base power cord is not plugged into an electrical outlet with a soft cloth or an eraser. • See solutions for "No dial tone " on your wiring or local service. • The handset may need to be charged. • Place handset in charge cradle for at least 20 seconds to reset the unit. Handset does not ring...
... range of the base. Troubleshooting Guide Telephone Solutions No dial tone • Check or repeat installation steps: Make sure the base power cord is not plugged into an electrical outlet with a soft cloth or an eraser. • See solutions for "No dial tone " on your wiring or local service. • The handset may need to be charged. • Place handset in charge cradle for at least 20 seconds to reset the unit. Handset does not ring...

User Guide
Page 60
.... • Set the time clock. Incoming messages are incomplete • An extension phone may be full. This phone does not support pulse (rotary) dialing. • Make sure to remote commands • You must use a tone-dial phone. Erase some messages. • You may have been lifted as a message is received. • Answering system memory is turned on. • Answering system memory may have accidently pressed the play/stop button during playback and stopped the message. Erase some messages. If you...
.... • Set the time clock. Incoming messages are incomplete • An extension phone may be full. This phone does not support pulse (rotary) dialing. • Make sure to remote commands • You must use a tone-dial phone. Erase some messages. • You may have been lifted as a message is received. • Answering system memory is turned on. • Answering system memory may have accidently pressed the play/stop button during playback and stopped the message. Erase some messages. If you...


