User Guide
Page 4
... from the U.S. Also, the Federal Communications Commission has prepared a helpful booklet, "How To Identify and Resolve Radio/TV Interference Problems." For body worn operation, this phone has been tested and meets the FCC RF exposure guidelines when used with the belt clip supplied with this equipment must not be co-located...
... from the U.S. Also, the Federal Communications Commission has prepared a helpful booklet, "How To Identify and Resolve Radio/TV Interference Problems." For body worn operation, this phone has been tested and meets the FCC RF exposure guidelines when used with the belt clip supplied with this equipment must not be co-located...
User Guide
Page 5
... Statement 4 Information for DECT Product.......... 4 Introduction 7 Before You Begin 7 Parts Checklist 7 Telephone Jack Requirements 8 Installation 8 Digital Security System 8 Important Installation Guidelines..... 9 Base Layout 10 Front View 10 Handset Layout 11 Display Icons 11 Installing the Phone 12 Installing the Handset Battery...... 12 Base Station 13 Programming the Telephone 14 Standby Screen 14...
... Statement 4 Information for DECT Product.......... 4 Introduction 7 Before You Begin 7 Parts Checklist 7 Telephone Jack Requirements 8 Installation 8 Digital Security System 8 Important Installation Guidelines..... 9 Base Layout 10 Front View 10 Handset Layout 11 Display Icons 11 Installing the Phone 12 Installing the Handset Battery...... 12 Base Station 13 Programming the Telephone 14 Standby Screen 14...
User Guide
Page 7
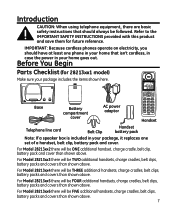
...belt clips, battery packs and covers than shown above. Introduction CAUTION: When using telephone equipment, there are basic safety instructions that isn't cordless, in case the power in your package includes the items shown here. Refer to the IMPORTANT SAFETY INSTRUCTIONS provided with this product and ... line cord Belt Clip Handset battery pack Note: If a speaker box is included in your package, it replaces one phone in your home goes out. IMPORTANT: Because cordless phones operate on electricity, you should have at least one set of a handset, belt clip, battery pack and cover. ...
...belt clips, battery packs and covers than shown above. Introduction CAUTION: When using telephone equipment, there are basic safety instructions that isn't cordless, in case the power in your package includes the items shown here. Refer to the IMPORTANT SAFETY INSTRUCTIONS provided with this product and ... line cord Belt Clip Handset battery pack Note: If a speaker box is included in your package, it replaces one phone in your home goes out. IMPORTANT: Because cordless phones operate on electricity, you should have at least one set of a handset, belt clip, battery pack and cover. ...
User Guide
Page 8
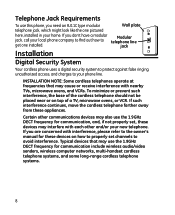
...or VCR. Typical devices that may interfere with nearby TVs, microwave ovens, and VCRs. jack Installation Digital Security System Your cordless phone uses a digital security system to protect against false ringing, unauthorized access, and charges to avoid interference. INSTALLATION NOTE: Some... cordless telephones operate at frequencies that may use the 1.9GHz DECT frequency for these appliances. ...
...or VCR. Typical devices that may interfere with nearby TVs, microwave ovens, and VCRs. jack Installation Digital Security System Your cordless phone uses a digital security system to protect against false ringing, unauthorized access, and charges to avoid interference. INSTALLATION NOTE: Some... cordless telephones operate at frequencies that may use the 1.9GHz DECT frequency for these appliances. ...
User Guide
Page 11
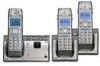
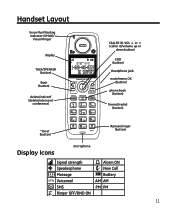
Handset Layout Voice Mail Waiting Indicator (VMWI)/ Visual Ringer display TALK/SPEAKER (button) flash (button) delete/int/conf (delete/intercom/ conference) CALLER ID-VOL 5 or 6 (caller id/volume up or down button) END (button) Headphone jack mute/menu OK (button) phone book (button) format/redial (button) *tone/ (button) #pause/ringer (button) Display Icons microphone Signal strength Speakerphone Message Voicemail SMS Ringer OFF/DND ON Alarm ON New Call Battery AM AM PM PM 11
Handset Layout Voice Mail Waiting Indicator (VMWI)/ Visual Ringer display TALK/SPEAKER (button) flash (button) delete/int/conf (delete/intercom/ conference) CALLER ID-VOL 5 or 6 (caller id/volume up or down button) END (button) Headphone jack mute/menu OK (button) phone book (button) format/redial (button) *tone/ (button) #pause/ringer (button) Display Icons microphone Signal strength Speakerphone Message Voicemail SMS Ringer OFF/DND ON Alarm ON New Call Battery AM AM PM PM 11
User Guide
Page 12
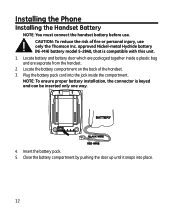
... battery compartment by pushing the door up until it snaps into the jack inside a plastic bag and are packaged together inside the compartment. Installing the Phone Installing the Handset Battery NOTE: You must connect the handset battery before use only the Thomson Inc. Locate the battery compartment on the back of...
... battery compartment by pushing the door up until it snaps into the jack inside a plastic bag and are packaged together inside the compartment. Installing the Phone Installing the Handset Battery NOTE: You must connect the handset battery before use only the Thomson Inc. Locate the battery compartment on the back of...
User Guide
Page 13
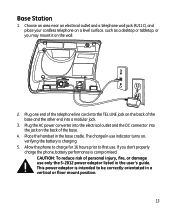
... the electrical outlet and the DC connector into a modular jack. 3. Choose an area near an electrical outlet and a telephone wall jack (RJ11C), and place your cordless telephone on the back of the base. 4. Plug one end of the telephone line cord into the TEL LINE jack on the back of personal... damage use only the 5-2812 power adaptor listed in the base cradle. The charge/in a vertical or floor mount position. 13 Base Station 1. Allow the phone to charge for 16 hours prior to be correctly orientated in use . Place the handset in the user's guide. If you may mount it on...
... the electrical outlet and the DC connector into a modular jack. 3. Choose an area near an electrical outlet and a telephone wall jack (RJ11C), and place your cordless telephone on the back of the base. 4. Plug one end of the telephone line cord into the TEL LINE jack on the back of personal... damage use only the 5-2812 power adaptor listed in the base cradle. The charge/in a vertical or floor mount position. 13 Base Station 1. Allow the phone to charge for 16 hours prior to be correctly orientated in use . Place the handset in the user's guide. If you may mount it on...
User Guide
Page 14
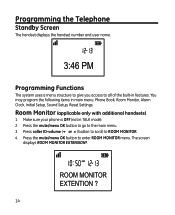
... OFF (not in main menu: Phone Book, Room Monitor, Alarm Clock, Initial Setup, Sound Setup, Reset Settings. Press caller ID-volume (6 or 5) button to scroll to enter ROOM MONITOR menu. Press ...
... OFF (not in main menu: Phone Book, Room Monitor, Alarm Clock, Initial Setup, Sound Setup, Reset Settings. Press caller ID-volume (6 or 5) button to scroll to enter ROOM MONITOR menu. Press ...

User Guide
Page 15
...While in room monitoring mode, the handsets will emit an alert tone approximately every 5 seconds if there is OFF (not in 0210. Make sure your phone is an incoming call . Press the mute/menu OK button to go to ALARM CLOCK. 4. Use the caller ID-volume (5 or 6) button to ... 6) button to select ON or OFF. NOTE: While in room monitoring mode, the originating handset can be on respectively. 6. Alarm Clock 1. NOTE: When this phone system is selected, then the screen displays SET ALARM TIME. Use the caller ID-volume (5 or 6) button to select AM or PM. 7. Press mute/menu...
...While in room monitoring mode, the handsets will emit an alert tone approximately every 5 seconds if there is OFF (not in 0210. Make sure your phone is an incoming call . Press the mute/menu OK button to go to ALARM CLOCK. 4. Use the caller ID-volume (5 or 6) button to ... 6) button to select ON or OFF. NOTE: While in room monitoring mode, the originating handset can be on respectively. 6. Alarm Clock 1. NOTE: When this phone system is selected, then the screen displays SET ALARM TIME. Use the caller ID-volume (5 or 6) button to select AM or PM. 7. Press mute/menu...

User Guide
Page 16
...: During programming, you make a mistake, use the delete/int/conf button to enter Bill Smith, press the key twice for the letter T; Make sure your phone is stored in the display. Initial Setup 1.
...: During programming, you make a mistake, use the delete/int/conf button to enter Bill Smith, press the key twice for the letter T; Make sure your phone is stored in the display. Initial Setup 1.
User Guide
Page 20
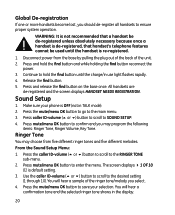
... to scroll to ensure proper system operation. The screen displays 4 1 OF 10. 01 is re-registered. 1. Press the mute/menu OK button to save your phone is de-registered, that handset's telephone features cannot be used until the charge/in TALK mode). 2. Make sure your selection. Press mute/menu OK button...
... to scroll to ensure proper system operation. The screen displays 4 1 OF 10. 01 is re-registered. 1. Press the mute/menu OK button to save your phone is de-registered, that handset's telephone features cannot be used until the charge/in TALK mode). 2. Make sure your selection. Press mute/menu OK button...
User Guide
Page 21
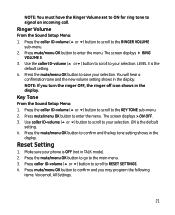
... to scroll to your selection. Use caller ID-volume (5 or 6) button to scroll to your selection. Press the mute/menu OK button to save your phone is OFF (not in the display. LEVEL 5 is the default setting. 4. Press the mute/menu OK button to confirm and the key tone setting shows...
... to scroll to your selection. Use caller ID-volume (5 or 6) button to scroll to your selection. Press the mute/menu OK button to save your phone is OFF (not in the display. LEVEL 5 is the default setting. 4. Press the mute/menu OK button to confirm and the key tone setting shows...
User Guide
Page 23
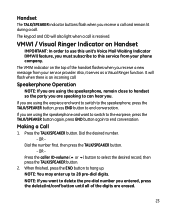
...flashes when you receive a new message from your service provider. NOTE: You may enter up . VMWI / Visual Ringer Indicator on the top of the digits are using the speakerphone and want to end conversation. The VMWI indicator on Handset IMPORTANT: In order to use this unit's Voice Mail Waiting Indicator... a call is an incoming call . Press the TALK/SPEAKER button. When finished, press the END button to hang up to this service from your phone company. OR - NOTE: If you want to switch to the earpiece, press the TALK/SPEAKER button again, press END button again to select the...
...flashes when you receive a new message from your service provider. NOTE: You may enter up . VMWI / Visual Ringer Indicator on the top of the digits are using the speakerphone and want to end conversation. The VMWI indicator on Handset IMPORTANT: In order to use this unit's Voice Mail Waiting Indicator... a call is an incoming call . Press the TALK/SPEAKER button. When finished, press the END button to hang up to this service from your phone company. OR - NOTE: If you want to switch to the earpiece, press the TALK/SPEAKER button again, press END button again to select the...
User Guide
Page 24
... the traditional way as described in call timer shows on the display and counts the length of time of the call immediately. Make sure the phone is the default setting. 4. NOTE: Adjust the handset volume by pressing the caller ID-volume (5 or 6) button during a call), the call . Auto ...for a few seconds. 24 Press #pause/ringer button again to your selection. Press the #pause/ringer button to set the ringer volume. When the phone rings, pick up . - Sound Setup; The other one is selected, pick up the handset from the charge cradle to answer the call in TALK...
... the traditional way as described in call timer shows on the display and counts the length of time of the call immediately. Make sure the phone is the default setting. 4. NOTE: Adjust the handset volume by pressing the caller ID-volume (5 or 6) button during a call), the call . Auto ...for a few seconds. 24 Press #pause/ringer button again to your selection. Press the #pause/ringer button to set the ringer volume. When the phone rings, pick up . - Sound Setup; The other one is selected, pick up the handset from the charge cradle to answer the call in TALK...
User Guide
Page 25
... signal and want to keep dialing the number, press the redial/format button to quickly redial the number. Press the caller ID-volume (5) to 20 digits long. If you dialed: 1. Press the TALK/SPEAKER button. Exit Press the END button to exit a menu function and return to select the desired redial... a beep to indicate another call is waiting on the line and Caller ID information for the waiting call is put on Call Waiting calls. During a phone call, you will receive Caller ID information (if available) on hold. • To switch between the two calls, press the flash button. Press the ...
... signal and want to keep dialing the number, press the redial/format button to quickly redial the number. Press the caller ID-volume (5) to 20 digits long. If you dialed: 1. Press the TALK/SPEAKER button. Exit Press the END button to exit a menu function and return to select the desired redial... a beep to indicate another call is waiting on the line and Caller ID information for the waiting call is put on Call Waiting calls. During a phone call, you will receive Caller ID information (if available) on hold. • To switch between the two calls, press the flash button. Press the ...
User Guide
Page 26
...each handset display. 3. The party on the base. 2. Press the mute/menu OK button. VOL 1 is minimum and VOL 5 is reached, the phone beeps twice. There are five volume levels to page all registered handsets at the base unit, even though the ringer volume of this manual. In...page feature helps you to your handset is not registered, follow the instructions in the Registration section of handset(s) has been preset. 1. If your phone conversation. To cancel the page, press the find button on each handset screen displays FIND HANDSET. 2. Mute To have a private, off all ...
...each handset display. 3. The party on the base. 2. Press the mute/menu OK button. VOL 1 is minimum and VOL 5 is reached, the phone beeps twice. There are five volume levels to page all registered handsets at the base unit, even though the ringer volume of this manual. In...page feature helps you to your handset is not registered, follow the instructions in the Registration section of handset(s) has been preset. 1. If your phone conversation. To cancel the page, press the find button on each handset screen displays FIND HANDSET. 2. Mute To have a private, off all ...

User Guide
Page 30
...Waiting Caller ID Provided you must subscribe to Call Waiting Caller ID service from your local phone company. Receiving CID Records When you receive a call, the Caller ID information is calling while you are using the GE multi handset system, a beep indicates the presence of all handsets in the system. ...• When you are on hold and answer the incoming call on the display while the phone rings, giving you must subscribe to put the current...
...Waiting Caller ID Provided you must subscribe to Call Waiting Caller ID service from your local phone company. Receiving CID Records When you receive a call, the Caller ID information is calling while you are using the GE multi handset system, a beep indicates the presence of all handsets in the system. ...• When you are on hold and answer the incoming call on the display while the phone rings, giving you must subscribe to put the current...
User Guide
Page 31
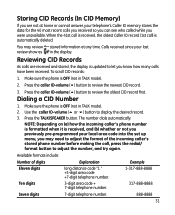
.... Reviewing CID Records As calls are not at any time. Make sure the phone is updated to adjust the number, and try again. The number dials automatically. Seven digits 7-digit telephone number. 888-8888 31 Press the caller ID-volume (6) button to display...ID-volume (5) button to adjust the format of digits Explanation Example Eleven digits long distance code "1 " +3-digit area code +7-digit telephone number. 1-317-888-8888 Ten digits 3-digit area code + 317-888-8888 7-digit telephone number. Make sure the phone is automatically deleted. Calls received since your telephone's...
.... Reviewing CID Records As calls are not at any time. Make sure the phone is updated to adjust the number, and try again. The number dials automatically. Seven digits 7-digit telephone number. 888-8888 31 Press the caller ID-volume (6) button to display...ID-volume (5) button to adjust the format of digits Explanation Example Eleven digits long distance code "1 " +3-digit area code +7-digit telephone number. 1-317-888-8888 Ten digits 3-digit area code + 317-888-8888 7-digit telephone number. Make sure the phone is automatically deleted. Calls received since your telephone's...
User Guide
Page 32
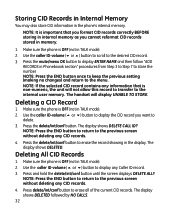
...caller ID-volume (6 or 5) button to scroll to the internal user memory. NOTE: If the selected CID record contains any CID records. 4. Make sure the phone is OFF (not in TALK mode). 2. Press delete/int/conf button to the menu. NOTE: Press the END button once to keep the previous setting... memory. The display shows DELETE CALL ID? Deleting All CID Records 1. The display shows DELETED followed by NO CALLS. 32 Make sure the phone is non-numeric, the unit will display UNABLE TO STORE. NOTE: Press the END button to return to display any CID records. 4. The handset ...
...caller ID-volume (6 or 5) button to scroll to the internal user memory. NOTE: If the selected CID record contains any CID records. 4. Make sure the phone is OFF (not in TALK mode). 2. Press delete/int/conf button to the menu. NOTE: Press the END button once to keep the previous setting... memory. The display shows DELETE CALL ID? Deleting All CID Records 1. The display shows DELETED followed by NO CALLS. 32 Make sure the phone is non-numeric, the unit will display UNABLE TO STORE. NOTE: Press the END button to return to display any CID records. 4. The handset ...
User Guide
Page 33
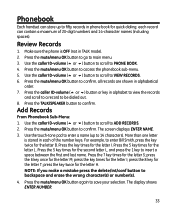
...6) button to scroll to main menu. 3. Use the touch-tone pad to enter a name (up to fifty records in phone book for the letter B. Press the 5 key times for the letter S; The display shows ENTER NUMBER. 33 Press the ...in TALK mode). 2. Add Records From Phonebook Sub-Menu: 1. Use the caller ID-volume (5 or 6) button to scroll to PHONE BOOK. 4. Press the 5 key times for the letter M; The screen displays ENTER NAME. 3. press the 6 key once for... and erase the wrong character(s) or number(s). 4. each of 20-digit numbers and 14-character names (including spaces).
...6) button to scroll to main menu. 3. Use the touch-tone pad to enter a name (up to fifty records in phone book for the letter B. Press the 5 key times for the letter S; The display shows ENTER NUMBER. 33 Press the ...in TALK mode). 2. Add Records From Phonebook Sub-Menu: 1. Use the caller ID-volume (5 or 6) button to scroll to PHONE BOOK. 4. Press the 5 key times for the letter M; The screen displays ENTER NAME. 3. press the 6 key once for... and erase the wrong character(s) or number(s). 4. each of 20-digit numbers and 14-character names (including spaces).


