User Guide
Page 4
... the interference, please consult your body. Government Printing Office, Washington, D.C. 20402. Please specify stock number 004000-00345-4 when ordering copies. For body worn operation, this phone has been tested and meets the FCC RF exposure guidelines when used with the belt clip supplied with FCC RF radiation exposure limits set forth...
... the interference, please consult your body. Government Printing Office, Washington, D.C. 20402. Please specify stock number 004000-00345-4 when ordering copies. For body worn operation, this phone has been tested and meets the FCC RF exposure guidelines when used with the belt clip supplied with FCC RF radiation exposure limits set forth...
User Guide
Page 5
... Statement 4 Information for DECT Product.......... 4 Introduction 7 Before You Begin 7 Parts Checklist 7 Telephone Jack Requirements 8 Installation 8 Digital Security System 8 Important Installation Guidelines..... 9 Base Layout 10 Front View 10 Handset Layout 11 Display Icons 11 Installing the Phone 12 Installing the Handset Battery...... 12 Base Station 13 Programming the Telephone 14 Standby Screen 14...
... Statement 4 Information for DECT Product.......... 4 Introduction 7 Before You Begin 7 Parts Checklist 7 Telephone Jack Requirements 8 Installation 8 Digital Security System 8 Important Installation Guidelines..... 9 Base Layout 10 Front View 10 Handset Layout 11 Display Icons 11 Installing the Phone 12 Installing the Handset Battery...... 12 Base Station 13 Programming the Telephone 14 Standby Screen 14...
User Guide
Page 7
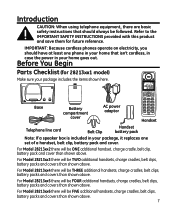
... future reference. Introduction CAUTION: When using telephone equipment, there are basic safety instructions that isn't cordless, in case the power in your package, it replaces one phone in your package includes the items shown here. IMPORTANT: Because cordless phones operate on electricity, you should always be FIVE additional handsets, charge cradles, belt clips, battery...
... future reference. Introduction CAUTION: When using telephone equipment, there are basic safety instructions that isn't cordless, in case the power in your package, it replaces one phone in your package includes the items shown here. IMPORTANT: Because cordless phones operate on electricity, you should always be FIVE additional handsets, charge cradles, belt clips, battery...
User Guide
Page 8
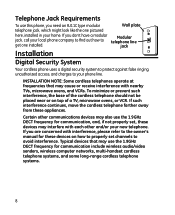
... to find out how to Modular telephone line get one pictured here, installed in your phone line. jack Installation Digital Security System Your cordless phone uses a digital security system to protect against false ringing, unauthorized access, and charges to properly set , these devices may interfere with nearby TVs, microwave ovens, and VCRs. ...
... to find out how to Modular telephone line get one pictured here, installed in your phone line. jack Installation Digital Security System Your cordless phone uses a digital security system to protect against false ringing, unauthorized access, and charges to properly set , these devices may interfere with nearby TVs, microwave ovens, and VCRs. ...
User Guide
Page 11
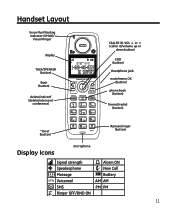
Handset Layout Voice Mail Waiting Indicator (VMWI)/ Visual Ringer display TALK/SPEAKER (button) flash (button) delete/int/conf (delete/intercom/ conference) CALLER ID-VOL 5 or 6 (caller id/volume up or down button) END (button) Headphone jack mute/menu OK (button) phone book (button) format/redial (button) *tone/ (button) #pause/ringer (button) Display Icons microphone Signal strength Speakerphone Message Voicemail SMS Ringer OFF/DND ON Alarm ON New Call Battery AM AM PM PM 11
Handset Layout Voice Mail Waiting Indicator (VMWI)/ Visual Ringer display TALK/SPEAKER (button) flash (button) delete/int/conf (delete/intercom/ conference) CALLER ID-VOL 5 or 6 (caller id/volume up or down button) END (button) Headphone jack mute/menu OK (button) phone book (button) format/redial (button) *tone/ (button) #pause/ringer (button) Display Icons microphone Signal strength Speakerphone Message Voicemail SMS Ringer OFF/DND ON Alarm ON New Call Battery AM AM PM PM 11
User Guide
Page 12
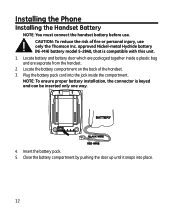
... of the handset. 3. approved Nickel-metal Hydride battery (Ni-MH) battery model 5-2840, that is keyed and can be inserted only one way. 4. Installing the Phone Installing the Handset Battery NOTE: You must connect the handset battery before use only the Thomson Inc.
... of the handset. 3. approved Nickel-metal Hydride battery (Ni-MH) battery model 5-2840, that is keyed and can be inserted only one way. 4. Installing the Phone Installing the Handset Battery NOTE: You must connect the handset battery before use only the Thomson Inc.
User Guide
Page 13
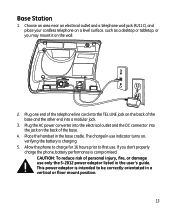
Place the handset in the user's guide. Allow the phone to charge for 16 hours prior to be correctly orientated in use indicator turns on the back of personal injury, fire, or damage use . CAUTION: ... the wall. 2. Choose an area near an electrical outlet and a telephone wall jack (RJ11C), and place your cordless telephone on a level surface, such as a desktop or tabletop, or you don't properly charge the phone, battery performance is intended to first use only the 5-2812 power adaptor listed in the base cradle. This...
Place the handset in the user's guide. Allow the phone to charge for 16 hours prior to be correctly orientated in use indicator turns on the back of personal injury, fire, or damage use . CAUTION: ... the wall. 2. Choose an area near an electrical outlet and a telephone wall jack (RJ11C), and place your cordless telephone on a level surface, such as a desktop or tabletop, or you don't properly charge the phone, battery performance is intended to first use only the 5-2812 power adaptor listed in the base cradle. This...
User Guide
Page 14
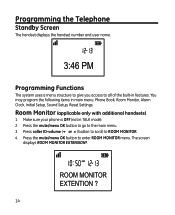
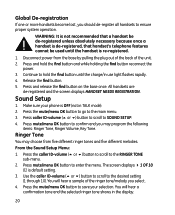
... MONITOR EXTENSION?. 14 Room Monitor (applicable only with additional handsets) 1. Press caller ID-volume (6 or 5) button to scroll to the main menu. 3. Make sure your phone is OFF (not in TALK mode). 2. Programming the Telephone Standby Screen The handset displays the handset number and user name. Press the mute/menu OK...
... MONITOR EXTENSION?. 14 Room Monitor (applicable only with additional handsets) 1. Press caller ID-volume (6 or 5) button to scroll to the main menu. 3. Make sure your phone is OFF (not in TALK mode). 2. Programming the Telephone Standby Screen The handset displays the handset number and user name. Press the mute/menu OK...

User Guide
Page 15
5. NOTE: When this phone system is expanded (up to 6 handsets by purchase of optional Model 28203 handset with recharge cradle), handsets are named HANDSET 1, HANDSET 2, HANDSET 3 and so on ... on the microphone and the originating handset will turn on the handset to work, the originating handset must NOT be on respectively. 6. Make sure your phone is OFF (not in room monitoring mode, the handsets will hear a confirmation tone and return to quit room monitor and answer the call . If ON...
5. NOTE: When this phone system is expanded (up to 6 handsets by purchase of optional Model 28203 handset with recharge cradle), handsets are named HANDSET 1, HANDSET 2, HANDSET 3 and so on ... on the microphone and the originating handset will turn on the handset to work, the originating handset must NOT be on respectively. 6. Make sure your phone is OFF (not in room monitoring mode, the handsets will hear a confirmation tone and return to quit room monitor and answer the call . If ON...

User Guide
Page 16
... letter I . You will hear a confirmation tone and the handset name shows in each of the number keys. Press mute/menu OK button to confirm your phone is stored in the display.
... letter I . You will hear a confirmation tone and the handset name shows in each of the number keys. Press mute/menu OK button to confirm your phone is stored in the display.
User Guide
Page 20
... proper system operation. Continue to enter the menu. Press mute/menu OK button to confirm and you should de-register all handsets to save your phone is OFF (not in TALK mode). 2. The screen displays 4 1 OF 10. 01 is re-registered. 1. Press mute/menu OK button to hold the find button...
... proper system operation. Continue to enter the menu. Press mute/menu OK button to confirm and you should de-register all handsets to save your phone is OFF (not in TALK mode). 2. The screen displays 4 1 OF 10. 01 is re-registered. 1. Press mute/menu OK button to hold the find button...
User Guide
Page 21
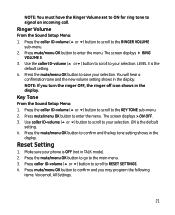
...: If you may program the following items: Voicemail, All Settings. 21 The screen displays > ON OFF. 3. Reset Setting 1. Press mute/menu OK button to your phone is OFF (not in TALK mode). 2. Key Tone From the Sound Setup Menu: 1. Use caller ID-volume (5 or 6) button to scroll to enter the menu...
...: If you may program the following items: Voicemail, All Settings. 21 The screen displays > ON OFF. 3. Reset Setting 1. Press mute/menu OK button to your phone is OFF (not in TALK mode). 2. Key Tone From the Sound Setup Menu: 1. Use caller ID-volume (5 or 6) button to scroll to enter the menu...
User Guide
Page 23
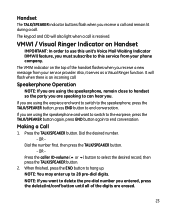
...will flash when there is received. VMWI / Visual Ringer Indicator on the top of the digits are using the speakerphone and want to switch to the earpiece, press the TALK/SPEAKER button...- OR - When finished, press the END button to hang up to can hear you are speaking to 28 pre-dial digits. Handset The TALK/SPEAKER indicator buttons flash when you are erased. 23 Also, it serves as a Visual Ringer function. ... on Handset IMPORTANT: In order to use this service from your phone company. If you receive a call and remain lit during a call . Press the TALK/SPEAKER button.
...will flash when there is received. VMWI / Visual Ringer Indicator on the top of the digits are using the speakerphone and want to switch to the earpiece, press the TALK/SPEAKER button...- OR - When finished, press the END button to hang up to can hear you are speaking to 28 pre-dial digits. Handset The TALK/SPEAKER indicator buttons flash when you are erased. 23 Also, it serves as a Visual Ringer function. ... on Handset IMPORTANT: In order to use this service from your phone company. If you receive a call and remain lit during a call . Press the TALK/SPEAKER button.
User Guide
Page 24
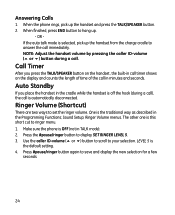
... seconds. 24 Press #pause/ringer button again to your selection. If the auto talk mode is OFF (not in the Programming Functions; Make sure the phone is selected, pick up the handset from the charge cradle to answer the call in the cradle while the handset is this short cut to... handset, the built-in call timer shows on the display and counts the length of time of the call immediately. Ringer Volume menus. When the phone rings, pick up . - Sound Setup; Ringer Volume (Shortcut) There are two ways to display SET RINGER LEVEL 5. 3. Answering Calls 1.
... seconds. 24 Press #pause/ringer button again to your selection. If the auto talk mode is OFF (not in the Programming Functions; Make sure the phone is selected, pick up the handset from the charge cradle to answer the call in the cradle while the handset is this short cut to... handset, the built-in call timer shows on the display and counts the length of time of the call immediately. Ringer Volume menus. When the phone rings, pick up . - Sound Setup; Ringer Volume (Shortcut) There are two ways to display SET RINGER LEVEL 5. 3. Answering Calls 1.
User Guide
Page 25
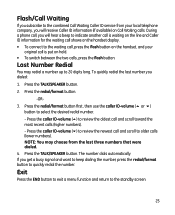
NOTE: You may redial a number up to 20 digits long. Flash/Call Waiting If you subscribe to the combined Call Waiting Caller ID service from the last three numbers that were dialed. 4. Press the ... your original call , you will receive Caller ID information (if available) on hold. • To switch between the two calls, press the flash button. During a phone call is put on Call Waiting calls. Press the redial/format button first, then use the caller ID-volume (5 or 6) button to the standby screen...
NOTE: You may redial a number up to 20 digits long. Flash/Call Waiting If you subscribe to the combined Call Waiting Caller ID service from the last three numbers that were dialed. 4. Press the ... your original call , you will receive Caller ID information (if available) on hold. • To switch between the two calls, press the flash button. During a phone call is put on Call Waiting calls. Press the redial/format button first, then use the caller ID-volume (5 or 6) button to the standby screen...
User Guide
Page 26
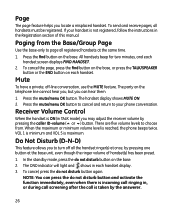
...be registered. Page The page feature helps you may adjust the receiver volume by pressing the caller ID-volume (5 or 6) button. If your phone conversation. Press the mute/menu OK button. There are five volume levels to choose from the Base/Group Page Use the base-only to ...the handset is not registered, follow the instructions in TALK mode) you locate a misplaced handset. VOL 1 is minimum and VOL 5 is reached, the phone beeps twice. To cancel, press the do not disturb button and activate the function immediately, even when there is incoming call ringing in each handset...
...be registered. Page The page feature helps you may adjust the receiver volume by pressing the caller ID-volume (5 or 6) button. If your phone conversation. Press the mute/menu OK button. There are five volume levels to choose from the Base/Group Page Use the base-only to ...the handset is not registered, follow the instructions in TALK mode) you locate a misplaced handset. VOL 1 is minimum and VOL 5 is reached, the phone beeps twice. To cancel, press the do not disturb button and activate the function immediately, even when there is incoming call ringing in each handset...

User Guide
Page 30
...; Press the flash button to return to the original call , the Caller ID information is calling while you are using the GE multi handset system, a beep indicates the presence of all handsets in the system. • When you must subscribe to Call Waiting Caller ID Service. Receiving ...CID Records When you are on the phone, you subscribe to either the standard Name/Number Caller ID Service or Call Waiting Caller ID Service. The Call Waiting Caller ID information will be...
...; Press the flash button to return to the original call , the Caller ID information is calling while you are using the GE multi handset system, a beep indicates the presence of all handsets in the system. • When you must subscribe to Call Waiting Caller ID Service. Receiving ...CID Records When you are on the phone, you subscribe to either the standard Name/Number Caller ID Service or Call Waiting Caller ID Service. The Call Waiting Caller ID information will be...
User Guide
Page 31
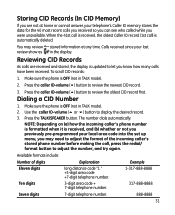
...your local area code into the set up menu, you know how many calls have been received. The number dials automatically. Seven digits 7-digit telephone number. 888-8888 31 To scroll CID records: 1. Use the caller ID-volume (5 or 6) button to review the oldest...need to adjust the format of digits Explanation Example Eleven digits long distance code "1 " +3-digit area code +7-digit telephone number. 1-317-888-8888 Ten digits 3-digit area code + 317-888-8888 7-digit telephone number. Make sure the phone is OFF (not in TALK mode). 2. Make sure the phone is OFF (not in TALK ...
...your local area code into the set up menu, you know how many calls have been received. The number dials automatically. Seven digits 7-digit telephone number. 888-8888 31 To scroll CID records: 1. Use the caller ID-volume (5 or 6) button to review the oldest...need to adjust the format of digits Explanation Example Eleven digits long distance code "1 " +3-digit area code +7-digit telephone number. 1-317-888-8888 Ten digits 3-digit area code + 317-888-8888 7-digit telephone number. Make sure the phone is OFF (not in TALK mode). 2. Make sure the phone is OFF (not in TALK ...
User Guide
Page 32
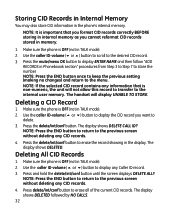
... record to transfer to the previous screen without deleting any information that you format CID records correctly BEFORE storing in TALK mode). 2. Make sure the phone is OFF (not in internal memory as you want to the desired CID record. 3. NOTE: Press the END button to return to display any ...CID records. 4. Make sure the phone is OFF (not in memory. 1. Use the caller ID-volume (6 or 5) button to scroll to delete. 3. The display shows DELETE CALL ID? Press the...
... record to transfer to the previous screen without deleting any information that you format CID records correctly BEFORE storing in TALK mode). 2. Make sure the phone is OFF (not in internal memory as you want to the desired CID record. 3. NOTE: Press the END button to return to display any ...CID records. 4. Make sure the phone is OFF (not in memory. 1. Use the caller ID-volume (6 or 5) button to scroll to delete. 3. The display shows DELETE CALL ID? Press the...
User Guide
Page 33
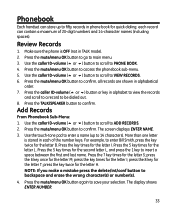
each of 20-digit numbers and 14-character names (including spaces). Press the mute/menu OK button ...button to scroll to enter Bill Smith, press the key twice for quick dialing; More than one letter is OFF (not in phone book for the letter B. For example, to ADD RECORDS. 2. Press the mute/menu OK button to save your selection. The.... 3. press the key times for the letter I ; Press the mute/menu OK button again to confirm. Make sure the phone is stored in alphabetical order. 7. Use the touch-tone pad to enter a name (up to fifty records in TALK mode)....
each of 20-digit numbers and 14-character names (including spaces). Press the mute/menu OK button ...button to scroll to enter Bill Smith, press the key twice for quick dialing; More than one letter is OFF (not in phone book for the letter B. For example, to ADD RECORDS. 2. Press the mute/menu OK button to save your selection. The.... 3. press the key times for the letter I ; Press the mute/menu OK button again to confirm. Make sure the phone is stored in alphabetical order. 7. Use the touch-tone pad to enter a name (up to fifty records in TALK mode)....


