Gateway NV40 Series User's Reference Guide - Canada/French
Page 73
... to enter the User Password if your notebook was turned off or put in Sleep mode. 4 Highlight Password on page 51. 67 www.gateway.com Important You must enter the User Password each time you turn on your notebook if it was put in hibernate mode. For information on... conserving battery power, using alternate power sources, and monitoring the battery charge, see "Managing Power" on boot, then press ENTER. 5 Highlight Enabled, then press ENTER. 6 Open the Exit menu, highlight Exit Saving Changes, then press ENTER. 7 When you start your ...
... to enter the User Password if your notebook was turned off or put in Sleep mode. 4 Highlight Password on page 51. 67 www.gateway.com Important You must enter the User Password each time you turn on your notebook if it was put in hibernate mode. For information on... conserving battery power, using alternate power sources, and monitoring the battery charge, see "Managing Power" on boot, then press ENTER. 5 Highlight Enabled, then press ENTER. 6 Open the Exit menu, highlight Exit Saving Changes, then press ENTER. 7 When you start your ...
Gateway NV40 Series User's Reference Guide - Canada/French
Page 88
... on your hard drive. 2 During startup, press F12 to open the BIOS setup utility and enable the F12 boot menu. 1 Turn on -screen prompts to select CDROM/DVD, then press ENTER. The boot menu is where you can select which device to start from the recovery disc you inserted. 4 Insert the second... optical disc. 3 Use your computer. Caution Continuing the process will erase all pre-installed software and drivers: Caution Before using your recovery discs, open the boot menu.
... on your hard drive. 2 During startup, press F12 to open the BIOS setup utility and enable the F12 boot menu. 1 Turn on -screen prompts to select CDROM/DVD, then press ENTER. The boot menu is where you can select which device to start from the recovery disc you inserted. 4 Insert the second... optical disc. 3 Use your computer. Caution Continuing the process will erase all pre-installed software and drivers: Caution Before using your recovery discs, open the boot menu.

Gateway NV40 Series User's Reference Guide - English
Page 73
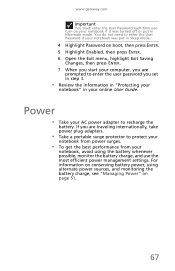
... using alternate power sources, and monitoring the battery charge, see "Managing Power" on your notebook if it was put in your online User Guide. www.gateway.com Important You must enter the User Password each time you turn on page 51. 67 You do not need to enter the User Password... if your notebook was turned off or put in Sleep mode. 4 Highlight Password on boot, then press ENTER. 5 Highlight Enabled, then press ENTER. 6 Open the Exit menu, highlight Exit Saving Changes, then press ENTER. 7 When you start your notebook" in...
... using alternate power sources, and monitoring the battery charge, see "Managing Power" on your notebook if it was put in your online User Guide. www.gateway.com Important You must enter the User Password each time you turn on page 51. 67 You do not need to enter the User Password... if your notebook was turned off or put in Sleep mode. 4 Highlight Password on boot, then press ENTER. 5 Highlight Enabled, then press ENTER. 6 Open the Exit menu, highlight Exit Saving Changes, then press ENTER. 7 When you start your notebook" in...

Gateway NV40 Series User's Reference Guide - English
Page 88
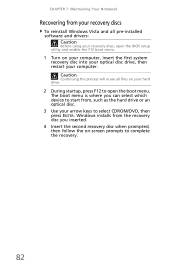
... To reinstall Windows Vista and all files on your hard drive. 2 During startup, press F12 to open the BIOS setup utility and enable the F12 boot menu. 1 Turn on -screen prompts to complete the recovery. 82 CHAPTER 7: Maintaining Your Notebook Recovering from , such as the hard drive or an optical... disc. 3 Use your arrow keys to select CDROM/DVD, then press ENTER. The boot menu is where you inserted. 4 Insert the second recovery disc when prompted, then follow the on your computer, insert the first system recovery disc into...
... To reinstall Windows Vista and all files on your hard drive. 2 During startup, press F12 to open the BIOS setup utility and enable the F12 boot menu. 1 Turn on -screen prompts to complete the recovery. 82 CHAPTER 7: Maintaining Your Notebook Recovering from , such as the hard drive or an optical... disc. 3 Use your arrow keys to select CDROM/DVD, then press ENTER. The boot menu is where you inserted. 4 Insert the second recovery disc when prompted, then follow the on your computer, insert the first system recovery disc into...
Gateway NV40 Series User's Reference Guide - Japanese
Page 70
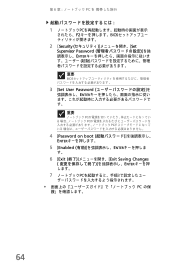
第 6 PC 1 PC F2 BIOS 2 [Security Set Supervisor Password ENTER 重要 BIOS 3 [Set User Password ENTER 重要 PC PC PC 4 [Password on boot ENTER 5 [Enabled ENTER す。 6 [Exit Exit Saving Changes ENTER 7 PC 3 PC の保 64
第 6 PC 1 PC F2 BIOS 2 [Security Set Supervisor Password ENTER 重要 BIOS 3 [Set User Password ENTER 重要 PC PC PC 4 [Password on boot ENTER 5 [Enabled ENTER す。 6 [Exit Exit Saving Changes ENTER 7 PC 3 PC の保 64

Gateway NV40 Series User's Reference Guide - Traditional Chinese
Page 70
第 6 2 開啟 Security Set Supervisor Password ENTER BIOS Supervisor Password 3 Set User Password ENTER 4 Password on boot ENTER。 5 Enabled ENTER。 6 開啟 Exit Exit Saving Changes ENTER。 7 3 資訊。 電源 • 攜帶 AC 51 64
第 6 2 開啟 Security Set Supervisor Password ENTER BIOS Supervisor Password 3 Set User Password ENTER 4 Password on boot ENTER。 5 Enabled ENTER。 6 開啟 Exit Exit Saving Changes ENTER。 7 3 資訊。 電源 • 攜帶 AC 51 64
Service Guide
Page 7
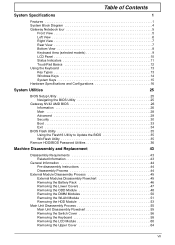
Table of Contents System Specifications 1 Features 1 System Block Diagram 4 Gateway Notebook tour 5 Front View 5 Left View 6 Right View 7 Rear View 7 Bottom View 8 Keyboard Area (selected models 9 LCD Panel 10 Status Indicators 11 TouchPad Basics 12 ... Keys 15 Hardware Specifications and Configurations 16 System Utilities 25 BIOS Setup Utility 25 Navigating the BIOS Utility 25 Gateway NV42 AMD BIOS 26 Information 26 Main 28 Advanced 29 Security 30 Boot 33 Exit 34 BIOS Flash Utility 35 Using the Flash16 Utility to Update the BIOS 35 WinFlash Utility 35...
Table of Contents System Specifications 1 Features 1 System Block Diagram 4 Gateway Notebook tour 5 Front View 5 Left View 6 Right View 7 Rear View 7 Bottom View 8 Keyboard Area (selected models 9 LCD Panel 10 Status Indicators 11 TouchPad Basics 12 ... Keys 15 Hardware Specifications and Configurations 16 System Utilities 25 BIOS Setup Utility 25 Navigating the BIOS Utility 25 Gateway NV42 AMD BIOS 26 Information 26 Main 28 Advanced 29 Security 30 Boot 33 Exit 34 BIOS Flash Utility 35 Using the Flash16 Utility to Update the BIOS 35 WinFlash Utility 35...

Service Guide
Page 32
... Receive side scaling (RSS) for multicore processors • Complies with IEEE 802.3, 802.3u, 802.3ab, and • 02.1p • Supports iSCSI boot • FLASH Auto-Sense mode • IPv4 and IPv6 large send offload and checksum • offload (LSO/TCO) • Wake on LAN (WOL)..., and • Ethernet MIB (IEEE 802.3z, Clause 30) • SMBus interface supporting Alert Standard Format • (ASF) v2.0 • Self-boot feature, utilizing smaller EEPROM size • Serial flash memory support • PCI Express CLKREQ support • Energy Detect/Cable Sense • Super Low Power ...
... Receive side scaling (RSS) for multicore processors • Complies with IEEE 802.3, 802.3u, 802.3ab, and • 02.1p • Supports iSCSI boot • FLASH Auto-Sense mode • IPv4 and IPv6 large send offload and checksum • offload (LSO/TCO) • Wake on LAN (WOL)..., and • Ethernet MIB (IEEE 802.3z, Clause 30) • SMBus interface supporting Alert Standard Format • (ASF) v2.0 • Self-boot feature, utilizing smaller EEPROM size • Serial flash memory support • PCI Express CLKREQ support • Energy Detect/Cable Sense • Super Low Power ...

Service Guide
Page 35
... BIOS (Basic Input/ Output System). Navigation keys for parameters are six menu options: Information, Main, Advanced, Security, Boot, and Exit. Please also refer to enter multi-boot menu. Press during POST (when "Press to enter setup. Navigating the BIOS Utility There are found in the Item ...user can load default settings by pressing F9. Please note that system information is already properly configured and optimized, and you want to change boot device without entering BIOS Setup Utility, please set to run this item. • Press Esc while you are shown on the bottom ...
... BIOS (Basic Input/ Output System). Navigation keys for parameters are six menu options: Information, Main, Advanced, Security, Boot, and Exit. Please also refer to enter multi-boot menu. Press during POST (when "Press to enter setup. Navigating the BIOS Utility There are found in the Item ...user can load default settings by pressing F9. Please note that system information is already properly configured and optimized, and you want to change boot device without entering BIOS Setup Utility, please set to run this item. • Press Esc while you are shown on the bottom ...
Service Guide
Page 36
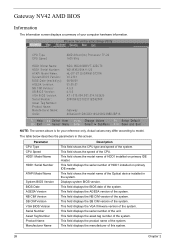
...version of the system. This field displays the NB CIM version of the system. This field displays the asset tag number of the system. Gateway NV42 AMD BIOS Information The Information screen displays a summary of your reference only. This field displays the serial number of the system. This... the parameters in the system. This field shows the model name of the system. Phoenix SecureCore(tm) Setup Utility Information Main Advanced Security Boot Exit CPU Type CPU Speed AMD Athlon(tm) Processor TF-20 1600 MHz HDD1 Model Name: HDD1 Serial Number: ATAPI Model Name: System...
...version of the system. This field displays the NB CIM version of the system. This field displays the asset tag number of the system. Gateway NV42 AMD BIOS Information The Information screen displays a summary of your reference only. This field displays the serial number of the system. This... the parameters in the system. This field shows the model name of the system. Phoenix SecureCore(tm) Setup Utility Information Main Advanced Security Boot Exit CPU Type CPU Speed AMD Athlon(tm) Processor TF-20 1600 MHz HDD1 Model Name: HDD1 Serial Number: ATAPI Model Name: System...

Service Guide
Page 38
... e n u F 10 S a v e a n d E x i t NOTE: The screen above is idle for your reference only. Sets the system date. Parameter System Time System Date Total Memory Video Memory Quiet Boot Network Boot F12 Boot Menu D2D Recovery SATA Mode Enable Cool 'n' Quiet Description Sets the system time. Allows startup to skip certain tests while... generation. Main The Main screen allows the user to set the system time and date as well as enable and disable boot option and recovery. This field shows the memory allocated for the video graphics. Enables, disables Cool 'n' Quiet. Format/Option...
... e n u F 10 S a v e a n d E x i t NOTE: The screen above is idle for your reference only. Sets the system date. Parameter System Time System Date Total Memory Video Memory Quiet Boot Network Boot F12 Boot Menu D2D Recovery SATA Mode Enable Cool 'n' Quiet Description Sets the system time. Allows startup to skip certain tests while... generation. Main The Main screen allows the user to set the system time and date as well as enable and disable boot option and recovery. This field shows the memory allocated for the video graphics. Enables, disables Cool 'n' Quiet. Format/Option...
Service Guide
Page 39
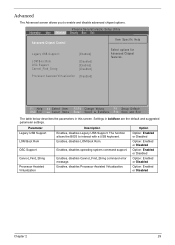
... and suggested parameter settings. Parameter Legacy USB Support LOM Boot Rom OSC Support Cannot_Find_String Processor Assisted Virtualization Description Enables, disables Legacy USB Support. Enables, disables LOM Boot Rom. Enables, disables Cannot_Find_String command error message. Option... disables Processor Assisted Virtualization. Pheonix SecureCore(tm) Setup Utility Information Main Advanced Security Boot Exit Advanced Chipset Control Item Specific Help Legacy USB Support: LOM Boot Rom OSC Support Cannot_Find_String [Enabled] [Disabled] [Enabled] [Disabled] Select options for...
... and suggested parameter settings. Parameter Legacy USB Support LOM Boot Rom OSC Support Cannot_Find_String Processor Assisted Virtualization Description Enables, disables Legacy USB Support. Enables, disables LOM Boot Rom. Enables, disables Cannot_Find_String command error message. Option... disables Processor Assisted Virtualization. Pheonix SecureCore(tm) Setup Utility Information Main Advanced Security Boot Exit Advanced Chipset Control Item Specific Help Legacy USB Support: LOM Boot Rom OSC Support Cannot_Find_String [Enabled] [Disabled] [Enabled] [Disabled] Select options for...
Service Guide
Page 40
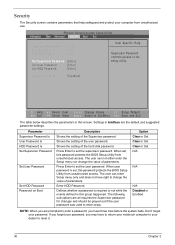
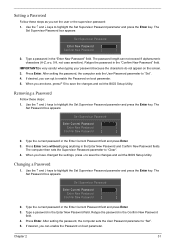
... parameter settings. Parameter Description Option Supervisor Password Is User Password Is HDD Password Is Set Supervisor Password Set User Password Set HDD Password Password on Boot [Disabled] F1 Help ESC Exit Select Item F5/F6 Change Values F9 Setup Default S e l e c t M e n u Ente r S e l e c t S u b M e n u F 10 S a v ...Setup Utility from unauthorized use. When set , this screen. Phoenix SecureCore(tm) Setup Utility Information Main Advanced Security Boot Exit Supervisor Password Is: Clear User Password Is: Clear HDD Password Is: Clear Set Supervisor Password [Enter] Set...
... parameter settings. Parameter Description Option Supervisor Password Is User Password Is HDD Password Is Set Supervisor Password Set User Password Set HDD Password Password on Boot [Disabled] F1 Help ESC Exit Select Item F5/F6 Change Values F9 Setup Default S e l e c t M e n u Ente r S e l e c t S u b M e n u F 10 S a v ...Setup Utility from unauthorized use. When set , this screen. Phoenix SecureCore(tm) Setup Utility Information Main Advanced Security Boot Exit Supervisor Password Is: Clear User Password Is: Clear HDD Password Is: Clear Set Supervisor Password [Enter] Set...
Service Guide
Page 41
...New Password [ ] Confirm New Password [ ] 2. IMPORTANT:Be very careful when typing your password because the characters do not appear on boot parameter. 5. After setting the password, the computer sets the User Password parameter to "Clear". 4. The Set Password box appears: Set ...box appears. Type the current password in the Enter New Password and Confirm New Password fields. The password length can enable the Password on boot parameter. If desired, you set the user or the supervisor password: 1. Set Supervisor Password Enter Current Password [ ] Enter New Password [...
...New Password [ ] Confirm New Password [ ] 2. IMPORTANT:Be very careful when typing your password because the characters do not appear on boot parameter. 5. After setting the password, the computer sets the User Password parameter to "Clear". 4. The Set Password box appears: Set ...box appears. Type the current password in the Enter New Password and Confirm New Password fields. The password length can enable the Password on boot parameter. If desired, you set the user or the supervisor password: 1. Set Supervisor Password Enter Current Password [ ] Enter New Password [...

Service Guide
Page 43
...up or down. Phoenix SecureCore(tm) Setup Utility Information M a i n Advanced Security B o o t Exit Boot priority order: 1: IDE HDD: WDC WD2500BEVT-22ZCT0-(S1) 2: CD/DVD: HL-DT-ST DVDRAM GT20N-(PM) ...: 6: USB KEY: 7: USB CD/DVD: 8: Item Specific Help Keys used to support boot. Select Boot Devices to select specific devices to view or configure devices: Up and Down arrows select a device.... Boot This menu allows the user to decide the order of boot devices to load the operating system. Bootable devices includes the USB diskette...
...up or down. Phoenix SecureCore(tm) Setup Utility Information M a i n Advanced Security B o o t Exit Boot priority order: 1: IDE HDD: WDC WD2500BEVT-22ZCT0-(S1) 2: CD/DVD: HL-DT-ST DVDRAM GT20N-(PM) ...: 6: USB KEY: 7: USB CD/DVD: 8: Item Specific Help Keys used to support boot. Select Boot Devices to select specific devices to view or configure devices: Up and Down arrows select a device.... Boot This menu allows the user to decide the order of boot devices to load the operating system. Bootable devices includes the USB diskette...
Service Guide
Page 45
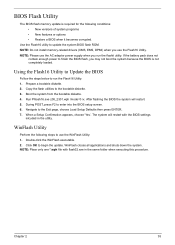
If the battery pack does not contain enough power to finish the BIOS flash, you may not boot the system because the BIOS is required for the following steps to use the Flash16 Utility. Run Phlash16.exe z08_2301.wph /mode=3 /x. During POST, press ... the BIOS Follow the steps below to begin the update. Use the Flash16 utility to the Exit page, choose Load Setup Defaults then press ENTER. 7. Boot the system from the bootable diskette. 4. Click OK to run the flashit utility. BIOS Flash Utility The BIOS flash memory update is not completely loaded...
If the battery pack does not contain enough power to finish the BIOS flash, you may not boot the system because the BIOS is required for the following steps to use the Flash16 Utility. Run Phlash16.exe z08_2301.wph /mode=3 /x. During POST, press ... the BIOS Follow the steps below to begin the update. Use the Flash16 utility to the Exit page, choose Load Setup Defaults then press ENTER. 7. Boot the system from the bootable diskette. 4. Click OK to run the flashit utility. BIOS Flash Utility The BIOS flash memory update is not completely loaded...

Service Guide
Page 48
... Selector, perform the following passwords can be changed without accessing the BIOS. Using Boot Sequence Selector The Boot Sequence Selector allows the boot order to be used for 4 seconds. 5. Turn on the screen. Create the unlock code by pressing down the Power button for unlocking the BIOS Password: ...
... Selector, perform the following passwords can be changed without accessing the BIOS. Using Boot Sequence Selector The Boot Sequence Selector allows the boot order to be used for 4 seconds. 5. Turn on the screen. Create the unlock code by pressing down the Power button for unlocking the BIOS Password: ...

Service Guide
Page 49
... data it is checking that the table correlates with the hardware before sending to EEPROM Input: Chapter 2 39 Select the desired boot sequence by entering the corresponding sequence. Read DMI Information from bios • dmitools /wm xxxx ==> Write manufacturer name to eeprom... following steps: 1. Using DMITools The DMI (Desktop Management Interface) Tool copies BIOS information to EEPROM to HDD | CD ROM | LAN | Floppy. Boot into DOS. 2. Execute dmitools. The following messages report to screen to confirm completion: • dmitools /r ==> Read dmi string from Memory Input: ...
... data it is checking that the table correlates with the hardware before sending to EEPROM Input: Chapter 2 39 Select the desired boot sequence by entering the corresponding sequence. Read DMI Information from bios • dmitools /wm xxxx ==> Write manufacturer name to eeprom... following steps: 1. Using DMITools The DMI (Desktop Management Interface) Tool copies BIOS information to EEPROM to HDD | CD ROM | LAN | Floppy. Boot into DOS. 2. Execute dmitools. The following messages report to screen to confirm completion: • dmitools /r ==> Read dmi string from Memory Input: ...

Service Guide
Page 50
Write UUID to open the MAC.CFG file. You can use the MAC.BAT utility to write the MAC.CFG file to make the new DMI data effective. Use a text editor (for example: Notepad) to EEPROM (Create UUID from Intel WFM20.pdf) Input: dmitools /wu 5). Write Asset Tag to EEPROM Input: dmitools /wa Acer Asstag NOTE: When using any of the Write options, restart the system to the EEPROM under DOS mode. 1. dmitools /ws 01234567890123456789 4). Using the LAN MAC EEPROM Utility You can see the MAC.CFG contents as below: WriteData = '001122334455' StartAddr=7A WriteLeng=6 KeepByte=0 MAC value MAC ...
Write UUID to open the MAC.CFG file. You can use the MAC.BAT utility to write the MAC.CFG file to make the new DMI data effective. Use a text editor (for example: Notepad) to EEPROM (Create UUID from Intel WFM20.pdf) Input: dmitools /wu 5). Write Asset Tag to EEPROM Input: dmitools /wa Acer Asstag NOTE: When using any of the Write options, restart the system to the EEPROM under DOS mode. 1. dmitools /ws 01234567890123456789 4). Using the LAN MAC EEPROM Utility You can see the MAC.CFG contents as below: WriteData = '001122334455' StartAddr=7A WriteLeng=6 KeepByte=0 MAC value MAC ...

Service Guide
Page 146
... properly connected to the computer and the electrical outlet. 2. Remove all external and non-essential hardware connected to the computer that are not necessary to boot the computer to correct the problem. Check the power cable is still not resolved, see "Online Support Information" on OK Check Daughter/B and FFC OK...
... properly connected to the computer and the electrical outlet. 2. Remove all external and non-essential hardware connected to the computer that are not necessary to boot the computer to correct the problem. Check the power cable is still not resolved, see "Online Support Information" on OK Check Daughter/B and FFC OK...


