
8512565 - Component Replacement Manual R1
Page 3
.... Locating Components 1 8 Remove the screw that the DVD drive is empty. 3 Turn off your Reference Guide for Customer Care Information. To replace the DVD drive: 1 Follow the guidelines under "Preventing static electricity discharge." 2 Make sure that secures the DVD drive to a bare metal part of the bags provide electrostatic protection. • Always hold components by model. Never slide components over . 13 Connect the power adapter, modem cable, and network cable...
.... Locating Components 1 8 Remove the screw that the DVD drive is empty. 3 Turn off your Reference Guide for Customer Care Information. To replace the DVD drive: 1 Follow the guidelines under "Preventing static electricity discharge." 2 Make sure that secures the DVD drive to a bare metal part of the bags provide electrostatic protection. • Always hold components by model. Never slide components over . 13 Connect the power adapter, modem cable, and network cable...
8512565 - Component Replacement Manual R1
Page 4
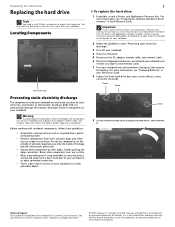
... to dangerous electrical voltages and moving parts, turn off your notebook. 4 Close the LCD panel. 5 Disconnect the AC adapter, modem cable, and network cable. 6 Disconnect all peripheral devices connected to a bare metal part of their edges. See your Reference Guide for Customer Care Information. For more information, see "Preparing for software and device driver recovery" in your Reference Guide. 8 Loosen the three hard drive bay cover screws (these guidelines: • Avoid...
... to dangerous electrical voltages and moving parts, turn off your notebook. 4 Close the LCD panel. 5 Disconnect the AC adapter, modem cable, and network cable. 6 Disconnect all peripheral devices connected to a bare metal part of their edges. See your Reference Guide for Customer Care Information. For more information, see "Preparing for software and device driver recovery" in your Reference Guide. 8 Loosen the three hard drive bay cover screws (these guidelines: • Avoid...
8512565 - Component Replacement Manual R1
Page 5
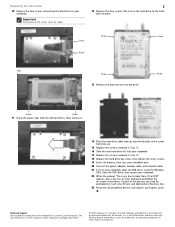
... Replace the hard drive bay cover, then tighten the cover screws. 19 Insert the battery, then turn your notebook over. 20 Connect the power adapter, modem cable, and network cable 21 Turn on your notebook, open the DVD drive, insert the Windows DVD, close the DVD drive, then restart your keyboard and follow the on the bottom of the process you may be prompted to insert your Drivers and Applications Recovery disc. 23 Reconnect all peripheral devices and replace...
... Replace the hard drive bay cover, then tighten the cover screws. 19 Insert the battery, then turn your notebook over. 20 Connect the power adapter, modem cable, and network cable 21 Turn on your notebook, open the DVD drive, insert the Windows DVD, close the DVD drive, then restart your keyboard and follow the on the bottom of the process you may be prompted to insert your Drivers and Applications Recovery disc. 23 Reconnect all peripheral devices and replace...
8512599 - Gateway Notebook Reference Guide R1
Page 5
... your notebook 84 Cleaning the exterior 85 Cleaning the keyboard 85 Cleaning the notebook screen 85 Maintaining the battery 86 Storing batteries 86 Cleaning CDs or DVDs 87 Recovering your system 87 Recovering pre-installed software and drivers 88 Using Microsoft System Restore 95 Recovering your system to its factory condition 98 Recovering your system using the Windows DVD 99 Chapter 8: Upgrading Your Notebook . . . . . 101 Preventing static electricity discharge 102 Adding or replacing memory modules...
... your notebook 84 Cleaning the exterior 85 Cleaning the keyboard 85 Cleaning the notebook screen 85 Maintaining the battery 86 Storing batteries 86 Cleaning CDs or DVDs 87 Recovering your system 87 Recovering pre-installed software and drivers 88 Using Microsoft System Restore 95 Recovering your system to its factory condition 98 Recovering your system using the Windows DVD 99 Chapter 8: Upgrading Your Notebook . . . . . 101 Preventing static electricity discharge 102 Adding or replacing memory modules...

8512599 - Gateway Notebook Reference Guide R1
Page 88
... in Sleep mode. 4 Highlight Password on the bottom of your notebook) in case of privacy. • Use a startup password to restrict access to you or behind you can see a startup screen, press F2. You must enter the Supervisor Password each time you turn on your notebook if it passes through the X-ray machine in security checkpoints. • Write down your notebook model number and serial number (located on boot, then press ENTER...
... in Sleep mode. 4 Highlight Password on the bottom of your notebook) in case of privacy. • Use a startup password to restrict access to you or behind you can see a startup screen, press F2. You must enter the Supervisor Password each time you turn on your notebook if it passes through the X-ray machine in security checkpoints. • Write down your notebook model number and serial number (located on boot, then press ENTER...
8512599 - Gateway Notebook Reference Guide R1
Page 96
... drivers from the Windows DVD, then recover your pre-installed software and device drivers using recovery discs that were pre-installed at the factory. If you need to follow that were pre-installed at the factory, see "Recovering pre-installed software and drivers" on page 88. For instructions on reinstalling software and drivers that were not pre-installed, see that product's documentation or support Web site. • If re-installing software or drivers does not help, then the problem...
... drivers from the Windows DVD, then recover your pre-installed software and device drivers using recovery discs that were pre-installed at the factory. If you need to follow that were pre-installed at the factory, see "Recovering pre-installed software and drivers" on page 88. For instructions on reinstalling software and drivers that were not pre-installed, see that product's documentation or support Web site. • If re-installing software or drivers does not help, then the problem...
8512599 - Gateway Notebook Reference Guide R1
Page 97
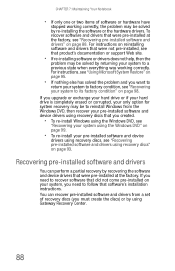
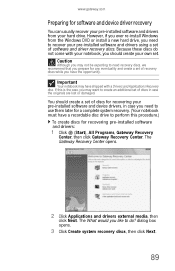
... shipped with your notebook, you should create a set of discs for recovering your pre-installed software and device drivers, in case the originals are lost or damaged. The Gateway Recovery Center opens. 2 Click Applications and drivers external media, then click Next. Because these discs do ? www.gateway.com Preparing for software and device driver recovery You can usually recover your pre-installed software and drivers from the Windows DVD or install a new hard drive, you need to recover your pre-installed software and drivers using a set of software and driver recovery discs.
... shipped with your notebook, you should create a set of discs for recovering your pre-installed software and device drivers, in case the originals are lost or damaged. The Gateway Recovery Center opens. 2 Click Applications and drivers external media, then click Next. Because these discs do ? www.gateway.com Preparing for software and device driver recovery You can usually recover your pre-installed software and drivers from the Windows DVD or install a new hard drive, you need to recover your pre-installed software and drivers using a set of software and driver recovery discs.

8512599 - Gateway Notebook Reference Guide R1
Page 129
... your notebook. Remove it, firmly reinsert it, then restart your browser, then reconnect and open the browser. Contact your notebook has been subjected to reinstall the operating system. For more information about troubleshooting Internet connections, click Start, then click Help and Support. For more information, see "Replacing the hard drive kit" on page 127. • Make sure that the hard drive is having technical difficulties. 121 Type...
... your notebook. Remove it, firmly reinsert it, then restart your browser, then reconnect and open the browser. Contact your notebook has been subjected to reinstall the operating system. For more information about troubleshooting Internet connections, click Start, then click Help and Support. For more information, see "Replacing the hard drive kit" on page 127. • Make sure that the hard drive is having technical difficulties. 121 Type...

8512599 - Gateway Notebook Reference Guide R1
Page 143
... for repair. Your notebook is not working device, such as a lamp, into a surge protector, make sure that the battery is installed correctly. For instructions on connecting the AC power adapter, see "Connecting the AC adapter" on page 18. • If your notebook is plugged into the outlet and turn it on. • Make sure that the AC power adapter cables are turned off, then retype the password. For more information about using power management settings...
... for repair. Your notebook is not working device, such as a lamp, into a surge protector, make sure that the battery is installed correctly. For instructions on connecting the AC power adapter, see "Connecting the AC adapter" on page 18. • If your notebook is plugged into the outlet and turn it on. • Make sure that the AC power adapter cables are turned off, then retype the password. For more information about using power management settings...

8512599 - Gateway Notebook Reference Guide R1
Page 144
... the default printer, make sure that the printer is plugged into an AC power source. Make sure that the power cable is online. The Control Panel window opens. 2 Click Hardware and Sound. 3 Click Printers. 4 Right-click the name of the printer you may need to work offline: 1 Click (Start), then click Control Panel. CHAPTER 9: Troubleshooting Printer Help For more information about printer troubleshooting, click Start, then click Help and Support. The...
... the default printer, make sure that the printer is plugged into an AC power source. Make sure that the power cable is online. The Control Panel window opens. 2 Click Hardware and Sound. 3 Click Printers. 4 Right-click the name of the printer you may need to work offline: 1 Click (Start), then click Control Panel. CHAPTER 9: Troubleshooting Printer Help For more information about printer troubleshooting, click Start, then click Help and Support. The...

8512599 - Gateway Notebook Reference Guide R1
Page 159
... managing power 69 maximizing performance 69 monitoring charge 66 purchasing 64 recalibrating 68 recharging 18, 66 release latch 11 replacing 67 storing 86 troubleshooting 135 bays battery 67 hard drive 11 memory 11, 103 BIOS Setup utility 68 Bluetooth system key 29 turning off 29, 49 turning on 29, 49 brightness adjusting 29, 30, 44 system keys 30 broadband modem connecting 20 button Effects 42 Help 42 Properties 42 settings 42 Snapshot 43 Start camera...
... managing power 69 maximizing performance 69 monitoring charge 66 purchasing 64 recalibrating 68 recharging 18, 66 release latch 11 replacing 67 storing 86 troubleshooting 135 bays battery 67 hard drive 11 memory 11, 103 BIOS Setup utility 68 Bluetooth system key 29 turning off 29, 49 turning on 29, 49 brightness adjusting 29, 30, 44 system keys 30 broadband modem connecting 20 button Effects 42 Help 42 Properties 42 settings 42 Snapshot 43 Start camera...

8512599 - Gateway Notebook Reference Guide R1
Page 162
...-installing software 91 H hard drive bay 11 indicator 25 installing 107 purchasing 64 replacing 107 troubleshooting 120 HDMI (TV) out jack 7 HDMI port 28, 58, 59 headphone jack 6 Help button 42 Hibernate mode 23, 71 hot-swapping 57, 58 Hybrid Sleep mode 28, 71 system key 28 turning on 74 I IEEE 802.11 using while traveling 79 indicators See status indicators inkjet printer 64 installing battery 67 devices 58 digital camera 58 digital video camera 58 Express Card 57 hard drive 107 memory...
...-installing software 91 H hard drive bay 11 indicator 25 installing 107 purchasing 64 replacing 107 troubleshooting 120 HDMI (TV) out jack 7 HDMI port 28, 58, 59 headphone jack 6 Help button 42 Hibernate mode 23, 71 hot-swapping 57, 58 Hybrid Sleep mode 28, 71 system key 28 turning on 74 I IEEE 802.11 using while traveling 79 indicators See status indicators inkjet printer 64 installing battery 67 devices 58 digital camera 58 digital video camera 58 Express Card 57 hard drive 107 memory...

8512599 - Gateway Notebook Reference Guide R1
Page 163
... of Authenticity 3 model number 2 serial number 2 laser printer 64 latch battery 11 LCD panel cleaning 85 switching display 28 troubleshooting 116 LCD/CRT system key 28 line protector 78 line tester 78 lock cable 80 Kensington cable 10 M maintenance cleaning 84, 87 Media Center 40 troubleshooting 123 media reader See memory card reader memory bay 11 installing 103 purchasing 64 removing 103 replacing 103 troubleshooting 126 memory card reader inserting card 56 locating 7 memory cards supported 55 removing card 56 troubleshooting 127 using 55 microphone built-in 14 jack 6 Microsoft Certificate...
... of Authenticity 3 model number 2 serial number 2 laser printer 64 latch battery 11 LCD panel cleaning 85 switching display 28 troubleshooting 116 LCD/CRT system key 28 line protector 78 line tester 78 lock cable 80 Kensington cable 10 M maintenance cleaning 84, 87 Media Center 40 troubleshooting 123 media reader See memory card reader memory bay 11 installing 103 purchasing 64 removing 103 replacing 103 troubleshooting 126 memory card reader inserting card 56 locating 7 memory cards supported 55 removing card 56 troubleshooting 127 using 55 microphone built-in 14 jack 6 Microsoft Certificate...
8512919 - Gateway Notebook Reference Guide R2
Page 15
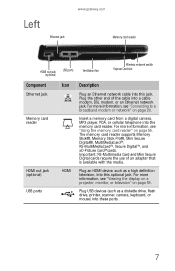
...an HDMI device, such as a diskette drive, flash drive, printer, scanner, camera, keyboard, or mouse) into these ports. 7 Plug the other end of an adapter that is available with the media. Left Ethernet jack www.gateway.com Memory card reader HDMI out jack (optional) USB ports Ventilation fan Wireless network switch Express Card slot Component Ethernet jack Memory card reader HDMI out jack (optional) USB ports Icon HDMI Description Plug an Ethernet network cable into a cable modem, DSL modem, or an Ethernet network jack. For more information, see "Using the memory card reader...
...an HDMI device, such as a diskette drive, flash drive, printer, scanner, camera, keyboard, or mouse) into these ports. 7 Plug the other end of an adapter that is available with the media. Left Ethernet jack www.gateway.com Memory card reader HDMI out jack (optional) USB ports Ventilation fan Wireless network switch Express Card slot Component Ethernet jack Memory card reader HDMI out jack (optional) USB ports Icon HDMI Description Plug an Ethernet network cable into a cable modem, DSL modem, or an Ethernet network jack. For more information, see "Using the memory card reader...

8512919 - Gateway Notebook Reference Guide R2
Page 88
... service. The BIOS Setup utility opens. 2 Open the Security menu, highlight Set Supervisor Password, then press ENTER and follow the instructions. This is set the supervisor password in airports, train stations, or bus terminals. Important You must return your notebook was turned off or put in hibernate mode. The startup password is the password you can see a startup screen, press F2. You must enter the User Password each time you use the BIOS Setup utility. 3 Highlight Set User Password, then press ENTER...
... service. The BIOS Setup utility opens. 2 Open the Security menu, highlight Set Supervisor Password, then press ENTER and follow the instructions. This is set the supervisor password in airports, train stations, or bus terminals. Important You must return your notebook was turned off or put in hibernate mode. The startup password is the password you can see a startup screen, press F2. You must enter the User Password each time you use the BIOS Setup utility. 3 Highlight Set User Password, then press ENTER...

8512919 - Gateway Notebook Reference Guide R2
Page 144
... is not set a default printer: 1 Click (Start), then click Control Panel. To set to work offline. Type the keyword printer troubleshooting in the printer setup. You see a "Printer queue is full" error message • Make sure that the printer is not set to is not the default printer, make sure that the printer is on but will not turn on installing the printer driver. Press the button to put...
... is not set a default printer: 1 Click (Start), then click Control Panel. To set to work offline. Type the keyword printer troubleshooting in the printer setup. You see a "Printer queue is full" error message • Make sure that the printer is not set to is not the default printer, make sure that the printer is on but will not turn on installing the printer driver. Press the button to put...

8512919 - Gateway Notebook Reference Guide R2
Page 163
... 27 wireless Ethernet 28 L labels Customer Care 11 Microsoft Certificate of Authenticity 3 model number 2 serial number 2 latch battery 11 LCD panel cleaning 85 switching display 28 troubleshooting 116 LCD/CRT system key 28 line protector 78 line tester 78 lock cable 80 Kensington cable 10 M maintenance cleaning 84, 87 Media Center 40 troubleshooting 123 media reader See memory card reader memory bay 11 installing 103 removing 103 replacing 103 troubleshooting 126 memory card reader inserting card 56 locating 7 memory cards supported 55 removing card 56 troubleshooting 127 using 55 microphone...
... 27 wireless Ethernet 28 L labels Customer Care 11 Microsoft Certificate of Authenticity 3 model number 2 serial number 2 latch battery 11 LCD panel cleaning 85 switching display 28 troubleshooting 116 LCD/CRT system key 28 line protector 78 line tester 78 lock cable 80 Kensington cable 10 M maintenance cleaning 84, 87 Media Center 40 troubleshooting 123 media reader See memory card reader memory bay 11 installing 103 removing 103 replacing 103 troubleshooting 126 memory card reader inserting card 56 locating 7 memory cards supported 55 removing card 56 troubleshooting 127 using 55 microphone...

8512778 - Gateway Notebook User Guide for Windows Vista R2
Page 5
... Adjusting tablet, digital pen, and input panel settings 74 Adding and modifying user accounts 75 Changing accessibility settings 76 Using the Ease of Access Center 76 Using voice recognition 77 Using the Windows Mobility Center 78 Setting up parental controls 80 Filtering Internet access 80 Scheduling notebook and Internet use 81 Restricting game access 81 Restricting specific programs 83 Creating activity reports 83 Chapter 8: Maintaining Your Notebook 85 Setting up a maintenance schedule 86 Updating Windows 86 Using BigFix 86 Managing hard drive...
... Adjusting tablet, digital pen, and input panel settings 74 Adding and modifying user accounts 75 Changing accessibility settings 76 Using the Ease of Access Center 76 Using voice recognition 77 Using the Windows Mobility Center 78 Setting up parental controls 80 Filtering Internet access 80 Scheduling notebook and Internet use 81 Restricting game access 81 Restricting specific programs 83 Creating activity reports 83 Chapter 8: Maintaining Your Notebook 85 Setting up a maintenance schedule 86 Updating Windows 86 Using BigFix 86 Managing hard drive...

8512778 - Gateway Notebook User Guide for Windows Vista R2
Page 50
... replace USB or Firewire cables. To create a wired Ethernet network, you to build computer networks in offices around the world and can be the same on all computers on . Using a router The most well-known example of creating a LAN. WAN-A wide area network (WAN) is made possible with Bluetooth. Ethernet, Fast Ethernet, or Gigabit Ethernet Important Check local code requirements before installing Ethernet cable...
... replace USB or Firewire cables. To create a wired Ethernet network, you to build computer networks in offices around the world and can be the same on all computers on . Using a router The most well-known example of creating a LAN. WAN-A wide area network (WAN) is made possible with Bluetooth. Ethernet, Fast Ethernet, or Gigabit Ethernet Important Check local code requirements before installing Ethernet cable...

8512778 - Gateway Notebook User Guide for Windows Vista R2
Page 58
... instructions that your router or access point is set on your computers and access a favorite Internet Web site. Important To share a printer among the computers connected to install the printer drivers on the front of the router or access point with your printer to the Internet: • Click (Start), Control Panel, Network and Internet, then click Network and Sharing Center. Modify the security settings to match the settings...
... instructions that your router or access point is set on your computers and access a favorite Internet Web site. Important To share a printer among the computers connected to install the printer drivers on the front of the router or access point with your printer to the Internet: • Click (Start), Control Panel, Network and Internet, then click Network and Sharing Center. Modify the security settings to match the settings...


