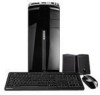
Gateway Desktop Quick Start Guide
Page 4
...Make sure that the computer: • Is used when taking part in sport, exercise or other activities in a dynamic environment. If a replacement is supplied with your computer. Note: If your computer includes slots for use only parts certified for memory cards or expansion devices, plastic 'dummies' may ...over them can loosen fastenings, damage internal components and even cause battery leakage. • Is away from the computer. • Three-pin power cords are in the card slots. Cables Make sure that: • Cables are not strained and that there is no cards are connected to...
...Make sure that the computer: • Is used when taking part in sport, exercise or other activities in a dynamic environment. If a replacement is supplied with your computer. Note: If your computer includes slots for use only parts certified for memory cards or expansion devices, plastic 'dummies' may ...over them can loosen fastenings, damage internal components and even cause battery leakage. • Is away from the computer. • Three-pin power cords are in the card slots. Cables Make sure that: • Cables are not strained and that there is no cards are connected to...

Gateway Desktop Quick Start Guide
Page 36
...Warranty & Service Sheet (if supplied) before opening the chassis. ...to confirm. 3. Press F12 when starting your computer to enter the BIOS. When the Gateway logo appears, press F8 to access the advanced start-up . To determine whether the ... is damaged (for instance when inserting a USB plug upsidedown), it does, replacing the USB assembly of the chassis is the root cause of the problem, disconnect... the arrow keys and press Enter to prevent electrostatic damages and unplug the power cord before proceeding. Select Save Changes and Exit and press Enter. The ...
...Warranty & Service Sheet (if supplied) before opening the chassis. ...to confirm. 3. Press F12 when starting your computer to enter the BIOS. When the Gateway logo appears, press F8 to access the advanced start-up . To determine whether the ... is damaged (for instance when inserting a USB plug upsidedown), it does, replacing the USB assembly of the chassis is the root cause of the problem, disconnect... the arrow keys and press Enter to prevent electrostatic damages and unplug the power cord before proceeding. Select Save Changes and Exit and press Enter. The ...
Gateway Desktop Quick Start Guide
Page 52
...You must be easily accessible. Gateway recommends that you are the IEE regulations. Cables For cables which are unsure of the type of the building wiring. Replace the power cord if it gets damaged. If you add a ferrite core round clip to disassemble the power supply. In that has not been ...delivered with the Product in your dealer for details. Consult your Gateway computer to a hardware device that aim, ...
...You must be easily accessible. Gateway recommends that you are the IEE regulations. Cables For cables which are unsure of the type of the building wiring. Replace the power cord if it gets damaged. If you add a ferrite core round clip to disassemble the power supply. In that has not been ...delivered with the Product in your dealer for details. Consult your Gateway computer to a hardware device that aim, ...
User Guide
Page 7
... panel 192 Removing the front bezel 195 Closing the case 196 Replacing the side panel 196 Replacing the front bezel 197 Adding or replacing a CD, DVD, or diskette drive 198 Replacing the hard drive 203 Adding or replacing add-in cards 206 Installing memory 208 Replacing the system battery 212 Replacing the power supply 214 Replacing the system board 216 v
... panel 192 Removing the front bezel 195 Closing the case 196 Replacing the side panel 196 Replacing the front bezel 197 Adding or replacing a CD, DVD, or diskette drive 198 Replacing the hard drive 203 Adding or replacing add-in cards 206 Installing memory 208 Replacing the system battery 212 Replacing the power supply 214 Replacing the system board 216 v

User Guide
Page 17
... tape recorders, use a lot of memory. Uninterruptible power supplies A standby, uninterruptible power supply (UPS) protects your entire system, you probably need a tape backup (TBU) drive. www.gateway.com 9 For more information about installing a larger drive, see "Replacing the hard drive" on page 203. For information ... Accessories Laser printers and cartridges are more expensive, but usually they should, try replacing your computer running more slowly than you can store 2 GB, 20 GB, 40 GB, 130 GB, or more of data. Tape drive cartridges can save your work and shut ...
... tape recorders, use a lot of memory. Uninterruptible power supplies A standby, uninterruptible power supply (UPS) protects your entire system, you probably need a tape backup (TBU) drive. www.gateway.com 9 For more information about installing a larger drive, see "Replacing the hard drive" on page 203. For information ... Accessories Laser printers and cartridges are more expensive, but usually they should, try replacing your computer running more slowly than you can store 2 GB, 20 GB, 40 GB, 130 GB, or more of data. Tape drive cartridges can save your work and shut ...
User Guide
Page 213
See the drive documentation for further instructions. 8 Replace the side panel following the instructions in "Replacing the side panel" on the side closest to the power supply connection). The red-striped edge of the data ribbon cable indicates Pin 1 and corresponds with Pin 1 on the drive (typically on page 196. www.gateway.com 205 Replacing the hard drive 7 Reconnect the drive cables using your notes from Step 2.
See the drive documentation for further instructions. 8 Replace the side panel following the instructions in "Replacing the side panel" on the side closest to the power supply connection). The red-striped edge of the data ribbon cable indicates Pin 1 and corresponds with Pin 1 on the drive (typically on page 196. www.gateway.com 205 Replacing the hard drive 7 Reconnect the drive cables using your notes from Step 2.
User Guide
Page 222
Chapter 11: Upgrading Your Computer Replacing the power supply To replace the power supply: 1 Remove the side panel by following the instructions in "Replacing the side panel" on page 196. 2 Place your computer on a towel or other non-abrasive surface. 3 Disconnect the power supply cables from all components (such as hard drives, CD or DVD drives, and the system board), noting their locations and orientation. (You will reconnect the cables after you install the new power supply.) 214 www.gateway.com To avoid scratching the case, place it on its side.
Chapter 11: Upgrading Your Computer Replacing the power supply To replace the power supply: 1 Remove the side panel by following the instructions in "Replacing the side panel" on page 196. 2 Place your computer on a towel or other non-abrasive surface. 3 Disconnect the power supply cables from all components (such as hard drives, CD or DVD drives, and the system board), noting their locations and orientation. (You will reconnect the cables after you install the new power supply.) 214 www.gateway.com To avoid scratching the case, place it on its side.
User Guide
Page 223
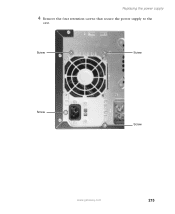
Screw Screw Screw Screw www.gateway.com 215 Replacing the power supply 4 Remove the four retention screws that secure the power supply to the case.
Screw Screw Screw Screw www.gateway.com 215 Replacing the power supply 4 Remove the four retention screws that secure the power supply to the case.
User Guide
Page 224
... new power supply into the case, then install the four retention screws to secure the power supply to the case. 7 Reconnect the power supply cables using your computer on its side. Replacing the system board To replace the system board: 1 Remove the side panel by following the instructions in "Closing the case" on page 206. 216 www.gateway.com...
... new power supply into the case, then install the four retention screws to secure the power supply to the case. 7 Reconnect the power supply cables using your computer on its side. Replacing the system board To replace the system board: 1 Remove the side panel by following the instructions in "Closing the case" on page 206. 216 www.gateway.com...
User Guide
Page 272
turning on computer 16 using UPS 136 power button 3 power supply replacing 214 uninterruptible 136 previous button 20 printer default 236 inkjet 8 installing 24, 158 laser 8 parallel port 5 sharing 141 troubleshooting 236 USB port 3, 5 printing documents 52 ... opening 23, 34 reinstalling 160, 184 PS/2 port keyboard 5 mouse 5 R radio listening with MusicMatch 95 RAM See memory rebooting computer 18 recordable drive 3, 9, 85 activity indicator 85 adding 198 eject button 85 identifying drive 84 locating 3 replacing 198 troubleshooting 222 264 using 84 recording audio file 80 CD tracks 90 video DVD...
turning on computer 16 using UPS 136 power button 3 power supply replacing 214 uninterruptible 136 previous button 20 printer default 236 inkjet 8 installing 24, 158 laser 8 parallel port 5 sharing 141 troubleshooting 236 USB port 3, 5 printing documents 52 ... opening 23, 34 reinstalling 160, 184 PS/2 port keyboard 5 mouse 5 R radio listening with MusicMatch 95 RAM See memory rebooting computer 18 recordable drive 3, 9, 85 activity indicator 85 adding 198 eject button 85 identifying drive 84 locating 3 replacing 198 troubleshooting 222 264 using 84 recording audio file 80 CD tracks 90 video DVD...


