Gateway Desktop Quick Start Guide
Page 4
... memory cards or expansion devices, plastic 'dummies' may have an electrical charge. If a replacement is completely dry before connecting the power cable to the AC power outlet. • The power cable is supplied with your computer from the computer. • Three-pin power cords are in the card slots. Allow the adapter to it, switch it...
... memory cards or expansion devices, plastic 'dummies' may have an electrical charge. If a replacement is completely dry before connecting the power cable to the AC power outlet. • The power cable is supplied with your computer from the computer. • Three-pin power cords are in the card slots. Allow the adapter to it, switch it...

Gateway Desktop Quick Start Guide
Page 36
...it does, replacing the USB ... proceed, please first touch the ground to prevent electrostatic damages and unplug the power cord before proceeding. Select the Default Values in the top menu using the ...Mode and press Enter. 36 - Press F12 when starting your Warranty & Service Sheet (if supplied) before opening the chassis. Please refer to your computer to enter the boot menu (this... 1. If it works fine. 3. Quick Start & Troubleshooting Guide The screen freezes when the Gateway logo displays When the computer starts, it can short circuit the system, thus preventing the computer...
...it does, replacing the USB ... proceed, please first touch the ground to prevent electrostatic damages and unplug the power cord before proceeding. Select the Default Values in the top menu using the ...Mode and press Enter. 36 - Press F12 when starting your Warranty & Service Sheet (if supplied) before opening the chassis. Please refer to your computer to enter the boot menu (this... 1. If it works fine. 3. Quick Start & Troubleshooting Guide The screen freezes when the Gateway logo displays When the computer starts, it can short circuit the system, thus preventing the computer...
Gateway Desktop Quick Start Guide
Page 52
... to disconnect the equipment from Hama 50030 CHASSIS COVER REMOVAL AND REPLACEMENT Before removing the chassis cover to service or modify the equipment, you are not delivered with your Gateway computer to be easily accessible. POWER SUPPLY AND CABLES Power Supply The power supply socket-inlet and socket-outlet (if equipped) are designed such that there is properly...
... to disconnect the equipment from Hama 50030 CHASSIS COVER REMOVAL AND REPLACEMENT Before removing the chassis cover to service or modify the equipment, you are not delivered with your Gateway computer to be easily accessible. POWER SUPPLY AND CABLES Power Supply The power supply socket-inlet and socket-outlet (if equipped) are designed such that there is properly...
User Guide
Page 7
... panel 192 Removing the front bezel 195 Closing the case 196 Replacing the side panel 196 Replacing the front bezel 197 Adding or replacing a CD, DVD, or diskette drive 198 Replacing the hard drive 203 Adding or replacing add-in cards 206 Installing memory 208 Replacing the system battery 212 Replacing the power supply 214 Replacing the system board 216 v
... panel 192 Removing the front bezel 195 Closing the case 196 Replacing the side panel 196 Replacing the front bezel 197 Adding or replacing a CD, DVD, or diskette drive 198 Replacing the hard drive 203 Adding or replacing add-in cards 206 Installing memory 208 Replacing the system battery 212 Replacing the power supply 214 Replacing the system board 216 v

User Guide
Page 17
...DVDs" on page 97. Memory Large programs, such as 4,700 MB of memory. Uninterruptible power supplies A standby, uninterruptible power supply (UPS) protects your computer correctly. With a recordable CD or DVD drive, you can ...GB, 40 GB, 130 GB, or more of data. If you need to store data. A UPS may also provide protection from your programs are running temporarily during a total power failure. Accessories Laser printers and cartridges are more expensive, but usually they should, try replacing your entire system, you probably need a tape backup (TBU) drive. www.gateway...
...DVDs" on page 97. Memory Large programs, such as 4,700 MB of memory. Uninterruptible power supplies A standby, uninterruptible power supply (UPS) protects your computer correctly. With a recordable CD or DVD drive, you can ...GB, 40 GB, 130 GB, or more of data. If you need to store data. A UPS may also provide protection from your programs are running temporarily during a total power failure. Accessories Laser printers and cartridges are more expensive, but usually they should, try replacing your entire system, you probably need a tape backup (TBU) drive. www.gateway...
User Guide
Page 213
See the drive documentation for further instructions. 8 Replace the side panel following the instructions in "Replacing the side panel" on the side closest to the power supply connection). The red-striped edge of the data ribbon cable indicates Pin 1 and corresponds with Pin 1 on the drive (typically on page 196. Replacing the hard drive 7 Reconnect the drive cables using your notes from Step 2. www.gateway.com 205
See the drive documentation for further instructions. 8 Replace the side panel following the instructions in "Replacing the side panel" on the side closest to the power supply connection). The red-striped edge of the data ribbon cable indicates Pin 1 and corresponds with Pin 1 on the drive (typically on page 196. Replacing the hard drive 7 Reconnect the drive cables using your notes from Step 2. www.gateway.com 205
User Guide
Page 222
To avoid scratching the case, place it on its side. Chapter 11: Upgrading Your Computer Replacing the power supply To replace the power supply: 1 Remove the side panel by following the instructions in "Replacing the side panel" on page 196. 2 Place your computer on a towel or other non-abrasive surface. 3 Disconnect the power supply cables from all components (such as hard drives, CD or DVD drives, and the system board), noting their locations and orientation. (You will reconnect the cables after you install the new power supply.) 214 www.gateway.com
To avoid scratching the case, place it on its side. Chapter 11: Upgrading Your Computer Replacing the power supply To replace the power supply: 1 Remove the side panel by following the instructions in "Replacing the side panel" on page 196. 2 Place your computer on a towel or other non-abrasive surface. 3 Disconnect the power supply cables from all components (such as hard drives, CD or DVD drives, and the system board), noting their locations and orientation. (You will reconnect the cables after you install the new power supply.) 214 www.gateway.com
User Guide
Page 223
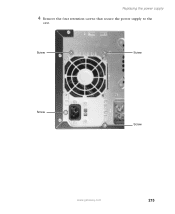
Screw Screw Screw Screw www.gateway.com 215 Replacing the power supply 4 Remove the four retention screws that secure the power supply to the case.
Screw Screw Screw Screw www.gateway.com 215 Replacing the power supply 4 Remove the four retention screws that secure the power supply to the case.
User Guide
Page 224
... "Closing the case" on page 196. See the power supply documentation for further instructions. 8 Close the case by following the instructions in cards" on its side. Replacing the system board To replace the system board: 1 Remove the side panel by ...replacing add-in "Removing the side panel" on page 192. 2 For more stability, place your notes from the power supply brackets. 6 Install the new power supply into the case, then install the four retention screws to secure the power supply to the case. 7 Reconnect the power supply cables using your computer on page 206. 216 www.gateway...
... "Closing the case" on page 196. See the power supply documentation for further instructions. 8 Close the case by following the instructions in cards" on its side. Replacing the system board To replace the system board: 1 Remove the side panel by ...replacing add-in "Removing the side panel" on page 192. 2 For more stability, place your notes from the power supply brackets. 6 Install the new power supply into the case, then install the four retention screws to secure the power supply to the case. 7 Reconnect the power supply cables using your computer on page 206. 216 www.gateway...
User Guide
Page 272
turning on computer 16 using UPS 136 power button 3 power supply replacing 214 uninterruptible 136 previous button 20 printer default 236 inkjet 8 installing 24, 158 laser 8 parallel port 5 sharing 141 troubleshooting 236 USB port 3, 5 printing documents 52 ... opening 23, 34 reinstalling 160, 184 PS/2 port keyboard 5 mouse 5 R radio listening with MusicMatch 95 RAM See memory rebooting computer 18 recordable drive 3, 9, 85 activity indicator 85 adding 198 eject button 85 identifying drive 84 locating 3 replacing 198 troubleshooting 222 264 using 84 recording audio file 80 CD tracks 90 video DVD...
turning on computer 16 using UPS 136 power button 3 power supply replacing 214 uninterruptible 136 previous button 20 printer default 236 inkjet 8 installing 24, 158 laser 8 parallel port 5 sharing 141 troubleshooting 236 USB port 3, 5 printing documents 52 ... opening 23, 34 reinstalling 160, 184 PS/2 port keyboard 5 mouse 5 R radio listening with MusicMatch 95 RAM See memory rebooting computer 18 recordable drive 3, 9, 85 activity indicator 85 adding 198 eject button 85 identifying drive 84 locating 3 replacing 198 troubleshooting 222 264 using 84 recording audio file 80 CD tracks 90 video DVD...


