SAR Specific Absorption Rate Statement
Page 1
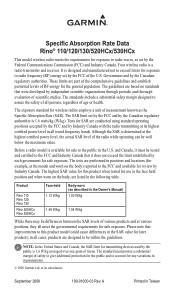
...differences in the SAR value for sale to the public in measurements. © 2008 Garmin Ltd. These limits are listed in Taiwan NOTE: In the United States and Canada...limits for exposure to assure the safety of all meet the governmental requirements for review by the FCC of various products and at the highest certified power level, ... the Specific Absorption Rate (SAR). The exposure standard for safe exposure. Product Rino 110 Rino 120 Rino 130 Rino 520HCx Rino 530HCx Face-held position and when worn on the body) reported to the ... a radio transmitter and receiver.
...differences in the SAR value for sale to the public in measurements. © 2008 Garmin Ltd. These limits are listed in Taiwan NOTE: In the United States and Canada...limits for exposure to assure the safety of all meet the governmental requirements for review by the FCC of various products and at the highest certified power level, ... the Specific Absorption Rate (SAR). The exposure standard for safe exposure. Product Rino 110 Rino 120 Rino 130 Rino 520HCx Rino 530HCx Face-held position and when worn on the body) reported to the ... a radio transmitter and receiver.

Owner's Manual
Page 24
...list (select OK). This information is available to transmit its position. Your Rino 110 responds to polling requests from another Rino, which is received from other Rino users and even navigate to -peer positioning enabled (see page 14) and a GPS position (see the "Setup Radio" section). 2. From the New Contact ... other Rino users: 1. Locations may only be sent once every 30 seconds due to ignore this contact. With peer-to their location on the top Status Bar or in Mark's hand indicates the unit is displayed. Press Page to FCC restrictions. This section reviews some ...
...list (select OK). This information is available to transmit its position. Your Rino 110 responds to polling requests from another Rino, which is received from other Rino users and even navigate to -peer positioning enabled (see page 14) and a GPS position (see the "Setup Radio" section). 2. From the New Contact ... other Rino users: 1. Locations may only be sent once every 30 seconds due to ignore this contact. With peer-to their location on the top Status Bar or in Mark's hand indicates the unit is displayed. Press Page to FCC restrictions. This section reviews some ...

Owner's Manual
Page 26
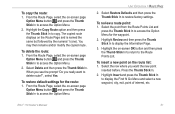
...the contacts on the Contact Bar, the Map Page centers the map on the Contact Bar and press the Thumb Stick In. From the Contact Review Page, highlight Map and press the Thumb Stick In. 2. From the Map Page, highlight the desired contact on that contact and display its... on their last position. 20 Rino® 110 Owner's Manual To view a contact on the Map Page: 1. Select the desired field and press the Thumb Stick In. For Notes, highlight Edit and press In to the Contact Review Page. UNIT OPERATION > USING THE RINO 110 RADIO FEATURES To review a contact and contact details: ...
...the contacts on the Contact Bar, the Map Page centers the map on the Contact Bar and press the Thumb Stick In. From the Contact Review Page, highlight Map and press the Thumb Stick In. 2. From the Map Page, highlight the desired contact on that contact and display its... on their last position. 20 Rino® 110 Owner's Manual To view a contact on the Map Page: 1. Select the desired field and press the Thumb Stick In. For Notes, highlight Edit and press In to the Contact Review Page. UNIT OPERATION > USING THE RINO 110 RADIO FEATURES To review a contact and contact details: ...
Owner's Manual
Page 57
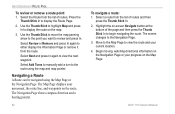
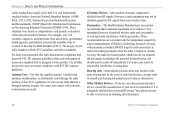
...Stick In to access the Option Menu. Select Restore Defaults and then press the Thumb Stick In to display the Information Page. 3. Highlight Review and then press the Thumb Stick In to restore factory settings. Press the Thumb Stick In. 2. From the Route Page, select the on... OK button and then press the Thumb Stick In to return to delete route?", select Yes. To review a route point: 1. To copy the route: 1. To restore default settings for the waypoint. 2. Rino® 110 Owner's Manual UNIT OPERATION > ROUTE PAGE 2. To delete the route: 1. Highlight the Copy Route ...
...Stick In to access the Option Menu. Select Restore Defaults and then press the Thumb Stick In to display the Information Page. 3. Highlight Review and then press the Thumb Stick In to restore factory settings. Press the Thumb Stick In. 2. From the Route Page, select the on... OK button and then press the Thumb Stick In to return to delete route?", select Yes. To review a route point: 1. To copy the route: 1. To restore default settings for the waypoint. 2. Rino® 110 Owner's Manual UNIT OPERATION > ROUTE PAGE 2. To delete the route: 1. Highlight the Copy Route ...

Owner's Manual
Page 58
.... Select the point from the route list: 1. Highlight the Move option and press the Thumb Stick In to replace the old route waypoint. Rino® 110 Owner's Manual To change from the list. With the new point highlighted, press the Thumb Stick In to display the Information Page for the ...select the on -screen Use button to select the waypoint. 3. Use the Thumb Stick to the points list. 3. UNIT OPERATION > ROUTE PAGE Route point review options 3. Highlight Remove and press the Thumb Stick In to remove from the Route Points List and press the Thumb Stick In. 2. To remove a ...
.... Select the point from the route list: 1. Highlight the Move option and press the Thumb Stick In to replace the old route waypoint. Rino® 110 Owner's Manual To change from the list. With the new point highlighted, press the Thumb Stick In to display the Information Page for the ...select the on -screen Use button to select the waypoint. 3. Use the Thumb Stick to the points list. 3. UNIT OPERATION > ROUTE PAGE Route point review options 3. Highlight Remove and press the Thumb Stick In to remove from the Route Points List and press the Thumb Stick In. 2. To remove a ...
Owner's Manual
Page 60
...the route line, and waypoints on the map. 3. Move to the Map Page to the route using the Map Page or the Navigation Page. Rino® 110 Owner's Manual Press the Thumb Stick In to view the next waypoint. Select Next and press In again to display the Route Page. 2. The ...a route: 1. Highlight the on the Map Page. Begin moving, watching directional information on the Navigation Page or your current location. 4. The screen changes to review and press In. Navigating a Route A Route can be navigated using the map and map pointer. Select a route from the list of the page and then...
...the route line, and waypoints on the map. 3. Move to the Map Page to the route using the Map Page or the Navigation Page. Rino® 110 Owner's Manual Press the Thumb Stick In to view the next waypoint. Select Next and press In again to display the Route Page. 2. The ...a route: 1. Highlight the on the Map Page. Begin moving, watching directional information on the Navigation Page or your current location. 4. The screen changes to review and press In. Navigating a Route A Route can be navigated using the map and map pointer. Select a route from the list of the page and then...
Owner's Manual
Page 65
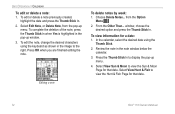
... Thumb Stick to place a check mark. 59 Choose Remove and press In. 2. Press the Page key or the Menu icon the Main Menu. 2. From the Review Page, select Use. To clear one or all proximity waypoints, highlight the Option Menu and press In. To turn proximity alarms on the Proximity list... press In. Choose Remove All and press the Thumb Stick In. In the Main Menu, scroll down and select Proximity. Highlight an item from other Rino users. If entering a proximity alarm circle, a "Near Proximity Point " message appears. Up to open Proximity Waypoints Page...
... Thumb Stick to place a check mark. 59 Choose Remove and press In. 2. Press the Page key or the Menu icon the Main Menu. 2. From the Review Page, select Use. To clear one or all proximity waypoints, highlight the Option Menu and press In. To turn proximity alarms on the Proximity list... press In. Choose Remove All and press the Thumb Stick In. In the Main Menu, scroll down and select Proximity. Highlight an item from other Rino users. If entering a proximity alarm circle, a "Near Proximity Point " message appears. Up to open Proximity Waypoints Page...
Owner's Manual
Page 78
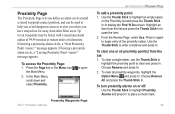
...when Yes is highlighted in the pop-up menu. 4. from the pop-up menu. window, choose the desired option and press the Thumb Stick In. Review the note in the image to display the pop-up window. 3. Press OK when you are finished editing the note. Editing a note To ... Than... UNIT OPERATION > CALENDAR To edit or delete a note: 1. Select View Sun & Moon to view the Hunt & Fish Page for that date. 72 Rino® 110 Owner's Manual Select Edit Note, or Delete Note, from the Option Menu . 2. To edit or delete a note previously created, highlight the date and press the...
...when Yes is highlighted in the pop-up menu. 4. from the pop-up menu. window, choose the desired option and press the Thumb Stick In. Review the note in the image to display the pop-up window. 3. Press OK when you are finished editing the note. Editing a note To ... Than... UNIT OPERATION > CALENDAR To edit or delete a note: 1. Select View Sun & Moon to view the Hunt & Fish Page for that date. 72 Rino® 110 Owner's Manual Select Edit Note, or Delete Note, from the Option Menu . 2. To edit or delete a note previously created, highlight the date and press the...
Owner's Manual
Page 84
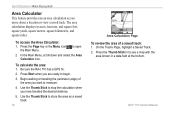
... provides you an area calculation as a saved track. 78 Area Calculation Page To review the area of the area you want to open 2. In the Main Menu, scroll down and select the Area Calculator icon. Be sure the Rino 110 has a GPS fix. 2. Press Start when you move about a location or view a saved track... the area shown in acres, hectares, and square feet, square yards, square meters, square kilometers, and square miles. On the Tracks Page, highlight a Saved Track. 2. Rino® 110 Owner's Manual
... provides you an area calculation as a saved track. 78 Area Calculation Page To review the area of the area you want to open 2. In the Main Menu, scroll down and select the Area Calculator icon. Be sure the Rino 110 has a GPS fix. 2. Press Start when you move about a location or view a saved track... the area shown in acres, hectares, and square feet, square yards, square meters, square kilometers, and square miles. On the Tracks Page, highlight a Saved Track. 2. Rino® 110 Owner's Manual

Owner's Manual
Page 103
...Rino 110 at a reasonable cost. To reduce the risk of unsafe operation, carefully review and understand all available navigation sources, including the information from the Rino 110...) adopted RF exposure guidelines with Rino® 110 Owner's Manual 97 Although the Garmin Rino 110 is a precision electronic NAVigation AID...GPS equipment. IMPORTANT: READ THIS INFORMATION BEFORE USING YOUR RINO: Exposure to Radio Frequency Signals-Your wireless handheld radio is available to provide customers with the most complete and accurate cartography that is a low power radio transmitter and receiver...
...Rino 110 at a reasonable cost. To reduce the risk of unsafe operation, carefully review and understand all available navigation sources, including the information from the Rino 110...) adopted RF exposure guidelines with Rino® 110 Owner's Manual 97 Although the Garmin Rino 110 is a precision electronic NAVigation AID...GPS equipment. IMPORTANT: READ THIS INFORMATION BEFORE USING YOUR RINO: Exposure to Radio Frequency Signals-Your wireless handheld radio is available to provide customers with the most complete and accurate cartography that is a low power radio transmitter and receiver...
Owner's Manual
Page 104
... National Standards Institute (ANSI) IEEE. Those standards were based on , should not carry the radio in obtaining this information. 98 Rino® 110 Owner's Manual For body-worn operation, this product. In the event of other personal medical device, consult the manufacturer of six inches... (6") be able to assist you may not be shielded against the RF signals from universities, government health agencies, and industry reviewed ...
... National Standards Institute (ANSI) IEEE. Those standards were based on , should not carry the radio in obtaining this information. 98 Rino® 110 Owner's Manual For body-worn operation, this product. In the event of other personal medical device, consult the manufacturer of six inches... (6") be able to assist you may not be shielded against the RF signals from universities, government health agencies, and industry reviewed ...
Owner's Manual
Page 107
... Features Setup 28 Map Page 22 Options 24 Overview 22 Pan Map 24 Restore Defaults 24 Scale 23 Setup Map 24, 27 Map Pointer 25 Rino® 110 Owner's Manual Mark Waypoint 16 Mark Waypoint Page 36 Measure Distance 24, 28 Message Beep 70 Microphone 15 Monitor Channels 12 Move a Waypoint 39... Code 10 Informational Picture 16 INDEX Overview 7 Setup Radio 14 Radio Transmission Status 16 Receive Signals 7 Recently Found Places 47 Reference Note 71 Reposition Here 41, 42 Reset 32, 75 Restore Defaults 24, 32 Reverse Route 50 Review Route 51 Ring Tone 15 Roger Tone 15 Routes 49 Copy 51 Create 49...
... Features Setup 28 Map Page 22 Options 24 Overview 22 Pan Map 24 Restore Defaults 24 Scale 23 Setup Map 24, 27 Map Pointer 25 Rino® 110 Owner's Manual Mark Waypoint 16 Mark Waypoint Page 36 Measure Distance 24, 28 Message Beep 70 Microphone 15 Monitor Channels 12 Move a Waypoint 39... Code 10 Informational Picture 16 INDEX Overview 7 Setup Radio 14 Radio Transmission Status 16 Receive Signals 7 Recently Found Places 47 Reference Note 71 Reposition Here 41, 42 Reset 32, 75 Restore Defaults 24, 32 Reverse Route 50 Review Route 51 Ring Tone 15 Roger Tone 15 Routes 49 Copy 51 Create 49...
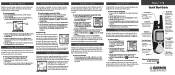
Quick Start Guide
Page 1
...the Thumb Stick In to display the Waypoint Review page. 4. Highlight the Name field and press the Thumb Stick In. Highlight the Symbol field and press the Thumb Stick In. Highlight the OK button at the top of Rino 110, refer to the Owner's Manual, which ... From the New Contact page you can then choose to begin with Your Rino 110 You can show the user's location on a direct course toward your Rino 110. Send Location 3. Other Rino users monitoring the same channel and squelch code receive this page and begin navigation. Using Find 'N Go Using Find 'N Go,...
...the Thumb Stick In to display the Waypoint Review page. 4. Highlight the Name field and press the Thumb Stick In. Highlight the Symbol field and press the Thumb Stick In. Highlight the OK button at the top of Rino 110, refer to the Owner's Manual, which ... From the New Contact page you can then choose to begin with Your Rino 110 You can show the user's location on a direct course toward your Rino 110. Send Location 3. Other Rino users monitoring the same channel and squelch code receive this page and begin navigation. Using Find 'N Go Using Find 'N Go,...