
Owner's Manual
Page 12
...then is replaced by the Status Bar. Install new batteries or recharge batteries. Using External Power Receiving Radio signal 6 Transmitting Radio signal Backlight On Radio On Peer-To-Peer On/Location Ready to Send Keylock On Alarm Clock On GPS On, Position Ready GPS On, Position Not Ready Rino® 110 Owner's... Manual The current settings and operational icons on all the available Main Pages. As you move around any of the screen displays on the Status Bar are displayed as...
...then is replaced by the Status Bar. Install new batteries or recharge batteries. Using External Power Receiving Radio signal 6 Transmitting Radio signal Backlight On Radio On Peer-To-Peer On/Location Ready to Send Keylock On Alarm Clock On GPS On, Position Ready GPS On, Position Not Ready Rino® 110 Owner's... Manual The current settings and operational icons on all the available Main Pages. As you move around any of the screen displays on the Status Bar are displayed as...

Owner's Manual
Page 58
... a route point: 1. Select the waypoint that you want to add it to replace the old route waypoint. Highlight the Move option and press the Thumb Stick In ... waypoint and add it the route. Select a new waypoint, access its Information Page and press the on -screen OK button to remove from the list. UNIT OPERATION > ROUTE PAGE Route point review options 3. To remove ...a point from the Route Points List and press the Thumb Stick In. 2. Rino® 110 Owner's Manual With the new point highlighted, press the Thumb Stick In to display the Information Page for...
... a route point: 1. Select the waypoint that you want to add it to replace the old route waypoint. Highlight the Move option and press the Thumb Stick In ... waypoint and add it the route. Select a new waypoint, access its Information Page and press the on -screen OK button to remove from the list. UNIT OPERATION > ROUTE PAGE Route point review options 3. To remove ...a point from the Route Points List and press the Thumb Stick In. 2. Rino® 110 Owner's Manual With the new point highlighted, press the Thumb Stick In to display the Information Page for...
Owner's Manual
Page 93
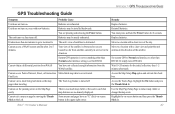
...set for the Americas System GPS operation is obstructed or you are too densely displayed. The Track Log feature is not activated. Cannot see the panning arrow on -screen button and then press the Thumb Stick In. button in service for RTCM. Rino® 110 Owner's Manual 87 Batteries may...Some menus and pages have not collected enough information from satellites currently in the upper right corner. Batteries may be nearly exhausted. Remedy Replace batteries. You are exhausted. There is too much map clutter or the scale is obstructed. Access the Map Setup Map option and ...
...set for the Americas System GPS operation is obstructed or you are too densely displayed. The Track Log feature is not activated. Cannot see the panning arrow on -screen button and then press the Thumb Stick In. button in service for RTCM. Rino® 110 Owner's Manual 87 Batteries may...Some menus and pages have not collected enough information from satellites currently in the upper right corner. Batteries may be nearly exhausted. Remedy Replace batteries. You are exhausted. There is too much map clutter or the scale is obstructed. Access the Map Setup Map option and ...
Quick Start Guide
Page 2
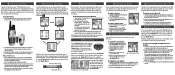
... batteries. If lighting conditions make it for navigation, the GPS receiver must be used batteries. • Extensive use all receiving Rinos. 3. See the Rino 110 Owner's Manual for satellite signals. Turn the D-ring 1/4 turn clockwise. Notes on -screen Main Page Menu button . You can adjust the contrast ... should take a few minutes. Remove the battery cover on the backlight and adjust the screen contrast: 1. Reinstall the battery cover by pressing the on battery use: • When replacing batteries, use your new ID, highlight OK and then press the Thumb Stick In. To...
... batteries. If lighting conditions make it for navigation, the GPS receiver must be used batteries. • Extensive use all receiving Rinos. 3. See the Rino 110 Owner's Manual for satellite signals. Turn the D-ring 1/4 turn clockwise. Notes on -screen Main Page Menu button . You can adjust the contrast ... should take a few minutes. Remove the battery cover on the backlight and adjust the screen contrast: 1. Reinstall the battery cover by pressing the on battery use: • When replacing batteries, use your new ID, highlight OK and then press the Thumb Stick In. To...


