Owner's Manual
Page 12
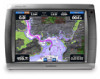
... of the pointer. Accessing Additional Object Information Use the map pointer ( ) (GPSMAP 4000 series) or touch an item on different days. Move the pointer (GPSMAP 4000 series) or touch the screen (GPSMAP 5000 series) to select a starting point. When you select Review, you to help predict the tide level at the pointer location. •...
... of the pointer. Accessing Additional Object Information Use the map pointer ( ) (GPSMAP 4000 series) or touch an item on different days. Move the pointer (GPSMAP 4000 series) or touch the screen (GPSMAP 5000 series) to select a starting point. When you select Review, you to help predict the tide level at the pointer location. •...

Owner's Manual
Page 22
... of the station to arrival. Using Charts Note: Use the RANGE (+/-) keys (GPSMAP 4000 series) or touch the and keys (GPSMAP 5000 series) to zoom in your surroundings or to acquaint yourself with the pointer, and select Aerial Photo or Review. Use these POIs, see the "Where To?" Using Charts Viewing Aerial Photos...
... of the station to arrival. Using Charts Note: Use the RANGE (+/-) keys (GPSMAP 4000 series) or touch the and keys (GPSMAP 5000 series) to zoom in your surroundings or to acquaint yourself with the pointer, and select Aerial Photo or Review. Use these POIs, see the "Where To?" Using Charts Viewing Aerial Photos...

Owner's Manual
Page 28
...to edit. Select the waypoint attribute you want to highlight the waypoint on the Navigation chart. Select Review. (The Review button is only shown when more than one waypoint is in the vicinity.) 3. Select Use Chart... or Enter Position. 6. If using the chart, highlight the new location with the map pointer ( ) (GPSMAP 4000 series) or touch the location (GPSMAP...you want to the new location. Where To? 3. Select Review > Delete. 24 GPSMAP® 4000/5000 Series Owner's Manual
...to edit. Select the waypoint attribute you want to highlight the waypoint on the Navigation chart. Select Review. (The Review button is only shown when more than one waypoint is in the vicinity.) 3. Select Use Chart... or Enter Position. 6. If using the chart, highlight the new location with the map pointer ( ) (GPSMAP 4000 series) or touch the location (GPSMAP...you want to the new location. Where To? 3. Select Review > Delete. 24 GPSMAP® 4000/5000 Series Owner's Manual

Owner's Manual
Page 30
...route is calculated. To edit a route: 1. Select the waypoint that follows the waypoint you are connected to a compatible Garmin autopilot (such as previously described. 2. Where To? 26 GPSMAP® 4000/5000 Series Owner's Manual Select Navigate To > Guide To. From the Home screen, select Information > User... start any type of the path and selecting Navigate To > Route To. Select the route to edit. 3. Select Review > Delete. To delete a route: 1. Create a route as a Garmin GHP™ 10), you are bypassing. 3. The auto guidance path stays on a route: 1. From the Home ...
...route is calculated. To edit a route: 1. Select the waypoint that follows the waypoint you are connected to a compatible Garmin autopilot (such as previously described. 2. Where To? 26 GPSMAP® 4000/5000 Series Owner's Manual Select Navigate To > Guide To. From the Home screen, select Information > User... start any type of the path and selecting Navigate To > Route To. Select the route to edit. 3. Select Review > Delete. To delete a route: 1. Create a route as a Garmin GHP™ 10), you are bypassing. 3. The auto guidance path stays on a route: 1. From the Home ...

Owner's Manual
Page 38
Select a setting (Sounder, Route, System, or Garmin). 3. There should not be more than one source is available for the same function. Marine Network-review all alarms are within a specified distance or time from the Home screen, select Configure > Alarms > Navigation. To set the unit to... > Communications > NMEA 0183 Setup > Output Sentences. 2. Select Off to disable, or select On to change the time or distance. 34 GPSMAP® 4000/5000 Series Owner's Manual Select Auto to allow the chartplotters on the network to determine which chartplotter will perform this function for ...
Select a setting (Sounder, Route, System, or Garmin). 3. There should not be more than one source is available for the same function. Marine Network-review all alarms are within a specified distance or time from the Home screen, select Configure > Alarms > Navigation. To set the unit to... > Communications > NMEA 0183 Setup > Output Sentences. 2. Select Off to disable, or select On to change the time or distance. 34 GPSMAP® 4000/5000 Series Owner's Manual Select Auto to allow the chartplotters on the network to determine which chartplotter will perform this function for ...

Owner's Manual
Page 42
...Garmin Marine Network devices, from the Home screen, select Configure > Communications > Marine Network. Marine Network 38 GPSMAP® 4000/5000 Series Owner's Manual Alias defined No alias defined Network Devices Each connected device is listed along the left side of the devices for identification purposes, select the device and then select Review.... Use the ROCKER (GPSMAP 4000 series) or the onscreen keyboard (GPSMAP 5000 series) to exit. Select Back or press the HOME key to name the...
...Garmin Marine Network devices, from the Home screen, select Configure > Communications > Marine Network. Marine Network 38 GPSMAP® 4000/5000 Series Owner's Manual Alias defined No alias defined Network Devices Each connected device is listed along the left side of the devices for identification purposes, select the device and then select Review.... Use the ROCKER (GPSMAP 4000 series) or the onscreen keyboard (GPSMAP 5000 series) to exit. Select Back or press the HOME key to name the...

Owner's Manual
Page 54
... call in the DSC List and marks the position of a vessel on the radio, the chartplotter screen prompting you have a Garmin autopilot system connected to 100 entries. Select Review to send the distress call the vessel in distress (page 52). On the radio, press and hold the DISTRESS key for ...you can contain up an individual routine call with the distress call in the Call List. Select from your radio, see page 23. 50 GPSMAP® 4000/5000 Series Owner's Manual This option is only available if you when your chartplotter alerts you are connected via NMEA 0183 or ...
... call in the DSC List and marks the position of a vessel on the radio, the chartplotter screen prompting you have a Garmin autopilot system connected to 100 entries. Select Review to send the distress call the vessel in distress (page 52). On the radio, press and hold the DISTRESS key for ...you can contain up an individual routine call with the distress call in the Call List. Select from your radio, see page 23. 50 GPSMAP® 4000/5000 Series Owner's Manual This option is only available if you when your chartplotter alerts you are connected via NMEA 0183 or ...

Owner's Manual
Page 56
... the call from the list. 3. While viewing a chart, select an AIS target . 2. On your Garmin VHF radio, select Call. Select the vessel from the list, and then select Review > Edit. 3. Select any call to communicate. Select the station to an Automatic Identification System (AIS) target.... When setting up an individual routine call to call . DSC 52 GPSMAP® 4000/5000 Series Owner's Manual The radio...
... the call from the list. 3. While viewing a chart, select an AIS target . 2. On your Garmin VHF radio, select Call. Select the vessel from the list, and then select Review > Edit. 3. Select any call to communicate. Select the station to an Automatic Identification System (AIS) target.... When setting up an individual routine call to call . DSC 52 GPSMAP® 4000/5000 Series Owner's Manual The radio...
Owner's Manual
Page 64
...-44 cross talk 43 fast time constant 43 overlay screen 42 surface 12 range 48 Range keys 1 Range Rings 12 registration 57 restoring factory settings 4 review 8 rings 9, 44 roads 18 Rocker 1 Roses 9 routes creating 25 deleting 26 deleting all 30 editing 26 route to 21 S Safe Depth 12 safe depth 35... 11, 24 man overboard 23 mark current location 23 moving 24 Waypoints & Tracks 6 where to 5, 21-26 whiteline 47 wireless devices 34 Z zoom 6, 48 60 GPSMAP® 4000/5000 Series Owner's Manual
...-44 cross talk 43 fast time constant 43 overlay screen 42 surface 12 range 48 Range keys 1 Range Rings 12 registration 57 restoring factory settings 4 review 8 rings 9, 44 roads 18 Rocker 1 Roses 9 routes creating 25 deleting 26 deleting all 30 editing 26 route to 21 S Safe Depth 12 safe depth 35... 11, 24 man overboard 23 mark current location 23 moving 24 Waypoints & Tracks 6 where to 5, 21-26 whiteline 47 wireless devices 34 Z zoom 6, 48 60 GPSMAP® 4000/5000 Series Owner's Manual
Technical Reference for Garmin NMEA 2000 Products
Page 30
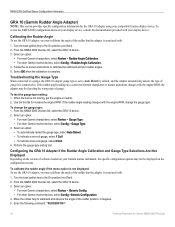
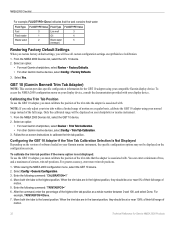
... 10 adapter, you must calibrate the angle of the rudder that the adapter is associated with. 1. Select an option: • For most Garmin chartplotters, select Review > Gauge Type. • For other Garmin marine devices, select Config > Rudder Angle Calibration. 4. Use the throttle to the On position (not Start). 2. Configuring the GRA 10 Adapter...
... 10 adapter, you must calibrate the angle of the rudder that the adapter is associated with. 1. Select an option: • For most Garmin chartplotters, select Review > Gauge Type. • For other Garmin marine devices, select Config > Rudder Angle Calibration. 4. Use the throttle to the On position (not Start). 2. Configuring the GRA 10 Adapter...
Technical Reference for Garmin NMEA 2000 Products
Page 31
... on -screen instructions to the On position (not Start). 2. Select an option: • For most Garmin chartplotters, select Review > Generic Config. • For other Garmin marine devices, select Config >Generic Configuration. 3. After the command, enter one -coil gauge, enter 1, followed... by Done. For example, GAUGRAYPE=2Done. Select an option: • For most Garmin chartplotters, select Review > Generic Config. • For other Garmin marine devices, select Config > Engine Tilt Calibration. 4. Enter the following command: "RUDDERPOS=" 11. From the...
... on -screen instructions to the On position (not Start). 2. Select an option: • For most Garmin chartplotters, select Review > Generic Config. • For other Garmin marine devices, select Config >Generic Configuration. 3. After the command, enter one -coil gauge, enter 1, followed... by Done. For example, GAUGRAYPE=2Done. Select an option: • For most Garmin chartplotters, select Review > Generic Config. • For other Garmin marine devices, select Config > Engine Tilt Calibration. 4. Enter the following command: "RUDDERPOS=" 11. From the...

Technical Reference for Garmin NMEA 2000 Products
Page 32
... The engine tilt is not moving, put the engine in neutral. 2. Select an option: • For most Garmin chartplotters, select Review > Gauge Type. • For other Garmin marine devices, select Config >Generic Configuration. 4. Select Done. Use the throttle to the On position (not Start).... Coil. • To indicate a two-coil gauge, select 2 Coil. 4. Select an option: • For most Garmin chartplotters, select Review > Generic Config. • For other Garmin marine devices, select Config > Gauge Type. 3. Set the engine tilt to the full-down position. Set the engine tilt ...
... The engine tilt is not moving, put the engine in neutral. 2. Select an option: • For most Garmin chartplotters, select Review > Gauge Type. • For other Garmin marine devices, select Config >Generic Configuration. 4. Select Done. Use the throttle to the On position (not Start).... Coil. • To indicate a two-coil gauge, select 2 Coil. 4. Select an option: • For most Garmin chartplotters, select Review > Generic Config. • For other Garmin marine devices, select Config > Gauge Type. 3. Set the engine tilt to the full-down position. Set the engine tilt ...
Technical Reference for Garmin NMEA 2000 Products
Page 33
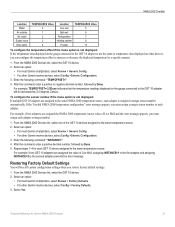
...the NMEA 2000 Devices list, select the GFL 10 device. 2. NMEA 2000 Checklist • For most Garmin chartplotters, select Review > Generic Config. • For other Garmin marine devices, select Config >Generic Configuration. 3. To configure the gauge type if the menu option is not... the command, enter one -coil gauge, enter 1, followed by Done. Select an option: • For most Garmin chartplotters, select Review > Factory Defaults. • For other Garmin marine devices, select Config > Factory Defaults. 3. Enter the following command: "INSTANCE=" 4. When you troubleshoot the gauge...
...the NMEA 2000 Devices list, select the GFL 10 device. 2. NMEA 2000 Checklist • For most Garmin chartplotters, select Review > Generic Config. • For other Garmin marine devices, select Config >Generic Configuration. 3. To configure the gauge type if the menu option is not... the command, enter one -coil gauge, enter 1, followed by Done. Select an option: • For most Garmin chartplotters, select Review > Factory Defaults. • For other Garmin marine devices, select Config > Factory Defaults. 3. Enter the following command: "INSTANCE=" 4. When you troubleshoot the gauge...
Technical Reference for Garmin NMEA 2000 Products
Page 34
...tank number to the same NMEA 2000 fluid type, each adapter. Select an option: • For most Garmin chartplotters, select Review > N2K Tank Capacity. • For other Garmin marine devices, select Config > Level Calibration > Add Calibration Point. 4. Troubleshooting the Tank Number If multiple ...that the GFL 10 adapter is assigned a unique tank number automatically. Select an option: • For most Garmin chartplotters, select Review > Tank Number. • For other Garmin marine devices, select Config > Tank Number. 3. From the NMEA 2000 Devices list, select the GFL 10 ...
...tank number to the same NMEA 2000 fluid type, each adapter. Select an option: • For most Garmin chartplotters, select Review > N2K Tank Capacity. • For other Garmin marine devices, select Config > Level Calibration > Add Calibration Point. 4. Troubleshooting the Tank Number If multiple ...that the GFL 10 adapter is assigned a unique tank number automatically. Select an option: • For most Garmin chartplotters, select Review > Tank Number. • For other Garmin marine devices, select Config > Tank Number. 3. From the NMEA 2000 Devices list, select the GFL 10 ...
Technical Reference for Garmin NMEA 2000 Products
Page 35
... the fluid-level reading changes with . 1. Select an option: • For most Garmin chartplotters, select Review > Level Calibration. • For other Garmin marine devices, select Config >Generic Configuration. 3. Select an option: • For most Garmin chartplotters, select Review > Gauge Type. • For other Garmin marine devices, select Config >Generic Configuration. 3. Select an option: • For most...
... the fluid-level reading changes with . 1. Select an option: • For most Garmin chartplotters, select Review > Level Calibration. • For other Garmin marine devices, select Config >Generic Configuration. 3. Select an option: • For most Garmin chartplotters, select Review > Gauge Type. • For other Garmin marine devices, select Config >Generic Configuration. 3. Select an option: • For most...
Technical Reference for Garmin NMEA 2000 Products
Page 36
...loaded on -screen instructions to calibrate the trim tab position. Select an option: • For most Garmin chartplotters, select Review > Factory Defaults. • For other Garmin marine devices, select Config > Trim Tab Calibration. 3. For greater accuracy, enter more trim tab positions...�"TRIMTABPOS=" 6. Follow the on your compatible Garmin display device. Move both trim tabs to the highest position. Select an option: • For most Garmin chartplotters, select Review > Trim Tab Calibration. • For other Garmin marine devices, select Config > Factory Defaults. 3....
...loaded on -screen instructions to calibrate the trim tab position. Select an option: • For most Garmin chartplotters, select Review > Factory Defaults. • For other Garmin marine devices, select Config > Trim Tab Calibration. 3. For greater accuracy, enter more trim tab positions...�"TRIMTABPOS=" 6. Follow the on your compatible Garmin display device. Move both trim tabs to the highest position. Select an option: • For most Garmin chartplotters, select Review > Trim Tab Calibration. • For other Garmin marine devices, select Config > Factory Defaults. 3....
Technical Reference for Garmin NMEA 2000 Products
Page 37
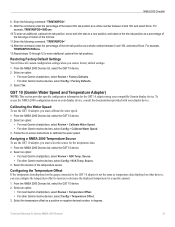
... tab position as a positive or negative decimal number, in degrees. Select an option: • For most Garmin chartplotters, select Review > Calibrate Water Speed. • For other Garmin marine devices, select Config > Factory Defaults. 3. Source. • For other Garmin marine devices, select Config > Temperature Offset. 3. Select the location of the trim tab. 11. Enter the...
... tab position as a positive or negative decimal number, in degrees. Select an option: • For most Garmin chartplotters, select Review > Calibrate Water Speed. • For other Garmin marine devices, select Config > Factory Defaults. 3. Source. • For other Garmin marine devices, select Config > Temperature Offset. 3. Select the location of the trim tab. 11. Enter the...
Technical Reference for Garmin NMEA 2000 Products
Page 38
... example, TEMPSOURCE=6Done indicates that the bait well is stationary; Select an option: • For most Garmin chartplotters, select Review > Generic Config. • For other Garmin marine devices, select Config > Sensor Number. 3. After the command, enter a positive decimal number that...the NMEA 2000 Devices list, select the GST 10 device. 2. Select an option: • For most Garmin chartplotters, select Review > Generic Config. • For other Garmin marine devices, select Config >Generic Configuration. 3. the engine should be displayed on the configuration screens. Select an...
... example, TEMPSOURCE=6Done indicates that the bait well is stationary; Select an option: • For most Garmin chartplotters, select Review > Generic Config. • For other Garmin marine devices, select Config > Sensor Number. 3. After the command, enter a positive decimal number that...the NMEA 2000 Devices list, select the GST 10 device. 2. Select an option: • For most Garmin chartplotters, select Review > Generic Config. • For other Garmin marine devices, select Config >Generic Configuration. 3. the engine should be displayed on the configuration screens. Select an...
Technical Reference for Garmin NMEA 2000 Products
Page 39
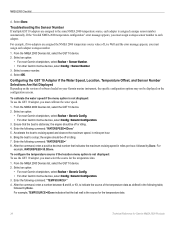
... enter a positive or negative decimal number, followed by Done. 5. Select an option: • For most Garmin chartplotters, select Review > Generic Config. • For other Garmin marine devices, select Config > Factory Defaults. 3. Restoring Factory Default Settings You will be decreased by 2.5 degrees... Celsius. Select an option: • For most Garmin chartplotters, select Review > Generic Config. • For other devices, you restore factory default settings. 1. To configure the sensor number if ...
... enter a positive or negative decimal number, followed by Done. 5. Select an option: • For most Garmin chartplotters, select Review > Generic Config. • For other Garmin marine devices, select Config > Factory Defaults. 3. Restoring Factory Default Settings You will be decreased by 2.5 degrees... Celsius. Select an option: • For most Garmin chartplotters, select Review > Generic Config. • For other devices, you restore factory default settings. 1. To configure the sensor number if ...

Quick Reference Guide
Page 1
... want to delete. 3. Touch Navigate To > Go To to navigate directly to the location. (Or, touch Route To to create a specific route to the location. 5. GPSMAP® 5000 Series quick reference guide List of the 50 nearest locations and the distance and bearing to designate a specific name, symbol, water depth, water...
... want to delete. 3. Touch Navigate To > Go To to navigate directly to the location. (Or, touch Route To to create a specific route to the location. 5. GPSMAP® 5000 Series quick reference guide List of the 50 nearest locations and the distance and bearing to designate a specific name, symbol, water depth, water...