Installation Instructions
Page 2
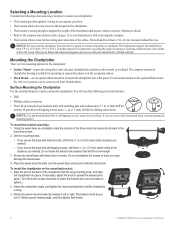
...GPSMAP 400/500 Series Installation Instructions Surface-Mounting the Chartplotter Use the included bracket to temperatures exceeding this range (in . (1.5 mm) drill bit for the chartplotter: • Surface Mount-mount the chartplotter onto a bracket (included) that secure the bracket to extreme temperature or conditions. To mount the bracket assembly: 1. Place the swivel mount bracket... bolts; To install the chartplotter on the optional flush mount kit, visit www.garmin.com or contact your local Garmin dealer. The bracket clicks as you operate your boat. • The ...
...GPSMAP 400/500 Series Installation Instructions Surface-Mounting the Chartplotter Use the included bracket to temperatures exceeding this range (in . (1.5 mm) drill bit for the chartplotter: • Surface Mount-mount the chartplotter onto a bracket (included) that secure the bracket to extreme temperature or conditions. To mount the bracket assembly: 1. Place the swivel mount bracket... bolts; To install the chartplotter on the optional flush mount kit, visit www.garmin.com or contact your local Garmin dealer. The bracket clicks as you operate your boat. • The ...
Installation Instructions
Page 4
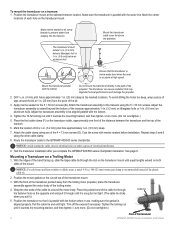
...through the fastener hole on the opposite end and pull it touches the mounting bracket, and then tighten 1/4 turn more . (Do not overtighten.) 5. Position the mount gasket on the curved top of each hole on the transducer mount until tight. Notice: Avoid routing the cable close to extend beyond the... instead of the propeller. Tighten the 10-32 locking nut until it .) 5. Wrap the two ends of the bit. 3. Apply marine sealant to the GPSMAP 400/500 series chartplotter. Drill a 1/8 in. (3.2 mm) pilot hole approximately 3/8 in . (25 mm) from the point of the cable tie around...
...through the fastener hole on the opposite end and pull it touches the mounting bracket, and then tighten 1/4 turn more . (Do not overtighten.) 5. Position the mount gasket on the curved top of each hole on the transducer mount until tight. Notice: Avoid routing the cable close to extend beyond the... instead of the propeller. Tighten the 10-32 locking nut until it .) 5. Wrap the two ends of the bit. 3. Apply marine sealant to the GPSMAP 400/500 series chartplotter. Drill a 1/8 in. (3.2 mm) pilot hole approximately 3/8 in . (25 mm) from the point of the cable tie around...
Flush Mount Kit Instructions (Multilingual)
Page 1
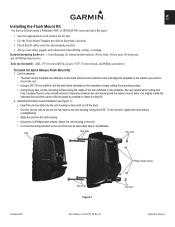
...mount brackets, (4) hex bolts, (4) hex nuts, (4) wing nuts, and (4) Phillips head screws. Remove the protective liner and apply the template to the location you want to mount the unit. • Using a 3/8" (10 mm) drill bit, drill the pilot holes indicated on the template to begin cutting the mounting ...32" (7 mm) wrench, and Phillips screwdriver. Cut the opening: • The flush mount template has adhesive on the back. Be very careful when cutting this kit to flush mount a Fishfinder 400C or GPSMAP 400 series unit into a flat panel. • Select an appropriately sized location for the...
...mount brackets, (4) hex bolts, (4) hex nuts, (4) wing nuts, and (4) Phillips head screws. Remove the protective liner and apply the template to the location you want to mount the unit. • Using a 3/8" (10 mm) drill bit, drill the pilot holes indicated on the template to begin cutting the mounting ...32" (7 mm) wrench, and Phillips screwdriver. Cut the opening: • The flush mount template has adhesive on the back. Be very careful when cutting this kit to flush mount a Fishfinder 400C or GPSMAP 400 series unit into a flat panel. • Select an appropriately sized location for the...
Flush Mount Kit Instructions (Multilingual)
Page 2
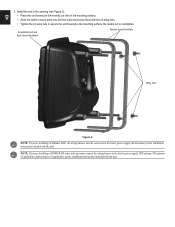
... unit in the opening (see Figure 2): • Place the unit housing in the recently cut hole in the mounting surface. • Slide the tension mount arms onto the hex bolts and secure them with the unit. NOTE: If you must be connected to the boat... and transducer (if applicable) per the installation instructions included with the unit. EN 3. Assembled unit and flush mount hardware Tension mount brackets Wing nuts Figure 2 NOTE: If you are installing a GPSMAP 400 series unit, you are installing a Fishfinder 400C, the wiring harness must connect the wiring harness to overtighten...
... unit in the opening (see Figure 2): • Place the unit housing in the recently cut hole in the mounting surface. • Slide the tension mount arms onto the hex bolts and secure them with the unit. NOTE: If you must be connected to the boat... and transducer (if applicable) per the installation instructions included with the unit. EN 3. Assembled unit and flush mount hardware Tension mount brackets Wing nuts Figure 2 NOTE: If you are installing a GPSMAP 400 series unit, you are installing a Fishfinder 400C, the wiring harness must connect the wiring harness to overtighten...


