Owner's Manual
Page 36
...chartplotter, select Information > User Data > Data Transfer > Card > Replace From Card. From the Home screen, select Information > DSC List. 32 GPSMAP 4000 Series Owner's Manual From the Home screen, select Information > User Data > Data Transfer > Network. 3. Insert an SD card into the SD...> User Data > Data Transfer > Card > Save to or from a network: 1. Unique data will be connected to a Garmin Marine Network using the Rocker or Numeric Keypad (GPSMAP 4210 or 4212 only), and select Done. 4. Copy a backup file from a boat. Viewing the DSC List Note: Your chartplotter must...
...chartplotter, select Information > User Data > Data Transfer > Card > Replace From Card. From the Home screen, select Information > DSC List. 32 GPSMAP 4000 Series Owner's Manual From the Home screen, select Information > User Data > Data Transfer > Network. 3. Insert an SD card into the SD...> User Data > Data Transfer > Card > Save to or from a network: 1. Unique data will be connected to a Garmin Marine Network using the Rocker or Numeric Keypad (GPSMAP 4210 or 4212 only), and select Done. 4. Copy a backup file from a boat. Viewing the DSC List Note: Your chartplotter must...
Owner's Manual
Page 39
...the Home screen, select Configure > System. The event log displays a list of networked devices (page 42), and display the event log. a Garmin Product Support representative may ask you transition to adjust the colors. • Screenshot Capture-turn in a route that you to Card option is ...the screenshot capture feature on ) or by installers. When On is selected, the chartplotter automatically will be named Demo.) Auto Power Up (GPSMAP 4210 only)-turn Auto Power Up On or Off. Select the language. Configuring the Device Use the Configure screen to retrieve data about the ...
...the Home screen, select Configure > System. The event log displays a list of networked devices (page 42), and display the event log. a Garmin Product Support representative may ask you transition to adjust the colors. • Screenshot Capture-turn in a route that you to Card option is ...the screenshot capture feature on ) or by installers. When On is selected, the chartplotter automatically will be named Demo.) Auto Power Up (GPSMAP 4210 only)-turn Auto Power Up On or Off. Select the language. Configuring the Device Use the Configure screen to retrieve data about the ...
Owner's Manual
Page 42
... alarm category. 3. Clock-sets an alarm using the Garmin Marine Network to turn or destination waypoint. • Type-select whether arrival alarms sound only when nearing destinations, or when nearing turns and destinations. Use the Rocker or Numeric Keypad (GPSMAP 4210 or 4212 only) to sound when you are within ...alarm to change the time or distance. Select an alarm. 4. If you exceed a specified drift distance. Use the Rocker or Numeric Keypad (GPSMAP 4210 or 4212 only) to sound when the depth is less than the specified value. Deep Water-set an alarm: 1.
... alarm category. 3. Clock-sets an alarm using the Garmin Marine Network to turn or destination waypoint. • Type-select whether arrival alarms sound only when nearing destinations, or when nearing turns and destinations. Use the Rocker or Numeric Keypad (GPSMAP 4210 or 4212 only) to sound when you are within ...alarm to change the time or distance. Select an alarm. 4. If you exceed a specified drift distance. Use the Rocker or Numeric Keypad (GPSMAP 4210 or 4212 only) to sound when the depth is less than the specified value. Deep Water-set an alarm: 1.

Owner's Manual
Page 47
Name assigned No name assigned To assign an alias or a name to name the device. 5. From the Home screen, select Configure > Communications > Marine Network. 2. Use the Rocker or Numeric Keypad (GPSMAP 4210 or 4212 only) to a Garmin Marine Network device: 1. Select Review. 4. Select the device. 3. Select Done. Marine Network GPSMAP 4000 Series Owner's Manual 43 Each connected device is listed along the left side of the screen. Marine Network Viewing Connected Garmin Marine Network Devices From the Home screen, select Configure > Communications > Marine Network.
Name assigned No name assigned To assign an alias or a name to name the device. 5. From the Home screen, select Configure > Communications > Marine Network. 2. Use the Rocker or Numeric Keypad (GPSMAP 4210 or 4212 only) to a Garmin Marine Network device: 1. Select Review. 4. Select the device. 3. Select Done. Marine Network GPSMAP 4000 Series Owner's Manual 43 Each connected device is listed along the left side of the screen. Marine Network Viewing Connected Garmin Marine Network Devices From the Home screen, select Configure > Communications > Marine Network.
Owner's Manual
Page 58
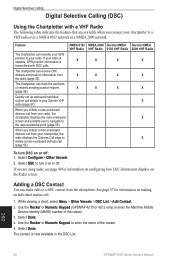
... position reports (page 56). When you to navigate to enter the name of the vessel. 3. Select Configure > Other Vessels. 2. Select DSC to your Garmin VHF radio (page 57). See page 57 for information on configuring how DSC information displays on or off : 1. While viewing a chart, select Menu >... send individual routine call details to turn DSC on making an individual routine call (page 55). Use the Rocker or Numeric Keypad (GPSMAP 4210 or 4212 only) to your GPS position to enter the Maritime Mobile Service Identity (MMSI) number of the vessel. 5. Select Done. 4. DSC...
... position reports (page 56). When you to navigate to enter the name of the vessel. 3. Select Configure > Other Vessels. 2. Select DSC to your Garmin VHF radio (page 57). See page 57 for information on configuring how DSC information displays on or off : 1. While viewing a chart, select Menu >... send individual routine call details to turn DSC on making an individual routine call (page 55). Use the Rocker or Numeric Keypad (GPSMAP 4210 or 4212 only) to your GPS position to enter the Maritime Mobile Service Identity (MMSI) number of the vessel. 5. Select Done. 4. DSC...
Installation Instructions
Page 4
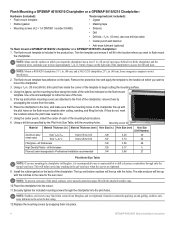
... holes on the chartplotter line up with the attached weather caps. 10.Place the chartplotter into the pilot holes. Garmin recommends applying an anti-galling, stainless antiseize lubricant to begin cutting the mounting surface. 4. Trim the template and ...table • Center punch and hammer • Anti-sieze lubricant (optional) To flush mount a GPSMAP 4010/4012 chartplotter or a GPSMAP 5015/5215 chartplotter: 1. Flush Mounting a GPSMAP 4010/4210 Chartplotter or a GPSMAP 5015/5215 Chartplotter: Hardware (included): • Flush-mount template Tools required (not included): •...
... holes on the chartplotter line up with the attached weather caps. 10.Place the chartplotter into the pilot holes. Garmin recommends applying an anti-galling, stainless antiseize lubricant to begin cutting the mounting surface. 4. Trim the template and ...table • Center punch and hammer • Anti-sieze lubricant (optional) To flush mount a GPSMAP 4010/4012 chartplotter or a GPSMAP 5015/5215 chartplotter: 1. Flush Mounting a GPSMAP 4010/4210 Chartplotter or a GPSMAP 5015/5215 Chartplotter: Hardware (included): • Flush-mount template Tools required (not included): •...

Installation Instructions
Page 18
...Black (gnd) + Battery - 10-35 Vdc Horn NMEA 0183 Cable Yellow (alarm) Wiring to 100 mA. Garmin GPSMAP 4000/5000 series chartplotter Power cable NMEA 0183 Cable Wire see table for the GPSMAP 4000/5000 chartplotter to function. The maximum current is 100 mA, and a relay is needed to limit the... an alert when the chartplotter displays a message. Relay 100 ma max coil current Lamp Wiring to a DB-9 PC Serial Connector The GPSMAP 4008/4208/4010/4210/4012/4212/5008/5208/5012/5212 chartplotters can be used with a serial port by wiring the chartplotter to a DB-9 serial connector. ...
...Black (gnd) + Battery - 10-35 Vdc Horn NMEA 0183 Cable Yellow (alarm) Wiring to 100 mA. Garmin GPSMAP 4000/5000 series chartplotter Power cable NMEA 0183 Cable Wire see table for the GPSMAP 4000/5000 chartplotter to function. The maximum current is 100 mA, and a relay is needed to limit the... an alert when the chartplotter displays a message. Relay 100 ma max coil current Lamp Wiring to a DB-9 PC Serial Connector The GPSMAP 4008/4208/4010/4210/4012/4212/5008/5208/5012/5212 chartplotters can be used with a serial port by wiring the chartplotter to a DB-9 serial connector. ...

Installation Instructions
Page 19
...manual for remote viewing of NTSC (National Television System Committee)/PAL (Phase Alternate Line) composite video sources, and PC monitor output (4008/4208/4010/4210/5008/5208 = VGA output, 4012/4212/5012/5212/5015/5215 = XGA output). The video output from video device attaches to the Video 1 ..., H-sync HD-15 Pin 14 12 VGA, V-sync HD-15 Pin shell 9 VGA, overall shield GPSMAP 4000/5000 Series Installation Instructions 19 Marine Video inputs are attached and will not transmit over the Garmin Marine Network. ➊ and ➋ VIDEO 1 and VIDEO 2 Inputs (RCA connectors) allow input ...
...manual for remote viewing of NTSC (National Television System Committee)/PAL (Phase Alternate Line) composite video sources, and PC monitor output (4008/4208/4010/4210/5008/5208 = VGA output, 4012/4212/5012/5212/5015/5215 = XGA output). The video output from video device attaches to the Video 1 ..., H-sync HD-15 Pin 14 12 VGA, V-sync HD-15 Pin shell 9 VGA, overall shield GPSMAP 4000/5000 Series Installation Instructions 19 Marine Video inputs are attached and will not transmit over the Garmin Marine Network. ➊ and ➋ VIDEO 1 and VIDEO 2 Inputs (RCA connectors) allow input ...

Quick Reference Guide
Page 2
.... Nav Chart or 2. Tips and Shortcuts • Press HOME from any screen to return to adjust the backlight and color mode. Garmin®, the Gamin logo, GPSMAP®, BlueChart®, and g2 Vision® are connected, a prompt asks if you want to delete. E Printed in the product... the number of combination screens. • Select Layout to change screen combinations: 1. If one of using the Rocker. Numeric Keypad (4010/4210/4012/4212 only)-enter numbers and letters into fields instead of the following actions to toggle the data bar on , press and release the ...
.... Nav Chart or 2. Tips and Shortcuts • Press HOME from any screen to return to adjust the backlight and color mode. Garmin®, the Gamin logo, GPSMAP®, BlueChart®, and g2 Vision® are connected, a prompt asks if you want to delete. E Printed in the product... the number of combination screens. • Select Layout to change screen combinations: 1. If one of using the Rocker. Numeric Keypad (4010/4210/4012/4212 only)-enter numbers and letters into fields instead of the following actions to toggle the data bar on , press and release the ...


