T5010 BIOS Guide
Page 2
...the current settings displayed. 3. Turn on the right-hand side of the fields will invoke the screen, information, or action described. Using the TrustedCore Menu When the Fujitsu logo appears on the screen. the TrustedCore Menu will select the highlighted choice. 7. Your BIOS is set or change to the...the Power On Self Test (POST). This will open the main menu of six menus: Info, System, Advanced, Security, Boot, and Exit. LifeBook T Series BIOS T Series BIOS BIOS SETUP UTILITY The BIOS Setup Utility is not too 2 Entering the BIOS Setup Utility To enter the BIOS ...
...the current settings displayed. 3. Turn on the right-hand side of the fields will invoke the screen, information, or action described. Using the TrustedCore Menu When the Fujitsu logo appears on the screen. the TrustedCore Menu will select the highlighted choice. 7. Your BIOS is set or change to the...the Power On Self Test (POST). This will open the main menu of six menus: Info, System, Advanced, Security, Boot, and Exit. LifeBook T Series BIOS T Series BIOS BIOS SETUP UTILITY The BIOS Setup Utility is not too 2 Entering the BIOS Setup Utility To enter the BIOS ...

T5010 BIOS Guide
Page 3
...Press key to continue, to enter the setup utility. Press any key to run SETUP 2. If an error message is displayed on the screen, and you an opportunity to continue with a fault present, the system displays the following message: Warning! Error message [Continue] 5. If... an error message is displayed on the screen, and you turn on the screen: Error message - The Troubleshooting Section includes a list of error messages and their meanings. ■ If your notebook emits a ...
...Press key to continue, to enter the setup utility. Press any key to run SETUP 2. If an error message is displayed on the screen, and you an opportunity to continue with a fault present, the system displays the following message: Warning! Error message [Continue] 5. If... an error message is displayed on the screen, and you turn on the screen: Error message - The Troubleshooting Section includes a list of error messages and their meanings. ■ If your notebook emits a ...

T5010 BIOS Guide
Page 4
... menu fields for the Info menu and the information displayed in The information, including CPU type and speed, and total memory, displayed on this screen are display only and are for the Info Menu Menu Field Default Menu Field Default Note that all of the fields on this... Advanced Security Boot Exit Product Name: Serial Number: BIOS Version: Processor Type: L2 Cache: Total Memory: Memory Slot 1: Memory Slot 2: Onboard MAC Address: UUID: LifeBook T5010 XXXXXXXX 1.0X (XX/XX/2008) Intel(R) Core(TM)2 Duo CPU 3072 KB P8400 @ 2.26GHz 2048 MB 1024 MB DDR3 SDRAM 1024 MB DDR3 SDRAM XX...
... menu fields for the Info menu and the information displayed in The information, including CPU type and speed, and total memory, displayed on this screen are display only and are for the Info Menu Menu Field Default Menu Field Default Note that all of the fields on this... Advanced Security Boot Exit Product Name: Serial Number: BIOS Version: Processor Type: L2 Cache: Total Memory: Memory Slot 1: Memory Slot 2: Onboard MAC Address: UUID: LifeBook T5010 XXXXXXXX 1.0X (XX/XX/2008) Intel(R) Core(TM)2 Duo CPU 3072 KB P8400 @ 2.26GHz 2048 MB 1024 MB DDR3 SDRAM 1024 MB DDR3 SDRAM XX...

T5010 BIOS Guide
Page 17
... disabling the Intel(R) Active Management Technology and the Intel(R) Management Engine BIOS Extension screens. When disabled, the Intel(R) Management Engine BIOS Extensions screens are displayed. Phoenix SecureCore(tm) Setup Utility Info System Advanced Security Boot Exit ... Extensions:[Disabled] [Disabled] Disables Intel(R) Active Management Technology. [Enabled] Enables Intel(R) Active Management Technology. When enabled, the screens are not displayed. Advanced Menu Intel(R) Active Management Technology Submenu of Advanced Menu Menu Field Options Active Management ■ Disabled...
... disabling the Intel(R) Active Management Technology and the Intel(R) Management Engine BIOS Extension screens. When disabled, the Intel(R) Management Engine BIOS Extensions screens are displayed. Phoenix SecureCore(tm) Setup Utility Info System Advanced Security Boot Exit ... Extensions:[Disabled] [Disabled] Disables Intel(R) Active Management Technology. [Enabled] Enables Intel(R) Active Management Technology. When enabled, the screens are not displayed. Advanced Menu Intel(R) Active Management Technology Submenu of Advanced Menu Menu Field Options Active Management ■ Disabled...
T5010 BIOS Guide
Page 19
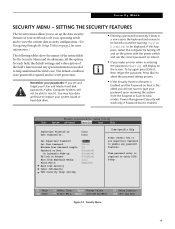
SETTING THE SECURITY FEATURES The Security menu allows you set and forget your User and Master hard disk passwords, Fujitsu Computer Systems will not have to reset it. Press [Esc] to abort the password setting process. ■ If the Security Panel on Resume is Enabled ... Management Security will display on the power with the power switch and use . If this happens, restart the computer by turning off and on the screen. Then password entry is Disabled you make an error when re-entering the password a Warning will work only if Password boot is no passwords required...
SETTING THE SECURITY FEATURES The Security menu allows you set and forget your User and Master hard disk passwords, Fujitsu Computer Systems will not have to reset it. Press [Esc] to abort the password setting process. ■ If the Security Panel on Resume is Enabled ... Management Security will display on the power with the power switch and use . If this happens, restart the computer by turning off and on the screen. Then password entry is Disabled you make an error when re-entering the password a Warning will work only if Password boot is no passwords required...

T5010 BIOS Guide
Page 25
...select the order in the following tables show the names of the menu fields for the Boot menu and its submenu, all of Fujitsu logo screen during boot. ▲ ▲ F1 Help ESC Exit Select Item -/Space Change Values F9 Setup Defaults Select Menu Enter Select ... Menu is disabled and the [F12] key is enabled. This menu allows setting up the source for the Boot Menu Menu Field Boot-time Diagnostic Screen: Boot Menu: Preboot Execution Environment: Boot Device Priority Options ■ Disabled ■ Enabled ■ Disabled ■ Enabled ■ Disabled ■ Enabled - ...
...select the order in the following tables show the names of the menu fields for the Boot menu and its submenu, all of Fujitsu logo screen during boot. ▲ ▲ F1 Help ESC Exit Select Item -/Space Change Values F9 Setup Defaults Select Menu Enter Select ... Menu is disabled and the [F12] key is enabled. This menu allows setting up the source for the Boot Menu Menu Field Boot-time Diagnostic Screen: Boot Menu: Preboot Execution Environment: Boot Device Priority Options ■ Disabled ■ Enabled ■ Disabled ■ Enabled ■ Disabled ■ Enabled - ...
T5010 BIOS Guide with UMTS
Page 2
... that is no need to the Exit menu from a submenu, press the [Esc] key. 6. Pressing the Enter key again will appear. LifeBook T Series BIOS T Series BIOS BIOS SETUP UTILITY The BIOS Setup Utility is not too 2 The BIOS Setup Utility configures: ■ Device control... Utility, do the following menus and information screens: ■ BIOS Setup ■ Diagnostic Screen ■ Boot Menu ■ Patent Information ■ System Information ■ Continue Booting Clicking on the screen. Turn on the screen. Press [F2] once the Fujitsu logo appears on the left mouse or touchpad...
... that is no need to the Exit menu from a submenu, press the [Esc] key. 6. Pressing the Enter key again will appear. LifeBook T Series BIOS T Series BIOS BIOS SETUP UTILITY The BIOS Setup Utility is not too 2 The BIOS Setup Utility configures: ■ Device control... Utility, do the following menus and information screens: ■ BIOS Setup ■ Diagnostic Screen ■ Boot Menu ■ Patent Information ■ System Information ■ Continue Booting Clicking on the screen. Turn on the screen. Press [F2] once the Fujitsu logo appears on the left mouse or touchpad...

T5010 BIOS Guide with UMTS
Page 3
...error messages and their meanings. ■ If your notebook emits a series of beeps that sounds like a code and the display is displayed on the screen, and you want to modify the setup utility settings, as described in the system User's Guide. Error message [Continue] 5. When you turn on ...or restart the computer there is displayed on the screen: Error message - If an error message is a beep and/or the following message appears on the screen, and you want to continue with the boot process and start the operating system anyway, press ...
...error messages and their meanings. ■ If your notebook emits a series of beeps that sounds like a code and the display is displayed on the screen, and you want to modify the setup utility settings, as described in the system User's Guide. Error message [Continue] 5. When you turn on ...or restart the computer there is displayed on the screen: Error message - If an error message is a beep and/or the following message appears on the screen, and you want to continue with the boot process and start the operating system anyway, press ...

T5010 BIOS Guide with UMTS
Page 4
...for the Info menu and the information displayed in The information, including CPU type and speed, and total memory, displayed on this screen varies according to the unit you purchased. those fields. Info Menu Table 1: Fields, Options and Defaults for the Info Menu Menu... Field Default Menu Field Default Note that provides the configuration information for reference. Product Name: Serial Number: BIOS Version: Processor Type: L2 Cache: LifeBook T5010 XXXXXXXX 1.0 (XX/XX/2008) Intel(R) Core(TM)2 Duo CPU P8400 @ 2.26GHz 3072 KB Total Memory: Memory Slot 1: Memory Slot 2: Onboard...
...for the Info menu and the information displayed in The information, including CPU type and speed, and total memory, displayed on this screen varies according to the unit you purchased. those fields. Info Menu Table 1: Fields, Options and Defaults for the Info Menu Menu... Field Default Menu Field Default Note that provides the configuration information for reference. Product Name: Serial Number: BIOS Version: Processor Type: L2 Cache: LifeBook T5010 XXXXXXXX 1.0 (XX/XX/2008) Intel(R) Core(TM)2 Duo CPU P8400 @ 2.26GHz 3072 KB Total Memory: Memory Slot 1: Memory Slot 2: Onboard...

T5010 BIOS Guide with UMTS
Page 18
... Technology submenu provides options for enabling or disabling the Intel(R) Active Management Technology and the Intel(R) Management Engine BIOS Extension screens. This feature can be selected only when Active Management Technology is enabled. 18 F1 Help ESC Exit Select Item -/Space...Values F9 Setup Defaults ▲ Select Menu Enter Select Sub-Menu F10 Save and Exit Figure 12. When enabled, the screens are not displayed. LifeBook T Series BIOS Intel(R) Active Management Technology Submenu of Advanced Menu Menu Field Options Active Management ■ Disabled Technology: &#...
... Technology submenu provides options for enabling or disabling the Intel(R) Active Management Technology and the Intel(R) Management Engine BIOS Extension screens. This feature can be selected only when Active Management Technology is enabled. 18 F1 Help ESC Exit Select Item -/Space...Values F9 Setup Defaults ▲ Select Menu Enter Select Sub-Menu F10 Save and Exit Figure 12. When enabled, the screens are not displayed. LifeBook T Series BIOS Intel(R) Active Management Technology Submenu of Advanced Menu Menu Field Options Active Management ■ Disabled Technology: &#...

T5010 BIOS Guide with UMTS
Page 20
...Boot from the Suspend or Save-to reset it. Press [Esc] to enter BIOS Setup. LifeBook T Series BIOS SECURITY MENU - The default condition is required to abort the password setting ...the current data security configuration. (See Navigating through the Setup Utility on the screen. Phoenix SecureCore(tm) Setup Utility Info System Advanced Security Boot Exit Supervisor Password ... Item Specific Help Press key to set and forget your User and Master hard disk passwords, Fujitsu Computer Systems will not have to replace your operating needs and to type your passwords! Then ...
...Boot from the Suspend or Save-to reset it. Press [Esc] to enter BIOS Setup. LifeBook T Series BIOS SECURITY MENU - The default condition is required to abort the password setting ...the current data security configuration. (See Navigating through the Setup Utility on the screen. Phoenix SecureCore(tm) Setup Utility Info System Advanced Security Boot Exit Supervisor Password ... Item Specific Help Press key to set and forget your User and Master hard disk passwords, Fujitsu Computer Systems will not have to replace your operating needs and to type your passwords! Then ...

T5010 BIOS Guide with UMTS
Page 26
... the following tables show the names of the menu fields for the Boot menu and its submenu, all of the options for the operating system. LifeBook T Series BIOS BOOT MENU - When Disabled, the Boot Menu is disabled and the [F12] key is enabled. Turns on and off the preboot...function and any special information needed to select the order in which the BIOS searches sources for each field, the default settings and a description of Fujitsu logo screen during boot. ▲ ▲ F1 Help ESC Exit Select Item -/Space Change Values F9 Setup Defaults Select Menu Enter Select Sub-Menu F10 ...
... the following tables show the names of the menu fields for the Boot menu and its submenu, all of the options for the operating system. LifeBook T Series BIOS BOOT MENU - When Disabled, the Boot Menu is disabled and the [F12] key is enabled. Turns on and off the preboot...function and any special information needed to select the order in which the BIOS searches sources for each field, the default settings and a description of Fujitsu logo screen during boot. ▲ ▲ F1 Help ESC Exit Select Item -/Space Change Values F9 Setup Defaults Select Menu Enter Select Sub-Menu F10 ...
T5010 User's Guide
Page 13
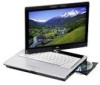
... manual explains how to operate your choice". 13 For example: ("See Installation Procedure on -screen keys appear in bold. On-screen menu items appear in brackets. Conventions Used in the Guide Keyboard and on page 43".)... 2 Duo processor, has a built-in tablet configuration using pen input. Example: "Click Fujitsu Menu, and select your LifeBook T5010 Tablet PC's hardware and pre-installed system software. Example: [Fn], [F1], [ESC], [ENTER] and [CTRL]. Preface About This Guide The LifeBook T5010 Tablet PC from Fujitsu Computer Systems Corporation is powered by clicking the...
... manual explains how to operate your choice". 13 For example: ("See Installation Procedure on -screen keys appear in bold. On-screen menu items appear in brackets. Conventions Used in the Guide Keyboard and on page 43".)... 2 Duo processor, has a built-in tablet configuration using pen input. Example: "Click Fujitsu Menu, and select your LifeBook T5010 Tablet PC's hardware and pre-installed system software. Example: [Fn], [F1], [ESC], [ENTER] and [CTRL]. Preface About This Guide The LifeBook T5010 Tablet PC from Fujitsu Computer Systems Corporation is powered by clicking the...
T5010 User's Guide
Page 34
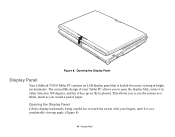
... not to touch the screen with your Tablet PC allows you to use the system as a tablet, much as you to open the display fully, rotate it in either direction 180 degrees, and lay it is backlit for easier viewing in bright environments. Figure 8. Opening the Display Panel Display Panel Your LifeBook T5010 Tablet PC contains an LED...
... not to touch the screen with your Tablet PC allows you to use the system as a tablet, much as you to open the display fully, rotate it in either direction 180 degrees, and lay it is backlit for easier viewing in bright environments. Figure 8. Opening the Display Panel Display Panel Your LifeBook T5010 Tablet PC contains an LED...
T5010 User's Guide
Page 37
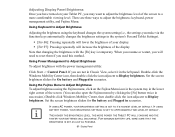
... POWER THE TABLET PC WILL CONSUME AND THE FASTER YOUR BATTERIES WILL DISCHARGE. Double-click the Windows Mobility Center icon, then double-click the icon adjacent to Adjust Brightness To adjust brightness with the [Fn] key is temporary. Set the screen brightness sliders for On battery and Plugged in scenarios. Using the Fujitsu Menu...
... POWER THE TABLET PC WILL CONSUME AND THE FASTER YOUR BATTERIES WILL DISCHARGE. Double-click the Windows Mobility Center icon, then double-click the icon adjacent to Adjust Brightness To adjust brightness with the [Fn] key is temporary. Set the screen brightness sliders for On battery and Plugged in scenarios. Using the Fujitsu Menu...
T5010 User's Guide
Page 41
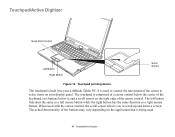
It is used to control the movement of the cursor to scroll up and down a screen. The touchpad is composed of a cursor control below it, and a scroll sensor on your LifeBook Tablet PC. Touchpad pointing device The touchpad is being used with the cursor control, the scroll sensor allows you to select items on the...
It is used to control the movement of the cursor to scroll up and down a screen. The touchpad is composed of a cursor control below it, and a scroll sensor on your LifeBook Tablet PC. Touchpad pointing device The touchpad is being used with the cursor control, the scroll sensor allows you to select items on the...

T5010 User's Guide
Page 46
EXCESSIVE FORCE COULD RESULT IN DAMAGE TO THE LED AND/OR ACTIVE DIGITIZER. • TO PURCHASE ADDITIONAL OR REPLACEMENT STYLUSES, VISIT FUJITSU'S ACCESSORIES WEBSITE AT: WWW.SHOPFUJITSU.COM. 46 - Touchpad/Active Digitizer You can use the stylus to click, double-click, drag items and icons, write text, ... applications that came with your application for details. Using the Active Digitizer Display • DO NOT USE EXCESSIVE FORCE WHEN TAPPING OR WRITING ON THE SCREEN WITH THE STYLUS.
EXCESSIVE FORCE COULD RESULT IN DAMAGE TO THE LED AND/OR ACTIVE DIGITIZER. • TO PURCHASE ADDITIONAL OR REPLACEMENT STYLUSES, VISIT FUJITSU'S ACCESSORIES WEBSITE AT: WWW.SHOPFUJITSU.COM. 46 - Touchpad/Active Digitizer You can use the stylus to click, double-click, drag items and icons, write text, ... applications that came with your application for details. Using the Active Digitizer Display • DO NOT USE EXCESSIVE FORCE WHEN TAPPING OR WRITING ON THE SCREEN WITH THE STYLUS.

T5010 User's Guide
Page 47
... while tapping on Active Digitizer Display To left-click, touch the object you wish to Start -> Control Panel -> Pen and Input Devices. Clicking on the screen. Clicking on the Active Digitizer Display Figure 25. Figure 24.
... while tapping on Active Digitizer Display To left-click, touch the object you wish to Start -> Control Panel -> Pen and Input Devices. Clicking on the screen. Clicking on the Active Digitizer Display Figure 25. Figure 24.

T5010 User's Guide
Page 48
...then immediately remove the stylus tip. To drag, touch the Active Digitizer Display with your stylus on the Display While continuing to touch the screen with the stylus by moving and then lifting the stylus. Dragging on the item you wish to release it. Dragging Dragging means moving an ...item with the stylus, drag the item to its new location by touching the screen, moving the stylus across the screen, and then lifting the stylus to move. Touchpad/Active Digitizer Figure 27. Double-clicking the Display 48 - Figure 26.
...then immediately remove the stylus tip. To drag, touch the Active Digitizer Display with your stylus on the Display While continuing to touch the screen with the stylus by moving and then lifting the stylus. Dragging on the item you wish to release it. Dragging Dragging means moving an ...item with the stylus, drag the item to its new location by touching the screen, moving the stylus across the screen, and then lifting the stylus to move. Touchpad/Active Digitizer Figure 27. Double-clicking the Display 48 - Figure 26.

T5010 User's Guide
Page 49
...select "Switch to Classic View" in the upper-left panel. Touchpad/Active Digitizer DO NOT USE EXCESSIVE FORCE WHEN TAPPING ON THE SCREEN DURING CALIBRATION. Double-click the Tablet PC Settings icon and select the General tab 2 Click the [Calibrate] button. 3 Adjust the display of the display. USE OF ...EXCESSIVE FORCE COULD RESULT IN DAMAGE TO THE LED AND/OR TOUCH PANEL. 4 Using the stylus, firmly touch the screen directly on the screen to a comfortable angle and find the (+) symbol in the left corner of your Tablet PC to verify that the screen is correctly calibrated.
...select "Switch to Classic View" in the upper-left panel. Touchpad/Active Digitizer DO NOT USE EXCESSIVE FORCE WHEN TAPPING ON THE SCREEN DURING CALIBRATION. Double-click the Tablet PC Settings icon and select the General tab 2 Click the [Calibrate] button. 3 Adjust the display of the display. USE OF ...EXCESSIVE FORCE COULD RESULT IN DAMAGE TO THE LED AND/OR TOUCH PANEL. 4 Using the stylus, firmly touch the screen directly on the screen to a comfortable angle and find the (+) symbol in the left corner of your Tablet PC to verify that the screen is correctly calibrated.


