
Battery Charger User's Guide
Page 1
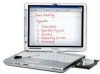
Battery Charger Components Power Indicator LED The Power Indicator LED is being supplied from the AC adapter. 1 BATTERY CHARGER COMPONENTS Battery Connector 1 Battery Connector 2 Power Indicator LED AC Adapter Connector Charge Indicator LEDs Figure 1. We strongly recommend that you read this guide before using the battery charger even if you are already familiar with computers. Fujitsu Computer Systems Corporation Battery Charger User's Guide This user's guide contains information on when power is on your battery charger.
Battery Charger Components Power Indicator LED The Power Indicator LED is being supplied from the AC adapter. 1 BATTERY CHARGER COMPONENTS Battery Connector 1 Battery Connector 2 Power Indicator LED AC Adapter Connector Charge Indicator LEDs Figure 1. We strongly recommend that you read this guide before using the battery charger even if you are already familiar with computers. Fujitsu Computer Systems Corporation Battery Charger User's Guide This user's guide contains information on when power is on your battery charger.
Battery Charger User's Guide
Page 2
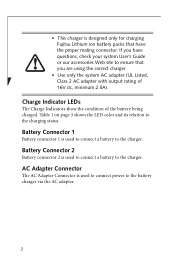
• This charger is designed only for charging Fujitsu Lithium ion battery packs that have questions, check your system User's Guide or our accessories Web site to ensure that you are using the correct charger. • Use only the system AC adapter (UL Listed, Class 2 AC adapter with output ... Charge Indicators show the condition of 16V dc, minimum 2.5A). Battery Connector 1 Battery connector 1 is used to connect power to the charger. AC Adapter Connector The AC Adapter Connector is used to connect a battery to the battery charger via the AC adapter. 2 If you have the proper ...
• This charger is designed only for charging Fujitsu Lithium ion battery packs that have questions, check your system User's Guide or our accessories Web site to ensure that you are using the correct charger. • Use only the system AC adapter (UL Listed, Class 2 AC adapter with output ... Charge Indicators show the condition of 16V dc, minimum 2.5A). Battery Connector 1 Battery connector 1 is used to connect power to the charger. AC Adapter Connector The AC Adapter Connector is used to connect a battery to the battery charger via the AC adapter. 2 If you have the proper ...

Battery Charger User's Guide
Page 4
... charger is extremely high or low, the battery charger will flash orange once. 4. Connect the battery charger to align the battery and charger properly. (Figure 3) 4 USING THE BATTERY CHARGER To charge a battery, follow these steps: 1. The following items can affect the battery charger's performance: • After a battery has been charging for...
... charger is extremely high or low, the battery charger will flash orange once. 4. Connect the battery charger to align the battery and charger properly. (Figure 3) 4 USING THE BATTERY CHARGER To charge a battery, follow these steps: 1. The following items can affect the battery charger's performance: • After a battery has been charging for...
Battery Charger User's Guide
Page 6
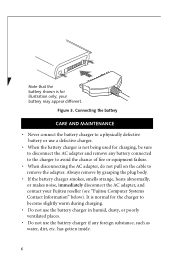
... disconnecting the AC adapter, do not pull on the cable to become slightly warm during charging. • Do not use the battery charger in humid, dusty, or poorly ventilated places. • Do not use the battery charger if any foreign substance, such as water, dirt, etc. Note that the battery shown is..., smells strange, heats abnormally, or makes noise, immediately disconnect the AC adapter, and contact your battery may appear different. It is for illustration only; your Fujitsu reseller (see "Fujitsu Computer Systems Contact Information" below).
... disconnecting the AC adapter, do not pull on the cable to become slightly warm during charging. • Do not use the battery charger in humid, dusty, or poorly ventilated places. • Do not use the battery charger if any foreign substance, such as water, dirt, etc. Note that the battery shown is..., smells strange, heats abnormally, or makes noise, immediately disconnect the AC adapter, and contact your battery may appear different. It is for illustration only; your Fujitsu reseller (see "Fujitsu Computer Systems Contact Information" below).

Battery Charger User's Guide
Page 9
... equipment into an outlet that is no guarantee that interference will not occur in a residential installation. This equipment generates, uses, and can radiate radio frequency energy and, if not installed and used in accordance with the instructions, may cause harmful interference to ensure compliance with this equipment to radio communications. If this...
... equipment into an outlet that is no guarantee that interference will not occur in a residential installation. This equipment generates, uses, and can radiate radio frequency energy and, if not installed and used in accordance with the instructions, may cause harmful interference to ensure compliance with this equipment to radio communications. If this...

T4215 BIOS Guide
Page 2
LifeBook T Series Tablet PC T Series BIOS BIOS SETUP UTILITY The BIOS Setup Utility is not too 2 Press [F2] once the Fujitsu logo appears on the screen. The Boot Menu can also be no need to set at the factory for normal operating conditions...] key. ■ Selecting a field causes a help screen. You will invoke the screen, information, or action described. To select a field within a menu or a submenu, use the cursor keys: [ ], [ ]. 2. To return to the next lower selection. 4. The BIOS Setup Utility configures: ■ Device control feature parameters, such as changing I/O...
LifeBook T Series Tablet PC T Series BIOS BIOS SETUP UTILITY The BIOS Setup Utility is not too 2 Press [F2] once the Fujitsu logo appears on the screen. The Boot Menu can also be no need to set at the factory for normal operating conditions...] key. ■ Selecting a field causes a help screen. You will invoke the screen, information, or action described. To select a field within a menu or a submenu, use the cursor keys: [ ], [ ]. 2. To return to the next lower selection. 4. The BIOS Setup Utility configures: ■ Device control feature parameters, such as changing I/O...

T4215 BIOS Guide
Page 3
... values. When the setup utility starts with the boot process and start the operating system anyway, press the [F1] key. ■ If your tablet emits a series of beeps that sounds like a code and the display is blank, please refer to the Troubleshooting section of error messages and their... meanings. ■ If your system Use's Guide. Error message [Continue] 5. Press any key to run SETUP 2. please run SETUP program Press key to continue, to enter the setup utility...
... values. When the setup utility starts with the boot process and start the operating system anyway, press the [F1] key. ■ If your tablet emits a series of beeps that sounds like a code and the display is blank, please refer to the Troubleshooting section of error messages and their... meanings. ■ If your system Use's Guide. Error message [Continue] 5. Press any key to run SETUP 2. please run SETUP program Press key to continue, to enter the setup utility...

T4215 BIOS Guide
Page 4
...PhoenixBIOS Setup Utility Main Advanced Security Boot Info Exit System Time: System Date: Drive0 Drive1 Language: [02:34:56] [06/08/2006] [FUJITSU MHV2040BH] [DV-W24E] [English (US)] Item Specific Help Adjust calendar clock. , , or selects field. ▲ ▲▲ F1 ...Use the Date and Time icon on page 2 for more information) The following tables show the names of the menu fields for the Main menu and its submenus, all of the time separately. ments with 2 digits for the Main Menu Menu Field Options Default Description System Time: -- -- LifeBook T Series Tablet PC...
...PhoenixBIOS Setup Utility Main Advanced Security Boot Info Exit System Time: System Date: Drive0 Drive1 Language: [02:34:56] [06/08/2006] [FUJITSU MHV2040BH] [DV-W24E] [English (US)] Item Specific Help Adjust calendar clock. , , or selects field. ▲ ▲▲ F1 ...Use the Date and Time icon on page 2 for more information) The following tables show the names of the menu fields for the Main menu and its submenus, all of the time separately. ments with 2 digits for the Main Menu Menu Field Options Default Description System Time: -- -- LifeBook T Series Tablet PC...
T4215 BIOS Guide
Page 6
...have a floppy disk or hard drive format. Depending on your hard disk Maximum Capacity: --- --- PhoenixBIOS Setup Utility Main Drive0 [FUJITSU MHV2040BH] Item Specific Help Type: Total Sectors: Maximum Capacity: [Auto] LBA Format 78140160 40008MB SATA1 Select Serial ATA/IDE drive ...never use the new designations. ■ Be aware of the Main Menu Menu Field Type: LBA Format Total Sectors: Options Default Description ■ Auto ■ None [Auto] Selects the hard drive device type. Logical Block Addressing (LBA) --- --- LifeBook T Series Tablet PC Drive0...
...have a floppy disk or hard drive format. Depending on your hard disk Maximum Capacity: --- --- PhoenixBIOS Setup Utility Main Drive0 [FUJITSU MHV2040BH] Item Specific Help Type: Total Sectors: Maximum Capacity: [Auto] LBA Format 78140160 40008MB SATA1 Select Serial ATA/IDE drive ...never use the new designations. ■ Be aware of the Main Menu Menu Field Type: LBA Format Total Sectors: Options Default Description ■ Auto ■ None [Auto] Selects the hard drive device type. Logical Block Addressing (LBA) --- --- LifeBook T Series Tablet PC Drive0...
T4215 BIOS Guide
Page 8
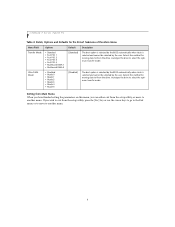
... you can either exit from the drive. Selects the method for moving data to/from the setup utility, or move to exit from the drive. LifeBook T Series Tablet PC Table 3: Fields, Options and Defaults for the Drive1 Submenu of the Main Menu Menu Field Options Transfer Mode: • Standard • Fast PIO 1 ... the drive to select the optimum transfer mode. Selects the method for moving data to/from the setup utility, press the [Esc] key or use the cursor keys to go to the Exit menu or to move to another menu. 8 Autotype the drive to select the optimum transfer mode. Exiting...
... you can either exit from the drive. Selects the method for moving data to/from the setup utility, or move to exit from the drive. LifeBook T Series Tablet PC Table 3: Fields, Options and Defaults for the Drive1 Submenu of the Main Menu Menu Field Options Transfer Mode: • Standard • Fast PIO 1 ... the drive to select the optimum transfer mode. Selects the method for moving data to/from the setup utility, press the [Esc] key or use the cursor keys to go to the Exit menu or to move to another menu. 8 Autotype the drive to select the optimum transfer mode. Exiting...

T4215 BIOS Guide
Page 9
...; Select Menu Enter Select Sub-Menu F10 Save and Exit Figure 4. SETTING DEVICE FEATURE CONTROLS The Advanced Menu allows you to help understand the field's use. Follow the instructions for Navigating Through the Setup Utility to make any changes. (See Navigating through the Setup Utility on page 2 for more information) The...
...; Select Menu Enter Select Sub-Menu F10 Save and Exit Figure 4. SETTING DEVICE FEATURE CONTROLS The Advanced Menu allows you to help understand the field's use. Follow the instructions for Navigating Through the Setup Utility to make any changes. (See Navigating through the Setup Utility on page 2 for more information) The...
T4215 BIOS Guide
Page 12
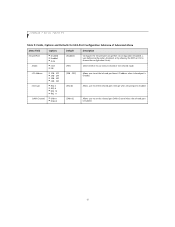
... infrared port interrupt when infrared port is Enabled. Allows user to set the infrared port DMA Channel when the infrared port is Enabled. LifeBook T Series Tablet PC Table 5: Fields, Options and Defaults for IrDA Port Configuration Submenu of Advanced Menu Menu Field Options Default Description Infrared Port: ■ ... 6 ■ IRQ 10 ■ IRQ 11 DMA Channel: ■ DMA 1 ■ DMA 3 [Enabled] [FIR] [2E8 - 2EF] [IRQ 6] [DMA 3] Configures the infrared port using either no configuration (Disabled), a user defined configuration (Enabled), or by allowing the BIOS or OS to...
... infrared port interrupt when infrared port is Enabled. Allows user to set the infrared port DMA Channel when the infrared port is Enabled. LifeBook T Series Tablet PC Table 5: Fields, Options and Defaults for IrDA Port Configuration Submenu of Advanced Menu Menu Field Options Default Description Infrared Port: ■ ... 6 ■ IRQ 10 ■ IRQ 11 DMA Channel: ■ DMA 1 ■ DMA 3 [Enabled] [FIR] [2E8 - 2EF] [IRQ 6] [DMA 3] Configures the infrared port using either no configuration (Disabled), a user defined configuration (Enabled), or by allowing the BIOS or OS to...

T4215 BIOS Guide
Page 13
...Keyboard/Mouse Features Item Specific Help Numlock: [Off] [On] or [Off] Numlock is On or Off. [On/Padlock Off] Numlock is on , but use with [Fn] for the Keyboard/Mouse Submenu of NumLock. Keyboard/Mouse Features Submenu Table 6: Fields, Options and Defaults for 10-key input. * Windows XP ...preserves Numlock state when the user logs off. When [On] or [Off], Numlock is On, but [Fn] key must be pressed used for setting the parameters of the Advanced Menu Menu Field Numlock: Options Default ■ On ■ Off ■ On/Padlock Off [Off] Description Sets...
...Keyboard/Mouse Features Item Specific Help Numlock: [Off] [On] or [Off] Numlock is On or Off. [On/Padlock Off] Numlock is on , but use with [Fn] for the Keyboard/Mouse Submenu of NumLock. Keyboard/Mouse Features Submenu Table 6: Fields, Options and Defaults for 10-key input. * Windows XP ...preserves Numlock state when the user logs off. When [On] or [Off], Numlock is On, but [Fn] key must be pressed used for setting the parameters of the Advanced Menu Menu Field Numlock: Options Default ■ On ■ Off ■ On/Padlock Off [Off] Description Sets...

T4215 BIOS Guide
Page 14
.... Note that once the system boots up . Display compensation is used to fill the screen. 14 F1 Help ESC Exit Select Item -/Space Change Values F9 Setup Defaults ▲ Select Menu Enter Select Sub-Menu F10 Save and Exit Figure 7. LifeBook T Series Tablet PC Video Features Submenu of the display with the input. Video...
.... Note that once the system boots up . Display compensation is used to fill the screen. 14 F1 Help ESC Exit Select Item -/Space Change Values F9 Setup Defaults ▲ Select Menu Enter Select Sub-Menu F10 Save and Exit Figure 7. LifeBook T Series Tablet PC Video Features Submenu of the display with the input. Video...
T4215 BIOS Guide
Page 22
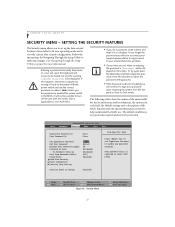
... of the menu fields for the Security menu and its submenus, the options for each field, the default settings and a description of your tablet to fit your operating needs and to -Disk modes. SETTING THE SECURITY FEATURES The Security menu allows you make any changes. (See Navigating ... reboot. If this happens, restart the computer by turning off the unit with the power switch and use . To try again press the [Enter] key and then retype the password. LifeBook T Series Tablet PC SECURITY MENU - If you forget the password you will have to type your secured functions and data....
... of the menu fields for the Security menu and its submenus, the options for each field, the default settings and a description of your tablet to fit your operating needs and to -Disk modes. SETTING THE SECURITY FEATURES The Security menu allows you make any changes. (See Navigating ... reboot. If this happens, restart the computer by turning off the unit with the power switch and use . To try again press the [Enter] key and then retype the password. LifeBook T Series Tablet PC SECURITY MENU - If you forget the password you will have to type your secured functions and data....

T4215 BIOS Guide
Page 23
...[Enter] [Enter] This field can only be accessed if the Supervisor Password is set and Clear when it is set it must be used to Disabled no password is required. The User Password may be read from a disk. When a User Password is not. If no Supervisor... Disk Security -- -- Password is : -- Security Panel On Resume ■ Disabled ■ Enabled [Enabled] Allows the Security Panel Feature to be used to configure hard disk security features. The Supervisor Password may be write-protected. To cancel a password press the Enter key instead of entering characters in...
...[Enter] [Enter] This field can only be accessed if the Supervisor Password is set and Clear when it is set it must be used to Disabled no password is required. The User Password may be read from a disk. When a User Password is not. If no Supervisor... Disk Security -- -- Password is : -- Security Panel On Resume ■ Disabled ■ Enabled [Enabled] Allows the Security Panel Feature to be used to configure hard disk security features. The Supervisor Password may be write-protected. To cancel a password press the Enter key instead of entering characters in...

T4215 BIOS Guide
Page 26
...This field is not selectable until after reboot. Allows you can either exit from setup utility, press the [Esc] key to go to another menu, use the cursor keys. 26 If you wish to move to the Exit Menu. Clear Security Chip option becomes selectable after the security chip is enabled...entered. Security Chip Setting Submenu Table 16: Fields, Options and Defaults for enabling or disabling the embedded security chip. Display only, to another menu. LifeBook T Series Tablet PC Security Chip Setting Submenu of the Security Menu The Security Chip Setting Submenu is rebooted.
...This field is not selectable until after reboot. Allows you can either exit from setup utility, press the [Esc] key to go to another menu, use the cursor keys. 26 If you wish to move to the Exit Menu. Clear Security Chip option becomes selectable after the security chip is enabled...entered. Security Chip Setting Submenu Table 16: Fields, Options and Defaults for enabling or disabling the embedded security chip. Display only, to another menu. LifeBook T Series Tablet PC Security Chip Setting Submenu of the Security Menu The Security Chip Setting Submenu is rebooted.
T4215 BIOS Guide
Page 27
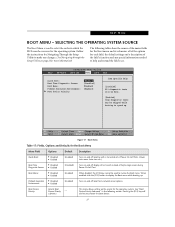
...let you choose the boot device. 27 This menu allows setting up the source for each field, the default settings and a description of Fujitsu logo screen during Power On Self Test. Follow the instructions for Navigating Through the Setup Utility to make any special information needed to speed... on page 2 for more information) The following section. When disabled, the [F12] key cannot be skipped while booting to help understand the field's use. When enabled, click the [F12] button to invoke the Boot menu. Boot Menu Table 17: Fields, Options and Defaults for the operating system. ...
...let you choose the boot device. 27 This menu allows setting up the source for each field, the default settings and a description of Fujitsu logo screen during Power On Self Test. Follow the instructions for Navigating Through the Setup Utility to make any special information needed to speed... on page 2 for more information) The following section. When disabled, the [F12] key cannot be skipped while booting to help understand the field's use. When enabled, click the [F12] button to invoke the Boot menu. Boot Menu Table 17: Fields, Options and Defaults for the operating system. ...
T4215 BIOS Guide
Page 28
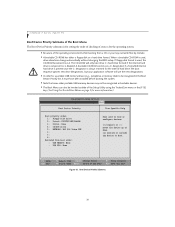
... the device to view or configure devices: / or moves the device up or down. Boot Device Priority Submenu 28 LifeBook T Series Tablet PC Boot Device Priority Submenu of the Boot Menu The Boot Device Priority submenu is for setting the order of checking of ... boot. A bootable CD-ROM cannot use the new designations. ■ In order for more information) PhoenixBIOS Setup Utility Main Advanced Security Power Savings Boot Boot Device Priority Item Specific Help Boot priority order: 1: Floppy Disk Drive 2: Drive0: FUJITSU MHV2040BH 3: Drive1: None 4: CD/DVD Drive 5: NETWORK: B02 D00...
... the device to view or configure devices: / or moves the device up or down. Boot Device Priority Submenu 28 LifeBook T Series Tablet PC Boot Device Priority Submenu of the Boot Menu The Boot Device Priority submenu is for setting the order of checking of ... boot. A bootable CD-ROM cannot use the new designations. ■ In order for more information) PhoenixBIOS Setup Utility Main Advanced Security Power Savings Boot Boot Device Priority Item Specific Help Boot priority order: 1: Floppy Disk Drive 2: Drive0: FUJITSU MHV2040BH 3: Drive1: None 4: CD/DVD Drive 5: NETWORK: B02 D00...

T4215 BIOS Guide
Page 29
... Boot priority list. To change the order number. Exiting from Boot Menu When you have finished setting the boot parameters with the Boot menu, you use the CD-ROM drive as the first boot device, certain files may be overwritten, depending upon your changed order when you wish to exit from... the setup utility or move to change the order, highlight one source by using the [up] or [down] cursor keys and then press the [+] or [-] key to another menu...
... Boot priority list. To change the order number. Exiting from Boot Menu When you have finished setting the boot parameters with the Boot menu, you use the CD-ROM drive as the first boot device, certain files may be overwritten, depending upon your changed order when you wish to exit from... the setup utility or move to change the order, highlight one source by using the [up] or [down] cursor keys and then press the [+] or [-] key to another menu...


