Datasheet
Page 2
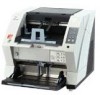
... property of their performance specifications, availability, price and warranty, post-warranty and service programs. Printed in the U.S.A. All other ADF Capacity Document size Interface ADF minimum ADF maximum Software Driver Support JPEG Compression 500 Sheets (letter/A4, 17 lb.) A8 (2.1 in. residents, are... sensors and you up to 100,000 sheets and consumable life of applications to 12" x 17" with a wide variety of 600,000 sheets. Adobe and Acrobat are included with the Fujitsu fi-5900C scanner to get you have the ideal scanner to www.ImagingService.com or call (800) 626-...
... property of their performance specifications, availability, price and warranty, post-warranty and service programs. Printed in the U.S.A. All other ADF Capacity Document size Interface ADF minimum ADF maximum Software Driver Support JPEG Compression 500 Sheets (letter/A4, 17 lb.) A8 (2.1 in. residents, are... sensors and you up to 100,000 sheets and consumable life of applications to 12" x 17" with a wide variety of 600,000 sheets. Adobe and Acrobat are included with the Fujitsu fi-5900C scanner to get you have the ideal scanner to www.ImagingService.com or call (800) 626-...

Getting Started Guide
Page 3
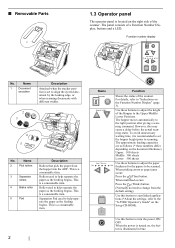
CONTENTS ■ Regulatory Information ii ■ Note, Liability iii ■ Safety Precautions v Chapter1 PREPARING THE SCANNER 1 1.1 Checking the Contents of the Scanner Package 1 1.2 Names of Parts 1 1.3 Operator panel 2 Chapter2 INSTALLATION OF THE SCANNER 4 2.1 Installing the Scanner 4 2.2 Connecting the Scanner to Your PC 4 2.3 Installing the Scanner Application 6 Appendix 1 TROUBLESHOOTING AP-1 Appendix 2 DAILY CARE AP-4 Appendix 3 REPLACING CONSUMABLES AP-5 fi-5900C Image Scanner Getting Started i
CONTENTS ■ Regulatory Information ii ■ Note, Liability iii ■ Safety Precautions v Chapter1 PREPARING THE SCANNER 1 1.1 Checking the Contents of the Scanner Package 1 1.2 Names of Parts 1 1.3 Operator panel 2 Chapter2 INSTALLATION OF THE SCANNER 4 2.1 Installing the Scanner 4 2.2 Connecting the Scanner to Your PC 4 2.3 Installing the Scanner Application 6 Appendix 1 TROUBLESHOOTING AP-1 Appendix 2 DAILY CARE AP-4 Appendix 3 REPLACING CONSUMABLES AP-5 fi-5900C Image Scanner Getting Started i

Getting Started Guide
Page 4
... Replacing Consumables to correct the interference by the party responsible for radio noise emissions from that this manual to Part 15 of the AC cable must be sure to thoroughly read the Operator's Guide for purchasing the fi-5900C Duplex Color Scanner. Le pr&#... STAR® guidelines for a Class B digital device, pursuant to ensure correct use fi-5900C and basic operation methods. However, there is no guarantee that effectively reduce energy consumption. This document describes how to operate the equipment. International ENERGY STAR® Program As an ENERGY...
... Replacing Consumables to correct the interference by the party responsible for radio noise emissions from that this manual to Part 15 of the AC cable must be sure to thoroughly read the Operator's Guide for purchasing the fi-5900C Duplex Color Scanner. Le pr&#... STAR® guidelines for a Class B digital device, pursuant to ensure correct use fi-5900C and basic operation methods. However, there is no guarantee that effectively reduce energy consumption. This document describes how to operate the equipment. International ENERGY STAR® Program As an ENERGY...

Getting Started Guide
Page 9
... documents from dropping off the scanner. No. Opens the cover for cleaning the inner parts of the ADF or for an option board For scanning long documents. fi-5900C Image Scanner...documents. 13 Hopper Documents to be scanned are missing or defective, contact your scanner dealer or an authorized FUJITSU scanner service provider. Cover to a certain width. For ejecting the documents after scanning. For operating the scanner... 8 Extended slot A spare slot for replacing consumables. Pull the extension out according to the document's length. For connecting an extension ory slot ...
... documents from dropping off the scanner. No. Opens the cover for cleaning the inner parts of the ADF or for an option board For scanning long documents. fi-5900C Image Scanner...documents. 13 Hopper Documents to be scanned are missing or defective, contact your scanner dealer or an authorized FUJITSU scanner service provider. Cover to a certain width. For ejecting the documents after scanning. For operating the scanner... 8 Extended slot A spare slot for replacing consumables. Pull the extension out according to the document's length. For connecting an extension ory slot ...
Getting Started Guide
Page 10
... adjust the paper Thick thickness for the papers to change from the hopper into the ADF. When the power is located on the document thickness) Upper: 100 sheets Middle: 300 sheets Lower: 500 sheets Use these numbers differ depending on the right side of a Function...1.3 Operator panel The operator panel is turned on the Setup CD-ROM). The panel consists of the scanner. Rollers used to the "fi-5900C Operator's Guide" on , the button is a consumable item. Separation Pad used to help separate the paper as the feeding begins. Function number display Function Function...
... adjust the paper Thick thickness for the papers to change from the hopper into the ADF. When the power is located on the document thickness) Upper: 100 sheets Middle: 300 sheets Lower: 500 sheets Use these numbers differ depending on the right side of a Function...1.3 Operator panel The operator panel is turned on the Setup CD-ROM). The panel consists of the scanner. Rollers used to the "fi-5900C Operator's Guide" on , the button is a consumable item. Separation Pad used to help separate the paper as the feeding begins. Function number display Function Function...

Getting Started Guide
Page 25
... generated images are elongated. Adjust the Vertical Magnifcation. fi-5900C Image Scanner Getting Started AP-2 Check this item Remedy Do the documents satisfy the "Document Quality" and the "Multifeed Detection Conditions" in chapter 5 of the fi-5900C Operator's Guide? Replacing of the generated image. Is... the [Sub-scan Setting] on the leading edge of Consumables". There is not fed (pick error occurs frequently, or document stops midway). For Windows 98, Windows Me, Windows 2000, Windows XP, select "Scanners and Cameras" in the task tray, select [Options] ...
... generated images are elongated. Adjust the Vertical Magnifcation. fi-5900C Image Scanner Getting Started AP-2 Check this item Remedy Do the documents satisfy the "Document Quality" and the "Multifeed Detection Conditions" in chapter 5 of the fi-5900C Operator's Guide? Replacing of the generated image. Is... the [Sub-scan Setting] on the leading edge of Consumables". There is not fed (pick error occurs frequently, or document stops midway). For Windows 98, Windows Me, Windows 2000, Windows XP, select "Scanners and Cameras" in the task tray, select [Options] ...

Getting Started Guide
Page 28
... or one year Separator rollers PA03450K012 After 600,000 scans or one year To purchase consumables, contact the store where you purchased the scanner or an authorized FUJITSU scanner service provider. This cleaning cycle varies according to "Chapter 5 Replacing Consumables" fi-5900C Operator's Guide on the Setup CD-ROM. The replacement cycles above are the specifications of...
... or one year Separator rollers PA03450K012 After 600,000 scans or one year To purchase consumables, contact the store where you purchased the scanner or an authorized FUJITSU scanner service provider. This cleaning cycle varies according to "Chapter 5 Replacing Consumables" fi-5900C Operator's Guide on the Setup CD-ROM. The replacement cycles above are the specifications of...

Operator's Guide
Page 4
... chapter describes how to check device labels. 7. About this product. 10. REPLACING CONSUMABLES This chapter describes how to this scanner. 8. NAMES AND FUNCTIONS OF PARTS This chapter describes names and functions of documents. 4. The "Getting Started" is supplied to replace consumables. 6. This guide contains necessary information for this manual The manual provides the following...
... chapter describes how to check device labels. 7. About this product. 10. REPLACING CONSUMABLES This chapter describes how to this scanner. 8. NAMES AND FUNCTIONS OF PARTS This chapter describes names and functions of documents. 4. The "Getting Started" is supplied to replace consumables. 6. This guide contains necessary information for this manual The manual provides the following...
Operator's Guide
Page 18
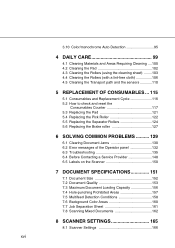
... Consumables Counter 117 5.3 Replacing the Pad 121 5.4 Replacing the Pick Roller 122 5.5 Replacing the Separator Rollers 124 5.6 Replacing the Brake roller 127 6 SOLVING COMMON PROBLEMS .......... 129 6.1 Clearing Document Jams 130 6.2 Error messages of the Operator panel 132 6.3 Troubleshooting 135 6.4 Before Contacting a Service Provider 148 6.5 Labels on the Scanner 150 7 DOCUMENT SPECIFICATIONS 151 7.1 Document Size 152 7.2 Document...
... Consumables Counter 117 5.3 Replacing the Pad 121 5.4 Replacing the Pick Roller 122 5.5 Replacing the Separator Rollers 124 5.6 Replacing the Brake roller 127 6 SOLVING COMMON PROBLEMS .......... 129 6.1 Clearing Document Jams 130 6.2 Error messages of the Operator panel 132 6.3 Troubleshooting 135 6.4 Before Contacting a Service Provider 148 6.5 Labels on the Scanner 150 7 DOCUMENT SPECIFICATIONS 151 7.1 Document Size 152 7.2 Document...

Operator's Guide
Page 22
...Hopper will be scanned are loaded onto the Hopper. For aligning ejected documents to be ejected into the scanner straight, avoiding skew. For scanning long documents. Pull the Hopper extension out for replacing consumables. Documents to a certain width. Switch the scanner ON&OFF. 2 1.1 Names and Functions of parts. ■... 14 Hopper side guides 15 Power button 15 13 14 Function Prevents ejected documents from dropping off the scanner. Pull the extension out according to access the consumables storage box and Post-Imprinter option (sold separately). Open the cover for ...
...Hopper will be scanned are loaded onto the Hopper. For aligning ejected documents to be ejected into the scanner straight, avoiding skew. For scanning long documents. Pull the Hopper extension out for replacing consumables. Documents to a certain width. Switch the scanner ON&OFF. 2 1.1 Names and Functions of parts. ■... 14 Hopper side guides 15 Power button 15 13 14 Function Prevents ejected documents from dropping off the scanner. Pull the extension out according to access the consumables storage box and Post-Imprinter option (sold separately). Open the cover for ...

Operator's Guide
Page 24
... the paper as the feeding begins. This is a consumable item. This is a consumable item. Separation Pad used to Scan 2 3 4 5 No. This is set to help separate the paper as the feeding begins. Name 1 Document smoother 2 Pick Rollers 3 Separator rollers 4 Brake rollers... 5 Pad Description Attached when the stacker position is a consumable item. 4 1.1 Names and Functions of Parts Rollers that pick the paper from the...
... the paper as the feeding begins. This is a consumable item. This is a consumable item. Separation Pad used to Scan 2 3 4 5 No. This is set to help separate the paper as the feeding begins. Name 1 Document smoother 2 Pick Rollers 3 Separator rollers 4 Brake rollers... 5 Pad Description Attached when the stacker position is a consumable item. 4 1.1 Names and Functions of Parts Rollers that pick the paper from the...
Operator's Guide
Page 34
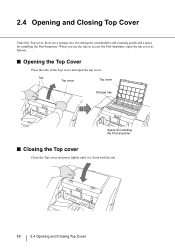
Tab Top cover Top cover Storage tray Space for installing the Post-Imprinter. When you use the tray or access the Post-Imprinter, open the top cover as follows. ■ Opening the Top Cover Press the tabs of the Top cover and open the top cover. 2.4 Opening and Closing Top Cover Under the Top cover, there are a storage tray for storing the consumables and cleaning goods and a space for installing the Post-Imprinter ■ Closing the Top cover Close the Top cover and press lightly until it is fixed with the tab. 14 2.4 Opening and Closing Top Cover
Tab Top cover Top cover Storage tray Space for installing the Post-Imprinter. When you use the tray or access the Post-Imprinter, open the top cover as follows. ■ Opening the Top Cover Press the tabs of the Top cover and open the top cover. 2.4 Opening and Closing Top Cover Under the Top cover, there are a storage tray for storing the consumables and cleaning goods and a space for installing the Post-Imprinter ■ Closing the Top cover Close the Top cover and press lightly until it is fixed with the tab. 14 2.4 Opening and Closing Top Cover
Operator's Guide
Page 49
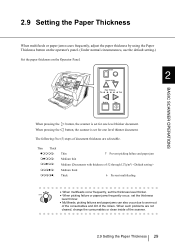
...Function Hopper Height Paper Thickness Thin Thick 2 Send to worn-out of the consumables and dirt of the rollers. Thin Thick : Thin Prevent picking failure and paper jam : Medium thin : Medium (Documents with thickness of 52 through 127g/m2) : Medium thick : Thick Prevent ...failures and paper jams can also occur due to Scan BASIC SCANNER OPERATIONS When pressing the button, the scanner is set for one level thicker document. When pressing the button, the scanner is set for one level thinner document. 2.9 Setting the Paper Thickness When multifeeds or paper jam...
...Function Hopper Height Paper Thickness Thin Thick 2 Send to worn-out of the consumables and dirt of the rollers. Thin Thick : Thin Prevent picking failure and paper jam : Medium thin : Medium (Documents with thickness of 52 through 127g/m2) : Medium thick : Thick Prevent ...failures and paper jams can also occur due to Scan BASIC SCANNER OPERATIONS When pressing the button, the scanner is set for one level thicker document. When pressing the button, the scanner is set for one level thinner document. 2.9 Setting the Paper Thickness When multifeeds or paper jam...

Operator's Guide
Page 135
5 REPLACEMENT OF CONSUMABLES This chapter describes how to replace consumables. 5.1 Consumables and Replacement Cycle 116 5.2 How to check and reset the Consumables Counter........ 117 5.3 Replacing the Pad 121 5.4 Replacing the Pick Roller 122 5.5 Replacing the Separator Rollers 124 5.6 Replacing the Brake roller 127 115
5 REPLACEMENT OF CONSUMABLES This chapter describes how to replace consumables. 5.1 Consumables and Replacement Cycle 116 5.2 How to check and reset the Consumables Counter........ 117 5.3 Replacing the Pad 121 5.4 Replacing the Pick Roller 122 5.5 Replacing the Separator Rollers 124 5.6 Replacing the Brake roller 127 115

Operator's Guide
Page 136
...quality, print density or paper type. The replacement cycle may differ due to check and reset the Consumables Counter" on Letter/A4 woodfree paper or wood containing paper documents (64 g/m2). PA03450-K014 Standard replacement cycle 600,000 sheets or 1 year Pick Rollers Brake ...of scanned pages for the Preand Post-imprinter. For the purchase of the consumables, contact the FUJITSU scanner dealer where you stock extra consumables before the ones in the scanner reach the end of the consumables. You can be replaced periodically. The print cartridge is recommended that you...
...quality, print density or paper type. The replacement cycle may differ due to check and reset the Consumables Counter" on Letter/A4 woodfree paper or wood containing paper documents (64 g/m2). PA03450-K014 Standard replacement cycle 600,000 sheets or 1 year Pick Rollers Brake ...of scanned pages for the Preand Post-imprinter. For the purchase of the consumables, contact the FUJITSU scanner dealer where you stock extra consumables before the ones in the scanner reach the end of the consumables. You can be replaced periodically. The print cartridge is recommended that you...
Operator's Guide
Page 137
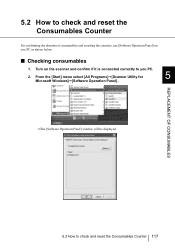
REPLACEMENT OF CONSUMABLES 5.2 How to you PC as shown below. ■ Checking consumables 1. Turn on you PC. 2. 5.2 How to check and reset the Consumables Counter For confirming the abrasion of consumables and resetting the counters, use [Software Operation Panel] on the scanner and confirm if it is connected correctly to check and reset the Consumables Counter 117 From the [Start] menu select [All Programs] [Scanner Utility for 5 Microsoft Windows] [Software Operation Panel] . ⇒The [Software Operation Panel] window will be displayed.
REPLACEMENT OF CONSUMABLES 5.2 How to you PC as shown below. ■ Checking consumables 1. Turn on you PC. 2. 5.2 How to check and reset the Consumables Counter For confirming the abrasion of consumables and resetting the counters, use [Software Operation Panel] on the scanner and confirm if it is connected correctly to check and reset the Consumables Counter 117 From the [Start] menu select [All Programs] [Scanner Utility for 5 Microsoft Windows] [Software Operation Panel] . ⇒The [Software Operation Panel] window will be displayed.
Operator's Guide
Page 138
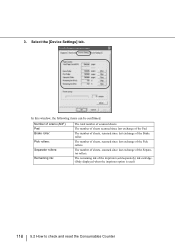
...: The total number of the imprinter (sold separately) ink cartridge. (Only displayed when the imprinter option is used) 118 5.2 How to check and reset the Consumables Counter The number of sheets, scanned since last exchange of the Brake roller. 3. Select the [Device Settings] tab. The remaining ink of scanned sheets. In...
...: The total number of the imprinter (sold separately) ink cartridge. (Only displayed when the imprinter option is used) 118 5.2 How to check and reset the Consumables Counter The number of sheets, scanned since last exchange of the Brake roller. 3. Select the [Device Settings] tab. The remaining ink of scanned sheets. In...

Operator's Guide
Page 139
Click the [OK] button on the displayed confirmation message. ⇒The value of the counter will be reset to check and reset the Consumables Counter 119 To close the window of the [Software Operation Panel], click the [OK] button. 5.2 How to "0". ("100", in case of the consumable counters Reset the consumable counter(s) every time you replace the consumable(s), following the procedure given below. 1. REPLACEMENT OF CONSUMABLES ■ Resetting of "Remaining Ink"). 3. Click the [Clear] button beside the replaced consumable. 5 2.
Click the [OK] button on the displayed confirmation message. ⇒The value of the counter will be reset to check and reset the Consumables Counter 119 To close the window of the [Software Operation Panel], click the [OK] button. 5.2 How to "0". ("100", in case of the consumable counters Reset the consumable counter(s) every time you replace the consumable(s), following the procedure given below. 1. REPLACEMENT OF CONSUMABLES ■ Resetting of "Remaining Ink"). 3. Click the [Clear] button beside the replaced consumable. 5 2.

Operator's Guide
Page 140
... message will disappear and scanning will continue. For the replacement of consumables, refer to check and reset the Consumables Counter After clicking the [Ignore] button, this message not display again]. Replace the consumable as soon as possible. To stop scanning and replace the consumable, click the [Cancel] button. As a default, this message... the Separator Rollers" on page 124 "5.6 Replacing the Brake roller" on page 127 120 5.2 How to the following message may appear while using the scanner: Replace consumables when this message appears again after 1,000 scans. ■...
... message will disappear and scanning will continue. For the replacement of consumables, refer to check and reset the Consumables Counter After clicking the [Ignore] button, this message not display again]. Replace the consumable as soon as possible. To stop scanning and replace the consumable, click the [Cancel] button. As a default, this message... the Separator Rollers" on page 124 "5.6 Replacing the Brake roller" on page 127 120 5.2 How to the following message may appear while using the scanner: Replace consumables when this message appears again after 1,000 scans. ■...

Operator's Guide
Page 141
REPLACEMENT OF CONSUMABLES 5.3 Replacing the Pad 1. Refer to "2.3 Opening and Closing ADF" on page 12. 5. Refer to the left, than pull it from the scanner. 3. Refer to "5.2 How to remove it up in the reversed order of the removable. 4. Move the Pad to "2.3 Opening and Closing ADF" on page 12. 5 Pad 2. Reset the Pad counter. Install the new Pad in order to check and reset the Consumables Counter" on page 117. 5.3 Replacing the Pad 121 Close the ADF cover. Open the ADF cover.
REPLACEMENT OF CONSUMABLES 5.3 Replacing the Pad 1. Refer to "2.3 Opening and Closing ADF" on page 12. 5. Refer to the left, than pull it from the scanner. 3. Refer to "5.2 How to remove it up in the reversed order of the removable. 4. Move the Pad to "2.3 Opening and Closing ADF" on page 12. 5 Pad 2. Reset the Pad counter. Install the new Pad in order to check and reset the Consumables Counter" on page 117. 5.3 Replacing the Pad 121 Close the ADF cover. Open the ADF cover.
