Getting Started Guide
Page 10
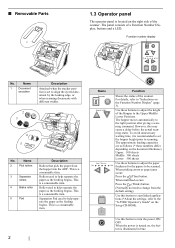
...scanning starts. When the power is set the hopper height prior to align the ejected document by the leading edge, or when scanning documents with different widths. 2 3 4 5 No. Name 1 Document smoother Description Attached when the stacker position is turned on the Function Number Display" (...of the scanner. Name 2 Pick rollers 3 Separator rollers 4 Brake roller 5 Pad Description Rollers that pick the paper from the default setting) Use this button to start linked applications (*About the settings, refer to the "fi-5900C Operator's Guide" on the document thickness) ...
...scanning starts. When the power is set the hopper height prior to align the ejected document by the leading edge, or when scanning documents with different widths. 2 3 4 5 No. Name 1 Document smoother Description Attached when the stacker position is turned on the Function Number Display" (...of the scanner. Name 2 Pick rollers 3 Separator rollers 4 Brake roller 5 Pad Description Rollers that pick the paper from the default setting) Use this button to start linked applications (*About the settings, refer to the "fi-5900C Operator's Guide" on the document thickness) ...
Getting Started Guide
Page 22
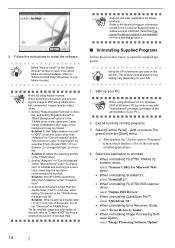
...privileges of the administrator of the currently installed applications. 4. Scanning a document longer than "Adaptive" for Microsoft Windows". • When uninstalling Scandall 21, select "ScandAll 21". • When uninstalling FUJITSU ISIS scanner driver, select "Fujitsu ISIS Drivers". • When uninstalling QuickScan ProTM, select "QuickScan 3.0"....Support] folder on the "Adobe HINT Acrobat" window to learn more about how to install the software. Solution 1: Set "Edge shadow removal" to "OFF" or set "Overscan" in TWAIN driver. *As for Acrobat. The windows and operations may ...
...privileges of the administrator of the currently installed applications. 4. Scanning a document longer than "Adaptive" for Microsoft Windows". • When uninstalling Scandall 21, select "ScandAll 21". • When uninstalling FUJITSU ISIS scanner driver, select "Fujitsu ISIS Drivers". • When uninstalling QuickScan ProTM, select "QuickScan 3.0"....Support] folder on the "Adobe HINT Acrobat" window to learn more about how to install the software. Solution 1: Set "Edge shadow removal" to "OFF" or set "Overscan" in TWAIN driver. *As for Acrobat. The windows and operations may ...

Getting Started Guide
Page 25
... Care". Click on the [Device Set] tab and then click on the Operator panel? For Windows 95, Windows NT 4.0, right-click the Scanner Control Center, select [Options]-[Subscan Setting] and adjust the offset. Are the Separator roller or the Pick rollers dirty? Refer to the Operator's...For Windows 98, Windows Me, Windows 2000, Windows XP, adjust the [Sub-scan Setting] on the leading edge of the fi-5900C Operator's Guide? Is there any debris from the document feed path. Adjust the Vertical Magnifcation. Are the Separator roller or the Pick rollers worn out? Clean the ...
... Care". Click on the [Device Set] tab and then click on the Operator panel? For Windows 95, Windows NT 4.0, right-click the Scanner Control Center, select [Options]-[Subscan Setting] and adjust the offset. Are the Separator roller or the Pick rollers dirty? Refer to the Operator's...For Windows 98, Windows Me, Windows 2000, Windows XP, adjust the [Sub-scan Setting] on the leading edge of the fi-5900C Operator's Guide? Is there any debris from the document feed path. Adjust the Vertical Magnifcation. Are the Separator roller or the Pick rollers worn out? Clean the ...
Operator's Guide
Page 19
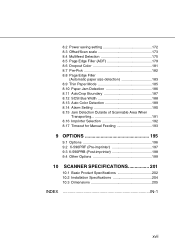
8.2 Power saving setting 172 8.3 Offset/Scan scale 173 8.4 Multifeed Detection 175 8.5 Page Edge Filler (ADF 179 8.6 Dropout Color 181 8.7 Pre-Pick 182 8.8 Page Edge Filler (Automatic paper size detection 183 8.9 Thin Paper Mode 185 8.10 Paper Jam Detection 186 8.11...16 Imprinter Selection 192 8.17 Timeout for Manual Feeding 193 9 OPTIONS 195 9.1 Options 196 9.2 fi-590PRF (Pre-imprinter 197 9.3 fi-590PRB (Post-imprinter 198 9.4 Other Options 199 10 SCANNER SPECIFICATIONS 201 10.1 Basic Product Specifications 202 10.2 Installation Specifications 204 10.3 Dimensions 205 INDEX ...
8.2 Power saving setting 172 8.3 Offset/Scan scale 173 8.4 Multifeed Detection 175 8.5 Page Edge Filler (ADF 179 8.6 Dropout Color 181 8.7 Pre-Pick 182 8.8 Page Edge Filler (Automatic paper size detection 183 8.9 Thin Paper Mode 185 8.10 Paper Jam Detection 186 8.11...16 Imprinter Selection 192 8.17 Timeout for Manual Feeding 193 9 OPTIONS 195 9.1 Options 196 9.2 fi-590PRF (Pre-imprinter 197 9.3 fi-590PRB (Post-imprinter 198 9.4 Other Options 199 10 SCANNER SPECIFICATIONS 201 10.1 Basic Product Specifications 202 10.2 Installation Specifications 204 10.3 Dimensions 205 INDEX ...

Operator's Guide
Page 24
This is a consumable item. 4 1.1 Names and Functions of Parts Separation Pad used to align the ejected document by the leading edge (see page 24), or when scanning documents with different widths (see page 73). This is a consumable item. Name 1 Document smoother 2 Pick Rollers 3 Separator rollers 4 Brake rollers 5 Pad Description Attached when the stacker position is...
This is a consumable item. 4 1.1 Names and Functions of Parts Separation Pad used to align the ejected document by the leading edge (see page 24), or when scanning documents with different widths (see page 73). This is a consumable item. Name 1 Document smoother 2 Pick Rollers 3 Separator rollers 4 Brake rollers 5 Pad Description Attached when the stacker position is...

Operator's Guide
Page 37
... documents. 2.6 Loading Documents on the Hopper ■ Preparing the Document 1. Align both hands, bend back the document as follows so that the bent section rises up in the middle of the documents. For how to scan the document with different widths, refer to "3.3 Scanning HINT Documents with both edges of the document as follows. 4) Repeat steps 1) to 20mm BASIC SCANNER...
... documents. 2.6 Loading Documents on the Hopper ■ Preparing the Document 1. Align both hands, bend back the document as follows so that the bent section rises up in the middle of the documents. For how to scan the document with different widths, refer to "3.3 Scanning HINT Documents with both edges of the document as follows. 4) Repeat steps 1) to 20mm BASIC SCANNER...

Operator's Guide
Page 38
...document edges and the guides, the scanned images may be skewed. Side guide Lock lever 18 2.6 Loading Documents on the hopper. ■ Setting the Document There are 2 ways to set documents on the hopper. (1) Set the document at the center of different size pages, or you want to the document width. Load the document...so that they contact the document sides. Adjust the Side guides to align the document by the side instead of the center line). (1) Setting the document at the center of the hopper (mainly for document of equal size pages). (2) Set the document by either side of the...
...document edges and the guides, the scanned images may be skewed. Side guide Lock lever 18 2.6 Loading Documents on the hopper. ■ Setting the Document There are 2 ways to set documents on the hopper. (1) Set the document at the center of different size pages, or you want to the document width. Load the document...so that they contact the document sides. Adjust the Side guides to align the document by the side instead of the center line). (1) Setting the document at the center of the hopper (mainly for document of equal size pages). (2) Set the document by either side of the...

Operator's Guide
Page 42
... extension. The Stacker table is horizontal, as a default, for aligning the bottom edge of the ejected documents, You can tilled the Stacker table forward for aligning the leading edge of the ejected documents also. Pull out the stacker extension in accordance with document length. 2.7 Setting up the Stacker Set up the Stacker by adjusting the...
... extension. The Stacker table is horizontal, as a default, for aligning the bottom edge of the ejected documents, You can tilled the Stacker table forward for aligning the leading edge of the ejected documents also. Pull out the stacker extension in accordance with document length. 2.7 Setting up the Stacker Set up the Stacker by adjusting the...

Operator's Guide
Page 44
Push down the part of stacker 1. Move your hands away from the stacker slowly. 24 2.7 Setting up the Stacker ■ Switching the stacker's inclination Bottom edge alignment by horizontal stacker setting Leading edge alignment by tilting forward setting of the stacker which is closer to you. ԙ ԙ 後端揃え 先端揃え Ԙ Ԙ ⇒The stacker inclines towards you . 3. Slide the stacker out towards you . 2.
Push down the part of stacker 1. Move your hands away from the stacker slowly. 24 2.7 Setting up the Stacker ■ Switching the stacker's inclination Bottom edge alignment by horizontal stacker setting Leading edge alignment by tilting forward setting of the stacker which is closer to you. ԙ ԙ 後端揃え 先端揃え Ԙ Ԙ ⇒The stacker inclines towards you . 3. Slide the stacker out towards you . 2.

Operator's Guide
Page 45
BASIC SCANNER OPERATIONS ⇒The stacker will be fixed in a position tilting forward. • When set to "Bottom edge" position, the stacker does not move up or HINT down and becomes immovable even during scanning operation. • In this position, the stacker's maximum load will be 200 sheets. • If the pages do not stack well, use the Document Smoother. (See next section.) 2 ATTENTION When you align the documents from the leading edge (by tilting forward setting of stacker), the documents must meet the following conditions: (Length) ÷ (Width) < 1.5
BASIC SCANNER OPERATIONS ⇒The stacker will be fixed in a position tilting forward. • When set to "Bottom edge" position, the stacker does not move up or HINT down and becomes immovable even during scanning operation. • In this position, the stacker's maximum load will be 200 sheets. • If the pages do not stack well, use the Document Smoother. (See next section.) 2 ATTENTION When you align the documents from the leading edge (by tilting forward setting of stacker), the documents must meet the following conditions: (Length) ÷ (Width) < 1.5

Operator's Guide
Page 46
...;The stacker will be 500 sheets. Make sure these sensors are installed to the "Bottom edge alignment" position, the stacker's maximum load will be fixed in a horizontal position. • When set to detect document height on it at those times. 26 2.7 Setting up or when scanning starts. Do ...stacker. Photo sensors Thin Power Send to the "bottom edge alignment" position, the stacker will auto- HINT matically adjust its height according to its load. • When set to • The stacker may move up or down when the scanner is in the ready status up the Stacker
...;The stacker will be 500 sheets. Make sure these sensors are installed to the "Bottom edge alignment" position, the stacker's maximum load will be fixed in a horizontal position. • When set to detect document height on it at those times. 26 2.7 Setting up or when scanning starts. Do ...stacker. Photo sensors Thin Power Send to the "bottom edge alignment" position, the stacker will auto- HINT matically adjust its height according to its load. • When set to • The stacker may move up or down when the scanner is in the ready status up the Stacker
Operator's Guide
Page 54
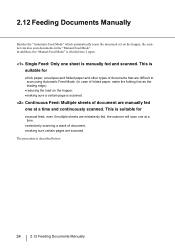
... sheets are mistakenly fed, the scanner will scan one at a time and continuously scanned. Continuous Feed: Multiple sheets of folded paper, make the folding line as the leading edge). •reducing the load on the hopper, the scanner can also scan documents in the "Manual Feed Mode".... The procedure is manually fed and scanned. 2.12 Feeding Documents Manually Besides the "Automatic Feed Mode" which automatically scans ...
... sheets are mistakenly fed, the scanner will scan one at a time and continuously scanned. Continuous Feed: Multiple sheets of folded paper, make the folding line as the leading edge). •reducing the load on the hopper, the scanner can also scan documents in the "Manual Feed Mode".... The procedure is manually fed and scanned. 2.12 Feeding Documents Manually Besides the "Automatic Feed Mode" which automatically scans ...

Operator's Guide
Page 55
..., do not stick the top edge of the document against the inner side of the hopper table. Lift up at the center of the hopper, instead set them a bit apart. 2.12 Feeding Documents Manually 35 Pick Roller Unit 2 Hopper Guide Plate BASIC SCANNER OPERATIONS ⇒The Pick roller unit... will click into place. ⇒The hopper will move up . 2. ATTENTION • If there is any document loaded on the left side using your fingers ...
..., do not stick the top edge of the document against the inner side of the hopper table. Lift up at the center of the hopper, instead set them a bit apart. 2.12 Feeding Documents Manually 35 Pick Roller Unit 2 Hopper Guide Plate BASIC SCANNER OPERATIONS ⇒The Pick roller unit... will click into place. ⇒The hopper will move up . 2. ATTENTION • If there is any document loaded on the left side using your fingers ...

Operator's Guide
Page 58
... of an operation, press down the Hopper Height Button ( ) on page 30. 38 2.12 Feeding Documents Manually Set the scanning condition. At this moment, do not stick the top edge of the document against the inner side of the hopper table. ■ Continuous Feed 1. Refer to the manual feed ...position. Start the application and display the scanner driver screen. For the information about how to run the scanner driver, refer to get your ...
... of an operation, press down the Hopper Height Button ( ) on page 30. 38 2.12 Feeding Documents Manually Set the scanning condition. At this moment, do not stick the top edge of the document against the inner side of the hopper table. ■ Continuous Feed 1. Refer to the manual feed ...position. Start the application and display the scanner driver screen. For the information about how to run the scanner driver, refer to get your ...
Operator's Guide
Page 66
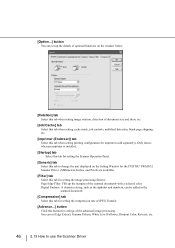
...be added in the scanned document. [Compression] tab Select this tab for setting the compression rate of JPEG Transfer. [Advance...] button Click this tab when setting printing configuration for settings of optional functions on the Setting Window for the FUJITSU TWAIN32 Scanner Driver. (Millimeters, Inches,... button You can set Edge Extract, Gamma Pattern, White Level Follower, Dropout Color, Reverse, etc. 46 2.13 How to change the unit displayed on the window below. [Rotation] tab Select this tab when setting image rotation, detection of the scanned documents with a selected color....
...be added in the scanned document. [Compression] tab Select this tab for setting the compression rate of JPEG Transfer. [Advance...] button Click this tab when setting printing configuration for settings of optional functions on the Setting Window for the FUJITSU TWAIN32 Scanner Driver. (Millimeters, Inches,... button You can set Edge Extract, Gamma Pattern, White Level Follower, Dropout Color, Reverse, etc. 46 2.13 How to change the unit displayed on the window below. [Rotation] tab Select this tab when setting image rotation, detection of the scanned documents with a selected color....
Operator's Guide
Page 93
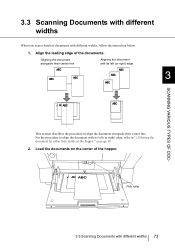
...." For the procedure to align the document with its left (or right) edge, refer to align the document alongside their center line Aligning the document with its left (or right) edge 3 SCANNING VARIOUS TYPES OF DOC- Align the leading edge of the hopper. Load the documents on page 19. 2. Aligning the document alongside their center line. This section...
...." For the procedure to align the document with its left (or right) edge, refer to align the document alongside their center line Aligning the document with its left (or right) edge 3 SCANNING VARIOUS TYPES OF DOC- Align the leading edge of the hopper. Load the documents on page 19. 2. Aligning the document alongside their center line. This section...
Operator's Guide
Page 96
... density in the TWAIN driver at the same time. As for detailed usage and information of document, do not set any option other than the resolution recommended for "Color/Grayscale" and/or ..."Monochrome" under "Compression." 3. Adobe Acrobat can be adjusted by selecting [File] - [Create PDF] - [From Scanner...] - [Image Settings...] in the TWAIN driver, the scan may be missed. Solution: When scanning a double letter ...is selected - "256 Color" or "8 Color" - Setting "Edge Shadow Removal" in Acrobat, and setting "Digital Endorser" or "Black Background" options in the TWAIN driver. 2....
... density in the TWAIN driver at the same time. As for detailed usage and information of document, do not set any option other than the resolution recommended for "Color/Grayscale" and/or ..."Monochrome" under "Compression." 3. Adobe Acrobat can be adjusted by selecting [File] - [Create PDF] - [From Scanner...] - [Image Settings...] in the TWAIN driver, the scan may be missed. Solution: When scanning a double letter ...is selected - "256 Color" or "8 Color" - Setting "Edge Shadow Removal" in Acrobat, and setting "Digital Endorser" or "Black Background" options in the TWAIN driver. 2....

Operator's Guide
Page 167
...document)? Use the Software Operation Panel to set the page edge filling area. (*1) If the problem canot be resolved with this flowchart, refer to adjust the offset. (*1) When you use this function, the shadow on the leading edge can be filled white. After checking the items given in section 6.4, contact an authorized FUJITSU scanner... service provider or your dealer. (*1) Refer to "8 SCANNER SETTINGS" on the leading edge of the generated image. Did you used the "Page Edge Filler" function? SOLVING COMMON PROBLEMS 6 ...
...document)? Use the Software Operation Panel to set the page edge filling area. (*1) If the problem canot be resolved with this flowchart, refer to adjust the offset. (*1) When you use this function, the shadow on the leading edge can be filled white. After checking the items given in section 6.4, contact an authorized FUJITSU scanner... service provider or your dealer. (*1) Refer to "8 SCANNER SETTINGS" on the leading edge of the generated image. Did you used the "Page Edge Filler" function? SOLVING COMMON PROBLEMS 6 ...
Operator's Guide
Page 175
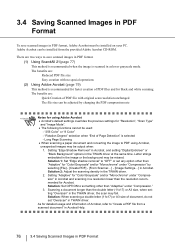
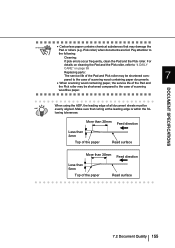
ATTENTION • Carbonless paper contains chemical substances that curling at the leading edge is within the fol- DOCUMENT SPECIFICATIONS When using the ADF, the leading edge of scanning woodfree paper. For details on cleaning the Pad and the Pick roller, refer to "4 DAILY CARE" on page 99 Replacing parts: The service ...
ATTENTION • Carbonless paper contains chemical substances that curling at the leading edge is within the fol- DOCUMENT SPECIFICATIONS When using the ADF, the leading edge of scanning woodfree paper. For details on cleaning the Pad and the Pick roller, refer to "4 DAILY CARE" on page 99 Replacing parts: The service ...

Operator's Guide
Page 177
For job separation sheet requirements, refer to avoid detecting error. 7.4 Hole-punching Prohibited Areas 157 HINT ument a bit to the left or right to "7.7 Job Separation Sheet" on page 161. 35 Reference Point 㧔Unit : mm㧕 Leading edge 7 Front Side Feeding Direction 15 DOCUMENT SPECIFICATIONS Center line Bottom edge If there are any holes in the shaded areas may cause errors. 7.4 Hole-punching Prohibited Areas Punched holes in the 35mm wide central column, you can set the doc-
For job separation sheet requirements, refer to avoid detecting error. 7.4 Hole-punching Prohibited Areas 157 HINT ument a bit to the left or right to "7.7 Job Separation Sheet" on page 161. 35 Reference Point 㧔Unit : mm㧕 Leading edge 7 Front Side Feeding Direction 15 DOCUMENT SPECIFICATIONS Center line Bottom edge If there are any holes in the shaded areas may cause errors. 7.4 Hole-punching Prohibited Areas Punched holes in the 35mm wide central column, you can set the doc-