Getting Started Guide
Page 19
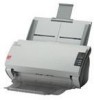
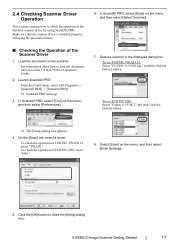
... ⇒ ScandAll PRO starts up. 3. Make sure that the scanner driver is installed properly, following the procedure below. 6. Select [Scan] on the scanner. Load the document on the menu, and then select [Scan Settings]. 5. For ...Scanner Driver 1. In ScandAll PRO, select [Tool] on the menu, and then select [Select Scanner]. ■ Checking the Operation of FUJITSU ISIS, select "ISIS." 8. To use FUJITSU TWAIN 32: Select "FUJITSU fi-5530C2dj," and then click the [Select] button. Click the [OK] button to section 1.2 in the displayed dialog box. fi-5530C2 Image Scanner...
... ⇒ ScandAll PRO starts up. 3. Make sure that the scanner driver is installed properly, following the procedure below. 6. Select [Scan] on the scanner. Load the document on the menu, and then select [Scan Settings]. 5. For ...Scanner Driver 1. In ScandAll PRO, select [Tool] on the menu, and then select [Select Scanner]. ■ Checking the Operation of FUJITSU ISIS, select "ISIS." 8. To use FUJITSU TWAIN 32: Select "FUJITSU fi-5530C2dj," and then click the [Select] button. Click the [OK] button to section 1.2 in the displayed dialog box. fi-5530C2 Image Scanner...

Operator's Guide
Page 19
BASIC SCANNER OPERATIONS 1.1 Turning the Scanner ON 3) In the [Printers and Other Hardware] window, double click the [Scanners and Cameras] icon. 1 ⇒ The [Scanners and Cameras] window appears. 4) In Windows XP and Windows Server 2003, right-click on the [fi5530C2dj] icon. ⇒ The [fi-5530C2dj Properties] dialog box appears. 5) Select the [Device Set] tab. In Windows 2000 and Windows Vista, double-click on the [fi-5530C2dj] icon, and then select [Properties]. fi-5530C2 Image Scanner Operator's Guide 3
BASIC SCANNER OPERATIONS 1.1 Turning the Scanner ON 3) In the [Printers and Other Hardware] window, double click the [Scanners and Cameras] icon. 1 ⇒ The [Scanners and Cameras] window appears. 4) In Windows XP and Windows Server 2003, right-click on the [fi5530C2dj] icon. ⇒ The [fi-5530C2dj Properties] dialog box appears. 5) Select the [Device Set] tab. In Windows 2000 and Windows Vista, double-click on the [fi-5530C2dj] icon, and then select [Properties]. fi-5530C2 Image Scanner Operator's Guide 3

Operator's Guide
Page 47
... the [Scan] menu, select [Select Scanner]. 1 BASIC SCANNER OPERATIONS ⇒ The [Select Scanner] dialog box appears. 2) Select a scanner you have to use. FUJITSU TWAIN 32 FUJITSU ISIS fi-5530C2 Image Scanner Operator's Guide 31 When the driver is FUJITSU ISIS, select [FUJITSU fi-5530C2], and then click the [Select] button. When the driver is FUJITSU TWAIN 32, select [FUJITSU fi-5530C2dj], and then click the [Select] button...
... the [Scan] menu, select [Select Scanner]. 1 BASIC SCANNER OPERATIONS ⇒ The [Select Scanner] dialog box appears. 2) Select a scanner you have to use. FUJITSU TWAIN 32 FUJITSU ISIS fi-5530C2 Image Scanner Operator's Guide 31 When the driver is FUJITSU ISIS, select [FUJITSU fi-5530C2], and then click the [Select] button. When the driver is FUJITSU TWAIN 32, select [FUJITSU fi-5530C2dj], and then click the [Select] button...

Operator's Guide
Page 73
2.5 Saving Scanned Images in the order presented. Select [FUJITSU fi-5530C2dj] from the [Scanner] drop-down list. Place the document on the ADF paper chute. 2. Then, Adobe Acrobat starts up. 3. SCANNING VARIOUS TYPES OF DOCUMENTS fi-5530C2 Image Scanner Operator's Guide 57 From the [File] menu, select [Create PDF], and then select [From Scanner]. 2 ⇒ The [Acrobat Scan] dialog box appears. 4. Launch Adobe Acrobat From the [Start] menu, select [All Programs] - [Adobe Acrobat] in PDF Format ■ Using Adobe Acrobat 1.
2.5 Saving Scanned Images in the order presented. Select [FUJITSU fi-5530C2dj] from the [Scanner] drop-down list. Place the document on the ADF paper chute. 2. Then, Adobe Acrobat starts up. 3. SCANNING VARIOUS TYPES OF DOCUMENTS fi-5530C2 Image Scanner Operator's Guide 57 From the [File] menu, select [Create PDF], and then select [From Scanner]. 2 ⇒ The [Acrobat Scan] dialog box appears. 4. Launch Adobe Acrobat From the [Start] menu, select [All Programs] - [Adobe Acrobat] in PDF Format ■ Using Adobe Acrobat 1.

Operator's Guide
Page 85
fi-5530C2 Image Scanner Operator's Guide 69 SCANNING VARIOUS TYPES OF DOCUMENTS 2.8 Detecting Multifeeds 4) Right-click on the [fi-5530C2dj] icon (in Windows XP/Windows Server 2003), or double-click on it (in Windows 2000/Windows Vista), and then select [Properties] from the pop-up menu. ⇒ The [fi-5530C2dj Properties] dialog box appears. 2 5) Select the [Device Set] tab. ⇒ The following dialog box appears.
fi-5530C2 Image Scanner Operator's Guide 69 SCANNING VARIOUS TYPES OF DOCUMENTS 2.8 Detecting Multifeeds 4) Right-click on the [fi-5530C2dj] icon (in Windows XP/Windows Server 2003), or double-click on it (in Windows 2000/Windows Vista), and then select [Properties] from the pop-up menu. ⇒ The [fi-5530C2dj Properties] dialog box appears. 2 5) Select the [Device Set] tab. ⇒ The following dialog box appears.

Operator's Guide
Page 100
From the [Start] menu, select [Control Panel]. 2. Display the [fi-5530C2dj Properties] dialog box. Select a button to 9 displayed on the [fi-5330C2dj] icon. In Windows 2000 or Windows Vista, double-click on the Scanner With ScandAll PRO, you can be selected: •Scan Button (Press the [Scan] button...] button. The following events can perform batch scan at a press of the button, by Pressing the Scan Button on the [fi-5330C2dj] icon. 4. Select [Scanners and Cameras]. 3. 2.14 Scanning by assigning a Batch Scan profile to the [Scan] or [Send to launch the application. ...
From the [Start] menu, select [Control Panel]. 2. Display the [fi-5530C2dj Properties] dialog box. Select a button to 9 displayed on the [fi-5330C2dj] icon. In Windows 2000 or Windows Vista, double-click on the Scanner With ScandAll PRO, you can be selected: •Scan Button (Press the [Scan] button...] button. The following events can perform batch scan at a press of the button, by Pressing the Scan Button on the [fi-5330C2dj] icon. 4. Select [Scanners and Cameras]. 3. 2.14 Scanning by assigning a Batch Scan profile to the [Scan] or [Send to launch the application. ...

Operator's Guide
Page 113
In the [Printers and Other Hardware] window, double-click on the [fi-5530C2dj] icon, and then select [Properties]. REPLACING CONSUMABLES fi-5530C2 Image Scanner Operator's Guide 97 In Windows XP or Windows Server 2003, right-click on the [Scanners and Cameras] icon. ⇒ The [Scanners and Cameras] window is displayed. 4 4. In Windows 2000 or Windows Vista, double-click on the [fi- 5530C2dj] icon. ⇒ The [fi-5530C2 Properties] dialog box appears. 4.1 Consumable and Replacement Cycle 3.
In the [Printers and Other Hardware] window, double-click on the [fi-5530C2dj] icon, and then select [Properties]. REPLACING CONSUMABLES fi-5530C2 Image Scanner Operator's Guide 97 In Windows XP or Windows Server 2003, right-click on the [Scanners and Cameras] icon. ⇒ The [Scanners and Cameras] window is displayed. 4 4. In Windows 2000 or Windows Vista, double-click on the [fi- 5530C2dj] icon. ⇒ The [fi-5530C2 Properties] dialog box appears. 4.1 Consumable and Replacement Cycle 3.

Operator's Guide
Page 117
... counter is connected to "0". fi-5530C2 Image Scanner Operator's Guide 101 REPLACING CONSUMABLES 4.2 Replacing the Pad ASSY 6. Reset the pad counter. 1) Check that the scanner is reset to your personal computer and turn on the scanner. 2) Open [Scanners and Cameras] from the control panel on your computer. 3) Select [Properties] of [fi-5530C2dj]. ⇒ The [fi-5530C2dj Properties] dialog box appears...
... counter is connected to "0". fi-5530C2 Image Scanner Operator's Guide 101 REPLACING CONSUMABLES 4.2 Replacing the Pad ASSY 6. Reset the pad counter. 1) Check that the scanner is reset to your personal computer and turn on the scanner. 2) Open [Scanners and Cameras] from the control panel on your computer. 3) Select [Properties] of [fi-5530C2dj]. ⇒ The [fi-5530C2dj Properties] dialog box appears...

Operator's Guide
Page 124
... connected to "0". 108 The Pick roller counter returns to your personal computer. 2) Open the [Scanners and Cameras] from the control panel of your personal computer. 3) Open the [Properties] of [fi-5530C2dj] from the [Scanners and Cameras]. ⇒ The [Properties of fi-5530C2dj] dialog box is displayed. 4) Click the [Device Set] tab. ⇒ The following window appears...
... connected to "0". 108 The Pick roller counter returns to your personal computer. 2) Open the [Scanners and Cameras] from the control panel of your personal computer. 3) Open the [Properties] of [fi-5530C2dj] from the [Scanners and Cameras]. ⇒ The [Properties of fi-5530C2dj] dialog box is displayed. 4) Click the [Device Set] tab. ⇒ The following window appears...

Operator's Guide
Page 163
In Windows 2000 or Windows Vista, double-click on the [fi-5530C2dj] icon, and then select [Properties]. A fi-5530C2 Image Scanner Operator's Guide AP-1 Select an event. When the operating system you can launch the linked application at a press of a button. (To use ScandAll PRO, ...read section 2.14 "Scanning by Pressing the Scan Button on the Scanner" on page 84.) ■ Settings to Configure on the Computer 1. In Windows XP or Windows Server 2003, right-click on the [fi-5530C2dj] icon. 4. Select the [Events] tab. 5. APPENDIX A Using the [Scan] or [Send to] ...
In Windows 2000 or Windows Vista, double-click on the [fi-5530C2dj] icon, and then select [Properties]. A fi-5530C2 Image Scanner Operator's Guide AP-1 Select an event. When the operating system you can launch the linked application at a press of a button. (To use ScandAll PRO, ...read section 2.14 "Scanning by Pressing the Scan Button on the Scanner" on page 84.) ■ Settings to Configure on the Computer 1. In Windows XP or Windows Server 2003, right-click on the [fi-5530C2dj] icon. 4. Select the [Events] tab. 5. APPENDIX A Using the [Scan] or [Send to] ...