Datasheet
Page 2
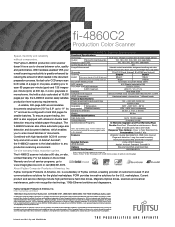
... labor and travel) Response Time Options: 4-hour or Next Business Day Consumables: ScanAid™ Kits Features Ultrasonic double feed detection, RGB color dropout, Page-end detection, Long document scanning, Hardware-assisted VRS and RoHS compliant Bundled Software (DVD format) ... registered trademark of Adobe Systems Incorporated in . has determined that this document. Fujitsu Computer Products of America, Inc. As an ENERGY STAR® Partner, Fujitsu Ltd. fi-4860C2 Production Color Scanner Speed, flexibility and reliability without prior notice these statements, our products,...
... labor and travel) Response Time Options: 4-hour or Next Business Day Consumables: ScanAid™ Kits Features Ultrasonic double feed detection, RGB color dropout, Page-end detection, Long document scanning, Hardware-assisted VRS and RoHS compliant Bundled Software (DVD format) ... registered trademark of Adobe Systems Incorporated in . has determined that this document. Fujitsu Computer Products of America, Inc. As an ENERGY STAR® Partner, Fujitsu Ltd. fi-4860C2 Production Color Scanner Speed, flexibility and reliability without prior notice these statements, our products,...
Operator's Guide
Page 3
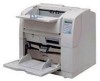
FUJITSU fi series image scanners are known for high reliability and this manual The manual provides the following features. Duplex capability is no exceptions. About this scanner is available as standard feature. Highly reliable document handling Accepts various thicknesses, sizes and types of 20 lb... scanning needs. DAILY CARE This chapter describes how to replace scanner consumables. ●i High speed, high quality color scanning capabilities Scans documents of Letter/A4 size at the speed of documents. 3. The fi-4860C2 is designed to scan various type of 60ppm/120ipm @...
FUJITSU fi series image scanners are known for high reliability and this manual The manual provides the following features. Duplex capability is no exceptions. About this scanner is available as standard feature. Highly reliable document handling Accepts various thicknesses, sizes and types of 20 lb... scanning needs. DAILY CARE This chapter describes how to replace scanner consumables. ●i High speed, high quality color scanning capabilities Scans documents of Letter/A4 size at the speed of documents. 3. The fi-4860C2 is designed to scan various type of 60ppm/120ipm @...
Operator's Guide
Page 24
... CONSUMABLES .... 4-1 Consumables and Replacement Cycle 4-2 How to check the Abrasion Counter 4-3 Replacing the Pad ASSY 4-4 Replacing the Pick Roller Unit 4-9 Replacing the Brake Roller Unit 4-12 Replacing the Front-side Lamp 4-15 Replacing the Back-side Lamp 4-20 5 SOLVING COMMON PROBLEMS 5-1 Clearing Document Jams 5-2 Troubleshooting 5-8 Before Contacting a Service Provider 5-29 Labels on the Scanner...
... CONSUMABLES .... 4-1 Consumables and Replacement Cycle 4-2 How to check the Abrasion Counter 4-3 Replacing the Pad ASSY 4-4 Replacing the Pick Roller Unit 4-9 Replacing the Brake Roller Unit 4-12 Replacing the Front-side Lamp 4-15 Replacing the Back-side Lamp 4-20 5 SOLVING COMMON PROBLEMS 5-1 Clearing Document Jams 5-2 Troubleshooting 5-8 Before Contacting a Service Provider 5-29 Labels on the Scanner...

Operator's Guide
Page 35
...m 1 Enter setup mode. (For the details on how to enter the setup mode, refer to estimate service life of the consumables. ■ Clearing the consumables replacement message This scanner has Abrasion counters to "7 OPERATOR PANEL MENUS" on page 7-1. Here is an example of the Operator Panel 1-9 BASIC... SCANNER OPERATIONS 1.3 Basic Operations of the error messages. When a counter (for the Pad ASSY, the...
...m 1 Enter setup mode. (For the details on how to enter the setup mode, refer to estimate service life of the consumables. ■ Clearing the consumables replacement message This scanner has Abrasion counters to "7 OPERATOR PANEL MENUS" on page 7-1. Here is an example of the Operator Panel 1-9 BASIC... SCANNER OPERATIONS 1.3 Basic Operations of the error messages. When a counter (for the Pad ASSY, the...

Operator's Guide
Page 135
4 REPLACEMENT OF CONSUMABLES This chapter describes how to replace consumables. 4.1 Consumables and Replacement Cycle 4-2 4.2 How to check the Abrasion Counter 4-3 4.3 Replacing the Pad ASSY 4-4 4.4 Replacing the Pick Roller Unit 4-9 4.5 Replacing the Brake Roller Unit 4-12 4.6 Replacing the Front-side Lamp 4-15 4.7 Replacing the Back-side Lamp 4-20 4-1
4 REPLACEMENT OF CONSUMABLES This chapter describes how to replace consumables. 4.1 Consumables and Replacement Cycle 4-2 4.2 How to check the Abrasion Counter 4-3 4.3 Replacing the Pad ASSY 4-4 4.4 Replacing the Pick Roller Unit 4-9 4.5 Replacing the Brake Roller Unit 4-12 4.6 Replacing the Front-side Lamp 4-15 4.7 Replacing the Back-side Lamp 4-20 4-1
Operator's Guide
Page 136
...Consumables and Replacement Cycle You can check the cumulative lamp-on time for the Pad ASSY, the Pick roller unit, the Brake roller unit, and Print cartridge, and you purchased your scanner. The Scanner may differ due to each counter on Letter/A4 woodfree paper or wood containing paper documents... that you stock extra consumables before the ones in the scanner reach the end of Their service life. For the purchase of the consumables, please contact the FUJITSU scanner dealer where you can check the number of the consumables. 4.1 Consumables and Replacement Cycle The ...
...Consumables and Replacement Cycle You can check the cumulative lamp-on time for the Pad ASSY, the Pick roller unit, the Brake roller unit, and Print cartridge, and you purchased your scanner. The Scanner may differ due to each counter on Letter/A4 woodfree paper or wood containing paper documents... that you stock extra consumables before the ones in the scanner reach the end of Their service life. For the purchase of the consumables, please contact the FUJITSU scanner dealer where you can check the number of the consumables. 4.1 Consumables and Replacement Cycle The ...

Operator's Guide
Page 137
... Batch counter indicates the number of scanned pages of LCD in the "Ready" status shows the consumables count. Batch counter 4 Re a d y xxxxx xxxxxx Abrasion counter When the counter is zero, nothing is displayed. REPLACEMENT OF CONSUMABLES 4.2 How to check the Abrasion Counter ■ Checking the counter from the Operator panel The number...
... Batch counter indicates the number of scanned pages of LCD in the "Ready" status shows the consumables count. Batch counter 4 Re a d y xxxxx xxxxxx Abrasion counter When the counter is zero, nothing is displayed. REPLACEMENT OF CONSUMABLES 4.2 How to check the Abrasion Counter ■ Checking the counter from the Operator panel The number...

Operator's Guide
Page 139
Press down on the upper part of the Guide plate with your fingers at the two positions shown and then rotate the plate toward you to remove it. ADF upper sheet guide 4 ADF release lever 3. Pad ASSY REPLACEMENT OF CONSUMABLES Guide plate 4.3 Replacing the Pad ASSY 4-5 Pull the ADF release lever toward you and lift up the ADF sheet guide. 2.
Press down on the upper part of the Guide plate with your fingers at the two positions shown and then rotate the plate toward you to remove it. ADF upper sheet guide 4 ADF release lever 3. Pad ASSY REPLACEMENT OF CONSUMABLES Guide plate 4.3 Replacing the Pad ASSY 4-5 Pull the ADF release lever toward you and lift up the ADF sheet guide. 2.

Operator's Guide
Page 141
Remove the Pad ASSY from the Guide plate by pushing the removal metal scroll down and then release hooks. 4 4.3 Replacing the Pad ASSY 4-7 REPLACEMENT OF CONSUMABLES 4.
Remove the Pad ASSY from the Guide plate by pushing the removal metal scroll down and then release hooks. 4 4.3 Replacing the Pad ASSY 4-7 REPLACEMENT OF CONSUMABLES 4.

Operator's Guide
Page 143
CAUTION Raise the Upper transport unit fully, then lower it . Pull up the lever on the right front of the Upper transport and then raise it to engage lock before you put your hands inside of the scanner. 4 REPLACEMENT OF CONSUMABLES 4.4 Replacing the Pick Roller Unit 4-9 4.4 Replacing the Pick Roller Unit 1. Remove documents from the stacker.
CAUTION Raise the Upper transport unit fully, then lower it . Pull up the lever on the right front of the Upper transport and then raise it to engage lock before you put your hands inside of the scanner. 4 REPLACEMENT OF CONSUMABLES 4.4 Replacing the Pick Roller Unit 4-9 4.4 Replacing the Pick Roller Unit 1. Remove documents from the stacker.
Operator's Guide
Page 145
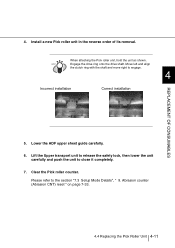
... the clutch ring with the shaft and move right to the section "7.3 Setup Mode Details", " 9. Please refer to engage. 4 Incorrect installation Correct installation REPLACEMENT OF CONSUMABLES 5. HINT Engage the drive ring onto the drive shaft. Clear the Pick roller counter. Abrasion counter (Abrasion CNT) reset " on page 7-33. 4.4 Replacing the Pick...
... the clutch ring with the shaft and move right to the section "7.3 Setup Mode Details", " 9. Please refer to engage. 4 Incorrect installation Correct installation REPLACEMENT OF CONSUMABLES 5. HINT Engage the drive ring onto the drive shaft. Clear the Pick roller counter. Abrasion counter (Abrasion CNT) reset " on page 7-33. 4.4 Replacing the Pick...

Operator's Guide
Page 147
REPLACEMENT OF CONSUMABLES 3. Turn the bail of the Guide plate with your fingers at the two positions shown and rotate the plate toward you to remove it. Brake roller Bail 4.5 Replacing the Brake Roller Unit 4-13 Pad ASSY 4 Guide plate 4. Press down on the upper part of the Brake roller upward and release the lock.
REPLACEMENT OF CONSUMABLES 3. Turn the bail of the Guide plate with your fingers at the two positions shown and rotate the plate toward you to remove it. Brake roller Bail 4.5 Replacing the Brake Roller Unit 4-13 Pad ASSY 4 Guide plate 4. Press down on the upper part of the Brake roller upward and release the lock.

Operator's Guide
Page 149
Wait 5 minutes after turning off the power. Remove documents from the stacker. Pull up the lever on the right front of the scanner. CAUTION Raise the Upper transport unit fully, then lower it . 4.6 Replacing the Front-side Lamp CAUTION Never replace the Lamp without turning off the power before you put your hands inside of the Upper transport and then raise it to engage lock before touching the Lamp. 4 1. REPLACEMENT OF CONSUMABLES 4.6 Replacing the Front-side Lamp 4-15
Wait 5 minutes after turning off the power. Remove documents from the stacker. Pull up the lever on the right front of the scanner. CAUTION Raise the Upper transport unit fully, then lower it . 4.6 Replacing the Front-side Lamp CAUTION Never replace the Lamp without turning off the power before you put your hands inside of the Upper transport and then raise it to engage lock before touching the Lamp. 4 1. REPLACEMENT OF CONSUMABLES 4.6 Replacing the Front-side Lamp 4-15

Operator's Guide
Page 151
Lamp socket 4.6 Replacing the Front-side Lamp 4-17 Tab 4 4. Pulling down the Lamp socket covers attached to the both end of the Lamp sockets and remove them. Rotate the Lamp a half turn so that the terminals on each end align with the slot on the Lamp socket and remove the Lamp from the unit. REPLACEMENT OF CONSUMABLES 3.
Lamp socket 4.6 Replacing the Front-side Lamp 4-17 Tab 4 4. Pulling down the Lamp socket covers attached to the both end of the Lamp sockets and remove them. Rotate the Lamp a half turn so that the terminals on each end align with the slot on the Lamp socket and remove the Lamp from the unit. REPLACEMENT OF CONSUMABLES 3.

Operator's Guide
Page 153
Lamp socket cover 4 REPLACEMENT OF CONSUMABLES 7. Make sure that the metal part is fixed firmly. 8. 6. Please refer to the section "7.5 Test Mode Details " " 3. Attach the Lamp socket cover in the reverse ...
Lamp socket cover 4 REPLACEMENT OF CONSUMABLES 7. Make sure that the metal part is fixed firmly. 8. 6. Please refer to the section "7.5 Test Mode Details " " 3. Attach the Lamp socket cover in the reverse ...

Operator's Guide
Page 155
Lamp socket Backside lamp unit 4.7 Replacing the Back-side Lamp 4-21 Rotate the Lamp a half turn so that the terminals on each end align with the slot on the Lamp socket and remove the Lamp from the unit. REPLACEMENT OF CONSUMABLES 2. Hold the handle (blue part) and pull out the Back-side lamp unit. 4 3.
Lamp socket Backside lamp unit 4.7 Replacing the Back-side Lamp 4-21 Rotate the Lamp a half turn so that the terminals on each end align with the slot on the Lamp socket and remove the Lamp from the unit. REPLACEMENT OF CONSUMABLES 2. Hold the handle (blue part) and pull out the Back-side lamp unit. 4 3.
Operator's Guide
Page 157
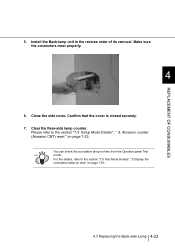
... order of its removal. Confirm that the cover is closed securely. 7. Clear the Rear-side lamp counter. Make sure the connectors meet properly. 4 REPLACEMENT OF CONSUMABLES 6. 5.
... order of its removal. Confirm that the cover is closed securely. 7. Clear the Rear-side lamp counter. Make sure the connectors meet properly. 4 REPLACEMENT OF CONSUMABLES 6. 5.

Operator's Guide
Page 172
... setting from the previous page Contact an authorized FUJITSU Scanner service provider. (* 1) If Binary mode is used , the method to specify "Photo" mode and the name of a photograph may not be different. Continued from scanner driver setting dialog, specify [Halftone], [Gray ...scale] or [24bit Color] for Image Mode. If the application allows you have to specify Dither pattern. (* 2) For the details of cleaning, refer to "3 DAILY CARE" on page 3-1. (* 3) For the details on how to replace Lamps, refer to "4 REPLACEMENT OF CONSUMABLES...
... setting from the previous page Contact an authorized FUJITSU Scanner service provider. (* 1) If Binary mode is used , the method to specify "Photo" mode and the name of a photograph may not be different. Continued from scanner driver setting dialog, specify [Halftone], [Gray ...scale] or [24bit Color] for Image Mode. If the application allows you have to specify Dither pattern. (* 2) For the details of cleaning, refer to "3 DAILY CARE" on page 3-1. (* 3) For the details on how to replace Lamps, refer to "4 REPLACEMENT OF CONSUMABLES...

Operator's Guide
Page 175
...", "3. Display the cumulative lamp-on time" on page 7-81. (* 3) For the details on time, please refer to "4 REPLACEMENT OF CONSUMABLES". 5.2 Troubleshooting 5-17 SOLVING COMMON PROBLEMS 5 (* 1) For the cleaning of the scanned document and is the "Line Art" mode selected. Are the streaks black? YES NO Is there text in the scanned image... guide , and the Glass sheet guide. (* 1) Select "Photo" mode. YES NO Are the Lamp(s) more than 1,000 hours old? Replace the Lamp. (* 3) Contact an authorized FUJITSU Scanner service provider.
...", "3. Display the cumulative lamp-on time" on page 7-81. (* 3) For the details on time, please refer to "4 REPLACEMENT OF CONSUMABLES". 5.2 Troubleshooting 5-17 SOLVING COMMON PROBLEMS 5 (* 1) For the cleaning of the scanned document and is the "Line Art" mode selected. Are the streaks black? YES NO Is there text in the scanned image... guide , and the Glass sheet guide. (* 1) Select "Photo" mode. YES NO Are the Lamp(s) more than 1,000 hours old? Replace the Lamp. (* 3) Contact an authorized FUJITSU Scanner service provider.

Operator's Guide
Page 180
...Have you have not scanned more than 300,000 sheets. (* 7) YES NO Contact an authorized FUJITSU Scanner service provider. For the method to check the number of rollers. Check the consumables life to "APPENDIX 2 DOUBLE- Replace the Pick roller unit and the Brake roller unit if ... replace and install Pick roller unit and Brake roller unit, refer to "4 REPLACEMENT OF CONSUMABLES" on page 4-1. (* 7) Check the wear of sheets scanned for each consumable, refer to the section "6.2 Document Quality" on page 7-33. 5-22 5.2 Troubleshooting Abrasion counter reset" on page 6-3. ...
...Have you have not scanned more than 300,000 sheets. (* 7) YES NO Contact an authorized FUJITSU Scanner service provider. For the method to check the number of rollers. Check the consumables life to "APPENDIX 2 DOUBLE- Replace the Pick roller unit and the Brake roller unit if ... replace and install Pick roller unit and Brake roller unit, refer to "4 REPLACEMENT OF CONSUMABLES" on page 4-1. (* 7) Check the wear of sheets scanned for each consumable, refer to the section "6.2 Document Quality" on page 7-33. 5-22 5.2 Troubleshooting Abrasion counter reset" on page 6-3. ...
