Operator's Guide
Page 57
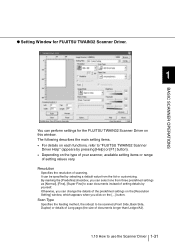
... details on each functions, refer to be specified by pressing [Help] or [F1] button). • Depending on this window. By marking the [Predefine] checkbox, you click on the [...] button. Scan Type Specifies the feeding method, the side(s) to "FUJITSU TWAIN32 Scanner Driver Help" (appears by selecting a default value from three predefined settings as... on the [Resolution Setting] window, which appears when you can be scanned (Front Side, Back Side, Duplex) or details of Long page (the size of documents longer than Ledger/A3). 1.10 How to scan...
... details on each functions, refer to be specified by pressing [Help] or [F1] button). • Depending on this window. By marking the [Predefine] checkbox, you click on the [...] button. Scan Type Specifies the feeding method, the side(s) to "FUJITSU TWAIN32 Scanner Driver Help" (appears by selecting a default value from three predefined settings as... on the [Resolution Setting] window, which appears when you can be scanned (Front Side, Back Side, Duplex) or details of Long page (the size of documents longer than Ledger/A3). 1.10 How to scan...
Operator's Guide
Page 58
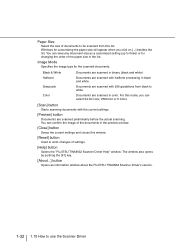
... Used to undo changes of settings. [Help] button Opens the "FUJITSU TWAIN32 Scanner Driver Help" window. Black & White Documents are scanned in binary (black and white). The window also opens by pushing the [F1] key. [About...] button Opens an information window about the FUJITSU TWAIN32 Scanner Driver's version. 1-32 1.10 How to three) or for the...
... Used to undo changes of settings. [Help] button Opens the "FUJITSU TWAIN32 Scanner Driver Help" window. Black & White Documents are scanned in binary (black and white). The window also opens by pushing the [F1] key. [About...] button Opens an information window about the FUJITSU TWAIN32 Scanner Driver's version. 1-32 1.10 How to three) or for the...

Operator's Guide
Page 88
...(* 1) Cleaner F2 CA99501-0014 1 bottle, 100ml/bottle (* 1) Isopropyl alcohol or CA99501-0013 Cleaner F1 1 bottle, 100ml/bottle Moisten cloth with this fluid and wipe the scanner to clean. (* 1) Cotton swab Commercially available one Lint-free dry cloth Commercially available one(* 2) ...* 1) For the purchase of the cleaning material, contact the FUJITSU scanner dealer where you purchased the scanner. *2) Any lint-free cloth can be used. 3-2 3.1 Cleaning Materials and Areas Requiring Cleaning 3.1 Cleaning Materials and Areas...
...(* 1) Cleaner F2 CA99501-0014 1 bottle, 100ml/bottle (* 1) Isopropyl alcohol or CA99501-0013 Cleaner F1 1 bottle, 100ml/bottle Moisten cloth with this fluid and wipe the scanner to clean. (* 1) Cotton swab Commercially available one Lint-free dry cloth Commercially available one(* 2) ...* 1) For the purchase of the cleaning material, contact the FUJITSU scanner dealer where you purchased the scanner. *2) Any lint-free cloth can be used. 3-2 3.1 Cleaning Materials and Areas Requiring Cleaning 3.1 Cleaning Materials and Areas...

Operator's Guide
Page 93
4. Lower the ADF upper sheet guide carefully. 7. Install the guide plate in the reverse order of the Pad ASSY using a lint free cloth moistened with cleaner F1. Lift the Upper transport unit to release the safety lock, then lower the unit carefully and push the unit to close it down then rotate back, so the installation can be done smoothly. 6. Pad (cleaning area) Pad ASSY 3 Guide plate DAILY CARE 5. Wipe the translucent rubber part of the removal.You should push it completely. 3.2 Cleaning the Pad 3-7
4. Lower the ADF upper sheet guide carefully. 7. Install the guide plate in the reverse order of the Pad ASSY using a lint free cloth moistened with cleaner F1. Lift the Upper transport unit to release the safety lock, then lower the unit carefully and push the unit to close it down then rotate back, so the installation can be done smoothly. 6. Pad (cleaning area) Pad ASSY 3 Guide plate DAILY CARE 5. Wipe the translucent rubber part of the removal.You should push it completely. 3.2 Cleaning the Pad 3-7

Operator's Guide
Page 98
Wipe both Pick rollers (2 positions) and the Separation roller using a clean lint free cloth moistened with cleaner F1. Ring Pick roller unit Separation roller 3-12 3.3 Cleaning the Rollers 4.
Wipe both Pick rollers (2 positions) and the Separation roller using a clean lint free cloth moistened with cleaner F1. Ring Pick roller unit Separation roller 3-12 3.3 Cleaning the Rollers 4.

Operator's Guide
Page 103
... the Guide plate down until it completely. 3.3 Cleaning the Rollers 3-17 DAILY CARE 6. Wipe the Brake roller unit using a lint free cloth moistened with cleaner F1. Install the Guide plate in . 8.
... the Guide plate down until it completely. 3.3 Cleaning the Rollers 3-17 DAILY CARE 6. Wipe the Brake roller unit using a lint free cloth moistened with cleaner F1. Install the Guide plate in . 8.

Operator's Guide
Page 107
Pinch roller (in 12 locations) 3 3. Lift the Upper transport unit to release the safety lock, then lower the unit carefully and push the unit to close it completely. 3.3 Cleaning the Rollers 3-21 DAILY CARE 2. Wipe the pinch rollers using a cloth moistened with cleaner F1.
Pinch roller (in 12 locations) 3 3. Lift the Upper transport unit to release the safety lock, then lower the unit carefully and push the unit to close it completely. 3.3 Cleaning the Rollers 3-21 DAILY CARE 2. Wipe the pinch rollers using a cloth moistened with cleaner F1.

Operator's Guide
Page 109
Vacuum the transport path if there are paper dust in the path. Lift the Upper transport unit to release the safety lock, then lower the unit carefully and push the unit to blow dust out of the scanner. Transport path DAILY CARE 3. HINT Do not use aerosol sprays to clean the path. 3 CAUTION Do not use HIgh Pressure Air to close it completely. 3.4 Cleaning the Transport Path 3-23 This will contaminate the optics and mechanism. Wipe and clean the whole transport path using a cloth moistened with cleaner F1. 2.
Vacuum the transport path if there are paper dust in the path. Lift the Upper transport unit to release the safety lock, then lower the unit carefully and push the unit to blow dust out of the scanner. Transport path DAILY CARE 3. HINT Do not use aerosol sprays to clean the path. 3 CAUTION Do not use HIgh Pressure Air to close it completely. 3.4 Cleaning the Transport Path 3-23 This will contaminate the optics and mechanism. Wipe and clean the whole transport path using a cloth moistened with cleaner F1. 2.

Operator's Guide
Page 115
Pull up the lever on the right front of the Upper transport and then raise it to contact hot lamps. 3 DAILY CARE 1. CAUTION Raise the Upper transport unit fully, then lower it . 3.6 Cleaning the Glass Surface ■ Cleaning of the scanner. 3.6 Cleaning the Glass Surface 3-29 Remove documents from the stacker. Do not allow F1 cleaner to engage lock before touching. Wait until the Lamps are cooled down CAUTION before you put your hands inside of the removable sheet guide The Lamps get very hot during use.
Pull up the lever on the right front of the Upper transport and then raise it to contact hot lamps. 3 DAILY CARE 1. CAUTION Raise the Upper transport unit fully, then lower it . 3.6 Cleaning the Glass Surface ■ Cleaning of the scanner. 3.6 Cleaning the Glass Surface 3-29 Remove documents from the stacker. Do not allow F1 cleaner to engage lock before touching. Wait until the Lamps are cooled down CAUTION before you put your hands inside of the removable sheet guide The Lamps get very hot during use.

Operator's Guide
Page 117
Attach the removable sheet guide in the reverse order of the glass surface using a clean lint free cloth moistened with cleaner F1. 3 6. Lift the Upper transport unit to release the safety lock, then lower the unit carefully and push the unit to close it completely. 3.6 Cleaning the Glass Surface 3-31 DAILY CARE 5. Wipe the both sides of its removal. 7.
Attach the removable sheet guide in the reverse order of the glass surface using a clean lint free cloth moistened with cleaner F1. 3 6. Lift the Upper transport unit to release the safety lock, then lower the unit carefully and push the unit to close it completely. 3.6 Cleaning the Glass Surface 3-31 DAILY CARE 5. Wipe the both sides of its removal. 7.

Operator's Guide
Page 118
Do not allow F1 cleaner to engage lock before touching. Pull up the lever on the right front of the scanner. 3-32 3.6 Cleaning the Glass Surface Remove documents from the stacker. ■ Cleaning the Glass Sheet Guide CAUTION The Lamps get very hot during use. Wait until the Lamps are cooled down before you put your hands inside of the Upper transport and then raise it to contact hot lamps. 1. CAUTION Raise the Upper transport unit fully, then lower it .
Do not allow F1 cleaner to engage lock before touching. Pull up the lever on the right front of the scanner. 3-32 3.6 Cleaning the Glass Surface Remove documents from the stacker. ■ Cleaning the Glass Sheet Guide CAUTION The Lamps get very hot during use. Wait until the Lamps are cooled down before you put your hands inside of the Upper transport and then raise it to contact hot lamps. 1. CAUTION Raise the Upper transport unit fully, then lower it .

Operator's Guide
Page 120
Close the Glass sheet guide. Make sure that the metal part locks. 5. Lift the tabs until the Guide locks in. Lift the Upper transport unit to release the safety lock, then lower the unit carefully and push the unit to close it completely. 3-34 3.6 Cleaning the Glass Surface Glass sheet guide Tab 4. Wipe the Glass sheet guide using a clean lint free cloth moistened with cleaner F1. 3.
Close the Glass sheet guide. Make sure that the metal part locks. 5. Lift the tabs until the Guide locks in. Lift the Upper transport unit to release the safety lock, then lower the unit carefully and push the unit to close it completely. 3-34 3.6 Cleaning the Glass Surface Glass sheet guide Tab 4. Wipe the Glass sheet guide using a clean lint free cloth moistened with cleaner F1. 3.

Operator's Guide
Page 122
Hold the ADF sheet guide with cleaner F1. Wipe the six sensor surfaces with a clean lint free cloth moistened with your hand to close it open. 4. Lower the ADF upper sheet guide gently. 6. 2. Pull the ADF release lever toward you and lift up the ADF sheet guide. ADF upper sheet guide ADF release lever 3. Lift the Upper transport unit to release the safety lock, then lower the unit carefully and push the unit to keep it completely. 3-36 3.7 Cleaning the Sensors Document width sensor(in 6 locations) 5.
Hold the ADF sheet guide with cleaner F1. Wipe the six sensor surfaces with a clean lint free cloth moistened with your hand to close it open. 4. Lower the ADF upper sheet guide gently. 6. 2. Pull the ADF release lever toward you and lift up the ADF sheet guide. ADF upper sheet guide ADF release lever 3. Lift the Upper transport unit to release the safety lock, then lower the unit carefully and push the unit to keep it completely. 3-36 3.7 Cleaning the Sensors Document width sensor(in 6 locations) 5.

Operator's Guide
Page 124
Pull the ADF release lever toward you and lift up the ADF sheet guide. Lower the ADF upper sheet guide gently. 6. Hold the ADF sheet guide with cleaner F1. Wipe SF0 and SF1 sensor surfaces with a clean lint free cloth moistened with your hand to close it open. 4. Lift the Upper transport unit to release the safety lock, then lower the unit carefully and push the unit to keep it completely. 3-38 3.7 Cleaning the Sensors 2. ADF upper sheet guide ADF release lever 3. SF1 Sensor SF0 Sensor 5.
Pull the ADF release lever toward you and lift up the ADF sheet guide. Lower the ADF upper sheet guide gently. 6. Hold the ADF sheet guide with cleaner F1. Wipe SF0 and SF1 sensor surfaces with a clean lint free cloth moistened with your hand to close it open. 4. Lift the Upper transport unit to release the safety lock, then lower the unit carefully and push the unit to keep it completely. 3-38 3.7 Cleaning the Sensors 2. ADF upper sheet guide ADF release lever 3. SF1 Sensor SF0 Sensor 5.

Operator's Guide
Page 126
Lift the Upper transport unit to release the safety lock, then lower the unit carefully and push the unit to close it completely. 3-40 3.7 Cleaning the Sensors SF2 Sensor SF1.5 Sensor 3. Wipe SF1.5 and SF2 sensor surfaces with a clean lint free cloth moistened with cleaner F1. 2.
Lift the Upper transport unit to release the safety lock, then lower the unit carefully and push the unit to close it completely. 3-40 3.7 Cleaning the Sensors SF2 Sensor SF1.5 Sensor 3. Wipe SF1.5 and SF2 sensor surfaces with a clean lint free cloth moistened with cleaner F1. 2.

Operator's Guide
Page 127
Wait until the Lamps are cooled down before you put your hands inside of the scanner. 3.8 Cleaning the Lamps 3-41 Pull up the lever on the right front of the Upper transport and then raise it to contact hot lamps. 3.8 Cleaning the Lamps CAUTION The Lamps get very hot during use. Remove documents from the stacker. DAILY CARE ■ Front-side lamp 1. CAUTION Raise the Upper transport unit fully, then lower it . Never replace the Lamp without turning off the power. 3 Do not allow F1 cleaner to engage lock before touching.
Wait until the Lamps are cooled down before you put your hands inside of the scanner. 3.8 Cleaning the Lamps 3-41 Pull up the lever on the right front of the Upper transport and then raise it to contact hot lamps. 3.8 Cleaning the Lamps CAUTION The Lamps get very hot during use. Remove documents from the stacker. DAILY CARE ■ Front-side lamp 1. CAUTION Raise the Upper transport unit fully, then lower it . Never replace the Lamp without turning off the power. 3 Do not allow F1 cleaner to engage lock before touching.
Operator's Guide
Page 313
... Cleaning materials 3-2 Cleaning sheet 3-2, 3-8 Configuration Window of FUJITSU ISIS Scanner Driver 1-38 Consumables 4-2 Abrasion counters........... 1-9, 4-3 Part No 4-2 Replacement cycle 4-2 Replacement message.......... 1-9 Correcting the skewed Documents2-15 Cumulative lamp-on time 4-19 D Daily Care 3-1 Detecting Double-Feeds 2-13 Dimensions 9-3, 9-5 Discharge brush 3-3, 3-24 Document Document quality 6-3 Document size 6-2 Document thickness 6-3 Document type 6-3 Grounding color area 6-8 Hole-punching, area 6-6 Hopper...
... Cleaning materials 3-2 Cleaning sheet 3-2, 3-8 Configuration Window of FUJITSU ISIS Scanner Driver 1-38 Consumables 4-2 Abrasion counters........... 1-9, 4-3 Part No 4-2 Replacement cycle 4-2 Replacement message.......... 1-9 Correcting the skewed Documents2-15 Cumulative lamp-on time 4-19 D Daily Care 3-1 Detecting Double-Feeds 2-13 Dimensions 9-3, 9-5 Discharge brush 3-3, 3-24 Document Document quality 6-3 Document size 6-2 Document thickness 6-3 Document type 6-3 Grounding color area 6-8 Hole-punching, area 6-6 Hopper...