Operator's Guide
Page 4
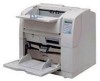
SOLVING COMMON PROBLEMS This chapter describes how to remedy document jams, scanner troubleshooting, and items to check before contacting the agent where you bought the scanner, and how to prepare the scanner for use. 2. OPTIONS This chapter describes the options available for the scanner and the driver installation, please also read the Installation Guide. 1. OPERATOR PANEL MENUS...
SOLVING COMMON PROBLEMS This chapter describes how to remedy document jams, scanner troubleshooting, and items to check before contacting the agent where you bought the scanner, and how to prepare the scanner for use. 2. OPTIONS This chapter describes the options available for the scanner and the driver installation, please also read the Installation Guide. 1. OPERATOR PANEL MENUS...
Operator's Guide
Page 24
... Roller Unit 4-12 Replacing the Front-side Lamp 4-15 Replacing the Back-side Lamp 4-20 5 SOLVING COMMON PROBLEMS 5-1 Clearing Document Jams 5-2 Troubleshooting 5-8 Before Contacting a Service Provider 5-29 Labels on the Scanner 5-31 6 ADF DOCUMENT SPECIFICATIONS ...... 6-1 Document Size 6-2 Document Quality 6-3 Hole-punching Prohibited Areas 6-6 Print Prohibited Area 6-7 Background Color Areas 6-8 Job Separation Sheet 6-9 Hopper Capacity 6-10 7 OPERATOR...
... Roller Unit 4-12 Replacing the Front-side Lamp 4-15 Replacing the Back-side Lamp 4-20 5 SOLVING COMMON PROBLEMS 5-1 Clearing Document Jams 5-2 Troubleshooting 5-8 Before Contacting a Service Provider 5-29 Labels on the Scanner 5-31 6 ADF DOCUMENT SPECIFICATIONS ...... 6-1 Document Size 6-2 Document Quality 6-3 Hole-punching Prohibited Areas 6-6 Print Prohibited Area 6-7 Background Color Areas 6-8 Job Separation Sheet 6-9 Hopper Capacity 6-10 7 OPERATOR...

Operator's Guide
Page 159
5 SOLVING COMMON PROBLEMS This chapter describes how to clear document jams, how to remedy other problems, items to be checked before contacting an authorized service provider and how to check labels on the scanner. 5.1 Clearing Document Jams 5-2 5.2 Troubleshooting 5-8 5.3 Before Contacting a Service Provider 5-29 5.4 Labels on the Scanner 5-31 5-1
5 SOLVING COMMON PROBLEMS This chapter describes how to clear document jams, how to remedy other problems, items to be checked before contacting an authorized service provider and how to check labels on the scanner. 5.1 Clearing Document Jams 5-2 5.2 Troubleshooting 5-8 5.3 Before Contacting a Service Provider 5-29 5.4 Labels on the Scanner 5-31 5-1

Operator's Guide
Page 166
... section describes common troubles during usage and how to an outlet that has power. Contact an authorized FUJITSU Scanner service provider. 5-8 5.2 Troubleshooting Symptom1 Scanner cannot be turned on page 5-29, and then contact an authorized FUJITSU Scanner service provider. YES NO Have you can not resolve the trouble after following flowchart to determine the trouble. Press...
... section describes common troubles during usage and how to an outlet that has power. Contact an authorized FUJITSU Scanner service provider. 5-8 5.2 Troubleshooting Symptom1 Scanner cannot be turned on page 5-29, and then contact an authorized FUJITSU Scanner service provider. YES NO Have you can not resolve the trouble after following flowchart to determine the trouble. Press...

Operator's Guide
Page 167
...FUJITSU Scanner service provider. 5 (* ) Press any button (except Power button) on again? Pressing the power button more than 2 seconds will not work to wake it been a while since you turned on the scanner ? (15 to 60 minutes) YES NO NO Does the LCD remain blank even after the scanner... has been turned on the operator panel to wake up . SOLVING COMMON PROBLEMS Symptom2 The operator panel LCD goes out. The Power button will turn off the power. 5.2 Troubleshooting 5-9 Scanner is normal. The scanner operation is in Power save mode....
...FUJITSU Scanner service provider. 5 (* ) Press any button (except Power button) on again? Pressing the power button more than 2 seconds will not work to wake it been a while since you turned on the scanner ? (15 to 60 minutes) YES NO NO Does the LCD remain blank even after the scanner... has been turned on the operator panel to wake up . SOLVING COMMON PROBLEMS Symptom2 The operator panel LCD goes out. The Power button will turn off the power. 5.2 Troubleshooting 5-9 Scanner is normal. The scanner operation is in Power save mode....

Operator's Guide
Page 168
Symptom3 Scanning does not start. YES Is the interface cable connected properly? correctly. YES NO Set the SCSI ID correctly from the operator panel of the scanner. (* 1) Continued on the hopper? NO Are the documents loaded properly on next page 5-10 5.2 Troubleshooting Load the documents centered in the hopper. YES Is the upper transport unit closed NO Close the upper transport unit correctly? YES Is the SCSI ID set correctly? NO Connect the interface cable properly.
Symptom3 Scanning does not start. YES Is the interface cable connected properly? correctly. YES NO Set the SCSI ID correctly from the operator panel of the scanner. (* 1) Continued on the hopper? NO Are the documents loaded properly on next page 5-10 5.2 Troubleshooting Load the documents centered in the hopper. YES Is the upper transport unit closed NO Close the upper transport unit correctly? YES Is the SCSI ID set correctly? NO Connect the interface cable properly.

Operator's Guide
Page 169
The scanner operation is normal. Is the LED still blinking? SOLVING COMMON PROBLEMS Continued from only one application. NO Is the Check LED blinking? YES NO Close all applications and select the scanner from the previous page Has the scanner been selected by multiple applications ? YES NO The scanner operation is normal. YES Check LCD display for error. Eliminate the cause of user recoverable errors. Continued on next page 5 5.2 Troubleshooting 5-11
The scanner operation is normal. Is the LED still blinking? SOLVING COMMON PROBLEMS Continued from only one application. NO Is the Check LED blinking? YES NO Close all applications and select the scanner from the previous page Has the scanner been selected by multiple applications ? YES NO The scanner operation is normal. YES Check LCD display for error. Eliminate the cause of user recoverable errors. Continued on next page 5 5.2 Troubleshooting 5-11

Operator's Guide
Page 170
Continued from the previous page Is the Check LED lit? NO The scanner operation is normal. YES Turn the power off and on page 7-48. 5-12 5.2 Troubleshooting Setting SCSI ID" on again. Is the Check LED lit? Contact an authorized FUJITSU Scanner service provider. (* 1) For the details on how to set SCSI ID, refer to the section "7.3 Setup Mode Details", "19. YES NO The scanner operation is normal.
Continued from the previous page Is the Check LED lit? NO The scanner operation is normal. YES Turn the power off and on page 7-48. 5-12 5.2 Troubleshooting Setting SCSI ID" on again. Is the Check LED lit? Contact an authorized FUJITSU Scanner service provider. (* 1) For the details on how to set SCSI ID, refer to the section "7.3 Setup Mode Details", "19. YES NO The scanner operation is normal.

Operator's Guide
Page 171
.... (* 1) Select halftoning or dithering mode on next page SOLVING COMMON PROBLEMS 5 5.2 Troubleshooting 5-13 YES Clean the scanner completely. (* 2) Are the Lamps installed correctly? Select "Photo" mode (white level following off) on the scanner setup menu in your PC. YES Is the document path, the Removable NO sheet guide, the Glass sheet guide and/or...
.... (* 1) Select halftoning or dithering mode on next page SOLVING COMMON PROBLEMS 5 5.2 Troubleshooting 5-13 YES Clean the scanner completely. (* 2) Are the Lamps installed correctly? Select "Photo" mode (white level following off) on the scanner setup menu in your PC. YES Is the document path, the Removable NO sheet guide, the Glass sheet guide and/or...

Operator's Guide
Page 172
... on page 4-1. 5-14 5.2 Troubleshooting In [Halftone] mode, you to "4 REPLACEMENT OF CONSUMABLES" on the applications used , the scanned image of cleaning, refer to "3 DAILY CARE" on page 3-1. (* 3) For the details on how to replace Lamps, refer to change the setting from the previous page Contact an authorized FUJITSU Scanner service provider. (* 1) If Binary...
... on page 4-1. 5-14 5.2 Troubleshooting In [Halftone] mode, you to "4 REPLACEMENT OF CONSUMABLES" on the applications used , the scanned image of cleaning, refer to "3 DAILY CARE" on page 3-1. (* 3) For the details on how to replace Lamps, refer to change the setting from the previous page Contact an authorized FUJITSU Scanner service provider. (* 1) If Binary...

Operator's Guide
Page 173
YES Select "Line Art" mode from scanner driver setting dialog, specify [Black & White] for Image Mode. (* 2 For the details of cleaning, refer to "3 DAILY CARE" on the applications used , the scanned image .... YES NO Is the document path, the Removable sheet guide, the Glass sheet guide and/or the Lamp(s) clean? If the application allows you to change the setting from your PC. (* 1) Clean the scanner completely. (* 2) Contact an authorized FUJITSU Scanner service provider. 5 (* 1) If halftone mode is unsatisfactory. Depending on page 3-1. 5.2 Troubleshooting 5-15 NO Is "Line...
YES Select "Line Art" mode from scanner driver setting dialog, specify [Black & White] for Image Mode. (* 2 For the details of cleaning, refer to "3 DAILY CARE" on the applications used , the scanned image .... YES NO Is the document path, the Removable sheet guide, the Glass sheet guide and/or the Lamp(s) clean? If the application allows you to change the setting from your PC. (* 1) Clean the scanner completely. (* 2) Contact an authorized FUJITSU Scanner service provider. 5 (* 1) If halftone mode is unsatisfactory. Depending on page 3-1. 5.2 Troubleshooting 5-15 NO Is "Line...

Operator's Guide
Page 174
YES NO Is the scanner installed on a flat and level surface. Clean the scanner completely. (* ) Install the scanner on a flat and NO level surface? Symptom6 The scanned image is distorted and/or not sharp. Is the document path, the Removable sheet guide, the Glass sheet guide and/or the Lamp(s) clean? YES Contact an authorized FUJITSU Scanner service provider. (* ) For the details of cleaning, refer to "3 DAILY CARE" on page 3-1. 5-16 5.2 Troubleshooting
YES NO Is the scanner installed on a flat and level surface. Clean the scanner completely. (* ) Install the scanner on a flat and NO level surface? Symptom6 The scanned image is distorted and/or not sharp. Is the document path, the Removable sheet guide, the Glass sheet guide and/or the Lamp(s) clean? YES Contact an authorized FUJITSU Scanner service provider. (* ) For the details of cleaning, refer to "3 DAILY CARE" on page 3-1. 5-16 5.2 Troubleshooting

Operator's Guide
Page 175
...on time" on page 7-81. (* 3) For the details on time, please refer to "4 REPLACEMENT OF CONSUMABLES". 5.2 Troubleshooting 5-17 Replace the Lamp. (* 3) Contact an authorized FUJITSU Scanner service provider. Symptom7 Vertical streaks appear in the top 3mm area of the removable sheet guide, and the glass sheet guide... Removable sheet guide , and the Glass sheet guide. (* 1) Select "Photo" mode. SOLVING COMMON PROBLEMS 5 (* 1) For the cleaning of the scanned document and is the "Line Art" mode selected. Are the streaks black? YES NO Are the Lamp(s) more than 1,000 hours old?
...on time" on page 7-81. (* 3) For the details on time, please refer to "4 REPLACEMENT OF CONSUMABLES". 5.2 Troubleshooting 5-17 Replace the Lamp. (* 3) Contact an authorized FUJITSU Scanner service provider. Symptom7 Vertical streaks appear in the top 3mm area of the removable sheet guide, and the glass sheet guide... Removable sheet guide , and the Glass sheet guide. (* 1) Select "Photo" mode. SOLVING COMMON PROBLEMS 5 (* 1) For the cleaning of the scanned document and is the "Line Art" mode selected. Are the streaks black? YES NO Are the Lamp(s) more than 1,000 hours old?

Operator's Guide
Page 176
Contact an authorized FUJITSU Scanner service provider. (* ) For the message display contents and the error recovery method, refer to "APPENDIX 3 MESSAGES ON THE OPERATOR PANEL", "Error message (Temporary error)" on . Eliminate the cause of user recover- NO able error. (* ) Is the Check LED blinking still? Symptom8 Check LED starts blinking right after power on page AP-9. 5-18 5.2 Troubleshooting YES The scanner operation is normal.
Contact an authorized FUJITSU Scanner service provider. (* ) For the message display contents and the error recovery method, refer to "APPENDIX 3 MESSAGES ON THE OPERATOR PANEL", "Error message (Temporary error)" on . Eliminate the cause of user recover- NO able error. (* ) Is the Check LED blinking still? Symptom8 Check LED starts blinking right after power on page AP-9. 5-18 5.2 Troubleshooting YES The scanner operation is normal.

Operator's Guide
Page 177
Turn off the power and on . Is the check LED lit again? Contact an authorized FUJITSU Scanner service provider. 5 SOLVING COMMON PROBLEMS 5.2 Troubleshooting 5-19 YES NO The scanner operation is normal. Symptom9 The Check LED lights right after power on again.
Turn off the power and on . Is the check LED lit again? Contact an authorized FUJITSU Scanner service provider. 5 SOLVING COMMON PROBLEMS 5.2 Troubleshooting 5-19 YES NO The scanner operation is normal. Symptom9 The Check LED lights right after power on again.

Operator's Guide
Page 178
... electricity. YES When double-feed (multi-feed) NO detection is on a copier or Laser printer? NO YES Fan the documents a few times before loading them on next page 5-20 5.2 Troubleshooting Continued on the hopper? NO Do the documents satisfy the conditions described in "6.2 Document Quality," "Precautions"? Symptom10 Double-feed (Multi-feed) error occurs frequently.
... electricity. YES When double-feed (multi-feed) NO detection is on a copier or Laser printer? NO YES Fan the documents a few times before loading them on next page 5-20 5.2 Troubleshooting Continued on the hopper? NO Do the documents satisfy the conditions described in "6.2 Document Quality," "Precautions"? Symptom10 Double-feed (Multi-feed) error occurs frequently.

Operator's Guide
Page 179
YES Clean the scanner completely. (* 5) NO Continued on next page SOLVING COMMON PROBLEMS 5 5.2 Troubleshooting 5-21 YES Replace the Pad ASSY. (* 4) NO NO Is the Pad ASSY installed properly? Install the Pad ASSY properly. (* 4) YES Are the Pick roller, the Brake roller or the document path dirty? Continued from the previous page Is the Pad ASSY dirty? YES Clean the Pad ASSY. (* 3) NO Is the Pad ASSY worn out?
YES Clean the scanner completely. (* 5) NO Continued on next page SOLVING COMMON PROBLEMS 5 5.2 Troubleshooting 5-21 YES Replace the Pad ASSY. (* 4) NO NO Is the Pad ASSY installed properly? Install the Pad ASSY properly. (* 4) YES Are the Pick roller, the Brake roller or the document path dirty? Continued from the previous page Is the Pad ASSY dirty? YES Clean the Pad ASSY. (* 3) NO Is the Pad ASSY worn out?

Operator's Guide
Page 180
... to ensure you scanned many sheets? FEED (MULTI-FEED) DETECTION CONDITIONS" on page AP-2. (* 3), (* 5) For the details on how to clean scanner, refer to "Chapter 3 DAILY CARE" on page 3-1. (* 4) For the details on how to replace Pas ASSY, refer to "4 REPLACEMENT OF CONSUMABLES...section "6.2 Document Quality" on page 7-33. 5-22 5.2 Troubleshooting For the method to "7.3 Setup Mode Details", "9. nstall the Pick roller and the Brake roller properly. (* 6) YES Have you have not scanned more than 300,000 sheets. (* 7) YES NO Contact an authorized FUJITSU Scanner service provider...
... to ensure you scanned many sheets? FEED (MULTI-FEED) DETECTION CONDITIONS" on page AP-2. (* 3), (* 5) For the details on how to clean scanner, refer to "Chapter 3 DAILY CARE" on page 3-1. (* 4) For the details on how to replace Pas ASSY, refer to "4 REPLACEMENT OF CONSUMABLES...section "6.2 Document Quality" on page 7-33. 5-22 5.2 Troubleshooting For the method to "7.3 Setup Mode Details", "9. nstall the Pick roller and the Brake roller properly. (* 6) YES Have you have not scanned more than 300,000 sheets. (* 7) YES NO Contact an authorized FUJITSU Scanner service provider...

Operator's Guide
Page 181
... NO Is the Pad ASSY installed properly? Use documents which satisfy the requirements. (* 1) YES Is the length of the documents shorter YES than 3 inches (80mm) and is the paper length set to [Normal]? Symptom11 Document jam occurs frequently. YES Select paper length [Short...] in the ADF paper path? NO Re-install the Pad ASSY properly. (* 4) YES Continued on next page SOLVING COMMON PROBLEMS 5 5.2 Troubleshooting 5-23 Do the documents satisfy the NO conditions described...
... NO Is the Pad ASSY installed properly? Use documents which satisfy the requirements. (* 1) YES Is the length of the documents shorter YES than 3 inches (80mm) and is the paper length set to [Normal]? Symptom11 Document jam occurs frequently. YES Select paper length [Short...] in the ADF paper path? NO Re-install the Pad ASSY properly. (* 4) YES Continued on next page SOLVING COMMON PROBLEMS 5 5.2 Troubleshooting 5-23 Do the documents satisfy the NO conditions described...
Operator's Guide
Page 182
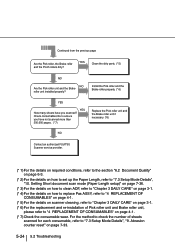
... if necessary. (*6) NO Contact an authorized FUJITSU Scanner service provider. (* 1) For the details on required conditions, refer to the section "6.2 Document Quality" on page 6-3. (* 2) For the details on how to set up the Paper Length, refer to "4 REPLACEMENT OF CONSUMABLES" on page 7-33. 5-24 5.2 Troubleshooting Setting Short document scan mode (Paper Length setup)" on page...
... if necessary. (*6) NO Contact an authorized FUJITSU Scanner service provider. (* 1) For the details on required conditions, refer to the section "6.2 Document Quality" on page 6-3. (* 2) For the details on how to set up the Paper Length, refer to "4 REPLACEMENT OF CONSUMABLES" on page 7-33. 5-24 5.2 Troubleshooting Setting Short document scan mode (Paper Length setup)" on page...