Complete Owner's Guide (English)
Page 1
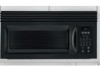
Visit the Frigidaire Web Site at: http://www.frigidaire.com Over-the-Range Microwave Oven with Convenience Pad Welcome 2 Important Safety Instructions .....3-6 Features and Specifications .......... 7 Before Operating 8 Manual Operation 9-14 Convenience Operation ......... 15-16 Cooking Charts 17-18 Questions or for Service Call: 1-800-944-9044(US) 1-800-265-8352(Canada) Care & Cleaning 19-21 Before You Call Solutions to Common Problems 22 Warranty Back Page READ AND SAVE THESE INSTRUCTIONS p/n 316495058
Visit the Frigidaire Web Site at: http://www.frigidaire.com Over-the-Range Microwave Oven with Convenience Pad Welcome 2 Important Safety Instructions .....3-6 Features and Specifications .......... 7 Before Operating 8 Manual Operation 9-14 Convenience Operation ......... 15-16 Cooking Charts 17-18 Questions or for Service Call: 1-800-944-9044(US) 1-800-265-8352(Canada) Care & Cleaning 19-21 Before You Call Solutions to Common Problems 22 Warranty Back Page READ AND SAVE THESE INSTRUCTIONS p/n 316495058
Complete Owner's Guide (English)
Page 2
... graphics shown are not meant to providing you with the best service possible. The graphics on your purchase of the microwave oven. The self-addressed PRODUCT REGISTRATION CARD should ever require servicing: This Use & Care Manual contains general operating instructions... for your appliance and feature information for choosing our product. These instructions are representative. Your microwave may not look exactly like those shown. All rights reserved. 2 Be sure to register your product. Your satisfaction is located...
... graphics shown are not meant to providing you with the best service possible. The graphics on your purchase of the microwave oven. The self-addressed PRODUCT REGISTRATION CARD should ever require servicing: This Use & Care Manual contains general operating instructions... for your appliance and feature information for choosing our product. These instructions are representative. Your microwave may not look exactly like those shown. All rights reserved. 2 Be sure to register your product. Your satisfaction is located...
Complete Owner's Guide (English)
Page 3
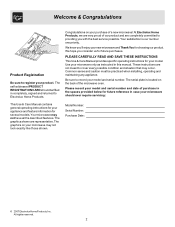
Always contact your dealer, distributor, service agent or manufacturer about problems or conditions you do not understand. Recognize Safety Symbols, Words, Labels SAVE THESE INSTRUCTIONS 3 Important Safety Instructions What You Need to Know About Safety Instructions Warning and Important Safety Instructions appearing in the Use & Care Guide are not meant to cover all possible conditions and situations that may occur. Common sense, caution, and care must be exercised when installing, maintaining or operating a microwave.
Always contact your dealer, distributor, service agent or manufacturer about problems or conditions you do not understand. Recognize Safety Symbols, Words, Labels SAVE THESE INSTRUCTIONS 3 Important Safety Instructions What You Need to Know About Safety Instructions Warning and Important Safety Instructions appearing in the Use & Care Guide are not meant to cover all possible conditions and situations that may occur. Common sense, caution, and care must be exercised when installing, maintaining or operating a microwave.
Complete Owner's Guide (English)
Page 4
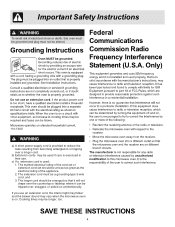
... may be longer, too. Only) a) A short power-supply cord is exercised in or tripping over , snagged, or pulled on . b) Extension cords may vary when the microwave oven is used if care is provided to reduce the risks resulting from becoming entangled in their use. SAVE THESE INSTRUCTIONS 4 Important Safety Instructions Federal...
... may be longer, too. Only) a) A short power-supply cord is exercised in or tripping over , snagged, or pulled on . b) Extension cords may vary when the microwave oven is used if care is provided to reduce the risks resulting from becoming entangled in their use. SAVE THESE INSTRUCTIONS 4 Important Safety Instructions Federal...

Complete Owner's Guide (English)
Page 5
Important Safety Instructions Precautions to Avoid Possible Exposure to Excessive Microwave Energy Adhere to the following precautions: • DO NOT attempt to operate this oven with the safety interlock switches. • DO NOT place any object ... : 1. hinges and latches (broken or loosended), 3. door (bent), 2. Doing so could cause damage. • DO NOT operate the oven if it is no damage to microwave energy. SAVE THESE INSTRUCTIONS 5 door seals and sealing surfaces. • Oven should not be be adjusted or repaired by anyone except properaly qualified service personnel...
Important Safety Instructions Precautions to Avoid Possible Exposure to Excessive Microwave Energy Adhere to the following precautions: • DO NOT attempt to operate this oven with the safety interlock switches. • DO NOT place any object ... : 1. hinges and latches (broken or loosended), 3. door (bent), 2. Doing so could cause damage. • DO NOT operate the oven if it is no damage to microwave energy. SAVE THESE INSTRUCTIONS 5 door seals and sealing surfaces. • Oven should not be be adjusted or repaired by anyone except properaly qualified service personnel...
Complete Owner's Guide (English)
Page 6
Important Safety Instructions When using oven. 2 READ AND FOLLOW the specific "PRECAUTIONS TO AVOID POSSIBLE EXPOSURE TO EXCESSIVE MICROWAVE ENERGY" on page 5. 3 This appliance must be boiling due to service oven. This type of table or counter. 1 READ ALL instructions before ... paper, plastic or other combustible materials are required to surface tension of fir in this Use & Care Manual. b Remove wire twist-ties from the microwave oven is not working properly, or if it has been damaged or dropped. 9 This oven, including power cord, must be grounded. SAVE THESE INSTRUCTIONS...
Important Safety Instructions When using oven. 2 READ AND FOLLOW the specific "PRECAUTIONS TO AVOID POSSIBLE EXPOSURE TO EXCESSIVE MICROWAVE ENERGY" on page 5. 3 This appliance must be boiling due to service oven. This type of table or counter. 1 READ ALL instructions before ... paper, plastic or other combustible materials are required to surface tension of fir in this Use & Care Manual. b Remove wire twist-ties from the microwave oven is not working properly, or if it has been damaged or dropped. 9 This oven, including power cord, must be grounded. SAVE THESE INSTRUCTIONS...
Complete Owner's Guide (English)
Page 7
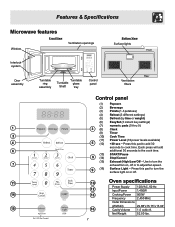
Features & Specifications Microwave features Front View Window Ventilation openings Bottom View Surface lights Front Interlock system Door assembly 1 2 4 6 7 11 14 15 Turntable ring assembly Turntable Turntable glass Shaft ... Supply 120VAC, 60 Hz Input Power 1,450W Cooking Power 900W Frequency 2,450 MHz Outer Dimensions (WxHxD) 29.88"x15.75"x 15.04" Cavity Volume 1.5 cubic ft. Net Weight 52.50 lbs.
Features & Specifications Microwave features Front View Window Ventilation openings Bottom View Surface lights Front Interlock system Door assembly 1 2 4 6 7 11 14 15 Turntable ring assembly Turntable Turntable glass Shaft ... Supply 120VAC, 60 Hz Input Power 1,450W Cooking Power 900W Frequency 2,450 MHz Outer Dimensions (WxHxD) 29.88"x15.75"x 15.04" Cavity Volume 1.5 cubic ft. Net Weight 52.50 lbs.
Complete Owner's Guide (English)
Page 8
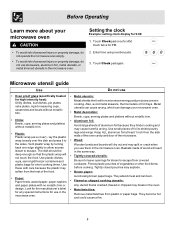
...to the sides. lay the plastic wrap loosely over the dish and press it to escape. Baskets made of wood will react in the microwave oven. Use small pieces of vegetables or other food items before cooking. Also, avoid metal skewers, thermometers or foil trays. Touch Clock ... you use them in the same way. • Tightly covered utensils: Be sure to shield poultry legs and wings. Before Operating Learn more about your microwave oven. • Metal decoration: Bowls, cups, serving plates and platters without metallic trim. • Plastic: Plastic wrap (as a cover) - Touch ...
...to the sides. lay the plastic wrap loosely over the dish and press it to escape. Baskets made of wood will react in the microwave oven. Use small pieces of vegetables or other food items before cooking. Also, avoid metal skewers, thermometers or foil trays. Touch Clock ... you use them in the same way. • Tightly covered utensils: Be sure to shield poultry legs and wings. Before Operating Learn more about your microwave oven. • Metal decoration: Bowls, cups, serving plates and platters without metallic trim. • Plastic: Plastic wrap (as a cover) - Touch ...
Complete Owner's Guide (English)
Page 9
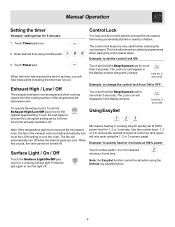
... may be quickly set time, you will appear in the display window. hold the Stop/Cancel pad for desired minutes of the range below the microwave oven. Use the number keys 1, 2 or 3 to choose the desired minutes of set at the LOW setting to set when using number pads. Note:..., the fan in the exhaust vent hood will disappear in the display window along with 2 beeps. Using EasySet Microwave heating or cooking may lock the control panel to prevent the microwave from ON to turn on at 100% power level for 5 minutes: 1. The Lock icon will automatically turn the exhaust ...
... may be quickly set time, you will appear in the display window. hold the Stop/Cancel pad for desired minutes of the range below the microwave oven. Use the number keys 1, 2 or 3 to choose the desired minutes of set at the LOW setting to set when using number pads. Note:..., the fan in the exhaust vent hood will disappear in the display window along with 2 beeps. Using EasySet Microwave heating or cooking may lock the control panel to prevent the microwave from ON to turn on at 100% power level for 5 minutes: 1. The Lock icon will automatically turn the exhaust ...
Complete Owner's Guide (English)
Page 10
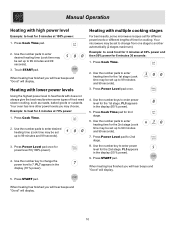
... (2 stages maximum). Use the number key to change from one stage to heat foods with does not always give the best results when some microwave recipes call for different power levels or different lengths of food need slower cooking, such as roasts, baked goods or custards. PL8 appears in... 6. When heating has finished you will hear beeps and "Good" will display. 5. Press Cook Time. 2. PL7 appears in the display (80 % power). 5. Your microwave may be set up to enter power level for power level 10 (100% power). 4. Press Cook Time. 2. Press Cook Time pad for 2nd stage. 8. Use...
... (2 stages maximum). Use the number key to change from one stage to heat foods with does not always give the best results when some microwave recipes call for different power levels or different lengths of food need slower cooking, such as roasts, baked goods or custards. PL8 appears in... 6. When heating has finished you will hear beeps and "Good" will display. 5. Press Cook Time. 2. PL7 appears in the display (80 % power). 5. Your microwave may be set up to enter power level for power level 10 (100% power). 4. Press Cook Time. 2. Press Cook Time pad for 2nd stage. 8. Use...
Complete Owner's Guide (English)
Page 11
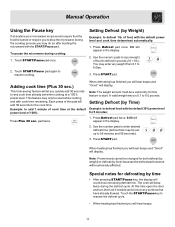
...weight entry is 0.1 to resume cooking. Touch the START/Pause key to defrost in pounds (10 = 1lb.) You may do so after starting the microwave with cook time remaining. pad twice. 1. Press Defrost pad twice. 0:00 will display. At this pad will beep twice during cooking: 1. Use ...cook time (Plus 30 sec.) This time-saving feature will let you will display. Manual Operation Using the Pause key If at anytime your microwave recipe would require that have already thawed. Touch START/Pause pad once. 2. Note: The weight amount must be adversely affected. Note: Power...
...weight entry is 0.1 to resume cooking. Touch the START/Pause key to defrost in pounds (10 = 1lb.) You may do so after starting the microwave with cook time remaining. pad twice. 1. Press Defrost pad twice. 0:00 will display. At this pad will beep twice during cooking: 1. Use ...cook time (Plus 30 sec.) This time-saving feature will let you will display. Manual Operation Using the Pause key If at anytime your microwave recipe would require that have already thawed. Touch START/Pause pad once. 2. Note: The weight amount must be adversely affected. Note: Power...
Complete Owner's Guide (English)
Page 14
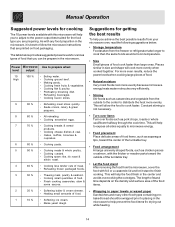
...would at room temperature. • Size Small pieces of stand time depends on food packaging. This will help to expose all sides equally to microwave energy. • Food placement Place delicate areas of food items, such as asparagus tips, toward the center of food. • Natural moisture... Very moist foods cook more evenly because microwave energy heats water molecules very efficiently. • Stirring Stir foods such as pork chops, roasts or whole cauliflower halfway through the cook time....
...would at room temperature. • Size Small pieces of stand time depends on food packaging. This will help to expose all sides equally to microwave energy. • Food placement Place delicate areas of food items, such as asparagus tips, toward the center of food. • Natural moisture... Very moist foods cook more evenly because microwave energy heats water molecules very efficiently. • Stirring Stir foods such as pork chops, roasts or whole cauliflower halfway through the cook time....
Complete Owner's Guide (English)
Page 15
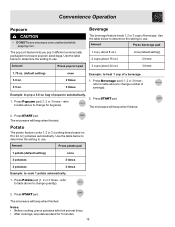
...table below to determine the setting to cook 1 potato automatically. 1. Press Popcorn pad (1, 2 or 3 times - Press START pad. The microwave will beep when finished. 2. Amount Press potato pad 1 potato (default setting) once 2 potatoes 2 times 3 potatoes 3 times Example: to ...75 oz. (default setting) 3.0 oz. 3.5 oz. Potato The potato feature cooks 1, 2 or 3 (cooking times based on 8 to pop a 3.0 oz. The microwave will beep when finished. once 2 times 3 times Example: to use . Notes: • Before cooking, pierce potatoes with fork several times. • After cookings, let...
...table below to determine the setting to cook 1 potato automatically. 1. Press Popcorn pad (1, 2 or 3 times - Press START pad. The microwave will beep when finished. 2. Amount Press potato pad 1 potato (default setting) once 2 potatoes 2 times 3 potatoes 3 times Example: to ...75 oz. (default setting) 3.0 oz. 3.5 oz. Potato The potato feature cooks 1, 2 or 3 (cooking times based on 8 to pop a 3.0 oz. The microwave will beep when finished. once 2 times 3 times Example: to use . Notes: • Before cooking, pierce potatoes with fork several times. • After cookings, let...
Complete Owner's Guide (English)
Page 16
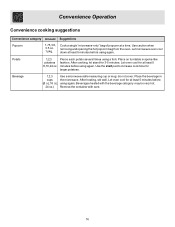
...,16 oz, using a fork. Pierce each potato several times using again. After heating, stir well. Place on turntable in cups the microwave. do not cover. Let oven cool for at a time. Use the start pad to increase cook time for 3-5 minutes. Beverage 1,2,3 Use... a microwave-safe measuring cup or mug; Beverages heated with the beverage category may be very hot. 24 oz.) Remove the container with care. 16 Let microwave oven cool down at least 5 minutes before using again. Convenience Operation Convenience...
...,16 oz, using a fork. Pierce each potato several times using again. After heating, stir well. Place on turntable in cups the microwave. do not cover. Let oven cool for at a time. Use the start pad to increase cook time for 3-5 minutes. Beverage 1,2,3 Use... a microwave-safe measuring cup or mug; Beverages heated with the beverage category may be very hot. 24 oz.) Remove the container with care. 16 Let microwave oven cool down at least 5 minutes before using again. Convenience Operation Convenience...
Complete Owner's Guide (English)
Page 17
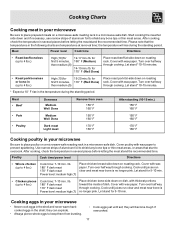
... /lb. 180° F dark meat 170° F dark meat Power level: medium high (7) Place chicken breast-side down on a microwave-safe roasting rack in a microwave-safe dish. Please note that start to prevent splattering. Meat • Beef Doneness Medium Well Done Remove from bursting. • Cook eggs... over half way through cooking. Use narrow strips of aluminum foil to place prepared meats on roasting rack. Cooking Charts Cooking meat in your microwave • Never cook eggs in the shell and never warm hardcooked eggs in the shell; Let stand* 10-15 minutes. * Expect a...
... /lb. 180° F dark meat 170° F dark meat Power level: medium high (7) Place chicken breast-side down on a microwave-safe roasting rack in a microwave-safe dish. Please note that start to prevent splattering. Meat • Beef Doneness Medium Well Done Remove from bursting. • Cook eggs... over half way through cooking. Use narrow strips of aluminum foil to place prepared meats on roasting rack. Cooking Charts Cooking meat in your microwave • Never cook eggs in the shell and never warm hardcooked eggs in the shell; Let stand* 10-15 minutes. * Expect a...
Complete Owner's Guide (English)
Page 18
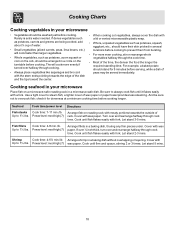
...cover to overcook fish; a lighter cover of peas may be sure not to steam fish; Power level: med-high (7) rack. Arrange fillets in a microwave-safe dish. Let stand 2-3 mins. And be served immediately. Turn over and rearrange halfway through the cook time. • Most of water. •... the required standing time. Cover with fork. Power level: med-high (7) wax paper. check it flakes easily with fork. Arrange fish on a microwave-safe roasting rack in a baking dish, thuring any thin pieces under. Cook until it for 5 minutes before cooking to 1½ lbs. Let stand...
...cover to overcook fish; a lighter cover of peas may be sure not to steam fish; Power level: med-high (7) rack. Arrange fillets in a microwave-safe dish. Let stand 2-3 mins. And be served immediately. Turn over and rearrange halfway through the cook time. • Most of water. •... the required standing time. Cover with fork. Power level: med-high (7) wax paper. check it flakes easily with fork. Arrange fish on a microwave-safe roasting rack in a baking dish, thuring any thin pieces under. Cook until it for 5 minutes before cooking to 1½ lbs. Let stand...
Complete Owner's Guide (English)
Page 19
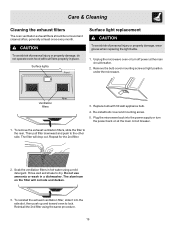
...the same procedure. 19 To reinstall the exhaust ventilation filter, slide it into the power supply or turn off power at light position under the microwave. Soak the ventilation filters in a dishwasher. To avoid risk of personal injury or property damage, wear gloves when replacing the light bulbs. 1....filter will corrode and darken. 3. Then pull filter downward and push to lock. The aluminum on at least once every month. Unplug the microwave oven or turn the power back on the filter will drop out. Rinse well and shake to the rear. Remove the bulb cover mounting screw...
...the same procedure. 19 To reinstall the exhaust ventilation filter, slide it into the power supply or turn off power at light position under the microwave. Soak the ventilation filters in a dishwasher. To avoid risk of personal injury or property damage, wear gloves when replacing the light bulbs. 1....filter will corrode and darken. 3. Then pull filter downward and push to lock. The aluminum on at least once every month. Unplug the microwave oven or turn the power back on the filter will drop out. Rinse well and shake to the rear. Remove the bulb cover mounting screw...
Complete Owner's Guide (English)
Page 20
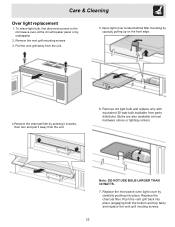
... filter. Remove the vent grill mounting screws. 3. Remove old light bulb and replace only with equivalent 30 watt bulb available from parts distributor. Replace the microwave oven light cover by unplugging 2. Note: DO NOT USE BULB LARGER THAN 30 WATTS. 7. Push the vent grill back into place. To relace light bulb...
... filter. Remove the vent grill mounting screws. 3. Remove old light bulb and replace only with equivalent 30 watt bulb available from parts distributor. Replace the microwave oven light cover by unplugging 2. Note: DO NOT USE BULB LARGER THAN 30 WATTS. 7. Push the vent grill back into place. To relace light bulb...
Complete Owner's Guide (English)
Page 21
.... 21 Dry with a soft cloth and and warm (not hot) mild detergent solution. Care & Cleaning Cleaning suggestions For best performance and for your microwave oven weekly or more often, if needed. • Wash the oven door window with very mild soap and water. Never use to keep the inner... the oven door, wipe with soap and a clean damp cloth. DO NOT use a soft clean cloth to the operating parts of the microwave with a soft cloth. Wipe the microwave oven inside (cavity) of 1 lemon if you desire to work less efficiently. • Wipe up . Steam can damage the magnetron tube...
.... 21 Dry with a soft cloth and and warm (not hot) mild detergent solution. Care & Cleaning Cleaning suggestions For best performance and for your microwave oven weekly or more often, if needed. • Wash the oven door window with very mild soap and water. Never use to keep the inner... the oven door, wipe with soap and a clean damp cloth. DO NOT use a soft clean cloth to the operating parts of the microwave with a soft cloth. Wipe the microwave oven inside (cavity) of 1 lemon if you desire to work less efficiently. • Wipe up . Steam can damage the magnetron tube...
Complete Owner's Guide (English)
Page 22
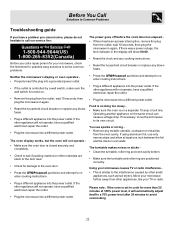
...away from the oven cavity. If the other appliance will not operate • Make sure the oven door is controlled by other appliances, like your microwave, check the list below for possible easy solutions to some common problems. The power goes off before the cook time has elapsed • If there... has been a power interruption, remove the plug from the outlet, wait 10 seconds, then plug the microwave in again. • Reset the household circuit breaker or replace any blown fuses. Food is cooking too slowy • Make sure the oven is turned...
...away from the oven cavity. If the other appliance will not operate • Make sure the oven door is controlled by other appliances, like your microwave, check the list below for possible easy solutions to some common problems. The power goes off before the cook time has elapsed • If there... has been a power interruption, remove the plug from the outlet, wait 10 seconds, then plug the microwave in again. • Reset the household circuit breaker or replace any blown fuses. Food is cooking too slowy • Make sure the oven is turned...


