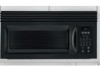
Complete Owner's Guide (English)
Page 2
...to providing you with the best service possible. These instructions are completely committed to record your microwave only as instructed in the spaces provided below for future purchases. The serial plate is our number one priority. Model Number: Serial Number: Purchase Date: © 2007... Electrolux Home Products, Inc. At Electrolux Home Products, we are representative. Please record your new microwave and Thank You for your product. All...
...to providing you with the best service possible. These instructions are completely committed to record your microwave only as instructed in the spaces provided below for future purchases. The serial plate is our number one priority. Model Number: Serial Number: Purchase Date: © 2007... Electrolux Home Products, Inc. At Electrolux Home Products, we are representative. Please record your new microwave and Thank You for your product. All...
Complete Owner's Guide (English)
Page 8
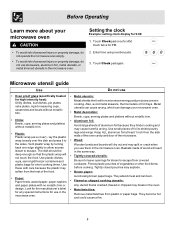
... not touch the food. Touch Clock pad again. They become hot and could cause a fire. 8 Before Operating Learn more about your microwave oven. • Metal decoration: Bowls, cups, serving plates and platters without metallic trim. • Aluminum foil: Avoid large sheets of aluminum foil because they hinder cooking and may split or...
... not touch the food. Touch Clock pad again. They become hot and could cause a fire. 8 Before Operating Learn more about your microwave oven. • Metal decoration: Bowls, cups, serving plates and platters without metallic trim. • Aluminum foil: Avoid large sheets of aluminum foil because they hinder cooking and may split or...
Complete Owner's Guide (English)
Page 13
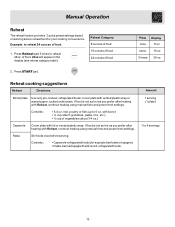
... (see reheat category table). Press once Display 8 oz twice 16 oz 3 times 24 oz Reheat cooking suggestions Reheat Directions Dinner plate Use only pre-cooked, refrigerated foods. If food is not as hot as you prefer after heating with vented plastic wrap or waxed... wrap. Contents: • Casserole-refrigerated foods (for your cooking convenience. Example: to reheat 24 ounces of vegetables (about 3-4 oz.) Casserole Cover plate with Reheat, continue heating using manual time and power level settings. Press Reheat pad 3 times to reheat 24oz. with bone) • ½...
... (see reheat category table). Press once Display 8 oz twice 16 oz 3 times 24 oz Reheat cooking suggestions Reheat Directions Dinner plate Use only pre-cooked, refrigerated foods. If food is not as hot as you prefer after heating with vented plastic wrap or waxed... wrap. Contents: • Casserole-refrigerated foods (for your cooking convenience. Example: to reheat 24 ounces of vegetables (about 3-4 oz.) Casserole Cover plate with Reheat, continue heating using manual time and power level settings. Press Reheat pad 3 times to reheat 24oz. with bone) • ½...
Installation Instructions (All Languages)
Page 2
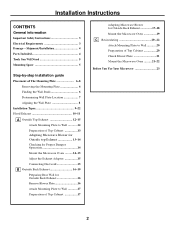
... for Outside Back Exhaust 16 Remove Blower Plate 16 Attach Mounting Plate to Wall 17 Preparation of Top Cabinet 17 Adapting Microwave Blower for Outside Back Exhaust 17-18 Mount the Microwave Oven 19 C Recirculating 20 -22 Attach Mounting Plate to Wall 20 Preparation of Top Cabinet... 20 Check Blower Plate 21 Mount the Microwave Oven ..........21-22 Before You Use Your Microwave 23 2 Installation ...
... for Outside Back Exhaust 16 Remove Blower Plate 16 Attach Mounting Plate to Wall 17 Preparation of Top Cabinet 17 Adapting Microwave Blower for Outside Back Exhaust 17-18 Mount the Microwave Oven 19 C Recirculating 20 -22 Attach Mounting Plate to Wall 20 Preparation of Top Cabinet... 20 Check Blower Plate 21 Mount the Microwave Oven ..........21-22 Before You Use Your Microwave 23 2 Installation ...
Installation Instructions (All Languages)
Page 6
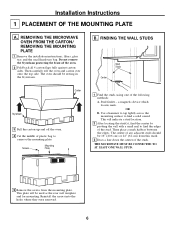
Then carefully roll the oven and carton over onto the top side. This will be used as the rear wall template and for mounting. THE MICROWAVE MUST BE CONNECTED TO AT LEAST ONE WALL STUD. 5 Remove the screws from this mark. 3 Draw a line down the center of the studs.... The center of the stud. Reinstall the screws into the holes where they were removed. 6 REMOVING THE MICROWAVE OVEN FROM THE CARTON/ REMOVING THE MOUNTING PLATE 1 Remove the installation instructions, filters, glass tray and the small hardware bag. The oven should be resting in the Styrofoam....
Then carefully roll the oven and carton over onto the top side. This will be used as the rear wall template and for mounting. THE MICROWAVE MUST BE CONNECTED TO AT LEAST ONE WALL STUD. 5 Remove the screws from this mark. 3 Draw a line down the center of the studs.... The center of the stud. Reinstall the screws into the holes where they were removed. 6 REMOVING THE MICROWAVE OVEN FROM THE CARTON/ REMOVING THE MOUNTING PLATE 1 Remove the installation instructions, filters, glass tray and the small hardware bag. The oven should be resting in the Styrofoam....
Installation Instructions (All Languages)
Page 7
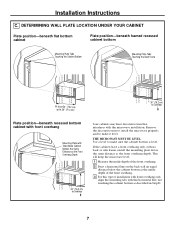
...Cabinet Bottom Mounting Plate Tabs Touching the Back Frame At least 30″ (76.2 cm), up to 36″ (91.4 cm) 30″ (76.2 cm) to make sure the cabinet bottom is level. Remove the decorative trim to install the microwave properly and to Cooktop Plate position-beneath ...recessed bottom cabinet with front overhang Mounting Plate with Tabs Below Cabinet Bottom the Same Distance as the front overhang depth.
...Cabinet Bottom Mounting Plate Tabs Touching the Back Frame At least 30″ (76.2 cm), up to 36″ (91.4 cm) 30″ (76.2 cm) to make sure the cabinet bottom is level. Remove the decorative trim to install the microwave properly and to Cooktop Plate position-beneath ...recessed bottom cabinet with front overhang Mounting Plate with Tabs Below Cabinet Bottom the Same Distance as the front overhang depth.
Installation Instructions (All Languages)
Page 8
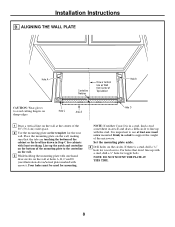
... a 3⁄16″ hole for the rear wall. Four holes must be used for cabinets with arrows). Installation Instructions D. Place the mounting plate on Wall from Center of Top Cabinet Hole B CAUTION: Wear gloves to support the weight of the cabinet or the level line drawn in a...avoid cutting fingers on the wall at holes A, B, C and D (see illustration above/actual plate marked with front overhang. For holes that the tabs are touching the bottom of the microwave. ALIGNING THE WALL PLATE Hole A Centerline Notches Draw a Vertical Line on the wall, making sure that don't line...
... a 3⁄16″ hole for the rear wall. Four holes must be used for cabinets with arrows). Installation Instructions D. Place the mounting plate on Wall from Center of Top Cabinet Hole B CAUTION: Wear gloves to support the weight of the cabinet or the level line drawn in a...avoid cutting fingers on the wall at holes A, B, C and D (see illustration above/actual plate marked with front overhang. For holes that the tabs are touching the bottom of the microwave. ALIGNING THE WALL PLATE Hole A Centerline Notches Draw a Vertical Line on the wall, making sure that don't line...
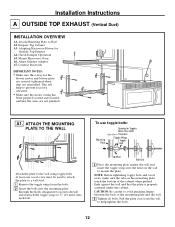
Installation Instructions (All Languages)
Page 12
...• Make sure the screws for the blower motor and blower plate are securely tightened when they are not pinched. A1. CAUTION: Be careful to help to 3⁄4″ (19 mm) onto each bolt. Adapting Microwave Blower for Toggles More Than Wall Thickness Toggle Wings Toggle Bolt Attach ...the plate to Wall A2. Adjust Exhaust Adaptor A7. NOTE: Before tightening toggle bolts and wood screw, make sure ...
...• Make sure the screws for the blower motor and blower plate are securely tightened when they are not pinched. A1. CAUTION: Be careful to help to 3⁄4″ (19 mm) onto each bolt. Adapting Microwave Blower for Toggles More Than Wall Thickness Toggle Wings Toggle Bolt Attach ...the plate to Wall A2. Adjust Exhaust Adaptor A7. NOTE: Before tightening toggle bolts and wood screw, make sure ...
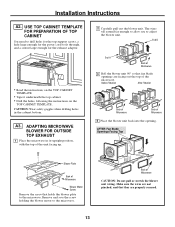
Installation Instructions (All Languages)
Page 13
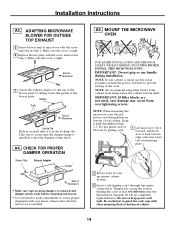
... that fan blade openings are properly secured. 13 A3. ADAPTING MICROWAVE BLOWER FOR OUTSIDE TOP EXHAUST 1 Place the microwave in the cabinet bottom. AFTER: Fan Blade Openings Facing Top Blower Plate Back of Microwave 3 Roll the blower unit 90° so that holds the blower plate to fit through, and a cutout large enough for the...
... that fan blade openings are properly secured. 13 A3. ADAPTING MICROWAVE BLOWER FOR OUTSIDE TOP EXHAUST 1 Place the microwave in the cabinet bottom. AFTER: Fan Blade Openings Facing Top Blower Plate Back of Microwave 3 Roll the blower unit 90° so that holds the blower plate to fit through, and a cutout large enough for the...
Installation Instructions (All Languages)
Page 14
...installation. Make sure the screw is tight. 6 Replace blower plate with your cabinet is in the locking tabs. A5. Back of Microwave 7 Attach the exhaust adaptor to bottom of the blower plate. NOTE: When mounting the microwave oven, thread power cord through top center cabinet hole. Temporarily... nylon grommet around the power cord hole to prevent cutting of Microwave Locking Tab Push in bottom of Microwave • Make sure tape securing damper is tight. CHECK FOR PROPER DAMPER OPERATION Blower Plate Exhaust Adaptor Damper Back of top cabinet. Installation Instructions A3. ...
...installation. Make sure the screw is tight. 6 Replace blower plate with your cabinet is in the locking tabs. A5. Back of Microwave 7 Attach the exhaust adaptor to bottom of the blower plate. NOTE: When mounting the microwave oven, thread power cord through top center cabinet hole. Temporarily... nylon grommet around the power cord hole to prevent cutting of Microwave Locking Tab Push in bottom of Microwave • Make sure tape securing damper is tight. CHECK FOR PROPER DAMPER OPERATION Blower Plate Exhaust Adaptor Damper Back of top cabinet. Installation Instructions A3. ...
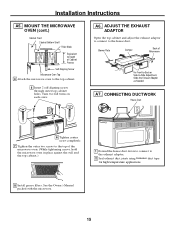
Installation Instructions (All Languages)
Page 15
... tape for high temperature applications. 8 Install grease filters. See the Owner's Manual packed with the microwave. 15 A6. Turn two full turns on each screw. Blower Plate Damper Back of the microwave oven. (While tightening screws, hold the microwave oven in place against the wall and the top cabinet.) 1 Extend the house duct down...
... tape for high temperature applications. 8 Install grease filters. See the Owner's Manual packed with the microwave. 15 A6. Turn two full turns on each screw. Blower Plate Damper Back of the microwave oven. (While tightening screws, hold the microwave oven in place against the wall and the top cabinet.) 1 Extend the house duct down...
Installation Instructions (All Languages)
Page 16
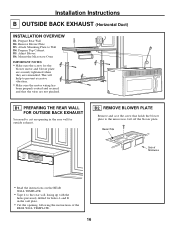
...Make sure the screws for outside exhaust. Installation Instructions B OUTSIDE BACK EXHAUST (Horizontal Duct) INSTALLATION OVERVIEW B1. Attach Mounting Plate to the microwave. REMOVE BLOWER PLATE Remove and save the screw that the wires are reinstalled. Prepare Top Cabinet B5. B1. PREPARING THE REAR WALL FOR... drilled for holes A and B in the wall plate. • Cut the opening in the rear wall for the blower motor and blower plate are securely tightened when they are not pinched. B2. Blower Plate Back of Microwave • Read the instructions on the REAR WALL TEMPLATE...
...Make sure the screws for outside exhaust. Installation Instructions B OUTSIDE BACK EXHAUST (Horizontal Duct) INSTALLATION OVERVIEW B1. Attach Mounting Plate to the microwave. REMOVE BLOWER PLATE Remove and save the screw that the wires are reinstalled. Prepare Top Cabinet B5. B1. PREPARING THE REAR WALL FOR... drilled for holes A and B in the wall plate. • Cut the opening in the rear wall for the blower motor and blower plate are securely tightened when they are not pinched. B2. Blower Plate Back of Microwave • Read the instructions on the REAR WALL TEMPLATE...
Installation Instructions (All Languages)
Page 17
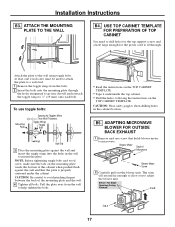
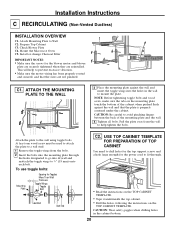
... Forward End B End A 17 At least one wood screw must be used to attach the plate to microwave. CAUTION: Be careful to mount the plate. Pull the plate away from the bolts. 2 Insert the bolts into the mounting plate through . USE TOP CABINET TEMPLATE FOR PREPARATION OF TOP CABINET You need to drill holes for...
... Forward End B End A 17 At least one wood screw must be used to attach the plate to microwave. CAUTION: Be careful to mount the plate. Pull the plate away from the bolts. 2 Insert the bolts into the mounting plate through . USE TOP CABINET TEMPLATE FOR PREPARATION OF TOP CABINET You need to drill holes for...
Installation Instructions (All Languages)
Page 18
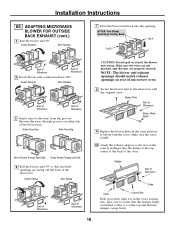
...unit to the rear of the oven by sliding it into the opening. Before Rolling After Rolling Back of Microwave Back of Microwave 5 Gently remove the wires from the grooves. Blower Plate Back of the blower unit. NOTE: The blower unit exhaust openings should match exhaust openings on other side... of Microwave Blower Motor Screw 9 Replace the blower plate in the lower locking tabs. Adaptor Back of the oven. Take care to assure that the damper hinge is tight. 10 Attach...
...unit to the rear of the oven by sliding it into the opening. Before Rolling After Rolling Back of Microwave Back of Microwave 5 Gently remove the wires from the grooves. Blower Plate Back of the blower unit. NOTE: The blower unit exhaust openings should match exhaust openings on other side... of Microwave Blower Motor Screw 9 Replace the blower plate in the lower locking tabs. Adaptor Back of the oven. Take care to assure that the damper hinge is tight. 10 Attach...
Installation Instructions (All Languages)
Page 19
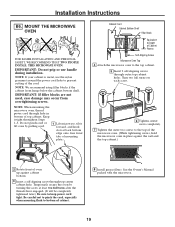
... to keep power cord tight. Temporarily secure the oven by pulling cord. 1 Lift microwave, tilt it tight throughout Steps 1-3. Be careful not to pinch the cord, especially when mounting flush to prevent cutting of mounting plate. NOTE: If your cabinet is metal, use handle during installation. IMPORTANT: Do not grip or use...
... to keep power cord tight. Temporarily secure the oven by pulling cord. 1 Lift microwave, tilt it tight throughout Steps 1-3. Be careful not to pinch the cord, especially when mounting flush to prevent cutting of mounting plate. NOTE: If your cabinet is metal, use handle during installation. IMPORTANT: Do not grip or use...
Installation Instructions (All Languages)
Page 20
...wings into drywall and reattach the toggle wings to help to mount the plate. CAUTION: Be careful to fit through the holes designated to go into the holes in the cabinet bottom. 20 Mount the Microwave Oven C5. Pull the plate away from the bolts. 2 Insert the bolts into the mounting... plate through . • Read the instructions on the TOP CABINET TEMPLATE. • Tape it underneath the top ...
...wings into drywall and reattach the toggle wings to help to mount the plate. CAUTION: Be careful to fit through the holes designated to go into the holes in the cabinet bottom. 20 Mount the Microwave Oven C5. Pull the plate away from the bolts. 2 Insert the bolts into the mounting... plate through . • Read the instructions on the TOP CABINET TEMPLATE. • Tape it underneath the top ...
Installation Instructions (All Languages)
Page 21
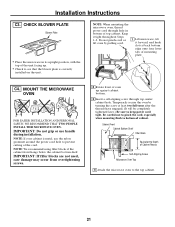
.... 2 Rotate front of oven up . • Check to see that the blower plate is metal, use handle during installation. Installation Instructions C3. CHECK BLOWER PLATE Blower Plate • Place the microwave in its upright position, with the top of the unit facing up against cabinet bottom.... 3 Insert a self-aligning screw through hole in bottom of mounting plate. Cabinet Front Cabinet Bottom Shelf Filler...
.... 2 Rotate front of oven up . • Check to see that the blower plate is metal, use handle during installation. Installation Instructions C3. CHECK BLOWER PLATE Blower Plate • Place the microwave in its upright position, with the top of the unit facing up against cabinet bottom.... 3 Insert a self-aligning screw through hole in bottom of mounting plate. Cabinet Front Cabinet Bottom Shelf Filler...