Complete Owner's Guide (English)
Page 2
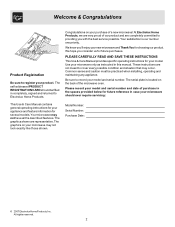
... self-addressed PRODUCT REGISTRATION CARD should ever require servicing: This Use & Care Manual contains general operating instructions for your appliance and feature information for your model. At Electrolux Home Products, we are very proud of the microwave oven. The graphics on your microwave may not have all the described features. Your satisfaction is located on your purchase of purchase in the spaces...
... self-addressed PRODUCT REGISTRATION CARD should ever require servicing: This Use & Care Manual contains general operating instructions for your appliance and feature information for your model. At Electrolux Home Products, we are very proud of the microwave oven. The graphics on your microwave may not have all the described features. Your satisfaction is located on your purchase of purchase in the spaces...
Complete Owner's Guide (English)
Page 6
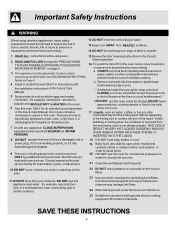
..., repair, or adjustment. 15 Review the door cleaning instructions in the Care & Cleaning section. 16 To avoid the risk of fir in the oven cavity: injury to persons or exposure to service oven. Corrosive cleaning agents such as water, coffee, or tea are able to heat, cook, or dry food. Special tools are placed inside the oven ignite, keep oven door CLOSED, turn the fan on Page 4 4 Install or locate this oven ONLY...
..., repair, or adjustment. 15 Review the door cleaning instructions in the Care & Cleaning section. 16 To avoid the risk of fir in the oven cavity: injury to persons or exposure to service oven. Corrosive cleaning agents such as water, coffee, or tea are able to heat, cook, or dry food. Special tools are placed inside the oven ignite, keep oven door CLOSED, turn the fan on Page 4 4 Install or locate this oven ONLY...
Complete Owner's Guide (English)
Page 8
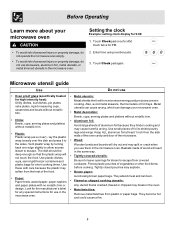
... plates and platters without metallic trim. • Aluminum foil: Avoid large sheets of aluminum foil because they hinder cooking and may soften from covered cookware. Keep ALL aluminum foil at least 1 inch from the side walls of the oven cavity and door of foil to escape from the heat of vegetables or other food items before cooking. Enter time using brown paper bags. Use...
... plates and platters without metallic trim. • Aluminum foil: Avoid large sheets of aluminum foil because they hinder cooking and may soften from covered cookware. Keep ALL aluminum foil at least 1 inch from the side walls of the oven cavity and door of foil to escape from the heat of vegetables or other food items before cooking. Enter time using brown paper bags. Use...
Complete Owner's Guide (English)
Page 9
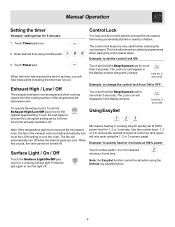
... set when using number pads. Using EasySet Microwave heating or cooking may lock the control panel to prevent the microwave from ON to OFF: Touch and hold for 3 seconds Example: to turn on at 100% power level for the highest speed setting. The fan will automatically turn the light off when the internal parts are cool. Press the pad again to change the control lock from being accidentally started or used by weight) feature. 9 Manual Operation Setting the timer Example: setting timer...
... set when using number pads. Using EasySet Microwave heating or cooking may lock the control panel to prevent the microwave from ON to OFF: Touch and hold for 3 seconds Example: to turn on at 100% power level for the highest speed setting. The fan will automatically turn the light off when the internal parts are cool. Press the pad again to change the control lock from being accidentally started or used by weight) feature. 9 Manual Operation Setting the timer Example: setting timer...
Complete Owner's Guide (English)
Page 10
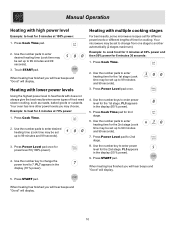
... power level Example: to heat for the 2nd stage. Press Cook Time pad. 2. Heating with lower power levels Using the highest power level to another automatically (2 stages maximum). Your oven has nine other power levels you will hear beeps and "Good" will display. 5. Use the number key to change from one stage to heat foods with multiple cooking stages For best results, some types of time for different power levels or different lengths of food need slower cooking...
... power level Example: to heat for the 2nd stage. Press Cook Time pad. 2. Heating with lower power levels Using the highest power level to another automatically (2 stages maximum). Your oven has nine other power levels you will hear beeps and "Good" will display. 5. Use the number key to change from one stage to heat foods with multiple cooking stages For best results, some types of time for different power levels or different lengths of food need slower cooking...
Complete Owner's Guide (English)
Page 11
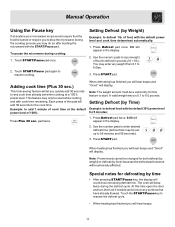
... defrost (by Weight) Example: to defrost food with the START/Pause pad. Each press of cook time at a 100% power level. Setting Defrost (by time • After pressing START/Pause key, the display will be adversely affected. Press Defrost pad twice. 0:00 will add 30 seconds to the cook time. At this time open the door and turn the food if needed and remove any portions that the food be turned or require you to stop the microwave...
... defrost (by Weight) Example: to defrost food with the START/Pause pad. Each press of cook time at a 100% power level. Setting Defrost (by time • After pressing START/Pause key, the display will be adversely affected. Press Defrost pad twice. 0:00 will add 30 seconds to the cook time. At this time open the door and turn the food if needed and remove any portions that the food be turned or require you to stop the microwave...
Complete Owner's Guide (English)
Page 12
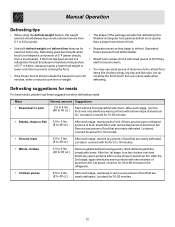
... 0°F (taken directly from 0.1 to 6.0 pounds). • The shape of the package will alter the defrosting time. Remove any pieces of food that are nearly defrosted. Manual Operation Defrosting tips • When using the defrost weight feature, the weight entered should always be thawed is stored outside the freezer for up to 20 minutes, enter a reduced cook time or weight. • Separate pieces as they start to become...
... 0°F (taken directly from 0.1 to 6.0 pounds). • The shape of the package will alter the defrosting time. Remove any pieces of food that are nearly defrosted. Manual Operation Defrosting tips • When using the defrost weight feature, the weight entered should always be thawed is stored outside the freezer for up to 20 minutes, enter a reduced cook time or weight. • Separate pieces as they start to become...
Complete Owner's Guide (English)
Page 13
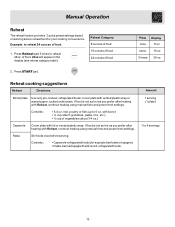
Press once Display 8 oz twice 16 oz 3 times 24 oz Reheat cooking suggestions Reheat Directions Dinner plate Use only pre-cooked, refrigerated foods. Cover plate with Reheat, continue heating using manual time and power level settings. Contents: • Casserole-refrigerated foods (for your cooking convenience. If food is not as hot as you prefer after heating with vented plastic wrap or waxed paper, tucked under plate. Contents: • 3-4 oz. met, poultry or fish (up to...
Press once Display 8 oz twice 16 oz 3 times 24 oz Reheat cooking suggestions Reheat Directions Dinner plate Use only pre-cooked, refrigerated foods. Cover plate with Reheat, continue heating using manual time and power level settings. Contents: • Casserole-refrigerated foods (for your cooking convenience. If food is not as hot as you prefer after heating with vented plastic wrap or waxed paper, tucked under plate. Contents: • 3-4 oz. met, poultry or fish (up to...
Complete Owner's Guide (English)
Page 19
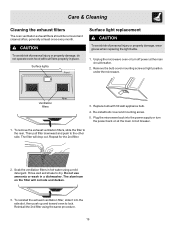
... replacing the light bulbs. 1. Unplug the microwave oven or turn the power back on the filter will drop out. Re-install bulb cover and mounting screw. 5. To remove the exhaust ventilation filters, slide the filter to lock. To reinstall the exhaust ventilation filter, slide it into the power supply or turn off power at the main circuit breaker. 1. Care & Cleaning Cleaning the exhaust filters The oven ventilation exhaust filters should be removed and cleaned often; Reinstall the 2nd filter using a mild detergent. Rear Ventilation filters 3. Replace bulb with 30 watt appliance bulb...
... replacing the light bulbs. 1. Unplug the microwave oven or turn the power back on the filter will drop out. Re-install bulb cover and mounting screw. 5. To remove the exhaust ventilation filters, slide the filter to lock. To reinstall the exhaust ventilation filter, slide it into the power supply or turn off power at the main circuit breaker. 1. Care & Cleaning Cleaning the exhaust filters The oven ventilation exhaust filters should be removed and cleaned often; Reinstall the 2nd filter using a mild detergent. Rear Ventilation filters 3. Replace bulb with 30 watt appliance bulb...
Complete Owner's Guide (English)
Page 21
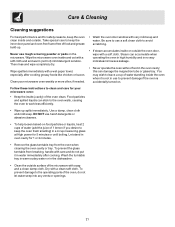
... free of the oven clean. Clean your microwave oven: • Keep the inside and outside the oven door, wipe with a clean soft cloth. Care & Cleaning Cleaning suggestions For best performance and for 1 or 2 minutes. • Remove the glass turntable tray from breaking, handle with very mild soap and water. Then rinse and wipe completely dry. Let stand in a 4 cup measuring glass at High power for your microwave oven weekly or more often, if needed...
... free of the oven clean. Clean your microwave oven: • Keep the inside and outside the oven door, wipe with a clean soft cloth. Care & Cleaning Cleaning suggestions For best performance and for 1 or 2 minutes. • Remove the glass turntable tray from breaking, handle with very mild soap and water. Then rinse and wipe completely dry. Let stand in a 4 cup measuring glass at High power for your microwave oven weekly or more often, if needed...
Complete Owner's Guide (English)
Page 22
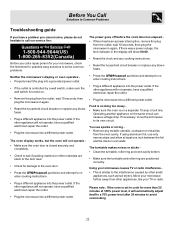
... to cook for damage to the oven door. • Press the STOP/cancel pad twice and attempt to see sparks or arcing • Remove any blown fuses. The oven display works, but the oven will not operate • Make sure the oven door is set to the interference caused by a wall switch, make sure the wall switch is controlled by other materials are positioned correctly. Neither the microwave's display or oven operates •...
... to cook for damage to the oven door. • Press the STOP/cancel pad twice and attempt to see sparks or arcing • Remove any blown fuses. The oven display works, but the oven will not operate • Make sure the oven door is set to the interference caused by a wall switch, make sure the wall switch is controlled by other materials are positioned correctly. Neither the microwave's display or oven operates •...
Complete Owner's Guide (English)
Page 24
... your best interest to repair or replace appliance light bulbs, air filters, water filters, other consumables, or knobs, handles, or other than in accordance with original serial numbers that has been transferred from your appliance. 9. Obligations for servicing, such as abuse, misuse, inadequate power supply, accidents, fires, or acts of Electrolux Home Products, Inc. Product that have been removed, altered or cannot...
... your best interest to repair or replace appliance light bulbs, air filters, water filters, other consumables, or knobs, handles, or other than in accordance with original serial numbers that has been transferred from your appliance. 9. Obligations for servicing, such as abuse, misuse, inadequate power supply, accidents, fires, or acts of Electrolux Home Products, Inc. Product that have been removed, altered or cannot...
Installation Instructions (All Languages)
Page 2
... Safety Instructions 3 Electrical Requirements 3 Damage - Shipment/Installation 4 Parts Included 4 Tools You Will Need 5 Mounting Space 5 Step-by-step installation guide Placement of The Mounting Plate 6-8 Removing the Mounting Plate 6 Finding the Wall Studs 6 Determining Wall Plate Location 7 Aligning the Wall Plate 8 Installation Types 9-22 Hood Exhaust 10 -11 A Outside Top Exhaust 12-15 Attach Mounting Plate to Wall 12 Preparation of Top Cabinet 13 Adapting Microwave Blower for Outside top Exhaust 13-14 Checking for Proper Damper Operation 14 Mount the Microwave Oven...
... Safety Instructions 3 Electrical Requirements 3 Damage - Shipment/Installation 4 Parts Included 4 Tools You Will Need 5 Mounting Space 5 Step-by-step installation guide Placement of The Mounting Plate 6-8 Removing the Mounting Plate 6 Finding the Wall Studs 6 Determining Wall Plate Location 7 Aligning the Wall Plate 8 Installation Types 9-22 Hood Exhaust 10 -11 A Outside Top Exhaust 12-15 Attach Mounting Plate to Wall 12 Preparation of Top Cabinet 13 Adapting Microwave Blower for Outside top Exhaust 13-14 Checking for Proper Damper Operation 14 Mount the Microwave Oven...
Installation Instructions (All Languages)
Page 3
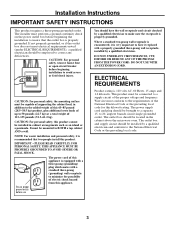
..., the mounting surface must conform to correct any deficiencies. Wire size must be capable of supporting the cabinet load, in addition to a supply circuit of this product cannot be installed in the cabinet above the microwave oven. The installer must be employed to the requirements of this appliance is properly grounded. CAUTION: For personal safety, remove house fuse or open circuit breaker before use The power cord of...
..., the mounting surface must conform to correct any deficiencies. Wire size must be capable of supporting the cabinet load, in addition to a supply circuit of this product cannot be installed in the cabinet above the microwave oven. The installer must be employed to the requirements of this appliance is properly grounded. CAUTION: For personal safety, remove house fuse or open circuit breaker before use The power cord of...
Installation Instructions (All Languages)
Page 6
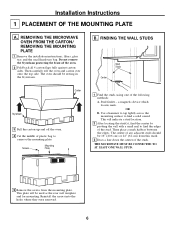
... - This plate will indicate a stud location. 2 After locating the stud(s), find the center by probing the wall with a small nail to find the edges of the studs. Do not remove the Styrofoam protecting the front of the following methods: A. Use a hammer to tap lightly across the mounting surface to find a solid sound. REMOVING THE MICROWAVE OVEN FROM THE CARTON/ REMOVING THE MOUNTING PLATE 1 Remove the installation instructions, filters, glass tray and...
... - This plate will indicate a stud location. 2 After locating the stud(s), find the center by probing the wall with a small nail to find the edges of the studs. Do not remove the Styrofoam protecting the front of the following methods: A. Use a hammer to tap lightly across the mounting surface to find a solid sound. REMOVING THE MICROWAVE OVEN FROM THE CARTON/ REMOVING THE MOUNTING PLATE 1 Remove the installation instructions, filters, glass tray and...
Installation Instructions (All Languages)
Page 12
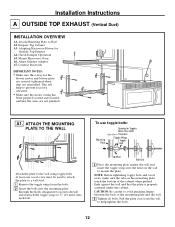
... sure the screws for Outside Top Exhaust A4. Pull the plate away from the bolts. 2 Insert the bolts into the mounting plate through the holes designated to go into the holes in the wall to mount the plate. Installation Instructions A OUTSIDE TOP EXHAUST (Vertical Duct) INSTALLATION OVERVIEW A1. Attach Mounting Plate to the wall using toggle bolts. Prepare Top Cabinet A3. Adapting Microwave Blower for the blower motor and blower plate are securely...
... sure the screws for Outside Top Exhaust A4. Pull the plate away from the bolts. 2 Insert the bolts into the mounting plate through the holes designated to go into the holes in the wall to mount the plate. Installation Instructions A OUTSIDE TOP EXHAUST (Vertical Duct) INSTALLATION OVERVIEW A1. Attach Mounting Plate to the wall using toggle bolts. Prepare Top Cabinet A3. Adapting Microwave Blower for the blower motor and blower plate are securely...
Installation Instructions (All Languages)
Page 15
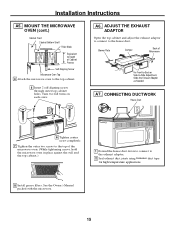
... cabinet and adjust the exhaust adaptor to connect to the top cabinet. 5 Insert 2 self-aligning screws through outer top cabinet holes. See the Owner's Manual packed with the microwave. 15 MOUNT THE MICROWAVE OVEN (cont.) Cabinet Front Cabinet Bottom Shelf Filler Block Equivalent to Depth of Microwave For Front-to-Back or Side-to the exhaust adaptor. 2 Seal exhaust duct joints using furnance duct tape for high temperature applications. 8 Install grease filters. Installation Instructions...
... cabinet and adjust the exhaust adaptor to connect to the top cabinet. 5 Insert 2 self-aligning screws through outer top cabinet holes. See the Owner's Manual packed with the microwave. 15 MOUNT THE MICROWAVE OVEN (cont.) Cabinet Front Cabinet Bottom Shelf Filler Block Equivalent to Depth of Microwave For Front-to-Back or Side-to the exhaust adaptor. 2 Seal exhaust duct joints using furnance duct tape for high temperature applications. 8 Install grease filters. Installation Instructions...
Installation Instructions (All Languages)
Page 16
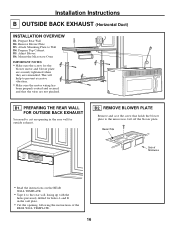
... REAR WALL FOR OUTSIDE BACK EXHAUST You need to the microwave. REMOVE BLOWER PLATE Remove and save the screw that the wires are reinstalled. This will help to prevent excessive vibration. • Make sure the motor wiring has been properly routed and secured, and that holds the blower plate to cut an opening , following the instructions of Microwave • Read the instructions on the REAR WALL TEMPLATE. • Tape it to Wall B4. Remove...
... REAR WALL FOR OUTSIDE BACK EXHAUST You need to the microwave. REMOVE BLOWER PLATE Remove and save the screw that the wires are reinstalled. This will help to prevent excessive vibration. • Make sure the motor wiring has been properly routed and secured, and that holds the blower plate to cut an opening , following the instructions of Microwave • Read the instructions on the REAR WALL TEMPLATE. • Tape it to Wall B4. Remove...
Installation Instructions (All Languages)
Page 20
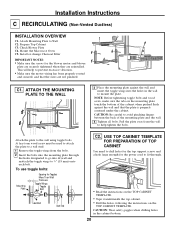
... TOP CABINET TEMPLATE. USE TOP CABINET TEMPLATE FOR PREPARATION OF TOP CABINET You need to drill holes for the top support screws and a hole large enough for the power cord to 3⁄4″ (19 mm) onto each bolt. At least one wood screw must be used to attach the plate to a wall stud. 1 Remove the toggle wings from the wall to mount the plate. Check Blower Plate C4. Install or change Charcoal Filter IMPORTANT...
... TOP CABINET TEMPLATE. USE TOP CABINET TEMPLATE FOR PREPARATION OF TOP CABINET You need to drill holes for the top support screws and a hole large enough for the power cord to 3⁄4″ (19 mm) onto each bolt. At least one wood screw must be used to attach the plate to a wall stud. 1 Remove the toggle wings from the wall to mount the plate. Check Blower Plate C4. Install or change Charcoal Filter IMPORTANT...
Product Specifications Sheet (English)
Page 2
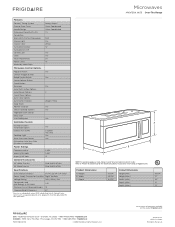
... Vegetable Cook Sensor Delay Start User Preferences Yes Yes Yes 3 Weight / Time Yes Yes Yes Ventilation System Ducted / Ductless Installation Option Exhaust Fan (CFM) Cooktop Light Auto-Start Heat Sensor Dishwasher-Safe Vent Filter (Ductless Installation) Power Ratings Frequency (Mhz) Watts @ 120 Volts Amps @ 120 Volts Yes 2-Speed 170 / 300 Yes Yes 2,450 1,450 13 B C Optional Accessories 36" White Trim Kit 36" Black Trim Kit PN # MWFILKTWH PN # MWFILKTBK NOTE: For planning purposes only. Refer to change...
... Vegetable Cook Sensor Delay Start User Preferences Yes Yes Yes 3 Weight / Time Yes Yes Yes Ventilation System Ducted / Ductless Installation Option Exhaust Fan (CFM) Cooktop Light Auto-Start Heat Sensor Dishwasher-Safe Vent Filter (Ductless Installation) Power Ratings Frequency (Mhz) Watts @ 120 Volts Amps @ 120 Volts Yes 2-Speed 170 / 300 Yes Yes 2,450 1,450 13 B C Optional Accessories 36" White Trim Kit 36" Black Trim Kit PN # MWFILKTWH PN # MWFILKTBK NOTE: For planning purposes only. Refer to change...


